


Spring WebFlux 是在 Spring 5 中引入的新模組。Spring WebFlux 是 Spring 框架中響應式編程模型的第一步。
Spring 響應式編程
如果你對響應式編程模型還不熟悉,我強烈建議你閱讀以下文章來學習響應式編程。
如果你對 Spring 5 還不熟悉,請閱讀Spring 5 功能。
Spring WebFlux
Spring WebFlux是Spring MVC模組的替代品。Spring WebFlux用於創建完全異步和非阻塞的應用程序,基於事件循環執行模型。下面的圖表來自Spring官方文檔,提供了有關Spring WebFlux和Spring Web MVC的比較的深入見解。如果您想開發基於非阻塞響應模型的Web應用程序或Rest Web服務,那麼您可以考慮使用Spring WebFlux。Spring WebFlux支持Tomcat、Jetty、Servlet 3.1+容器,以及Netty和Undertow等非Servlet運行時。Spring WebFlux是建立在Project Reactor之上的。Project Reactor是Reactive Streams規範的實現。Reactor提供兩種類型:
- Mono:實現Publisher並返回0或1個元素
- Flux:實現Publisher並返回N個元素。
Spring WebFlux Hello World Example
讓我們建立一個簡單的 Spring WebFlux Hello World 應用程式。我們將創建一個簡單的 REST Web 服務,並使用 Spring Boot 在默認的 Netty 伺服器上運行它。我們最終的專案結構如下圖所示。 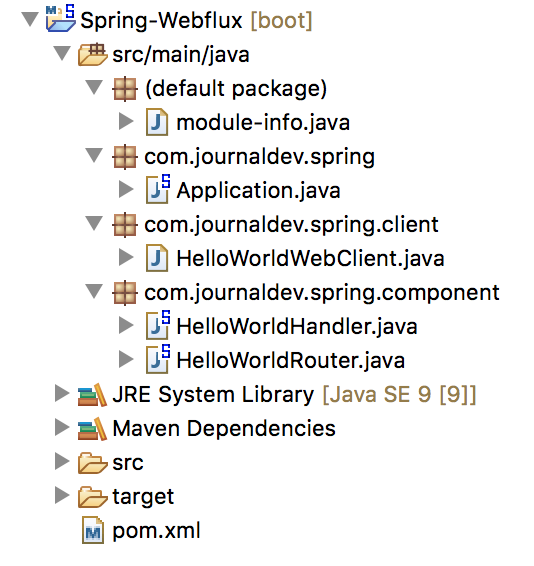 讓我們逐個查看應用程式的每個組件。
Spring WebFlux Maven 依賴
<project xmlns="https://maven.apache.org/POM/4.0.0" xmlns:xsi="https://www.w3.org/2001/XMLSchema-instance" xsi:schemaLocation="https://maven.apache.org/POM/4.0.0 https://maven.apache.org/xsd/maven-4.0.0.xsd">
  <modelVersion>4.0.0</modelVersion>
  <groupId>com.journaldev.spring</groupId>
  <artifactId>SpringWebflux</artifactId>
  <version>0.0.1-SNAPSHOT</version>
  <name>Spring WebFlux</name>
  <description>Spring WebFlux Example</description>

      <properties>
        <project.build.sourceEncoding>UTF-8</project.build.sourceEncoding>
        <project.reporting.outputEncoding>UTF-8</project.reporting.outputEncoding>
        <jdk.version>1.9</jdk.version>
    </properties>

  <parent>
		<groupId>org.springframework.boot</groupId>
		<artifactId>spring-boot-starter-parent</artifactId>
		<version>2.0.1.RELEASE</version>
		<relativePath/> <!-- lookup parent from repository -->
	</parent>

	<dependencies>
		<dependency>
			<groupId>org.springframework.boot</groupId>
			<artifactId>spring-boot-starter-webflux</artifactId>
		</dependency>
		<dependency>
			<groupId>org.springframework.boot</groupId>
			<artifactId>spring-boot-starter-test</artifactId>
			<scope>test</scope>
		</dependency>

		<dependency>
			<groupId>io.projectreactor</groupId>
			<artifactId>reactor-test</artifactId>
			<scope>test</scope>
		</dependency>
    </dependencies>
	<repositories>
		<repository>
			<id>spring-snapshots</id>
			<name>Spring Snapshots</name>
			<url>https://repo.spring.io/snapshot</url>
			<snapshots>
				<enabled>true</enabled>
			</snapshots>
		</repository>
		<repository>
			<id>spring-milestones</id>
			<name>Spring Milestones</name>
			<url>https://repo.spring.io/milestone</url>
			<snapshots>
				<enabled>false</enabled>
			</snapshots>
		</repository>
	</repositories>
	<pluginRepositories>
		<pluginRepository>
			<id>spring-snapshots</id>
			<name>Spring Snapshots</name>
			<url>https://repo.spring.io/snapshot</url>
			<snapshots>
				<enabled>true</enabled>
			</snapshots>
		</pluginRepository>
		<pluginRepository>
			<id>spring-milestones</id>
			<name>Spring Milestones</name>
			<url>https://repo.spring.io/milestone</url>
			<snapshots>
				<enabled>false</enabled>
			</snapshots>
		</pluginRepository>
	</pluginRepositories>
    <build>
        <plugins>
            <plugin>
                <groupId>org.springframework.boot</groupId>
                <artifactId>spring-boot-maven-plugin</artifactId>
            </plugin>
        </plugins>
        <pluginManagement>
            <plugins>
                <plugin>
                    <groupId>org.apache.maven.plugins</groupId>
                    <artifactId>maven-compiler-plugin</artifactId>
                    <version>3.7.0</version>
                    <configuration>
                        <source>${jdk.version}</source>
                        <target>${jdk.version}</target>
                    </configuration>
                </plugin>
            </plugins>
    </pluginManagement>
    </build>

</project>
最重要的依賴項目是 spring-boot-starter-webflux 和 spring-boot-starter-parent。一些其他依賴項目是用於創建 JUnit 測試案例。
Spring WebFlux Handler
Spring WebFlux Handler 方法處理請求並返回 Mono 或 Flux 作為回應。
package com.journaldev.spring.component;

import org.springframework.http.MediaType;
import org.springframework.stereotype.Component;
import org.springframework.web.reactive.function.BodyInserters;
import org.springframework.web.reactive.function.server.ServerRequest;
import org.springframework.web.reactive.function.server.ServerResponse;

import reactor.core.publisher.Mono;

@Component
public class HelloWorldHandler {

	public Mono<ServerResponse> helloWorld(ServerRequest request) {
		return ServerResponse.ok().contentType(MediaType.TEXT_PLAIN)
			.body(BodyInserters.fromObject("Hello World!"));
	}
}
請注意,反應式組件 Mono 包含了 ServerResponse 的主體。還要看一下設置返回內容類型、響應代碼和主體的函數鏈。
Spring WebFlux Router
路由方法被用于定义应用程序的路由。这些方法返回RouterFunction对象,该对象还包含ServerResponse的body。
package com.journaldev.spring.component;

import org.springframework.context.annotation.Bean;
import org.springframework.context.annotation.Configuration;
import org.springframework.http.MediaType;
import org.springframework.web.reactive.function.server.RequestPredicates;
import org.springframework.web.reactive.function.server.RouterFunction;
import org.springframework.web.reactive.function.server.RouterFunctions;
import org.springframework.web.reactive.function.server.ServerResponse;

@Configuration
public class HelloWorldRouter {

	@Bean
	public RouterFunction<ServerResponse> routeHelloWorld(HelloWorldHandler helloWorldHandler) {

		return RouterFunctions.route(RequestPredicates.GET("/helloWorld")
                .and(RequestPredicates.accept(MediaType.TEXT_PLAIN)), helloWorldHandler::helloWorld);
	}
}
因此,我们为/helloWorld暴露了一个GET方法,客户端调用应该接受纯文本响应。
Spring Boot应用程序
让我们使用Spring Boot配置我们的简单WebFlux应用程序。
package com.journaldev.spring;

import org.springframework.boot.SpringApplication;
import org.springframework.boot.autoconfigure.SpringBootApplication;

@SpringBootApplication
public class Application {

	public static void main(String[] args) {
		SpringApplication.run(Application.class, args);
	}
}
如果您查看上面的代码,与Spring WebFlux无关。但是由于我们已添加了spring-boot-starter-webflux模块的依赖项,Spring Boot将配置我们的应用程序为Spring WebFlux。
Java 9模块支持
我们的应用程序已准备好在Java 8上执行,但如果您使用Java 9,则还需要添加module-info.java类。
module com.journaldev.spring {
    requires reactor.core;
    requires spring.web;
    requires spring.beans;
    requires spring.context;
    requires spring.webflux;
    requires spring.boot;
    requires spring.boot.autoconfigure;
    exports com.journaldev.spring;
}
运行Spring WebFlux Spring Boot应用程序
如果您在Eclipse中有Spring支持,那么您可以将上述类作为Spring Boot应用程序运行。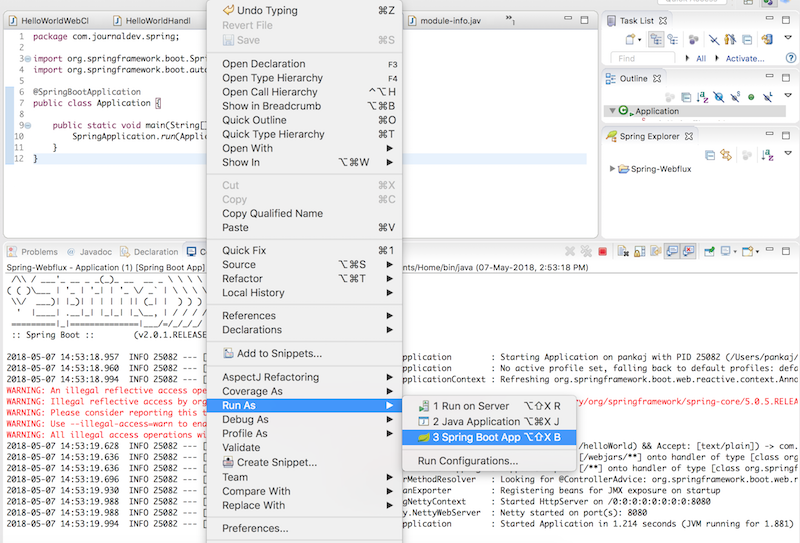 如果您喜欢使用命令行,则打开终端并从项目源目录运行命令
mvn spring-boot:run。一旦应用程序运行起来,请注意以下日志消息,以确保我们的应用程序一切正常。当您通过添加更多路由和功能来扩展这个简单的应用程序时,这也会很有帮助。
2018-05-07 15:01:47.893  INFO 25158 --- [           main] o.s.w.r.f.s.s.RouterFunctionMapping      : Mapped ((GET && /helloWorld) && Accept: [text/plain]) -> com.journaldev.spring.component.HelloWorldRouter$$Lambda$501/704766954@6eeb5d56
2018-05-07 15:01:48.495  INFO 25158 --- [ctor-http-nio-1] r.ipc.netty.tcp.BlockingNettyContext     : Started HttpServer on /0:0:0:0:0:0:0:0:8080
2018-05-07 15:01:48.495  INFO 25158 --- [           main] o.s.b.web.embedded.netty.NettyWebServer  : Netty started on port(s): 8080
2018-05-07 15:01:48.501  INFO 25158 --- [           main] com.journaldev.spring.Application        : Started Application in 1.86 seconds (JVM running for 5.542)
从日志中可以清楚地看出,我们的应用程序正在Netty服务器上的8080端口上运行。让我们继续测试我们的应用程序。
Spring WebFlux应用程序测试
我们可以使用各种方法测试我们的应用程序。
-
使用CURL命令
$ curl https://localhost:8080/helloWorld Hello World! $ -
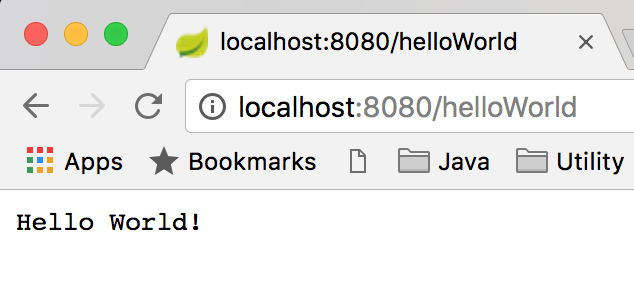
在浏览器中打开URL
-
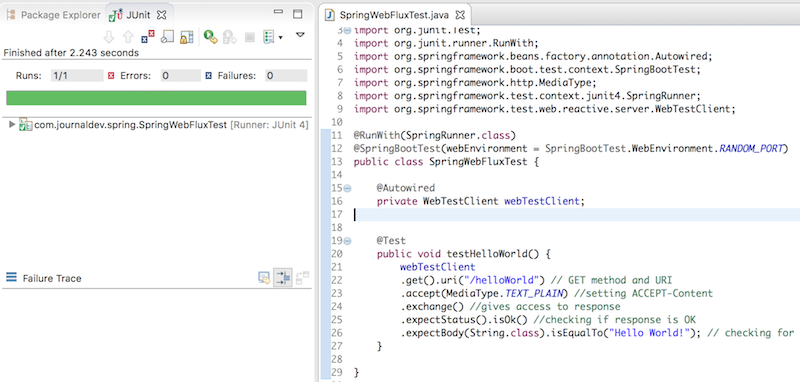
使用 Spring 5 的 WebTestClient 這裡有一個 JUnit 測試程序,用來測試我們的 Rest web 服務,使用 Spring 5 的 reactive web 中的
WebTestClient。package com.journaldev.spring; import org.junit.Test; import org.junit.runner.RunWith; import org.springframework.beans.factory.annotation.Autowired; import org.springframework.boot.test.context.SpringBootTest; import org.springframework.http.MediaType; import org.springframework.test.context.junit4.SpringRunner; import org.springframework.test.web.reactive.server.WebTestClient; @RunWith(SpringRunner.class) @SpringBootTest(webEnvironment = SpringBootTest.WebEnvironment.RANDOM_PORT) public class SpringWebFluxTest { @Autowired private WebTestClient webTestClient; @Test public void testHelloWorld() { webTestClient .get().uri("/helloWorld") // GET 方法和 URI .accept(MediaType.TEXT_PLAIN) // 設置 ACCEPT-Content .exchange() // 可以訪問響應 .expectStatus().isOk() // 檢查響應是否正確 .expectBody(String.class).isEqualTo("Hello World!"); // 檢查響應類型和消息 } }運行它作為 JUnit 測試案例,它應該能輕鬆通過測試。
-
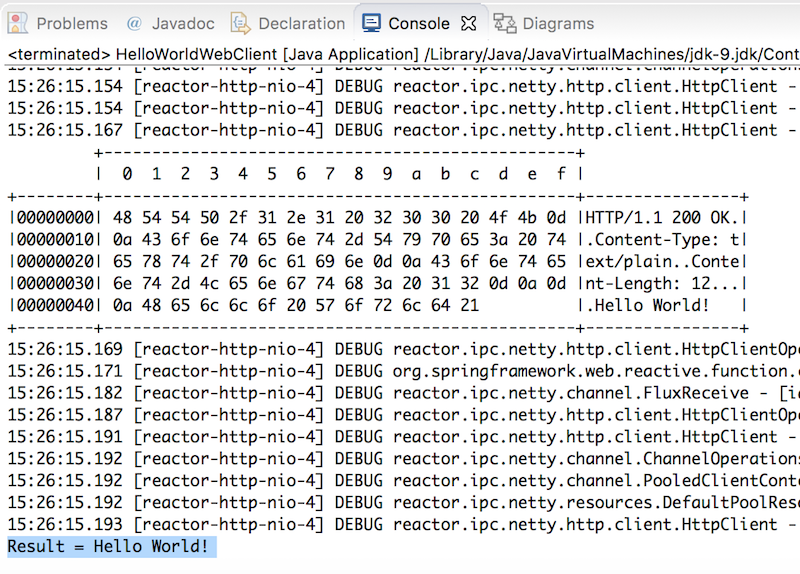
使用 Spring Web Reactive 中的 WebClient 我們也可以使用
WebClient來呼叫 REST web 服務。package com.journaldev.spring.client; import org.springframework.http.MediaType; import org.springframework.web.reactive.function.client.ClientResponse; import org.springframework.web.reactive.function.client.WebClient; import reactor.core.publisher.Mono; public class HelloWorldWebClient { public static void main(String args[]) { WebClient client = WebClient.create("https://localhost:8080"); Mono<ClientResponse> result = client.get() .uri("/helloWorld") .accept(MediaType.TEXT_PLAIN) .exchange(); System.out.println("Result = " + result.flatMap(res -> res.bodyToMono(String.class)).block()); } }只需將其運行為一個簡單的 Java 應用程序,您應該能夠看到適當的輸出以及大量的調試消息。
總結
在這篇文章中,我們了解了Spring WebFlux以及如何構建一個簡單的反應式Restful Web服務。很高興看到像Spring這樣的流行框架支持反應式編程模型。但我們有很多內容要涵蓋,因為如果你的所有依賴都不是反應式和非阻塞的,那麼你的應用程序也不是真正的反應式。例如,關聯式數據庫供應商沒有反應式驅動程序,因為它們依賴於JDBC,這不是反應式的。因此,Hibernate API也是非反應式的。所以如果你使用關聯式數據庫,那麼你還不能構建一個真正的反應式應用程序。我希望這種情況會在不久的將來改變。
你可以從我的GitHub存儲庫下載項目代碼。
參考:官方文檔
Source:
https://www.digitalocean.com/community/tutorials/spring-webflux-reactive-programming