


Rsync(遠端同步)是在Linux/Unix系統中最常用的命令,用於遠程和本地拷貝和同步文件和目錄。
借助rsync命令,您可以在目錄、磁盤和網絡之間遠程和本地拷貝和同步數據,執行數據備份,以及在兩個Linux機器之間鏡像。
本文解釋了16種rsync命令的基本和高級用法,以在基於Linux的機器上遠程和本地傳輸您的文件。您不需要是root用戶來運行rsync命令。
目錄
Rsync 命令的優勢
它提供了幾個優勢,包括:
- 高效的文件傳輸– rsync 使用增量傳輸算法,這意味著它只傳輸源文件和目的文件之間的差異,大大減少了傳輸的數據量,使其在同步大文件或目錄時效率更高。
- 遠程文件同步– rsync 支持通過 SSH 進行本地和遠程文件傳輸,這允許在本地和遠程系統之間進行同步或在多台機器之間鏡像目錄。
- 增量備份– rsync 非常適用於增量備份,因為它可以通過僅傳輸新文件或已修改文件來高效地創建和更新備份。
- 保留檔案權限 – rsync 可以保留各種檔案屬性,如權限、所有權、時間戳記和符號連結,確保複製的檔案在目的地上保留其原始特性。
- 頻寬控制 – rsync 允許您在檔案傳輸期間限制頻寬使用,因為它在兩端傳送和接收資料時使用壓縮和解壓縮方法。
- 更快 – 對於傳輸檔案,特別是在同步大型目錄或處理已經部分傳輸或存在於目的地上的檔案時,rsync 可能比 scp(安全拷貝) 更快。
Rsync 命令語法
rsync 命令遵循以下語法:
# rsync [OPTIONS] SOURCE DESTINATION
以下是與 rsync 命令一起使用的不同組件和選項的說明:
-v– 詳細輸出,顯示有關傳輸的詳細資訊。-r– 遞歸複製資料(但在傳輸資料時不保留時間戳記和權限)。-a– 存檔模式,允許遞迴地複製文件,同時保留符號連結、文件權限、使用者和群組所有權以及時間戳。-z– 在傳輸期間壓縮文件以減少網絡使用量。-h– 以人類可讀的格式輸出數字。-P– 在傳輸過程中顯示進度。SOURCE– 指定要傳輸的源文件或目錄,可以是本地或遠程位置。DESTINATION– 指定將要複製文件或目錄的目標路徑。與源相似,它可以是本地路徑或遠程位置。
在Linux系統中安裝Rsync
我們可以根據您的Linux發行版使用以下套件管理器來安裝rsync套件。
$ sudo apt install rsync         [On Debian, Ubuntu and Mint]
$ sudo yum install rsync         [On RHEL/CentOS/Fedora and Rocky/AlmaLinux]
$ sudo emerge -a sys-apps/rsync  [On Gentoo Linux]
$ sudo apk add rsync            [On Alpine Linux]
$ sudo pacman -S rsync           [On Arch Linux]
$ sudo zypper install rsync      [On OpenSUSE]
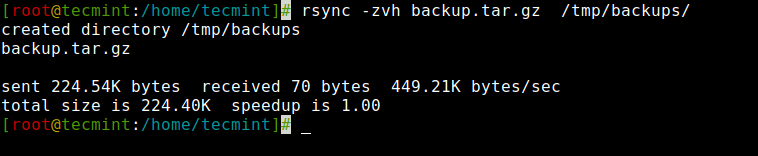
1. 在本地複製/同步文件
要在本地複製或同步文件,您可以使用以下命令,它將從一個位置將單個文件同步到另一個位置。
在這個例子中,文件名為backup.tar的文件需要複製或同步到/tmp/backups/文件夾。
[root@tecmint]# rsync -zvh backup.tar.gz /tmp/backups/

created directory /tmp/backups
backup.tar.gz

sent 224.54K bytes  received 70 bytes  449.21K bytes/sec
total size is 224.40K  speedup is 1.00
從上面的例子中可以看到,如果目標不存在,rsync將自動為目標創建一個目錄。
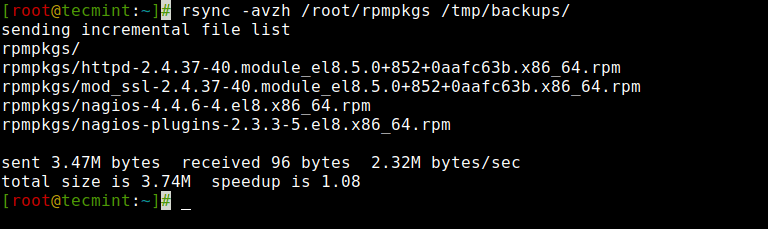
2. 複製/同步本地目錄
以下命令將在同一台機器上從一個目錄傳輸或同步所有文件到另一個目錄。
在這個例子中,/root/rpmpkgs 包含一些 rpm 套件文件,您希望將該目錄複製到 /tmp/backups/ 文件夾內。
[root@tecmint]# rsync -avzh /root/rpmpkgs /tmp/backups/

sending incremental file list
rpmpkgs/
rpmpkgs/httpd-2.4.37-40.module_el8.5.0+852+0aafc63b.x86_64.rpm
rpmpkgs/mod_ssl-2.4.37-40.module_el8.5.0+852+0aafc63b.x86_64.rpm
rpmpkgs/nagios-4.4.6-4.el8.x86_64.rpm
rpmpkgs/nagios-plugins-2.3.3-5.el8.x86_64.rpm

sent 3.47M bytes  received 96 bytes  2.32M bytes/sec
total size is 3.74M  speedup is 1.08
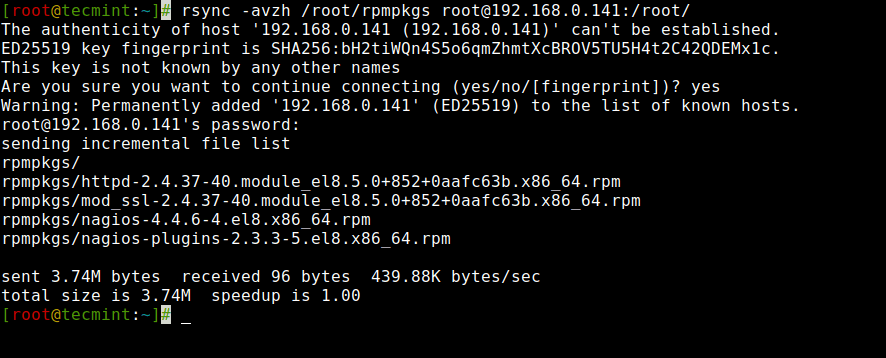
3. 從本地複製目錄到遠程伺服器
要從本地伺服器複製目錄到遠程伺服器,您可以使用以下命令,這將從本地同步一個目錄到遠程機器。
例如,如果您的本地電腦中有一個名為“rpmpkgs”的文件夾,其中包含一些 RPM 套件,並且您希望將本地目錄的內容發送到遠程伺服器,您可以使用以下命令。
# rsync -avzh /root/rpmpkgs [email protected]:/root/

The authenticity of host '192.168.0.141 (192.168.0.141)' can't be established.
ED25519 key fingerprint is SHA256:bH2tiWQn4S5o6qmZhmtXcBROV5TU5H4t2C42QDEMx1c.
This key is not known by any other names
Are you sure you want to continue connecting (yes/no/[fingerprint])? yes
Warning: Permanently added '192.168.0.141' (ED25519) to the list of known hosts.
[email protected]'s password:
sending incremental file list
rpmpkgs/
rpmpkgs/httpd-2.4.37-40.module_el8.5.0+852+0aafc63b.x86_64.rpm
rpmpkgs/mod_ssl-2.4.37-40.module_el8.5.0+852+0aafc63b.x86_64.rpm
rpmpkgs/nagios-4.4.6-4.el8.x86_64.rpm
rpmpkgs/nagios-plugins-2.3.3-5.el8.x86_64.rpm

sent 3.74M bytes  received 96 bytes  439.88K bytes/sec
total size is 3.74M  speedup is 1.00
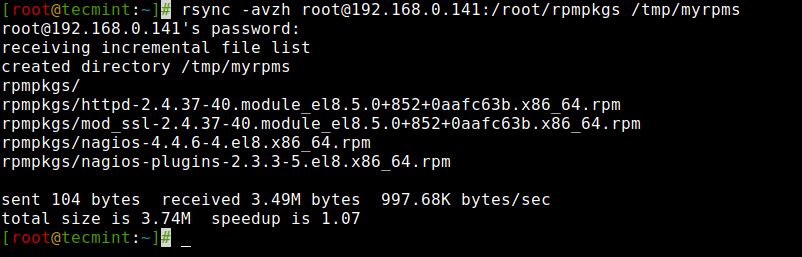
4. 從遠程複製目錄到本地伺服器
此命令將幫助您將遠程目錄同步到本地目錄。在這個例子中,一個位於遠程伺服器上的目錄 /root/rpmpkgs 正在複製到您的本地電腦中的 /tmp/myrpms。
# rsync -avzh [email protected]:/root/rpmpkgs /tmp/myrpms

[email protected]'s password:
receiving incremental file list
created directory /tmp/myrpms
rpmpkgs/
rpmpkgs/httpd-2.4.37-40.module_el8.5.0+852+0aafc63b.x86_64.rpm
rpmpkgs/mod_ssl-2.4.37-40.module_el8.5.0+852+0aafc63b.x86_64.rpm
rpmpkgs/nagios-4.4.6-4.el8.x86_64.rpm
rpmpkgs/nagios-plugins-2.3.3-5.el8.x86_64.rpm

sent 104 bytes  received 3.49M bytes  997.68K bytes/sec
total size is 3.74M  speedup is 1.07
5. 透過 SSH 進行 Rsync
使用 rsync,我們可以使用 SSH(Secure Shell) 進行數據傳輸,使用 SSH 協議在傳輸我們的數據時,您可以確保您的數據正在通過加密的安全連接進行傳輸,這樣在互聯網上傳輸時沒有人可以讀取您的數據。
同時,當我們使用 rsync 時,我們需要提供 用戶/root 密碼來完成特定任務,因此使用 SSH 選項將以加密方式發送您的登錄信息,這樣您的 密碼 將是安全的。
要在 rsync 上使用 SSH,您可以使用 -e 選項來指定遠程 shell 命令,通常是 ssh,如下所示。
# rsync [OPTIONS] -e ssh /path/to/source user@remote:/path/to/destination
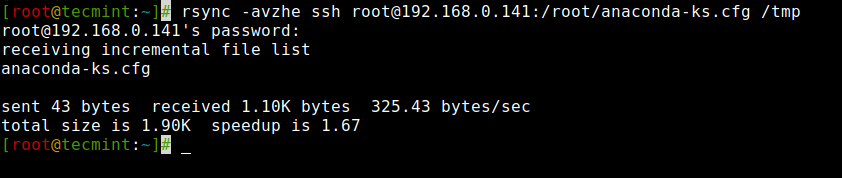
6. 從遠程服務器將文件複製到本地服務器使用 SSH
要將文件從遠程服務器同步到本地服務器,您可以使用“rsync”並使用“-e”選項與您想要使用的協議名稱一起指定協議。
在這個例子中,我們將使用“ssh” 和“-e” 選項進行數據傳輸。
# rsync -avzhe ssh [email protected]:/root/anaconda-ks.cfg /tmp

[email protected]'s password:
receiving incremental file list
anaconda-ks.cfg

sent 43 bytes  received 1.10K bytes  325.43 bytes/sec
total size is 1.90K  speedup is 1.67
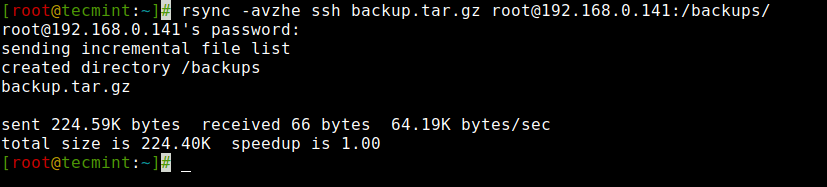
7. 使用 SSH 將檔案從本地伺服器複製到遠端伺服器
要使用 SSH 將檔案從本地伺服器同步到遠端伺服器,您可以使用以下命令:
# rsync -avzhe ssh backup.tar.gz [email protected]:/backups/

[email protected]'s password:
sending incremental file list
created directory /backups
backup.tar.gz

sent 224.59K bytes  received 66 bytes  64.19K bytes/sec
total size is 224.40K  speedup is 1.00
8. 使用 Rsync 在資料傳輸時顯示進度
在從一台機器傳輸資料到另一台機器時顯示進度,我們可以使用 `–progress` 選項,該選項會顯示檔案以及完成傳輸所需的剩餘時間。
# rsync -avzhe ssh --progress /root/rpmpkgs [email protected]:/root/rpmpkgs

[email protected]'s password:
sending incremental file list
rpmpkgs/
rpmpkgs/httpd-2.4.37-40.module_el8.5.0+852+0aafc63b.x86_64.rpm
          1.47M 100%   31.80MB/s    0:00:00 (xfr#1, to-chk=3/5)
rpmpkgs/mod_ssl-2.4.37-40.module_el8.5.0+852+0aafc63b.x86_64.rpm
        138.01K 100%    2.69MB/s    0:00:00 (xfr#2, to-chk=2/5)
rpmpkgs/nagios-4.4.6-4.el8.x86_64.rpm
          2.01M 100%   18.45MB/s    0:00:00 (xfr#3, to-chk=1/5)
rpmpkgs/nagios-plugins-2.3.3-5.el8.x86_64.rpm
        120.48K 100%    1.04MB/s    0:00:00 (xfr#4, to-chk=0/5)

sent 3.74M bytes  received 96 bytes  1.50M bytes/sec
total size is 3.74M  speedup is 1.00

9. 使用 Rsync 包含特定擴展名的檔案
在 rsync 操作期間包含特定檔案或模式,您可以使用 `–include` 選項和匹配所有檔案的擴展名。
# rsync -avz --include='*.txt' /path/to/source/ user@remote:/path/to/destination/
在提供的範例中,rsync 將只包含從 /path/to/source/ 目錄傳輸的具有 `.txt` 擴展名的檔案。
10. 使用 Rsync 排除特定擴展名的檔案
同樣,在 rsync 操作期間排除特定擴展名,您可以使用 `–exclude` 選項和萬用字元模式。
# rsync -avz --exclude='*.ext' /path/to/source/ user@remote:/path/to/destination/
在提供的範例中,rsync 在傳輸期間會排除指定擴展名為 (*.ext) 的文件,同時包含所有其他文件和目錄。
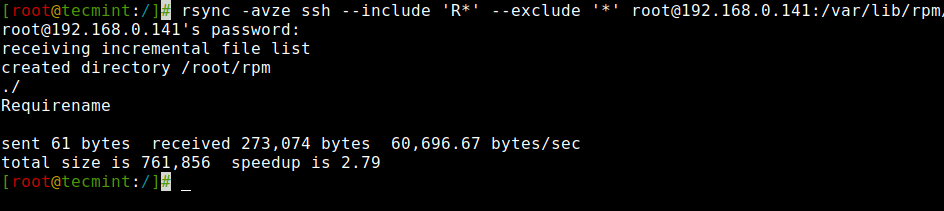
11. 使用 Rsync 包含和排除文件
在 rsync 操作期間包含和排除特定文件或模式,您可以使用 --include 和 --exclude 選項,並使用適當的萬用字元模式。
這兩個選項允許我們通過指定參數來包含和排除文件,這些選項可以幫助我們指定要在同步中包含的文件或目錄,並排除您不希望傳輸的文件和文件夾。
在這個例子中,rsync 命令將僅包含以 ‘R’ 開頭的那些文件和目錄,並排除所有其他文件和目錄。
# rsync -avze ssh --include 'R*' --exclude '*' [email protected]:/var/lib/rpm/ /root/rpm
12. 使用 Rsync 的 –delete 選項
如果源目錄中不存在文件或目錄,但目的地目錄中已經存在,您可能希望在同步時刪除目標位置中已存在的文件/目錄。
我們可以使用 ‘--delete’ 選項來刪除源目錄中不存在的文件。
源和目標現在已經同步。現在在目標位置創建一個新文件 test.txt。
[root@tecmint:~]# cd /root/rpm/
[root@tecmint:~/rpm]# touch test.txt
[root@tecmint:~/rpm]# rsync -avz --delete [email protected]:/var/lib/rpm/ /root/rpm/

[email protected]'s password:
receiving incremental file list
deleting test.txt
./
.dbenv.lock
.rpm.lock
Basenames
Conflictname
Dirnames
Enhancename
Filetriggername
Group
Installtid
Name
Obsoletename
Packages
Providename
Sha1header
Sigmd5
Suggestname
Supplementname
Transfiletriggername
Triggername
__db.001
__db.002
__db.003

sent 445 bytes  received 18,543,954 bytes  2,472,586.53 bytes/sec
total size is 71,151,616  speedup is 3.84
目標在與源同步時有一個名為test.txt的新文件,使用“--delete”選項時,它刪除了文件test.txt。

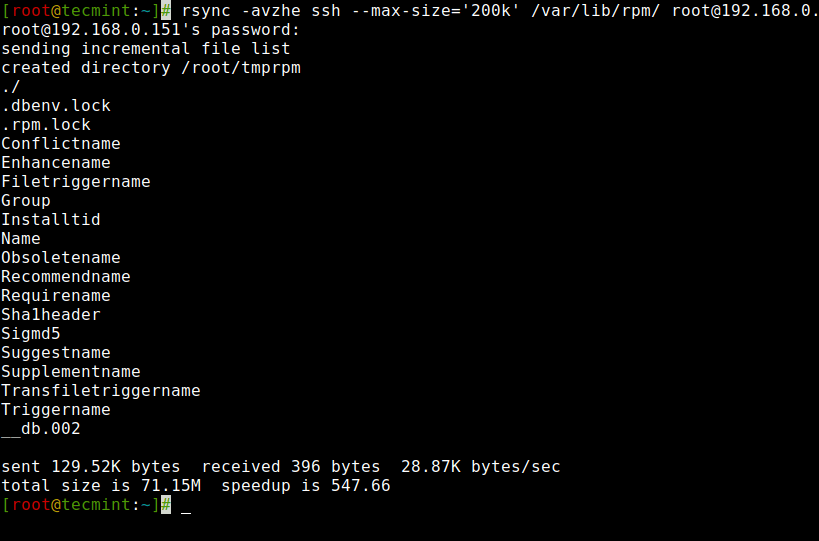
13. 使用Rsync設置文件傳輸限制
您可以指定要傳輸或同步的最大文件大小。您可以使用“--max-size”選項來完成。在這個例子中,最大文件大小是200k,因此這個命令將僅傳輸那些大小等於或小於200k的文件。
# rsync -avzhe ssh --max-size='200k' /var/lib/rpm/ [email protected]:/root/tmprpm

[email protected]'s password:
sending incremental file list
created directory /root/tmprpm
./
.dbenv.lock
.rpm.lock
Conflictname
Enhancename
Filetriggername
Group
Installtid
Name
Obsoletename
Recommendname
Requirename
Sha1header
Sigmd5
Suggestname
Supplementname
Transfiletriggername
Triggername
__db.002

sent 129.52K bytes  received 396 bytes  28.87K bytes/sec
total size is 71.15M  speedup is 547.66
14. 在傳輸後自動刪除源文件
現在,假設您有主Web服務器和一個數據備份服務器,您創建了每日備份並將其與備份服務器同步,但現在您不想在Web服務器中保留該本地備份的副本。
那麼,您會等待傳輸完成然後手動刪除該本地備份文件嗎?當然不會。這種自動刪除可以使用“--remove-source-files”選項來完成。
# rsync --remove-source-files -zvh backup.tar.gz [email protected]:/tmp/backups/

[email protected]'s password:
backup.tar.gz

sent 795 bytes  received 2.33K bytes  894.29 bytes/sec
total size is 267.30K  speedup is 85.40

[root@tecmint:~]# ls -l backup.tar.gz

ls: cannot access 'backup.tar.gz': No such file or directory

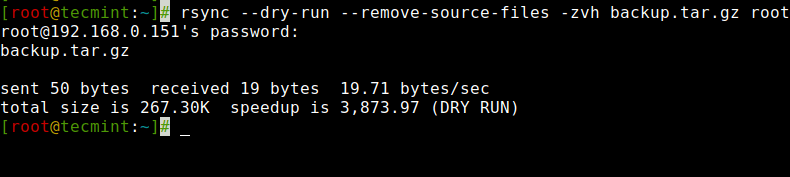
15. 使用Rsync執行乾燥運行
如果您是一個新手使用rsync並不知道您的命令究竟會做什麼。Rsync可能會真正搞砸您目標文件夾中的事情,然後撤消可能是一項繁瑣的工作。
使用此選項不會對檔案進行任何更改,並顯示命令的輸出,如果輸出與您想要的完全相同,則可以從您的命令中刪除’--dry-run‘選項並在終端上運行。
# rsync --dry-run --remove-source-files -zvh backup.tar.gz [email protected]:/tmp/backups/

[email protected]'s password:
backup.tar.gz

sent 50 bytes  received 19 bytes  19.71 bytes/sec
total size is 267.30K  speedup is 3,873.97 (DRY RUN)
16. Rsync 設置帶寬限制並傳輸文件
您可以使用’--bwlimit‘選項在從一台機器傳輸數據到另一台機器時設置帶寬限制。此選項可幫助我們限制I/O帶寬。
# rsync --bwlimit=100 -avzhe ssh  /var/lib/rpm/  [email protected]:/root/tmprpm/
[email protected]'s password:
sending incremental file list
sent 324 bytes  received 12 bytes  61.09 bytes/sec
total size is 38.08M  speedup is 113347.05
此外,預設情況下,rsync僅同步已更改的塊和字節,如果您明確希望同步整個文件,則可以使用’-W‘選項。
# rsync -zvhW backup.tar /tmp/backups/backup.tar
backup.tar
sent 14.71M bytes  received 31 bytes  3.27M bytes/sec
total size is 16.18M  speedup is 1.10
結論
這就是我們對rsync及其功能的概述。如果您想進一步探索其廣泛的選項和功能,我建議您參考可用的詳細手冊頁面(man頁面)。
Source:
https://www.tecmint.com/rsync-local-remote-file-synchronization-commands/