


JUnit 5是一個軟體測試框架,被開發人員用來進行單元測試。這是一個基於Java的框架,可以在Java平台上進行測試的編寫和執行,包括一個集成報告器,顯示測試結果。
JUnit可用於自動化測試的兩個主要目的:
- 測試軟體是否按預期運作
- 找出並報告代碼中的錯誤,盡快修復它們
在本博客中,我們將專注於並學習JUnit 5中使用的設置、配置和基本方法。
什麼是JUnit 5?
JUnit 5是JUnit測試框架的最新版本。它支持Java 8及以上的新版本,支持不同的測試風格,並為JVM上的開發人員端測試提供了現代基礎。
使用JUnit的主要好處是其模塊化,因為它包含多個模塊,讓開發人員可以輕鬆測試軟體的不同組件。它也可以用於測試應用程序的單個類,而不是整個應用程序。
JUnit 5的功能
以下是一些區分它與其他單元測試框架的受歡迎和重要功能。
| Feature | Description | Annotations/Method |
|---|---|---|
| 測試套件 |
測試套件基本上是一組測試,例如 Smoke、Sanity,或與特定功能相關的一組測試。 JUnit 5 允許創建可以一起運行的測試套件。 |
要使用測試套件,我們需要添加一個 JUnit 平台套件 依賴並使用以下註解。@SelectPackages、@SelectClasses、@Suite |
| 斷言 | 斷言用於驗證軟體的預期行為。JUnit 5 提供內建的斷言方法,可以幫助輕鬆執行斷言。 | 在 import org.junit.jupiter.api.Assertions; 類中有多種斷言方法可用。一些方法如下所列: assertTrue()、assertFalse()、assertEquals()、assertAll()、assertNotEquals() |
| 測試執行順序 | 自定義測試執行順序。它允許開發者控制測試的執行,並根據需要以特定順序運行測試。 | @TestMethodOrder、@Order、@TestClassOrder |
| 異常測試 | 執行驗證所需異常是否被拋出到測試中的異常測試。 | 以下方法從import org.junit.jupiter.api.Assertions;類中使用: assertThrows() |
| 測試依賴性 | 測試依賴性允許通過提供讓測試方法相互依賴的設施進行順序測試。這意味著下一個依賴於前一個測試方法的測試方法將不會被執行,除非前一個通過。在編寫集成測試時,這是一個有用的特性。 | @TestInstance |
| 禁用測試 | 禁用測試或測試類。 | @Disabled |
| 超時 | 如果測試執行時間超過指定持續時間,則測試失敗。 | @Timeout |
| 報告 | 提供內置報告器來分析測試結果並顯示詳細信息。生成一個.html文件,其中包含測試執行結果。 |
N/A |
JUnit 4 vs. JUnit 5
隨著最新版本JUnit,即JUnit 5的發布,框架中添加了多個變化和新功能。下表列出了兩個版本之間的不同:
| criteria | JUNIT4 | JUNIT5 |
|---|---|---|
| 架構 | 一切都打包在單個JAR文件中。 | 分為 3 個子專案: – JUnit 平台 – JUnit Jupiter – JUnit Vintage |
| JDK 版本要求 | 需要 Java 5 或更高版本 | 需要 Java 8 或更高版本 |
| 第三方整合 | 不支援插件和 IDE 的第三方整合 | 專門的子專案(JUnit 平台)用於第三方整合 |
| 支援嵌套測試 | 沒有提供用於編寫嵌套測試的註解 | 提供 @Nested 註解以編寫嵌套測試 |
| 支援註冊自定義擴展 | 不支援自定義擴展 | 提供 @ExtendWith 註解以註冊自定義擴展 |
| 對常用註解所做的更改 | – @BeforeClass– @AfterClass– @Before– @After– @Ignore |
– @BeforeAll– @AfterAll– @BeforeEach– @AfterEach– @Disabled |
| 標記和過濾的註解更改 | @Category 註解已被使用 |
@Tag 註解已被使用 |
| 測試套件 | @RunWith 和 @Suite 註解已被使用 |
@Suite、@SelectPackages 和 @SelectClasses 注釋用於 |
開始使用 JUnit 5
在本節中,我們將學習如何使用 IntelliJ IDE 編寫 JUnit 5 測試案例。由於它已經預先打包了 JUnit 5,我們無需額外進行任何安裝即可使用它。
我們需要創建一個新的 Maven 項目,添加 JUnit 5 依賴項,並立即開始編寫測試。
在 Maven 項目中添加 JUnit 依賴項
需要在 pom.xml 文件中添加以下 JUnit 5 依賴項:
- JUnit Jupiter Engine
- JUnit Jupiter API
- JUnit Platform Suite(匯總器)
- JUnit Jupiter Params
<dependency>
<groupId>org.junit.jupiter</groupId>
<artifactId>junit-jupiter-engine</artifactId>
<version>5.11.4</version>
<scope>test</scope>
</dependency>
<dependency>
<groupId>org.junit.jupiter</groupId>
<artifactId>junit-jupiter-api</artifactId>
<version>5.11.4</version>
<scope>test</scope>
</dependency>
<dependency>
<groupId>org.junit.platform</groupId>
<artifactId>junit-platform-suite</artifactId>
<version>1.11.4</version>
<scope>test</scope>
</dependency>
<dependency>
<groupId>org.junit.jupiter</groupId>
<artifactId>junit-jupiter-params</artifactId>
<version>5.11.4</version>
<scope>test</scope>
</dependency>
這是完整的 pom.xml 文件
<project xmlns="http://maven.apache.org/POM/4.0.0" xmlns:xsi="http://www.w3.org/2001/XMLSchema-instance"
xsi:schemaLocation="http://maven.apache.org/POM/4.0.0 http://maven.apache.org/xsd/maven-4.0.0.xsd">
<modelVersion>4.0.0</modelVersion>
<groupId>io.github.mfaisalkhatri</groupId>
<artifactId>junit-basic</artifactId>
<version>1.0-SNAPSHOT</version>
<packaging>jar</packaging>
<name>junit-basic</name>
<url>http://maven.apache.org</url>
<properties>
<project.build.sourceEncoding>UTF-8</project.build.sourceEncoding>
</properties>
<dependencies>
<dependency>
<groupId>org.junit.jupiter</groupId>
<artifactId>junit-jupiter-engine</artifactId>
<version>5.11.4</version>
<scope>test</scope>
</dependency>
<dependency>
<groupId>org.junit.jupiter</groupId>
<artifactId>junit-jupiter-api</artifactId>
<version>5.11.4</version>
<scope>test</scope>
</dependency>
<dependency>
<groupId>org.junit.platform</groupId>
<artifactId>junit-platform-suite</artifactId>
<version>1.11.4</version>
<scope>test</scope>
</dependency>
<dependency>
<groupId>org.junit.jupiter</groupId>
<artifactId>junit-jupiter-params</artifactId>
<version>5.11.4</version>
<scope>test</scope>
</dependency>
</dependencies>
</project>
添加完依賴項後,我們就可以開始編寫測試了。但在我們開始使用 JUnit 5 編寫測試之前,讓我們首先了解幾個基本的注釋,這些注釋可以幫助我們有效地設置測試套件並按需運行測試。
JUnit 5 中使用的基本注釋
以下是開發人員在使用 JUnit 5 撰寫測試時最常用的基本注釋。
@BeforeAll 注釋
@BeforeAll 注釋表示被標記的方法應在當前類別中的任何@Test、@RepeatedTest、@ParameterizedTest 或 @TestFactory 方法之前執行。它必須是測試類別中的靜態方法。
@BeforeAll 作為 JUnit 4.x 中使用的 @BeforeClass 注釋的替代品。
語法:
public class BasicTest {
public static void beforeAllTest() {
System.out.println("Before All method called!!");
}
//..
}
@BeforeEach 注釋
@BeforeEach 注釋表示被標記的方法應在當前類別中的每次呼叫 @Test、@RepeatedTest、@ParameterizedTest 或 @TestFactory 方法之前執行。
它是測試生命週期方法的一部分,並取代了 JUnit 4 中使用的 @Before 注釋。
語法:
public class BasicTest {
public void beforeEachTest() {
System.out.println("Before Each method called!!");
}
//...
}
@AfterAll 注釋
@AfterAll 注釋表示被標記的方法應在當前類別中的所有測試都執行完畢後調用。它必須是靜態方法,並且被用作測試類別中的拆卸方法。
@AfterAll 注釋是 JUnit 4 中 @AfterClass 注釋的替代品。
語法:
public class BasicTest {
//...
public static void afterAllMethod() {
System.out.println("After All method called!!");
}
}
@AfterEach 注釋
@AfterEach 注釋表示被標記的方法應在當前類別中的每個 @Test、@RepeatedTest、@ParameterizedTest 或 @TestFactory 方法之後執行。
它是JUnit 5中用於取代JUnit 4中@After註釋的功能。
語法:
public class BasicTest {
//...
public void afterEachMethod() {
System.out.println("After Each method called!!");
}
}
@Test註釋
@Test註釋表示被註釋的方法是一個測試方法。測試方法不能是私有或靜態方法,也不能返回值。
語法:
public class BasicTest {
//..
public void testMethod() {
System.out.println("Test Method Called!!");
}
}
@DisplayName註釋
@DisplayName註釋用於為被註釋的測試類或方法指定自定義名稱。這些自定義名稱可以包含空格、特殊字符,甚至是表情符號,通常在IDE和構建工具生成的測試報告中使用。
語法:
("Demo Test class")
public class BasicTest {
//...
("This is a demo test")
public void testMethod() {
System.out.println("Test Method Called!!");
}
}
@Disabled註釋
在JUnit 5中,@Disabled註釋用於排除測試方法或測試類在執行時的測試套件中。
當應用於測試類時,該類中的所有方法都會自動被視為已停用。該註釋有一個可選參數,允許指定停用測試的理由。
語法:
public class BasicTest {
("Test method disabled")
public void testMethod() {
System.out.println("Test Method Called!!");
}
//...
}
如何使用JUnit 5編寫自動化測試用例
現在是進入代碼並開始使用JUnit 5的時候了。我們將創建一個新的Java類,BasicTest。
public class BasicTest {
//..
}

所有我們討論過的基本註釋將作為演示的一部分。
讓我們在BasicTest類中添加方法來演示JUnit 5中可用的@BeforeAll、@BeforeEach、@AfterAll、@AfterEach、@Test、@DisplayName和@Disabled註釋的使用。
("Demo Test class")
public class BasicTest {
public static void beforeAllTest() {
System.out.println("Before All method called!!");
}
public void beforeEachTest() {
System.out.println("Before Each method called!!");
}
("This is a demo test")
public void testMethodOne() {
System.out.println("Test Method One Called!!");
}
("This test is disabled to demo disable annotation")
public void disabledTest() {
System.out.println("This is a disabled test!!");
}
public void testMethodTwo() {
System.out.println("Test Method Two Called!!");
}
public void afterEachMethod() {
System.out.println("After Each method called!!");
}
public static void afterAllMethod() {
System.out.println("After All method called!!");
}
}
代碼演練
在測試類上方的@DisplayName註釋將在執行測試時將測試名稱顯示為“Demo test class”。
beforeAllTest()方法將在任何測試運行之前執行,並打印文本“Before All method Called!!”。接下來,beforeEachTest()方法將在每次測試之前執行並打印文本“Before Each Method called!!”。
這個類中有三個測試方法,分別是testMethodOne()、testMethodTwo()和disabledTest()。所有這三個測試方法上方都有@Test註釋,這表示這些是測試方法。
disabledTest()方法將不會被執行,因為它有放置在上方的@Disabled 註釋。
每次測試執行完成後,afterEachTestMethod()將被執行,因為它上方有@AfterEach註釋。
最後,在運行所有測試後,afterAllMethod()將被執行,因為它上方有@AfterAll註釋。
測試執行
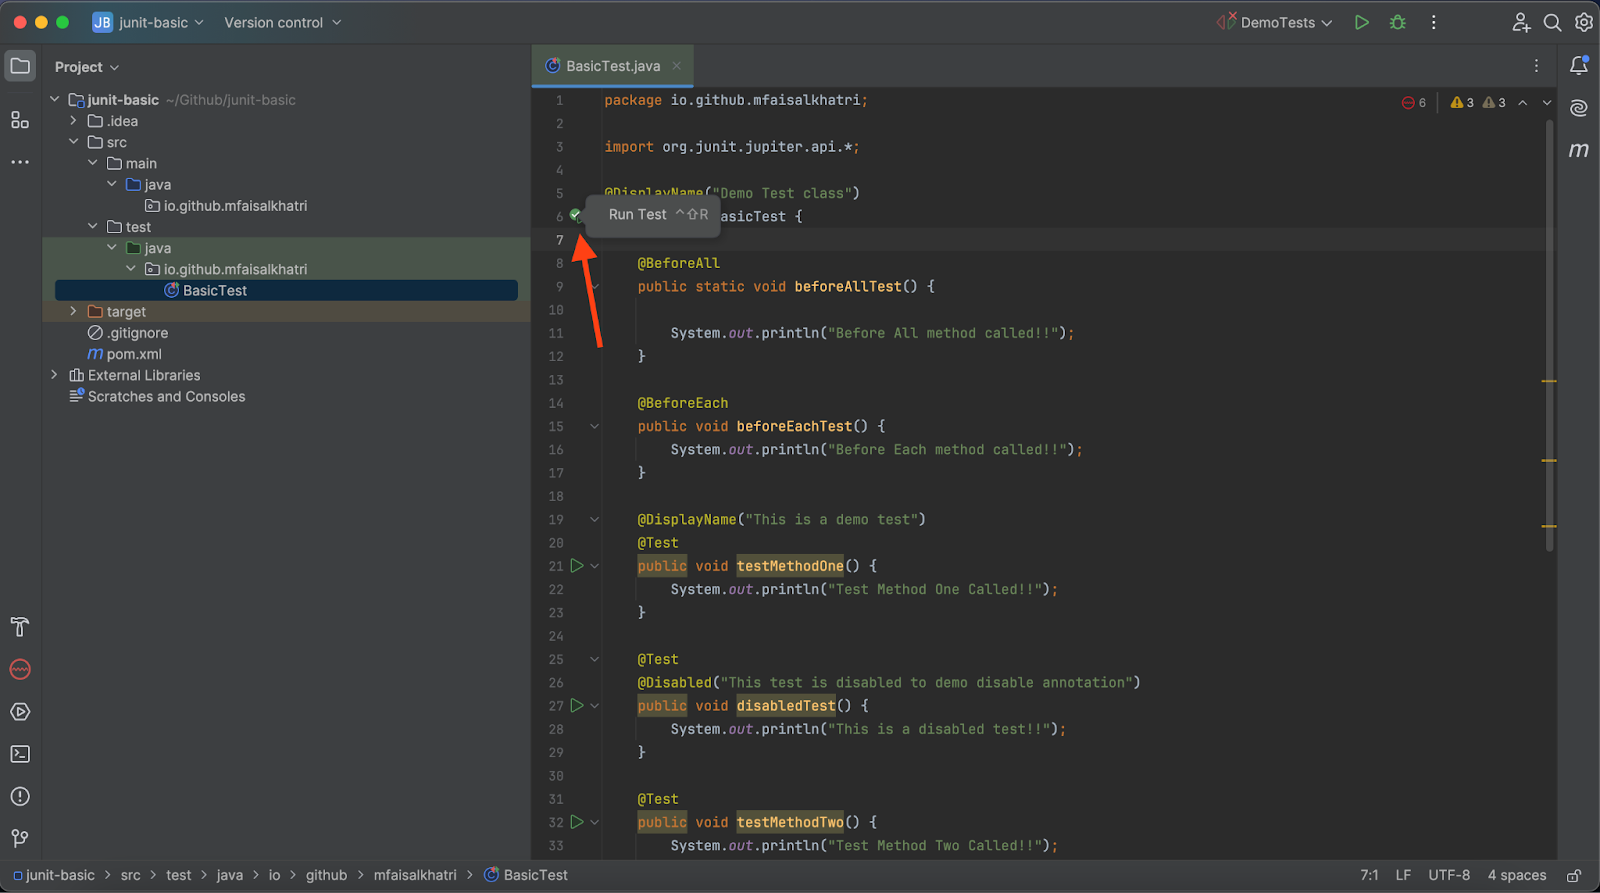
可以通過右鍵單擊測試類並選擇運行 ‘<測試類名稱>’ 來執行測試 (在我們的例子中是“BasicTest”)。

另一種方法是單擊測試類聲明旁邊的綠色播放圖標,如下圖所示:
以下來自 IntelliJ IDE 的截圖顯示測試已成功執行。
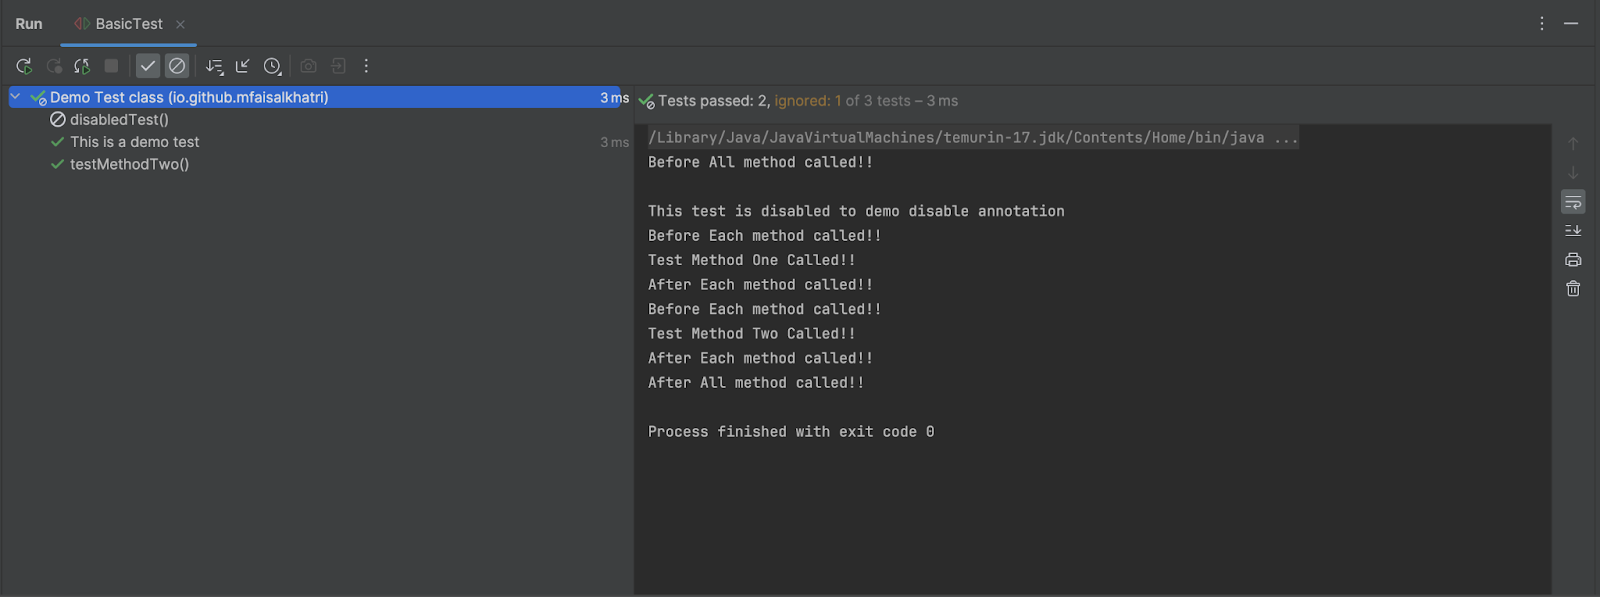
從上面的截圖可以看到,測試類的顯示名稱已經打印出來,還可以看到禁用的測試,以及禁用測試的原因已在控制台中打印。
剩下的所有測試方法,包括 beforetest 和 aftertest 方法,都已成功執行,並且相應的結果已打印在控制台上。
總結
JUnit 5 是一個強大的測試框架,開發人員用它來執行 代碼的單元測試。它也被測試自動化工程師用來編寫和運行測試自動化腳本。它擁有豐富的功能,使開發人員和測試人員能夠編寫測試腳本並執行代碼的單元測試。
它還提供多種方法來執行斷言和驗證,這在編寫自動化測試時非常方便。除了編寫和運行測試腳本外,它還提供了一個測試報告,可以用來向利益相關者演示測試執行結果,以展示測試覆蓋率。
快樂測試!
Source:
https://dzone.com/articles/beginners-guide-to-junit-5