Spring 事務管理 是 Spring 框架中最廣泛使用和重要的功能之一。在任何企業應用程序中,事務管理都是一個微不足道的任務。我們已經學會如何使用 JDBC API 進行事務管理。Spring 為事務管理提供了廣泛的支持,幫助開發人員更多地專注於業務邏輯,而不必擔心系統故障時數據的完整性。
Spring 事務管理
- 支持聲明式事務管理。在這個模型中,Spring 使用 AOP 覆蓋事務方法來提供數據完整性。這是首選方法,在大多數情況下都有效。
- 支援大多數交易API,例如JDBC、Hibernate、JPA、JDO、JTA等。我們只需要使用適當的交易管理器實現類。例如對於JDBC交易管理,可以使用
org.springframework.jdbc.datasource.DriverManagerDataSource,對於使用Hibernate作為ORM工具的情況,可以使用org.springframework.orm.hibernate3.HibernateTransactionManager。 - 通過使用
TransactionTemplate或PlatformTransactionManager實現,支援程式化交易管理。
大多數我們想要在交易管理器中的功能都受到聲明式交易管理的支持,因此我們將使用這種方法來進行我們的示例項目。
Spring交易管理JDBC示例
我們將創建一個簡單的Spring JDBC項目,在其中我們將在單個事務中更新多個表。只有當所有JDBC語句成功執行時,事務才應該提交,否則應該回滾以避免數據不一致。如果您了解JDBC事務管理,您可能會認為我們可以通過將連接的自動提交設置為false來輕鬆實現,並根據所有語句的結果,提交或回滾事務。顯然,我們可以這樣做,但這將導致很多模板代碼僅用於事務管理。同樣的代碼也將存在於我們尋找事務管理的所有地方,導致緊密耦合且難以維護的代碼。Spring聲明式事務管理通過使用面向切面編程實現鬆散耦合和避免我們應用程序中的模板代碼,解決了這些問題。讓我們通過一個簡單的例子來看看Spring是如何實現的。在我們開始Spring項目之前,讓我們為我們的用途進行一些數據庫設置。
Spring事務管理-數據庫設置
我們將為我們的用途創建兩個表,並在單個事務中更新它們。
CREATE TABLE `Customer` (
  `id` int(11) unsigned NOT NULL,
  `name` varchar(20) DEFAULT NULL,
  PRIMARY KEY (`id`)
) ENGINE=InnoDB DEFAULT CHARSET=utf8;
CREATE TABLE `Address` (
  `id` int(11) unsigned NOT NULL,
  `address` varchar(20) DEFAULT NULL,
  `country` varchar(20) DEFAULT NULL,
  PRIMARY KEY (`id`)
) ENGINE=InnoDB DEFAULT CHARSET=utf8;
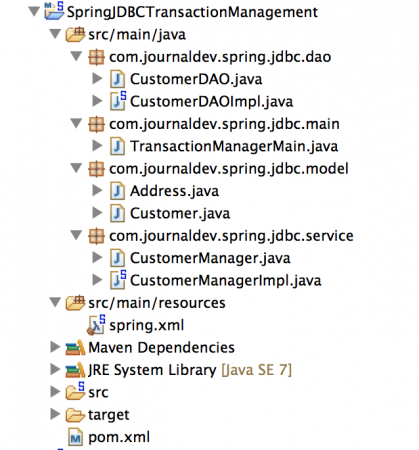
我們可以在這裡從Address id列定義到Customer id列的外鍵關係,但為了簡單起見,我在這裡沒有定義任何約束。我們的數據庫設置已經為Spring事務管理項目做好準備,讓我們在Spring Tool Suite中創建一個簡單的Spring Maven項目。我們的最終項目結構將如下圖所示。  讓我們一一查看每個部分,它們將共同提供一個帶有JDBC的簡單Spring事務管理示例。
Spring事務管理 – Maven依賴項
由於我們使用JDBC API,我們必須在應用程序中包含spring-jdbc依賴項。我們還需要MySQL數據庫驅動程序來連接到mysql數據庫,因此我們還將包含mysql-connector-java依賴項。 spring-tx工件提供事務管理依賴項,通常由STS自動包含,但如果沒有,則您也需要包含它。您可能會看到一些用於日誌記錄和單元測試的其他依賴項,但我們將不使用它們中的任何一個。我們的最終pom.xml文件看起來像下面的代碼。
<project xmlns="https://maven.apache.org/POM/4.0.0" xmlns:xsi="https://www.w3.org/2001/XMLSchema-instance"
	xsi:schemaLocation="https://maven.apache.org/POM/4.0.0 https://maven.apache.org/xsd/maven-4.0.0.xsd">
	<modelVersion>4.0.0</modelVersion>
	<groupId>org.springframework.samples</groupId>
	<artifactId>SpringJDBCTransactionManagement</artifactId>
	<version>0.0.1-SNAPSHOT</version>

	<properties>

		<!-- Generic properties -->
		<java.version>1.7</java.version>
		<project.build.sourceEncoding>UTF-8</project.build.sourceEncoding>
		<project.reporting.outputEncoding>UTF-8</project.reporting.outputEncoding>

		<!-- Spring -->
		<spring-framework.version>4.0.2.RELEASE</spring-framework.version>

		<!-- Logging -->
		<logback.version>1.0.13</logback.version>
		<slf4j.version>1.7.5</slf4j.version>

		<!-- Test -->
		<junit.version>4.11</junit.version>

	</properties>

	<dependencies>
		<!-- Spring and Transactions -->
		<dependency>
			<groupId>org.springframework</groupId>
			<artifactId>spring-context</artifactId>
			<version>${spring-framework.version}</version>
		</dependency>
		<dependency>
			<groupId>org.springframework</groupId>
			<artifactId>spring-tx</artifactId>
			<version>${spring-framework.version}</version>
		</dependency>

		<!-- Spring JDBC and MySQL Driver -->
		<dependency>
			<groupId>org.springframework</groupId>
			<artifactId>spring-jdbc</artifactId>
			<version>${spring-framework.version}</version>
		</dependency>
		<dependency>
			<groupId>mysql</groupId>
			<artifactId>mysql-connector-java</artifactId>
			<version>5.0.5</version>
		</dependency>

		<!-- Logging with SLF4J & LogBack -->
		<dependency>
			<groupId>org.slf4j</groupId>
			<artifactId>slf4j-api</artifactId>
			<version>${slf4j.version}</version>
			<scope>compile</scope>
		</dependency>
		<dependency>
			<groupId>ch.qos.logback</groupId>
			<artifactId>logback-classic</artifactId>
			<version>${logback.version}</version>
			<scope>runtime</scope>
		</dependency>

		<!-- Test Artifacts -->
		<dependency>
			<groupId>org.springframework</groupId>
			<artifactId>spring-test</artifactId>
			<version>${spring-framework.version}</version>
			<scope>test</scope>
		</dependency>
		<dependency>
			<groupId>junit</groupId>
			<artifactId>junit</artifactId>
			<version>${junit.version}</version>
			<scope>test</scope>
		</dependency>

	</dependencies>
</project>
I have updated the Spring versions to the latest one as of today. Make sure MySQL database driver is compatible with your mysql installation.
Spring 交易管理 – 模型類別
我們將創建兩個 Java Beans,Customer 和 Address,它們將映射到我們的表格。
package com.journaldev.spring.jdbc.model;

public class Address {

	private int id;
	private String address;
	private String country;

	public int getId() {
		return id;
	}
	public void setId(int id) {
		this.id = id;
	}
	public String getAddress() {
		return address;
	}
	public void setAddress(String address) {
		this.address = address;
	}
	public String getCountry() {
		return country;
	}
	public void setCountry(String country) {
		this.country = country;
	}

}
package com.journaldev.spring.jdbc.model;

public class Customer {

	private int id;
	private String name;
	private Address address;

	public int getId() {
		return id;
	}
	public void setId(int id) {
		this.id = id;
	}
	public String getName() {
		return name;
	}
	public void setName(String name) {
		this.name = name;
	}
	public Address getAddress() {
		return address;
	}
	public void setAddress(Address address) {
		this.address = address;
	}

}
請注意,Customer bean 將 Address 視為其變數之一。當我們為 Customer 實現 DAO 時,我們將獲取客戶和地址表的數據,並為這些表執行兩個獨立的插入查詢,這就是為什麼我們需要事務管理來避免數據不一致的原因。
Spring 交易管理 – DAO 實現
讓我們為 Customer bean 實現 DAO,為了簡單起見,我們將只有一個方法來在客戶和地址表中插入記錄。
package com.journaldev.spring.jdbc.dao;

import com.journaldev.spring.jdbc.model.Customer;

public interface CustomerDAO {

	public void create(Customer customer);
}
package com.journaldev.spring.jdbc.dao;

import javax.sql.DataSource;

import org.springframework.jdbc.core.JdbcTemplate;

import com.journaldev.spring.jdbc.model.Customer;

public class CustomerDAOImpl implements CustomerDAO {

	private DataSource dataSource;

	public void setDataSource(DataSource dataSource) {
		this.dataSource = dataSource;
	}

	@Override
	public void create(Customer customer) {
		String queryCustomer = "insert into Customer (id, name) values (?,?)";
		String queryAddress = "insert into Address (id, address,country) values (?,?,?)";

		JdbcTemplate jdbcTemplate = new JdbcTemplate(dataSource);

		jdbcTemplate.update(queryCustomer, new Object[] { customer.getId(),
				customer.getName() });
		System.out.println("Inserted into Customer Table Successfully");
		jdbcTemplate.update(queryAddress, new Object[] { customer.getId(),
				customer.getAddress().getAddress(),
				customer.getAddress().getCountry() });
		System.out.println("Inserted into Address Table Successfully");
	}

}
請注意,CustomerDAO 實現沒有處理事務管理。這樣我們就實現了關注點的分離,因為有時我們會從第三方獲取 DAO 實現,而我們無法控制這些類別。
Spring 声明式事务管理 – 服务
让我们创建一个客户服务,该服务将使用 CustomerDAO 实现,并在单个方法中向客户和地址表插入记录时提供事务管理。
package com.journaldev.spring.jdbc.service;

import com.journaldev.spring.jdbc.model.Customer;

public interface CustomerManager {

	public void createCustomer(Customer cust);
}
package com.journaldev.spring.jdbc.service;

import org.springframework.transaction.annotation.Transactional;

import com.journaldev.spring.jdbc.dao.CustomerDAO;
import com.journaldev.spring.jdbc.model.Customer;

public class CustomerManagerImpl implements CustomerManager {

	private CustomerDAO customerDAO;

	public void setCustomerDAO(CustomerDAO customerDAO) {
		this.customerDAO = customerDAO;
	}

	@Override
	@Transactional
	public void createCustomer(Customer cust) {
		customerDAO.create(cust);
	}

}
如果您注意 CustomerManager 实现,它只是使用 CustomerDAO 实现来创建客户,但通过在 createCustomer() 方法上使用 @Transactional 注解提供声明式事务管理。这就是我们在代码中需要做的一切,以获得 Spring 事务管理的好处。@Transactional 注解可以应用于方法以及整个类。如果您希望所有方法都具有事务管理功能,应该使用此注解对类进行注释。在Java 注解教程中了解更多关于注解的信息。剩下的部分就是将 Spring bean 进行连接,以使 Spring 事务管理示例正常工作。
Spring 事务管理 – Bean 配置
創建名為“spring.xml”的Spring Bean配置文件。我們將在測試程序中使用它來連接Spring Beans並執行我們的JDBC程序以測試事務管理。
<?xml version="1.0" encoding="UTF-8"?>
<beans xmlns="https://www.springframework.org/schema/beans"
	xmlns:xsi="https://www.w3.org/2001/XMLSchema-instance" xmlns:context="https://www.springframework.org/schema/context"
	xmlns:tx="https://www.springframework.org/schema/tx"
	xsi:schemaLocation="https://www.springframework.org/schema/beans https://www.springframework.org/schema/beans/spring-beans.xsd
		https://www.springframework.org/schema/context https://www.springframework.org/schema/context/spring-context-4.0.xsd
		https://www.springframework.org/schema/tx https://www.springframework.org/schema/tx/spring-tx-4.0.xsd">

	<!-- Enable Annotation based Declarative Transaction Management -->
	<tx:annotation-driven proxy-target-class="true"
		transaction-manager="transactionManager" />

	<!-- Creating TransactionManager Bean, since JDBC we are creating of type
		DataSourceTransactionManager -->
	<bean id="transactionManager"
		class="org.springframework.jdbc.datasource.DataSourceTransactionManager">
		<property name="dataSource" ref="dataSource" />
	</bean>

	<!-- MySQL DB DataSource -->
	<bean id="dataSource"
		class="org.springframework.jdbc.datasource.DriverManagerDataSource">

		<property name="driverClassName" value="com.mysql.jdbc.Driver" />
		<property name="url" value="jdbc:mysql://localhost:3306/TestDB" />
		<property name="username" value="pankaj" />
		<property name="password" value="pankaj123" />
	</bean>

	<bean id="customerDAO" class="com.journaldev.spring.jdbc.dao.CustomerDAOImpl">
		<property name="dataSource" ref="dataSource"></property>
	</bean>

	<bean id="customerManager" class="com.journaldev.spring.jdbc.service.CustomerManagerImpl">
		<property name="customerDAO" ref="customerDAO"></property>
	</bean>

</beans>
Spring Bean配置文件中需要注意的重要點如下:
- tx:annotation-driven元素用於告訴Spring上下文我們使用基於注解的事務管理配置。transaction-manager屬性用於提供事務管理器的Bean名稱。transaction-manager的默認值為transactionManager,但為避免混淆,我仍然將其明確指定。proxy-target-class屬性用於告訴Spring上下文使用基於類的代理,如果不指定,則會出現運行時異常,例如Exception in thread “main” org.springframework.beans.factory.BeanNotOfRequiredTypeException: Bean named ‘customerManager’ must be of type [com.journaldev.spring.jdbc.service.CustomerManagerImpl], but was actually of type [com.sun.proxy.$Proxy6]
- 由於我們使用JDBC,因此我們創建了一個類型為
org.springframework.jdbc.datasource.DataSourceTransactionManager的transactionManager Bean。這非常重要,我們應根據我們的事務API使用適當的事務管理器實現類。 - dataSource Bean用於創建DataSource對象,我們需要提供數據庫配置屬性,如driverClassName、url、username和password。請根據您的本地設置更改這些值。
- 我們正在將dataSource注入到customerDAO bean 中。同樣地,我們正在將customerDAO bean 注入到customerManager bean 定義中。
我們的設置已經完成,現在讓我們創建一個簡單的測試類來測試我們的事務管理實現。
package com.journaldev.spring.jdbc.main;

import org.springframework.context.support.ClassPathXmlApplicationContext;

import com.journaldev.spring.jdbc.model.Address;
import com.journaldev.spring.jdbc.model.Customer;
import com.journaldev.spring.jdbc.service.CustomerManager;
import com.journaldev.spring.jdbc.service.CustomerManagerImpl;

public class TransactionManagerMain {

	public static void main(String[] args) {
		ClassPathXmlApplicationContext ctx = new ClassPathXmlApplicationContext(
				"spring.xml");

		CustomerManager customerManager = ctx.getBean("customerManager",
				CustomerManagerImpl.class);

		Customer cust = createDummyCustomer();
		customerManager.createCustomer(cust);

		ctx.close();
	}

	private static Customer createDummyCustomer() {
		Customer customer = new Customer();
		customer.setId(2);
		customer.setName("Pankaj");
		Address address = new Address();
		address.setId(2);
		address.setCountry("India");
		// 設置值超過20個字符,這樣在將數據插入到地址表時會發生 SQLException
		address.setAddress("Albany Dr, San Jose, CA 95129");
		customer.setAddress(address);
		return customer;
	}

}
請注意,我明確地設置了地址列值太長,這樣在插入數據到地址表時會出現異常。現在當我們運行測試程序時,我們會得到以下輸出。
Mar 29, 2014 7:59:32 PM org.springframework.context.support.ClassPathXmlApplicationContext prepareRefresh
INFO: Refreshing org.springframework.context.support.ClassPathXmlApplicationContext@3fa99295: startup date [Sat Mar 29 19:59:32 PDT 2014]; root of context hierarchy
Mar 29, 2014 7:59:32 PM org.springframework.beans.factory.xml.XmlBeanDefinitionReader loadBeanDefinitions
INFO: Loading XML bean definitions from class path resource [spring.xml]
Mar 29, 2014 7:59:32 PM org.springframework.jdbc.datasource.DriverManagerDataSource setDriverClassName
INFO: Loaded JDBC driver: com.mysql.jdbc.Driver
Inserted into Customer Table Successfully
Mar 29, 2014 7:59:32 PM org.springframework.beans.factory.xml.XmlBeanDefinitionReader loadBeanDefinitions
INFO: Loading XML bean definitions from class path resource [org/springframework/jdbc/support/sql-error-codes.xml]
Mar 29, 2014 7:59:32 PM org.springframework.jdbc.support.SQLErrorCodesFactory <init>
INFO: SQLErrorCodes loaded: [DB2, Derby, H2, HSQL, Informix, MS-SQL, MySQL, Oracle, PostgreSQL, Sybase]
Exception in thread "main" org.springframework.dao.DataIntegrityViolationException: PreparedStatementCallback; SQL [insert into Address (id, address,country) values (?,?,?)]; Data truncation: Data too long for column 'address' at row 1; nested exception is com.mysql.jdbc.MysqlDataTruncation: Data truncation: Data too long for column 'address' at row 1
	at org.springframework.jdbc.support.SQLStateSQLExceptionTranslator.doTranslate(SQLStateSQLExceptionTranslator.java:100)
	at org.springframework.jdbc.support.AbstractFallbackSQLExceptionTranslator.translate(AbstractFallbackSQLExceptionTranslator.java:73)
	at org.springframework.jdbc.support.AbstractFallbackSQLExceptionTranslator.translate(AbstractFallbackSQLExceptionTranslator.java:81)
	at org.springframework.jdbc.support.AbstractFallbackSQLExceptionTranslator.translate(AbstractFallbackSQLExceptionTranslator.java:81)
	at org.springframework.jdbc.core.JdbcTemplate.execute(JdbcTemplate.java:658)
	at org.springframework.jdbc.core.JdbcTemplate.update(JdbcTemplate.java:907)
	at org.springframework.jdbc.core.JdbcTemplate.update(JdbcTemplate.java:968)
	at org.springframework.jdbc.core.JdbcTemplate.update(JdbcTemplate.java:978)
	at com.journaldev.spring.jdbc.dao.CustomerDAOImpl.create(CustomerDAOImpl.java:27)
	at com.journaldev.spring.jdbc.service.CustomerManagerImpl.createCustomer(CustomerManagerImpl.java:19)
	at com.journaldev.spring.jdbc.service.CustomerManagerImpl$$FastClassBySpringCGLIB$$84f71441.invoke(<generated>)
	at org.springframework.cglib.proxy.MethodProxy.invoke(MethodProxy.java:204)
	at org.springframework.aop.framework.CglibAopProxy$CglibMethodInvocation.invokeJoinpoint(CglibAopProxy.java:711)
	at org.springframework.aop.framework.ReflectiveMethodInvocation.proceed(ReflectiveMethodInvocation.java:157)
	at org.springframework.transaction.interceptor.TransactionInterceptor$1.proceedWithInvocation(TransactionInterceptor.java:98)
	at org.springframework.transaction.interceptor.TransactionAspectSupport.invokeWithinTransaction(TransactionAspectSupport.java:262)
	at org.springframework.transaction.interceptor.TransactionInterceptor.invoke(TransactionInterceptor.java:95)
	at org.springframework.aop.framework.ReflectiveMethodInvocation.proceed(ReflectiveMethodInvocation.java:179)
	at org.springframework.aop.framework.CglibAopProxy$DynamicAdvisedInterceptor.intercept(CglibAopProxy.java:644)
	at com.journaldev.spring.jdbc.service.CustomerManagerImpl$$EnhancerBySpringCGLIB$$891ec7ac.createCustomer(<generated>)
	at com.journaldev.spring.jdbc.main.TransactionManagerMain.main(TransactionManagerMain.java:20)
Caused by: com.mysql.jdbc.MysqlDataTruncation: Data truncation: Data too long for column 'address' at row 1
	at com.mysql.jdbc.MysqlIO.checkErrorPacket(MysqlIO.java:2939)
	at com.mysql.jdbc.MysqlIO.sendCommand(MysqlIO.java:1623)
	at com.mysql.jdbc.MysqlIO.sqlQueryDirect(MysqlIO.java:1715)
	at com.mysql.jdbc.Connection.execSQL(Connection.java:3249)
	at com.mysql.jdbc.PreparedStatement.executeInternal(PreparedStatement.java:1268)
	at com.mysql.jdbc.PreparedStatement.executeUpdate(PreparedStatement.java:1541)
	at com.mysql.jdbc.PreparedStatement.executeUpdate(PreparedStatement.java:1455)
	at com.mysql.jdbc.PreparedStatement.executeUpdate(PreparedStatement.java:1440)
	at org.springframework.jdbc.core.JdbcTemplate$2.doInPreparedStatement(JdbcTemplate.java:914)
	at org.springframework.jdbc.core.JdbcTemplate$2.doInPreparedStatement(JdbcTemplate.java:907)
	at org.springframework.jdbc.core.JdbcTemplate.execute(JdbcTemplate.java:642)
	... 16 more
請注意,日誌訊息顯示成功將數據插入到客戶表中,但MySQL數據庫驅動程序明確指出地址列的值太長而引發異常。現在,如果您檢查Customer表,您將找不到任何行,這意味著事務已完全回滾。如果您想知道事務管理的魔法出在哪裡,請仔細查看日誌並注意Spring框架創建的AOP和Proxy類。Spring框架使用環繞通知為CustomerManagerImpl生成代理類,僅在方法成功返回時提交事務。如果有任何異常,它只是回滾整個事務。我建議您閱讀Spring AOP Example以了解更多關於面向方面的編程模型的信息。這就是有關Spring事務管理示例的全部內容,從下面的鏈接下載示例項目並進行更多學習。
Source:
https://www.digitalocean.com/community/tutorials/spring-transaction-management-jdbc-example


