


Spring 是最廣泛使用的 Java EE 框架之一。 我們之前已經看過如何使用 Spring MVC 來創建基於 Java 的 Web 應用程序。 今天我們將學習使用 Spring MVC 創建 Spring Restful Web Services,然後使用 Rest 客戶端進行測試。 最後,我們還將研究如何使用 Spring RestTemplate API 調用 Spring Restful Web 服務。 
Spring REST
我們將使用 Spring 的最新版本 4.0.0.RELEASE 並利用 Spring Jackson JSON 整合來在 rest call 響應中發送 JSON 響應。該教程是在 Spring STS IDE 中開發的,用於輕鬆創建 Spring MVC 骨架代碼,然後擴展以實現 Restful 架構。在 STS 中創建一個新的 Spring MVC 項目,我們的最終項目將看起來像下面的圖片。我們將逐一查看每個組件。
Spring REST 配置 XML 文件
我們的 pom.xml 文件如下所示。
<?xml version="1.0" encoding="UTF-8"?>
<project xmlns="https://maven.apache.org/POM/4.0.0" xmlns:xsi="https://www.w3.org/2001/XMLSchema-instance"
	xsi:schemaLocation="https://maven.apache.org/POM/4.0.0 https://maven.apache.org/maven-v4_0_0.xsd">
	<modelVersion>4.0.0</modelVersion>
	<groupId>com.journaldev</groupId>
	<artifactId>SpringRestExample</artifactId>
	<name>SpringRestExample</name>
	<packaging>war</packaging>
	<version>1.0.0-BUILD-SNAPSHOT</version>
	<properties>
		<java-version>1.6</java-version>
		<org.springframework-version>4.0.0.RELEASE</org.springframework-version>
		<org.aspectj-version>1.7.4</org.aspectj-version>
		<org.slf4j-version>1.7.5</org.slf4j-version>
		<jackson.databind-version>2.2.3</jackson.databind-version>
	</properties>
	<dependencies>
		<!-- Jackson -->
		<dependency>
			<groupId>com.fasterxml.jackson.core</groupId>
			<artifactId>jackson-databind</artifactId>
			<version>${jackson.databind-version}</version>
		</dependency>
		<!-- Spring -->
		<dependency>
			<groupId>org.springframework</groupId>
			<artifactId>spring-context</artifactId>
			<version>${org.springframework-version}</version>
			<exclusions>
				<!-- Exclude Commons Logging in favor of SLF4j -->
				<exclusion>
					<groupId>commons-logging</groupId>
					<artifactId>commons-logging</artifactId>
				</exclusion>
			</exclusions>
		</dependency>
		<dependency>
			<groupId>org.springframework</groupId>
			<artifactId>spring-webmvc</artifactId>
			<version>${org.springframework-version}</version>
		</dependency>

		<!-- AspectJ -->
		<dependency>
			<groupId>org.aspectj</groupId>
			<artifactId>aspectjrt</artifactId>
			<version>${org.aspectj-version}</version>
		</dependency>

		<!-- Logging -->
		<dependency>
			<groupId>org.slf4j</groupId>
			<artifactId>slf4j-api</artifactId>
			<version>${org.slf4j-version}</version>
		</dependency>
		<dependency>
			<groupId>org.slf4j</groupId>
			<artifactId>jcl-over-slf4j</artifactId>
			<version>${org.slf4j-version}</version>
			<scope>runtime</scope>
		</dependency>
		<dependency>
			<groupId>org.slf4j</groupId>
			<artifactId>slf4j-log4j12</artifactId>
			<version>${org.slf4j-version}</version>
			<scope>runtime</scope>
		</dependency>
		<dependency>
			<groupId>log4j</groupId>
			<artifactId>log4j</artifactId>
			<version>1.2.15</version>
			<exclusions>
				<exclusion>
					<groupId>javax.mail</groupId>
					<artifactId>mail</artifactId>
				</exclusion>
				<exclusion>
					<groupId>javax.jms</groupId>
					<artifactId>jms</artifactId>
				</exclusion>
				<exclusion>
					<groupId>com.sun.jdmk</groupId>
					<artifactId>jmxtools</artifactId>
				</exclusion>
				<exclusion>
					<groupId>com.sun.jmx</groupId>
					<artifactId>jmxri</artifactId>
				</exclusion>
			</exclusions>
			<scope>runtime</scope>
		</dependency>

		<!-- @Inject -->
		<dependency>
			<groupId>javax.inject</groupId>
			<artifactId>javax.inject</artifactId>
			<version>1</version>
		</dependency>

		<!-- Servlet -->
		<dependency>
			<groupId>javax.servlet</groupId>
			<artifactId>servlet-api</artifactId>
			<version>2.5</version>
			<scope>provided</scope>
		</dependency>
		<dependency>
			<groupId>javax.servlet.jsp</groupId>
			<artifactId>jsp-api</artifactId>
			<version>2.1</version>
			<scope>provided</scope>
		</dependency>
		<dependency>
			<groupId>javax.servlet</groupId>
			<artifactId>jstl</artifactId>
			<version>1.2</version>
		</dependency>

		<!-- Test -->
		<dependency>
			<groupId>junit</groupId>
			<artifactId>junit</artifactId>
			<version>4.7</version>
			<scope>test</scope>
		</dependency>
	</dependencies>
	<build>
		<plugins>
			<plugin>
				<artifactId>maven-eclipse-plugin</artifactId>
				<version>2.9</version>
				<configuration>
					<additionalProjectnatures>
						<projectnature>org.springframework.ide.eclipse.core.springnature</projectnature>
					</additionalProjectnatures>
					<additionalBuildcommands>
						<buildcommand>org.springframework.ide.eclipse.core.springbuilder</buildcommand>
					</additionalBuildcommands>
					<downloadSources>true</downloadSources>
					<downloadJavadocs>true</downloadJavadocs>
				</configuration>
			</plugin>
			<plugin>
				<groupId>org.apache.maven.plugins</groupId>
				<artifactId>maven-compiler-plugin</artifactId>
				<version>2.5.1</version>
				<configuration>
					<source>1.6</source>
					<target>1.6</target>
					<compilerArgument>-Xlint:all</compilerArgument>
					<showWarnings>true</showWarnings>
					<showDeprecation>true</showDeprecation>
				</configuration>
			</plugin>
			<plugin>
				<groupId>org.codehaus.mojo</groupId>
				<artifactId>exec-maven-plugin</artifactId>
				<version>1.2.1</version>
				<configuration>
					<mainClass>org.test.int1.Main</mainClass>
				</configuration>
			</plugin>
		</plugins>

	</build>
</project>
STS 工具為我們生成了 pom.xml 文件。但是,我已將 Spring Framework、AspectJ、SLF4J 和 Jackson 版本更新為今天的最新版本。大部分內容都是通用且自動生成的,值得注意的重點是我已經將 Jackson JSON 函式庫添加到依賴中,因為我們將使用它將對象轉換為 JSON,反之亦然。
<?xml version="1.0" encoding="UTF-8"?>
<web-app version="2.5" xmlns="https://java.sun.com/xml/ns/javaee"
	xmlns:xsi="https://www.w3.org/2001/XMLSchema-instance"
	xsi:schemaLocation="https://java.sun.com/xml/ns/javaee https://java.sun.com/xml/ns/javaee/web-app_2_5.xsd">

	<!-- The definition of the Root Spring Container shared by all Servlets and Filters -->
	<context-param>
		<param-name>contextConfigLocation</param-name>
		<param-value>/WEB-INF/spring/root-context.xml</param-value>
	</context-param>

	<!-- Creates the Spring Container shared by all Servlets and Filters -->
	<listener>
		<listener-class>org.springframework.web.context.ContextLoaderListener</listener-class>
	</listener>

	<!-- Processes application requests -->
	<servlet>
		<servlet-name>appServlet</servlet-name>
		<servlet-class>org.springframework.web.servlet.DispatcherServlet</servlet-class>
		<init-param>
			<param-name>contextConfigLocation</param-name>
			<param-value>/WEB-INF/spring/appServlet/servlet-context.xml</param-value>
		</init-param>
		<load-on-startup>1</load-on-startup>
	</servlet>

	<servlet-mapping>
		<servlet-name>appServlet</servlet-name>
		<url-pattern>/</url-pattern>
	</servlet-mapping>

</web-app>
此檔案是自動生成的,我並未對其進行任何更改。但是,如果您想要更改上下文配置檔案及其位置,您可以在web.xml檔案中進行設定。
<?xml version="1.0" encoding="UTF-8"?>
<beans xmlns="https://www.springframework.org/schema/beans"
	xmlns:xsi="https://www.w3.org/2001/XMLSchema-instance"
	xsi:schemaLocation="https://www.springframework.org/schema/beans https://www.springframework.org/schema/beans/spring-beans.xsd">

	<!-- Root Context: defines shared resources visible to all other web components -->

</beans>
該檔案包含將對所有網絡組件可見的共享資源,我們將開發一個簡單的REST服務,因此在這裡我並未進行任何更改。
<?xml version="1.0" encoding="UTF-8"?>
<beans:beans xmlns="https://www.springframework.org/schema/mvc"
	xmlns:xsi="https://www.w3.org/2001/XMLSchema-instance"
	xmlns:beans="https://www.springframework.org/schema/beans"
	xmlns:context="https://www.springframework.org/schema/context"
	xsi:schemaLocation="https://www.springframework.org/schema/mvc https://www.springframework.org/schema/mvc/spring-mvc.xsd
		https://www.springframework.org/schema/beans https://www.springframework.org/schema/beans/spring-beans.xsd
		https://www.springframework.org/schema/context https://www.springframework.org/schema/context/spring-context.xsd">

	<!-- DispatcherServlet Context: defines this servlet's request-processing infrastructure -->

	<!-- Enables the Spring MVC @Controller programming model -->
	<annotation-driven />

	<!-- Handles HTTP GET requests for /resources/** by efficiently serving up static resources in the ${webappRoot}/resources directory -->
	<resources mapping="/resources/**" location="/resources/" />

	<!-- Resolves views selected for rendering by @Controllers to .jsp resources in the /WEB-INF/views directory -->
	<beans:bean class="org.springframework.web.servlet.view.InternalResourceViewResolver">
		<beans:property name="prefix" value="/WEB-INF/views/" />
		<beans:property name="suffix" value=".jsp" />
	</beans:bean>

	<!-- Configure to plugin JSON as request and response in method handler -->
	<beans:bean class="org.springframework.web.servlet.mvc.method.annotation.RequestMappingHandlerAdapter">
		<beans:property name="messageConverters">
			<beans:list>
				<beans:ref bean="jsonMessageConverter"/>
			</beans:list>
		</beans:property>
	</beans:bean>

	<!-- Configure bean to convert JSON to POJO and vice versa -->
	<beans:bean id="jsonMessageConverter" class="org.springframework.http.converter.json.MappingJackson2HttpMessageConverter">
	</beans:bean>

	<context:component-scan base-package="com.journaldev.spring.controller" />

</beans:beans>
大部分內容都是自動生成的並包含樣板配置。但是需要注意的重要點是使用annotation-driven元素支持基於註解的配置,並將MappingJackson2HttpMessageConverter插入到RequestMappingHandlerAdapter的messageConverters中,以使Jackson API發揮作用並將JSON轉換為Java Beans及其反向操作。通過這個配置,我們將在請求主體中使用JSON並在響應中接收JSON數據。
Spring REST模型類
讓我們編寫一個簡單的POJO類,它將作為我們的RESTful Web服務方法的輸入和輸出。
package com.journaldev.spring.model;

import java.io.Serializable;
import java.util.Date;

import com.fasterxml.jackson.databind.annotation.JsonSerialize;
import com.fasterxml.jackson.databind.ser.std.DateSerializer;

public class Employee implements Serializable{

	private static final long serialVersionUID = -7788619177798333712L;

	private int id;
	private String name;
	private Date createdDate;

	public int getId() {
		return id;
	}
	public void setId(int id) {
		this.id = id;
	}
	public String getName() {
		return name;
	}
	public void setName(String name) {
		this.name = name;
	}

	@JsonSerialize(using=DateSerializer.class)
	public Date getCreatedDate() {
		return createdDate;
	}
	public void setCreatedDate(Date createdDate) {
		this.createdDate = createdDate;
	}


}
唯一需要注意的重點是使用@JsonSerialize註解來使用DateSerializer類進行從Java類型到JSON格式的日期轉換及其反向操作。
Spring Restful 網絡服務端點
我們將擁有以下 REST 網絡服務端點。
| Sl. No | URI | HTTP Method | Details |
|---|---|---|---|
| 1 | /rest/emp/dummy | GET | Health Check service, to insert a dummy data in the Employees data storage |
| 2 | /rest/emp/{id} | GET | To get the Employee object based on the id |
| 3 | /rest/emps | GET | To get the list of all the Employees in the data store |
| 4 | /rest/emp/create | POST | To create the Employee object and store it |
| 5 | /rest/emp/delete/{id} | PUT | To delete the Employee object from the data storage based on the id |
我們有一個類定義了所有這些 URI 為字符串常量。
package com.journaldev.spring.controller;

public class EmpRestURIConstants {

	public static final String DUMMY_EMP = "/rest/emp/dummy";
	public static final String GET_EMP = "/rest/emp/{id}";
	public static final String GET_ALL_EMP = "/rest/emps";
	public static final String CREATE_EMP = "/rest/emp/create";
	public static final String DELETE_EMP = "/rest/emp/delete/{id}";
}
Spring Restful 網絡服務控制器類
我們的 EmployeeController 類將發布上述所有網絡服務端點。讓我們先看一下類的代碼,然後我們將詳細了解每個方法。
package com.journaldev.spring.controller;

import java.util.ArrayList;
import java.util.Date;
import java.util.HashMap;
import java.util.List;
import java.util.Map;
import java.util.Set;

import org.slf4j.Logger;
import org.slf4j.LoggerFactory;
import org.springframework.stereotype.Controller;
import org.springframework.web.bind.annotation.PathVariable;
import org.springframework.web.bind.annotation.RequestBody;
import org.springframework.web.bind.annotation.RequestMapping;
import org.springframework.web.bind.annotation.RequestMethod;
import org.springframework.web.bind.annotation.ResponseBody;

import com.journaldev.spring.model.Employee;

/**
 * Handles requests for the Employee service.
 */
@Controller
public class EmployeeController {

	private static final Logger logger = LoggerFactory.getLogger(EmployeeController.class);

	//Map 以存儲員工,理想情況下應該使用數據庫
	Map empData = new HashMap();

	@RequestMapping(value = EmpRestURIConstants.DUMMY_EMP, method = RequestMethod.GET)
	public @ResponseBody Employee getDummyEmployee() {
		logger.info("Start getDummyEmployee");
		Employee emp = new Employee();
		emp.setId(9999);
		emp.setName("Dummy");
		emp.setCreatedDate(new Date());
		empData.put(9999, emp);
		return emp;
	}

	@RequestMapping(value = EmpRestURIConstants.GET_EMP, method = RequestMethod.GET)
	public @ResponseBody Employee getEmployee(@PathVariable("id") int empId) {
		logger.info("Start getEmployee. ID="+empId);

		return empData.get(empId);
	}

	@RequestMapping(value = EmpRestURIConstants.GET_ALL_EMP, method = RequestMethod.GET)
	public @ResponseBody List getAllEmployees() {
		logger.info("Start getAllEmployees.");
		List emps = new ArrayList();
		Set empIdKeys = empData.keySet();
		for(Integer i : empIdKeys){
			emps.add(empData.get(i));
		}
		return emps;
	}

	@RequestMapping(value = EmpRestURIConstants.CREATE_EMP, method = RequestMethod.POST)
	public @ResponseBody Employee createEmployee(@RequestBody Employee emp) {
		logger.info("Start createEmployee.");
		emp.setCreatedDate(new Date());
		empData.put(emp.getId(), emp);
		return emp;
	}

	@RequestMapping(value = EmpRestURIConstants.DELETE_EMP, method = RequestMethod.PUT)
	public @ResponseBody Employee deleteEmployee(@PathVariable("id") int empId) {
		logger.info("Start deleteEmployee.");
		Employee emp = empData.get(empId);
		empData.remove(empId);
		return emp;
	}

}
為了簡單起見,我將所有員工的數據存儲在 HashMap empData 中。@RequestMapping註釋用於將請求 URI 映射到處理程序方法。我們還可以指定應用程序客戶端應該使用的 HTTP 方法來調用 rest 方法。@ResponseBody註釋用於將響應對象映射到響應主體中。一旦處理程序方法返回響應對象,MappingJackson2HttpMessageConverter 就會啟動並將其轉換為 JSON 響應。@PathVariable註釋是從 rest URI 中提取數據並將其映射到方法參數的簡單方法。@RequestBody註釋用於將請求主體 JSON 數據映射到員工對象中,同樣這是由 MappingJackson2HttpMessageConverter 映射完成的。其餘代碼簡單易懂,我們的應用程序已準備好部署和測試。只需將其導出為 WAR 文件並將其複製到 servlet 容器 Web 應用程序目錄中。如果您在 STS 中配置了服務器,只需運行它即可將其部署。我正在使用 WizTools RestClient 調用 rest 調用,但您也可以使用 Chrome 擴展 Postman。以下屏幕截圖顯示了我們應用程序公開的不同 rest API 調用及其輸出。Health Check – 獲取虛擬員工 Rest 調用  創建員工 POST Rest 調用: 確保請求 Content-Type 設置為 “application/json”,否則您將收到 HTTP 錯誤代碼 415。
 獲取員工 Rest 調用
  刪除員工 Rest 調用
 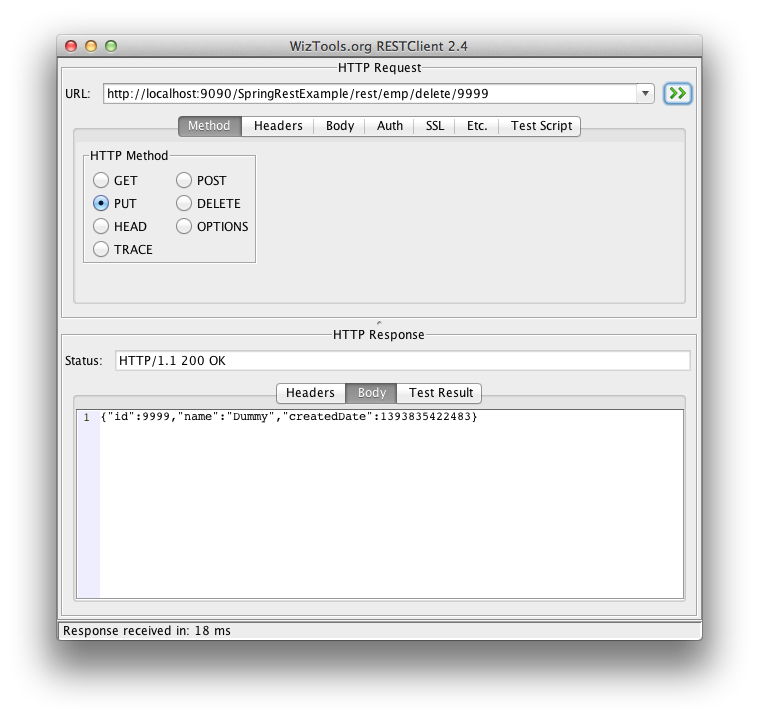 獲取所有員工 Rest 調用
Spring Rest Client 程式
Rest Clients 用於測試我們的 rest web 服務,但大多數時候,我們需要通過我們的程式調用 rest 服務。我們可以使用 Spring RestTemplate 輕鬆調用這些方法。以下是一個使用 RestTemplate API 調用我們應用程式 rest 方法的簡單程式。
package com.journaldev.spring;

import java.util.LinkedHashMap;
import java.util.List;

import org.springframework.web.client.RestTemplate;

import com.journaldev.spring.controller.EmpRestURIConstants;
import com.journaldev.spring.model.Employee;

public class TestSpringRestExample {

	public static final String SERVER_URI = "https://localhost:9090/SpringRestExample";

	public static void main(String args[]){

		testGetDummyEmployee();
		System.out.println("*****");
		testCreateEmployee();
		System.out.println("*****");
		testGetEmployee();
		System.out.println("*****");
		testGetAllEmployee();
	}

	private static void testGetAllEmployee() {
		RestTemplate restTemplate = new RestTemplate();
		//我們無法獲取 List 因為 JSON 轉換器不知道
		列表中對象的類型,因此將其轉換為默認的 JSON 對象類型 LinkedHashMap
		List emps = restTemplate.getForObject(SERVER_URI+EmpRestURIConstants.GET_ALL_EMP, List.class);
		System.out.println(emps.size());
		for(LinkedHashMap map : emps){
			System.out.println("ID="+map.get("id")+",Name="+map.get("name")+",CreatedDate="+map.get("createdDate"));;
		}
	}

	private static void testCreateEmployee() {
		RestTemplate restTemplate = new RestTemplate();
		Employee emp = new Employee();
		emp.setId(1);emp.setName("Pankaj Kumar");
		Employee response = restTemplate.postForObject(SERVER_URI+EmpRestURIConstants.CREATE_EMP, emp, Employee.class);
		printEmpData(response);
	}

	private static void testGetEmployee() {
		RestTemplate restTemplate = new RestTemplate();
		Employee emp = restTemplate.getForObject(SERVER_URI+"/rest/emp/1", Employee.class);
		printEmpData(emp);
	}

	private static void testGetDummyEmployee() {
		RestTemplate restTemplate = new RestTemplate();
		Employee emp = restTemplate.getForObject(SERVER_URI+EmpRestURIConstants.DUMMY_EMP, Employee.class);
		printEmpData(emp);
	}

	public static void printEmpData(Employee emp){
		System.out.println("ID="+emp.getId()+",Name="+emp.getName()+",CreatedDate="+emp.getCreatedDate());
	}
}
大多數程式很容易理解,但是當調用返回 Collection 的 rest 方法時,我們需要使用 LinkedHashMap,因為 JSON 對象轉換不了 Employee 對象,而是將其轉換為 LinkedHashMap 的集合。我們可以編寫一個實用方法將 LinkedHashMap 轉換為我們的 Java Bean 對象。當我們運行上面的程式時,我們在控制台中獲得以下輸出。
ID=9999,Name=Dummy,CreatedDate=Tue Mar 04 21:02:41 PST 2014
*****
ID=1,Name=Pankaj Kumar,CreatedDate=Tue Mar 04 21:02:41 PST 2014
*****
ID=1,Name=Pankaj Kumar,CreatedDate=Tue Mar 04 21:02:41 PST 2014
*****
2
ID=1,Name=Pankaj Kumar,CreatedDate=1393995761654
ID=9999,Name=Dummy,CreatedDate=1393995761381
另一個重點是 RestTemplate 的 put 方法沒有設置響應對象的選項,因為 PUT 方法應該用於將某些內容存儲在服務器上,並且一個簡單的 HTTP 200 狀態碼應該足夠。
這就是關於Spring Restful Web應用程序教程的全部內容。從上面的鏈接中下載示例項目並通過使用它來學習更多知識。更新:由於有很多要求提供類似的XML示例並支持XML和JSON,我在Spring REST XML JSON示例中擴展了這個應用程序,以支持XML和JSON的請求和響應。我強烈建議您通過這個示例來看到Spring框架的美妙之處以及實現這一點有多麼簡單。
您可以從我們的GitHub存儲庫中下載完整的項目。