在這個Spring MVC教程中,我們將學習如何使用Spring Tool Suite開發Spring MVC Web應用程序。Spring MVC框架廣泛用於Java Web應用程序。
Spring MVC
 就像Struts框架一樣,Spring MVC也是基於Java EE的Servlet和JSP技術實現的模型–視圖–控制器設計模式。
Spring MVC教程
我們之前已經看過 Spring 依賴注入 的工作原理,在這個教程中我們將學習如何使用 Spring MVC 框架創建一個簡單的網絡應用程序。可以使用 Eclipse 或 IntelliJ 這些 IDE 進行 Spring 項目的開發,但 SpringSource 提供了一個基於 Eclipse 的 IDE,稱為 Spring Tool Suite(STS),它內置了 VMware vFabric tc Server,該服務器是建立在 Apache Tomcat 容器之上,並且對於基於 Spring 的應用程序進行了優化。我將在 Spring MVC 教程 和其他未來的教程中使用 STS,因為它通過提供以下功能使開發者的生活更加輕鬆:
- 支持創建 Spring 應用程序的基本框架(MVC,Rest,Batch 等),非常適合從頭開始項目。我們很快就會在這個 Spring MVC 教程中看到創建 Spring MVC 項目有多麼簡單。
- 提供有用的功能,例如創建 Spring 配置文件,解析配置文件和類以提供有用的信息。
- 自動驗證 Spring 應用程序
- 支持重構以輕鬆進行項目更改,更改也會反映在配置文件中。
- 不僅對類,而且對配置文件也提供代碼輔助,我非常喜歡這個功能,因為大多數時候我們需要知道可以使用什麼以及它的詳細信息。
- 通過集成 AspectJ 提供最佳的面向對象編程(AOP)支持。
看到STS提供的所有功能,我立刻被它吸引,决定在Spring应用程序中使用它,到目前为止,我非常满意。只需从STS官方下载页面下载并安装即可。我正在使用基于Eclipse 4.3.1发布的STS 3.4.0.RELEASE版本。如果您不想使用STS,并想在现有的Eclipse中获得其功能,则需要从Eclipse Marketplace安装其插件。请参考下面的图片,并确保选择正确的STS版本进行安装。下面的插件适用于Eclipse Kepler。如果您不想使用SpringSource服务器,可以将应用程序部署到任何其他Java EE容器,如Tomcat、JBoss等。对于本教程,我将使用随STS一起提供的服务器,但我已经通过将其导出为WAR文件到独立的Tomcat服务器中进行了测试,一切正常。现在,我们的服务器环境和IDE已准备就绪,让我们继续创建我们的第一个Spring MVC项目。下面的步骤适用于STS以及带有STS插件的Eclipse。
在STS或Eclipse中创建Spring MVC应用程序
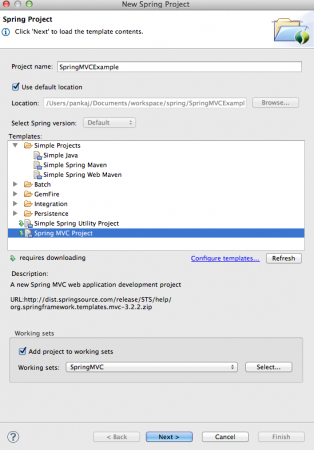
步驟1:從選單中建立新的Spring專案。 步驟2:在新專案視窗中,將名稱設為“SpringMVCExample”,並選擇模板為“Spring MVC專案”。如果您是第一次使用此模板,STS將從SpringSource網站下載它。如果需要,您可以將專案添加到任何工作集中。
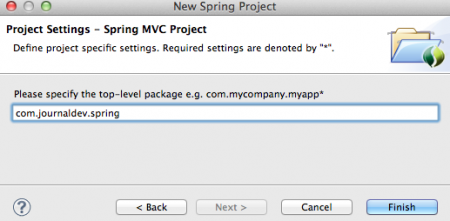
 步驟3:在模板下載完成後,在下一個畫面中需要提供頂級套件名稱。此套件將用作Spring元件的基礎套件。
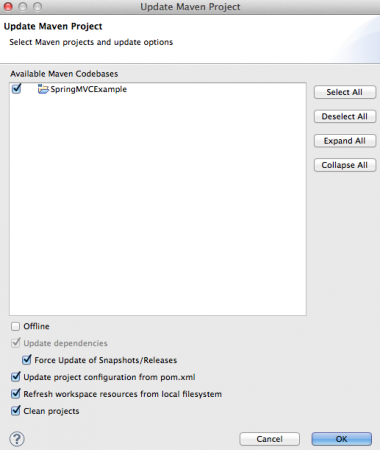
 步驟4:一旦使用Spring MVC模板建立專案,它將看起來像下面的圖片。如果您看不到User.java類別、login.jsp和user.jsp檔案,不要擔心,它們稍後由我添加。如果您的專案未編譯並且出現一些錯誤,請運行Maven/更新專案。請確保勾選“強制更新快照/發行版”選項,參考下面的圖片。
 整個專案看起來就像任何其他基於Maven的Web應用程序,附帶一些Spring配置檔案。現在是時候分析專案的不同部分並對其進行擴展了。
Spring MVC 依賴項
我們生成的pom.xml文件如下所示。
<?xml version="1.0" encoding="UTF-8"?>
<project xmlns="https://maven.apache.org/POM/4.0.0" xmlns:xsi="https://www.w3.org/2001/XMLSchema-instance"
	xsi:schemaLocation="https://maven.apache.org/POM/4.0.0 https://maven.apache.org/maven-v4_0_0.xsd">
	<modelVersion>4.0.0</modelVersion>
	<groupId>com.journaldev</groupId>
	<artifactId>SpringMVCExample</artifactId>
	<name>SpringMVCExample</name>
	<packaging>war</packaging>
	<version>1.0.0-BUILD-SNAPSHOT</version>
	<properties>
		<java-version>1.6</java-version>
		<org.springframework-version>4.0.0.RELEASE</org.springframework-version>
		<org.aspectj-version>1.7.4</org.aspectj-version>
		<org.slf4j-version>1.7.5</org.slf4j-version>
	</properties>
	<dependencies>
		<!-- Spring -->
		<dependency>
			<groupId>org.springframework</groupId>
			<artifactId>spring-context</artifactId>
			<version>${org.springframework-version}</version>
			<exclusions>
				<!-- Exclude Commons Logging in favor of SLF4j -->
				<exclusion>
					<groupId>commons-logging</groupId>
					<artifactId>commons-logging</artifactId>
				 </exclusion>
			</exclusions>
		</dependency>
		<dependency>
			<groupId>org.springframework</groupId>
			<artifactId>spring-webmvc</artifactId>
			<version>${org.springframework-version}</version>
		</dependency>

		<!-- AspectJ -->
		<dependency>
			<groupId>org.aspectj</groupId>
			<artifactId>aspectjrt</artifactId>
			<version>${org.aspectj-version}</version>
		</dependency>

		<!-- Logging -->
		<dependency>
			<groupId>org.slf4j</groupId>
			<artifactId>slf4j-api</artifactId>
			<version>${org.slf4j-version}</version>
		</dependency>
		<dependency>
			<groupId>org.slf4j</groupId>
			<artifactId>jcl-over-slf4j</artifactId>
			<version>${org.slf4j-version}</version>
			<scope>runtime</scope>
		</dependency>
		<dependency>
			<groupId>org.slf4j</groupId>
			<artifactId>slf4j-log4j12</artifactId>
			<version>${org.slf4j-version}</version>
			<scope>runtime</scope>
		</dependency>
		<dependency>
			<groupId>log4j</groupId>
			<artifactId>log4j</artifactId>
			<version>1.2.15</version>
			<exclusions>
				<exclusion>
					<groupId>javax.mail</groupId>
					<artifactId>mail</artifactId>
				</exclusion>
				<exclusion>
					<groupId>javax.jms</groupId>
					<artifactId>jms</artifactId>
				</exclusion>
				<exclusion>
					<groupId>com.sun.jdmk</groupId>
					<artifactId>jmxtools</artifactId>
				</exclusion>
				<exclusion>
					<groupId>com.sun.jmx</groupId>
					<artifactId>jmxri</artifactId>
				</exclusion>
			</exclusions>
			<scope>runtime</scope>
		</dependency>

		<!-- @Inject -->
		<dependency>
			<groupId>javax.inject</groupId>
			<artifactId>javax.inject</artifactId>
			<version>1</version>
		</dependency>

		<!-- Servlet -->
		<dependency>
			<groupId>javax.servlet</groupId>
			<artifactId>servlet-api</artifactId>
			<version>2.5</version>
			<scope>provided</scope>
		</dependency>
		<dependency>
			<groupId>javax.servlet.jsp</groupId>
			<artifactId>jsp-api</artifactId>
			<version>2.1</version>
			<scope>provided</scope>
		</dependency>
		<dependency>
			<groupId>javax.servlet</groupId>
			<artifactId>jstl</artifactId>
			<version>1.2</version>
		</dependency>

		<!-- Test -->
		<dependency>
			<groupId>junit</groupId>
			<artifactId>junit</artifactId>
			<version>4.7</version>
			<scope>test</scope>
		</dependency>
	</dependencies>
    <build>
        <plugins>
            <plugin>
                <artifactId>maven-eclipse-plugin</artifactId>
                <version>2.9</version>
                <configuration>
                    <additionalProjectnatures>
                        <projectnature>org.springframework.ide.eclipse.core.springnature</projectnature>
                    </additionalProjectnatures>
                    <additionalBuildcommands>
                        <buildcommand>org.springframework.ide.eclipse.core.springbuilder</buildcommand>
                    </additionalBuildcommands>
                    <downloadSources>true</downloadSources>
                    <downloadJavadocs>true</downloadJavadocs>
                </configuration>
            </plugin>
            <plugin>
                <groupId>org.apache.maven.plugins</groupId>
                <artifactId>maven-compiler-plugin</artifactId>
                <version>2.5.1</version>
                <configuration>
                    <source>1.6</source>
                    <target>1.6</target>
                    <compilerArgument>-Xlint:all</compilerArgument>
                    <showWarnings>true</showWarnings>
                    <showDeprecation>true</showDeprecation>
                </configuration>
            </plugin>
            <plugin>
                <groupId>org.codehaus.mojo</groupId>
                <artifactId>exec-maven-plugin</artifactId>
                <version>1.2.1</version>
                <configuration>
                    <mainClass>org.test.int1.Main</mainClass>
                </configuration>
            </plugin>
        </plugins>
    </build>
</project>
artifactId將用於Web應用程序的servlet-context,如果您希望使用其他名稱,可以進行更改。Spring Framework、AspectJ和SLF4j版本的幾個屬性已經定義,我發現它們沒有反映最新版本,所以我將它們更改為最新的穩定版本。我感興趣的項目依賴項包括:
- spring-context:Spring核心依賴項。注意,排除了commons logging,改為使用SLF4J。
- spring-webmvc:MVC支持的Spring依賴項
- aspectjrt:AspectJ API 參考
- SLF4J和Log4j:用於日誌記錄,Spring非常容易配置成使用log4j或Java Logging API,因為它與SLF4J集成。
- javax.inject – 用於依賴注入的JSR330 API
還添加了其他一些依賴項,例如Servlet、JSP、JSTL和JUnit API,但對於入門應用程序,我們可以忽略它們。
Spring MVC教程 – Log4j配置
生成的log4j.xml文件如下所示。
<?xml version="1.0" encoding="UTF-8"?>
<!DOCTYPE log4j:configuration PUBLIC "-//APACHE//DTD LOG4J 1.2//EN" "log4j.dtd">
<log4j:configuration xmlns:log4j="https://jakarta.apache.org/log4j/">

	<!-- Appenders -->
	<appender name="console" class="org.apache.log4j.ConsoleAppender">
		<param name="Target" value="System.out" />
		<layout class="org.apache.log4j.PatternLayout">
			<param name="ConversionPattern" value="%-5p: %c - %m%n" />
		</layout>
	</appender>

	<!-- Application Loggers -->
	<logger name="com.journaldev.spring">
		<level value="info" />
	</logger>

	<!-- 3rdparty Loggers -->
	<logger name="org.springframework.core">
		<level value="info" />
	</logger>

	<logger name="org.springframework.beans">
		<level value="info" />
	</logger>

	<logger name="org.springframework.context">
		<level value="info" />
	</logger>

	<logger name="org.springframework.web">
		<level value="info" />
	</logger>

	<!-- Root Logger -->
	<root>
		<priority value="warn" />
		<appender-ref ref="console" />
	</root>

</log4j:configuration>
请注意,它将所有内容打印到控制台,我们可以轻松地添加附加器来将日志重定向到文件。
Spring MVC教程 – 部署描述符配置
让我们看看我们的web.xml并对其进行分析。
<?xml version="1.0" encoding="UTF-8"?>
<web-app version="2.5" xmlns="https://java.sun.com/xml/ns/javaee"
	xmlns:xsi="https://www.w3.org/2001/XMLSchema-instance"
	xsi:schemaLocation="https://java.sun.com/xml/ns/javaee https://java.sun.com/xml/ns/javaee/web-app_2_5.xsd">

	<!-- The definition of the Root Spring Container shared by all Servlets and Filters -->
	<context-param>
		<param-name>contextConfigLocation</param-name>
		<param-value>/WEB-INF/spring/root-context.xml</param-value>
	</context-param>

	<!-- Creates the Spring Container shared by all Servlets and Filters -->
	<listener>
		<listener-class>org.springframework.web.context.ContextLoaderListener</listener-class>
	</listener>

	<!-- Processes application requests -->
	<servlet>
		<servlet-name>appServlet</servlet-name>
		<servlet-class>org.springframework.web.servlet.DispatcherServlet</servlet-class>
		<init-param>
			<param-name>contextConfigLocation</param-name>
			<param-value>/WEB-INF/spring/appServlet/servlet-context.xml</param-value>
		</init-param>
		<load-on-startup>1</load-on-startup>
	</servlet>

	<servlet-mapping>
		<servlet-name>appServlet</servlet-name>
		<url-pattern>/</url-pattern>
	</servlet-mapping>

</web-app>
ContextLoaderListener将ApplicationContext的生命周期与ServletContext的生命周期绑定在一起,并自动创建ApplicationContext。ApplicationContext是Spring beans的地方,我们可以通过contextConfigLocation上下文参数提供其配置。root-context.xml文件提供了WebApplicationContext的配置详细信息。DispatcherServlet是Spring MVC应用程序的控制器类,所有客户端请求都由此servlet处理。配置从servlet-context.xml文件中加载。
Spring MVC教程-配置文件
root-context.xml文件:
<?xml version="1.0" encoding="UTF-8"?>
<beans xmlns="https://www.springframework.org/schema/beans"
	xmlns:xsi="https://www.w3.org/2001/XMLSchema-instance"
	xsi:schemaLocation="https://www.springframework.org/schema/beans https://www.springframework.org/schema/beans/spring-beans.xsd">

	<!-- Root Context: defines shared resources visible to all other web components -->

</beans>
我们可以在这里定义共享的bean,目前还没有任何内容。servlet-context.xml代码:
<?xml version="1.0" encoding="UTF-8"?>
<beans:beans xmlns="https://www.springframework.org/schema/mvc"
	xmlns:xsi="https://www.w3.org/2001/XMLSchema-instance"
	xmlns:beans="https://www.springframework.org/schema/beans"
	xmlns:context="https://www.springframework.org/schema/context"
	xsi:schemaLocation="https://www.springframework.org/schema/mvc https://www.springframework.org/schema/mvc/spring-mvc.xsd
		https://www.springframework.org/schema/beans https://www.springframework.org/schema/beans/spring-beans.xsd
		https://www.springframework.org/schema/context https://www.springframework.org/schema/context/spring-context.xsd">

	<!-- DispatcherServlet Context: defines this servlet's request-processing infrastructure -->

	<!-- Enables the Spring MVC @Controller programming model -->
	<annotation-driven />

	<!-- Handles HTTP GET requests for /resources/** by efficiently serving up static resources in the ${webappRoot}/resources directory -->
	<resources mapping="/resources/**" location="/resources/" />

	<!-- Resolves views selected for rendering by @Controllers to .jsp resources in the /WEB-INF/views directory -->
	<beans:bean class="org.springframework.web.servlet.view.InternalResourceViewResolver">
		<beans:property name="prefix" value="/WEB-INF/views/" />
		<beans:property name="suffix" value=".jsp" />
	</beans:bean>

	<context:component-scan base-package="com.journaldev.spring" />

</beans:beans>
这是标准的Spring配置文件的样子,想象一下自己写这些代码,你会开始喜欢STS工具。annotation-driven元素用于让Controller servlet知道将使用注解进行bean配置。resources元素定义了我们可以放置静态文件(如图像、HTML页面等)的位置,这些文件不需要通过Spring框架获取。InternalResourceViewResolver是视图解析器,我们可以通过前缀和后缀属性提供视图页面的位置。因此,我们所有的JSP页面都应该放在/WEB-INF/views/目录下。context:component-scan元素用于提供扫描Controller类的基本包位置。记住在创建项目时给出的顶级包的值,这里使用的就是同样的值。
Spring MVC控制器类
HomeController是自動創建的,它有home()方法,我稍微擴展了它,添加了loginPage()和login()方法。
package com.journaldev.spring;

import java.text.DateFormat;
import java.util.Date;
import java.util.Locale;

import org.slf4j.Logger;
import org.slf4j.LoggerFactory;
import org.springframework.stereotype.Controller;
import org.springframework.ui.Model;
import org.springframework.validation.annotation.Validated;
import org.springframework.web.bind.annotation.RequestMapping;
import org.springframework.web.bind.annotation.RequestMethod;

/**
 * Handles requests for the application home page.
 */
@Controller
public class HomeController {

	private static final Logger logger = LoggerFactory.getLogger(HomeController.class);

	/**
	 * Simply selects the home view to render by returning its name.
	 */
	@RequestMapping(value = "/", method = RequestMethod.GET)
	public String home(Locale locale, Model model) {
		logger.info("Welcome home! The client locale is {}.", locale);

		Date date = new Date();
		DateFormat dateFormat = DateFormat.getDateTimeInstance(DateFormat.LONG, DateFormat.LONG, locale);

		String formattedDate = dateFormat.format(date);

		model.addAttribute("serverTime", formattedDate );

		return "home";
	}

	@RequestMapping(value = "/login", method = RequestMethod.GET)
	public String loginPage(Locale locale, Model model) {
		return "login";
	}

	@RequestMapping(value = "/home", method = RequestMethod.POST)
	public String login(@Validated User user, Model model) {
		model.addAttribute("userName", user.getUserName());
		return "user";
	}
}
@Controller註釋用於指示這是一個網絡控制器類。 @RequestMapping用於類和方法,將客戶端請求重定向到特定的處理程序方法。請注意,處理程序方法返回String,這應該是要用作響應的視圖頁面的名稱。正如您所看到的,我們有三個返回不同字符串的方法,所以我們需要創建具有相同名稱的JSP頁面。請注意,login()方法將使用POST方法調用,因此我們在這裡期望一些表單數據。因此,我們有User模型類,並使用@Validated註釋標記為驗證。每個方法都包含Model作為參數,我們可以設置屬性,以便稍後在JSP響應頁面中使用。
Spring MVC模型類
模型類用於保存表單變量,我們的User模型bean如下所示。
package com.journaldev.spring;

public class User {

	private String userName;

	public String getUserName() {
		return userName;
	}

	public void setUserName(String userName) {
		this.userName = userName;
	}

}
A simple java bean with the variable name and its getter and setter methods.
Spring MVC教程-視圖頁面
我們有三個JSP頁面,如下所示。 home.jsp代碼:
<%@ taglib uri="https://java.sun.com/jsp/jstl/core" prefix="c" %>
<%@ page session="false" %>
<html>
<head>
	<title>Home</title>
</head>
<body>
<h1>
	Hello world!
</h1>

<P>  The time on the server is ${serverTime}. </P>
</body>
</html>
注意使用JSP表達式語言來獲取屬性值。 login.jsp代碼:
<%@ page language="java" contentType="text/html; charset=UTF-8"
    pageEncoding="UTF-8"%>
<!DOCTYPE html PUBLIC "-//W3C//DTD HTML 4.01 Transitional//EN" "https://www.w3.org/TR/html4/loose.dtd">
<html>
<head>
<meta http-equiv="Content-Type" content="text/html; charset=UTF-8">
<title>Login Page</title>
</head>
<body>
<form action="home" method="post">
<input type="text" name="userName"><br>
<input type="submit" value="Login">
</form>
</body>
</html>
A simple JSP page for the user to provide the userName as input. Notice that form variable name is same as User class variable name. Also, form action is “home” and method is “post”. It’s clear that HomeController login() method will handle this request. user.jsp code:
<%@ page language="java" contentType="text/html; charset=UTF-8"
    pageEncoding="UTF-8"%>
<!DOCTYPE html PUBLIC "-//W3C//DTD HTML 4.01 Transitional//EN" "https://www.w3.org/TR/html4/loose.dtd">
<html>
<head>
<meta http-equiv="Content-Type" content="text/html; charset=UTF-8">
<title>User Home Page</title>
</head>
<body>
<h3>Hi ${userName}</h3>
</body>
</html>
用戶的簡單主頁,其中顯示用戶名,請注意我們在登錄方法中設置了該屬性。
Spring MVC示例應用程序測試
我們的應用程式已經準備好執行,只需在 VMware tc Server 或您選擇的其他 Servlet 容器上運行,您將得到以下頁面作為回應。 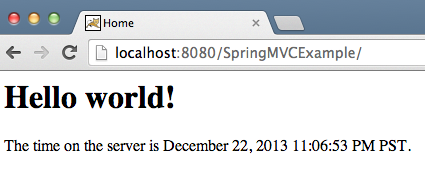
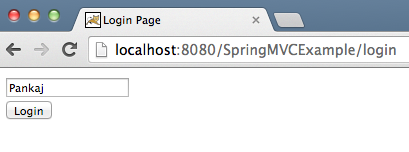
 這就是 Spring MVC 教程的全部內容,您可以看到使用 STS 插件創建 Spring MVC 應用程式是多麼簡單。代碼大小非常小,大部分配置由 Spring MVC 處理,因此我們可以專注於業務邏輯。從下面的鏈接下載示例 Spring MVC 項目並進行測試。
Source:
https://www.digitalocean.com/community/tutorials/spring-mvc-tutorial


