本教程的主題是Spring JDBC。資料庫是大部分企業應用程式的重要組成部分。因此,對於Java EE框架來說,與JDBC有良好的整合非常重要。
Spring JDBC
 Spring Framework 提供了与 JDBC API 卓越的集成,并提供了
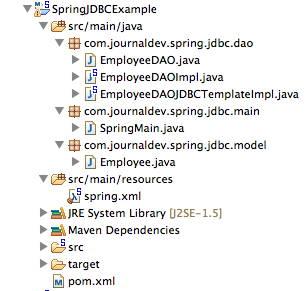
 JdbcTemplate 实用类,我们可以使用它来避免数据库操作逻辑中的样板代码,比如打开/关闭连接、ResultSet、PreparedStatement 等。让我们首先看一个简单的 Spring JDBC 示例应用,然后我们将看到 JdbcTemplate 类如何帮助我们轻松编写模块化代码,而不用担心资源是否正确关闭。使用 Spring Tool Suite 开发基于 Spring 的应用非常有帮助,因此我们将使用 STS 来创建我们的 Spring JDBC 应用程序。我们最终的项目结构将如下图所示。 从 STS 菜单创建一个简单的 Spring Maven 项目,您可以选择任何名称,或者坚持使用我的项目名称 SpringJDBCExample。
Spring JDBC 依赖
首先,我们需要在 maven 项目的 pom.xml 文件中包含 Spring JDBC 和数据库驱动程序。我的最终 pom.xml 文件如下。
<project xmlns="https://maven.apache.org/POM/4.0.0" xmlns:xsi="https://www.w3.org/2001/XMLSchema-instance"
	xsi:schemaLocation="https://maven.apache.org/POM/4.0.0 https://maven.apache.org/xsd/maven-4.0.0.xsd">
	<modelVersion>4.0.0</modelVersion>
	<groupId>org.springframework.samples</groupId>
	<artifactId>SpringJDBCExample</artifactId>
	<version>0.0.1-SNAPSHOT</version>

	<properties>

		<!-- Generic properties -->
		<java.version>1.6</java.version>
		<project.build.sourceEncoding>UTF-8</project.build.sourceEncoding>
		<project.reporting.outputEncoding>UTF-8</project.reporting.outputEncoding>

		<!-- Spring -->
		<spring-framework.version>4.0.2.RELEASE</spring-framework.version>

		<!-- Logging -->
		<logback.version>1.0.13</logback.version>
		<slf4j.version>1.7.5</slf4j.version>

	</properties>

	<dependencies>
		<!-- Spring and Transactions -->
		<dependency>
			<groupId>org.springframework</groupId>
			<artifactId>spring-context</artifactId>
			<version>${spring-framework.version}</version>
		</dependency>
		<dependency>
			<groupId>org.springframework</groupId>
			<artifactId>spring-tx</artifactId>
			<version>${spring-framework.version}</version>
		</dependency>

		<!-- Spring JDBC Support -->
		<dependency>
			<groupId>org.springframework</groupId>
			<artifactId>spring-jdbc</artifactId>
			<version>${spring-framework.version}</version>
		</dependency>

		<!-- MySQL Driver -->
		<dependency>
			<groupId>mysql</groupId>
			<artifactId>mysql-connector-java</artifactId>
			<version>5.0.5</version>
		</dependency>

		<!-- Logging with SLF4J & LogBack -->
		<dependency>
			<groupId>org.slf4j</groupId>
			<artifactId>slf4j-api</artifactId>
			<version>${slf4j.version}</version>
			<scope>compile</scope>
		</dependency>
		<dependency>
			<groupId>ch.qos.logback</groupId>
			<artifactId>logback-classic</artifactId>
			<version>${logback.version}</version>
			<scope>runtime</scope>
		</dependency>

	</dependencies>
</project>
大部分的部分是由STS自動生成的,但我已將Spring Framework版本更新為最新版本4.0.2.RELEASE。另外,我們還添加了所需的組件 spring-jdbc 和 mysql-connector-java。第一個包含Spring JDBC支持類,第二個是數據庫驅動程序。我正在使用MySQL數據庫進行測試,因此我添加了MySQL JConnector jar依賴項。如果您使用其他RDBMS,則應對依賴項進行相應的更改。
Spring JDBC示例 – 數據庫設置
讓我們創建一個簡單的表,我們將在應用程序中用於CRUD操作的示例。
CREATE TABLE `Employee` (
  `id` int(11) unsigned NOT NULL,
  `name` varchar(20) DEFAULT NULL,
  `role` varchar(20) DEFAULT NULL,
  PRIMARY KEY (`id`)
) ENGINE=InnoDB DEFAULT CHARSET=utf8;
Spring JDBC示例 – 模型類
我們將使用DAO模式進行JDBC操作,因此讓我們創建一個Java bean來模擬我們的員工表。
package com.journaldev.spring.jdbc.model;

public class Employee {

	private int id;
	private String name;
	private String role;

	public int getId() {
		return id;
	}
	public void setId(int id) {
		this.id = id;
	}
	public String getName() {
		return name;
	}
	public void setName(String name) {
		this.name = name;
	}
	public String getRole() {
		return role;
	}
	public void setRole(String role) {
		this.role = role;
	}

	@Override
	public String toString(){
		return "{ID="+id+",Name="+name+",Role="+role+"}";
	}
}
Spring JDBC示例 – DAO接口和實現
對於 DAO 模式,我們首先會有一個介面來聲明我們想要實現的所有操作。
package com.journaldev.spring.jdbc.dao;

import java.util.List;

import com.journaldev.spring.jdbc.model.Employee;

//CRUD 操作
public interface EmployeeDAO {

	//Create
	public void save(Employee employee);
	//Read
	public Employee getById(int id);
	//Update
	public void update(Employee employee);
	//Delete
	public void deleteById(int id);
	//獲取全部
	public List getAll();
}
package com.journaldev.spring.jdbc.dao;

import java.sql.Connection;
import java.sql.PreparedStatement;
import java.sql.ResultSet;
import java.sql.SQLException;
import java.util.ArrayList;
import java.util.List;

import javax.sql.DataSource;

import com.journaldev.spring.jdbc.model.Employee;

public class EmployeeDAOImpl implements EmployeeDAO {

	private DataSource dataSource;

	public void setDataSource(DataSource dataSource) {
		this.dataSource = dataSource;
	}

	@Override
	public void save(Employee employee) {
		String query = "insert into Employee (id, name, role) values (?,?,?)";
		Connection con = null;
		PreparedStatement ps = null;
		try{
			con = dataSource.getConnection();
			ps = con.prepareStatement(query);
			ps.setInt(1, employee.getId());
			ps.setString(2, employee.getName());
			ps.setString(3, employee.getRole());
			int out = ps.executeUpdate();
			if(out !=0){
				System.out.println("Employee saved with id="+employee.getId());
			}else System.out.println("Employee save failed with id="+employee.getId());
		}catch(SQLException e){
			e.printStackTrace();
		}finally{
			try {
				ps.close();
				con.close();
			} catch (SQLException e) {
				e.printStackTrace();
			}
		}
	}

	@Override
	public Employee getById(int id) {
		String query = "select name, role from Employee where id = ?";
		Employee emp = null;
		Connection con = null;
		PreparedStatement ps = null;
		ResultSet rs = null;
		try{
			con = dataSource.getConnection();
			ps = con.prepareStatement(query);
			ps.setInt(1, id);
			rs = ps.executeQuery();
			if(rs.next()){
				emp = new Employee();
				emp.setId(id);
				emp.setName(rs.getString("name"));
				emp.setRole(rs.getString("role"));
				System.out.println("Employee Found::"+emp);
			}else{
				System.out.println("No Employee found with id="+id);
			}
		}catch(SQLException e){
			e.printStackTrace();
		}finally{
			try {
				rs.close();
				ps.close();
				con.close();
			} catch (SQLException e) {
				e.printStackTrace();
			}
		}
		return emp;
	}

	@Override
	public void update(Employee employee) {
		String query = "update Employee set name=?, role=? where id=?";
		Connection con = null;
		PreparedStatement ps = null;
		try{
			con = dataSource.getConnection();
			ps = con.prepareStatement(query);
			ps.setString(1, employee.getName());
			ps.setString(2, employee.getRole());
			ps.setInt(3, employee.getId());
			int out = ps.executeUpdate();
			if(out !=0){
				System.out.println("Employee updated with id="+employee.getId());
			}else System.out.println("No Employee found with id="+employee.getId());
		}catch(SQLException e){
			e.printStackTrace();
		}finally{
			try {
				ps.close();
				con.close();
			} catch (SQLException e) {
				e.printStackTrace();
			}
		}
	}

	@Override
	public void deleteById(int id) {
		String query = "delete from Employee where id=?";
		Connection con = null;
		PreparedStatement ps = null;
		try{
			con = dataSource.getConnection();
			ps = con.prepareStatement(query);
			ps.setInt(1, id);
			int out = ps.executeUpdate();
			if(out !=0){
				System.out.println("Employee deleted with id="+id);
			}else System.out.println("No Employee found with id="+id);
		}catch(SQLException e){
			e.printStackTrace();
		}finally{
			try {
				ps.close();
				con.close();
			} catch (SQLException e) {
				e.printStackTrace();
			}
		}
	}

	@Override
	public List<Employee> getAll() {
		String query = "select id, name, role from Employee";
		List<Employee> empList = new ArrayList<Employee>();
		Connection con = null;
		PreparedStatement ps = null;
		ResultSet rs = null;
		try{
			con = dataSource.getConnection();
			ps = con.prepareStatement(query);
			rs = ps.executeQuery();
			while(rs.next()){
				Employee emp = new Employee();
				emp.setId(rs.getInt("id"));
				emp.setName(rs.getString("name"));
				emp.setRole(rs.getString("role"));
				empList.add(emp);
			}
		}catch(SQLException e){
			e.printStackTrace();
		}finally{
			try {
				rs.close();
				ps.close();
				con.close();
			} catch (SQLException e) {
				e.printStackTrace();
			}
		}
		return empList;
	}

}
CRUD 操作的實現很容易理解。如果你想更多地了解數據源,請閱讀 JDBC 數據源範例。
Spring JDBC 範例 – Bean 配置
如果你看一下上面的所有類,它們都是使用標準的 JDBC API,沒有引用 Spring JDBC 框架。當我們創建 Spring Bean 配置文件並定義 bean 時,Spring JDBC 框架類就會出現。我們將在 Spring Bean 上下文文件中創建數據源並將其設置為我們的 DAO 實現類。我的 Spring Bean 配置文件如下所示。
<?xml version="1.0" encoding="UTF-8"?>
<beans xmlns="https://www.springframework.org/schema/beans"
	xmlns:xsi="https://www.w3.org/2001/XMLSchema-instance"
	xsi:schemaLocation="https://www.springframework.org/schema/beans https://www.springframework.org/schema/beans/spring-beans.xsd">

	<bean id="employeeDAO" class="com.journaldev.spring.jdbc.dao.EmployeeDAOImpl">
		<property name="dataSource" ref="dataSource" />
	</bean>

	<bean id="dataSource" class="org.springframework.jdbc.datasource.DriverManagerDataSource">

		<property name="driverClassName" value="com.mysql.jdbc.Driver" />
		<property name="url" value="jdbc:mysql://localhost:3306/TestDB" />
		<property name="username" value="pankaj" />
		<property name="password" value="pankaj123" />
	</bean>

</beans>
首先,我們正在創建一個 `DriverManagerDataSource` 類的 `DataSource` 對象。該類提供了我們可以使用的 DataSource 的基本實現。我們將 MySQL 數據庫的 URL、用戶名和密碼作為屬性傳遞給 DataSource bean。再次,dataSource bean 設置為 `EmployeeDAOImpl` bean,我們的 Spring JDBC 實現已經準備就緒。該實現是鬆散耦合的,如果我們想切換到其他實現或遷移到其他數據庫服務器,我們只需在 bean 配置中進行相應的更改。這是 Spring JDBC 框架提供的一個主要優勢之一。
Spring JDBC 測試類
讓我們編寫一個簡單的測試類,以確保一切正常運作。
package com.journaldev.spring.jdbc.main;

import java.util.List;
import java.util.Random;

import org.springframework.context.support.ClassPathXmlApplicationContext;

import com.journaldev.spring.jdbc.dao.EmployeeDAO;
import com.journaldev.spring.jdbc.model.Employee;

public class SpringMain {

	public static void main(String[] args) {
		//獲取 Spring 上下文
		ClassPathXmlApplicationContext ctx = new ClassPathXmlApplicationContext("spring.xml");

		//獲取 EmployeeDAO Bean
		EmployeeDAO employeeDAO = ctx.getBean("employeeDAO", EmployeeDAO.class);

		//運行一些有關 JDBC CRUD 操作的測試
		Employee emp = new Employee();
		int rand = new Random().nextInt(1000);
		emp.setId(rand);
		emp.setName("Pankaj");
		emp.setRole("Java Developer");

		//Create
		employeeDAO.save(emp);

		//Read
		Employee emp1 = employeeDAO.getById(rand);
		System.out.println("Employee Retrieved::"+emp1);

		//Update
		emp.setRole("CEO");
		employeeDAO.update(emp);

		//獲取所有
		List empList = employeeDAO.getAll();
		System.out.println(empList);

		//Delete
		employeeDAO.deleteById(rand);

		//關閉 Spring 上下文
		ctx.close();

		System.out.println("DONE");
	}

}
I am using Random Class to generate random number for employee id. When we run above program, we get following output.
Mar 25, 2014 12:54:18 PM org.springframework.context.support.ClassPathXmlApplicationContext prepareRefresh
INFO: Refreshing org.springframework.context.support.ClassPathXmlApplicationContext@4b9af9a9: startup date [Tue Mar 25 12:54:18 PDT 2014]; root of context hierarchy
Mar 25, 2014 12:54:18 PM org.springframework.beans.factory.xml.XmlBeanDefinitionReader loadBeanDefinitions
INFO: Loading XML bean definitions from class path resource [spring.xml]
Mar 25, 2014 12:54:19 PM org.springframework.jdbc.datasource.DriverManagerDataSource setDriverClassName
INFO: Loaded JDBC driver: com.mysql.jdbc.Driver
Employee saved with id=726
Employee Found::{ID=726,Name=Pankaj,Role=Java Developer}
Employee Retrieved::{ID=726,Name=Pankaj,Role=Java Developer}
Employee updated with id=726
[{ID=726,Name=Pankaj,Role=CEO}]
Employee deleted with id=726
Mar 25, 2014 12:54:19 PM org.springframework.context.support.ClassPathXmlApplicationContext doClose
INFO: Closing org.springframework.context.support.ClassPathXmlApplicationContext@4b9af9a9: startup date [Tue Mar 25 12:54:18 PDT 2014]; root of context hierarchy
DONE
Spring JdbcTemplate 示例
如果您查看 DAO 實現類,將會發現很多樣板代碼,我們在其中打開和關閉 Connection、PreparedStatements 和 ResultSet。如果有人忘記正確地關閉資源,這可能導致資源洩漏。我們可以使用 org.springframework.jdbc.core.JdbcTemplate 類來避免這些錯誤。Spring JdbcTemplate 是 Spring JDBC 核心包中的核心類,提供了許多方法來執行查詢,並自動解析 ResultSet 以獲取對象或對象列表。我們所需的只是提供對象數組作為參數,並實現回調接口,如 PreparedStatementSetter 和 RowMapper,用於映射參數或將 ResultSet 數據轉換為 bean 對象。讓我們看一下另一個 EmployeeDAO 的實現,我們將使用 Spring JdbcTemplate 類來執行不同類型的查詢。
package com.journaldev.spring.jdbc.dao;

import java.sql.ResultSet;
import java.sql.SQLException;
import java.util.ArrayList;
import java.util.List;
import java.util.Map;

import javax.sql.DataSource;

import org.springframework.jdbc.core.JdbcTemplate;
import org.springframework.jdbc.core.RowMapper;

import com.journaldev.spring.jdbc.model.Employee;

public class EmployeeDAOJDBCTemplateImpl implements EmployeeDAO {

	private DataSource dataSource;

	public void setDataSource(DataSource dataSource) {
		this.dataSource = dataSource;
	}

	@Override
	public void save(Employee employee) {
		String query = "insert into Employee (id, name, role) values (?,?,?)";

		JdbcTemplate jdbcTemplate = new JdbcTemplate(dataSource);

		Object[] args = new Object[] {employee.getId(), employee.getName(), employee.getRole()};

		int out = jdbcTemplate.update(query, args);

		if(out !=0){
			System.out.println("Employee saved with id="+employee.getId());
		}else System.out.println("Employee save failed with id="+employee.getId());
	}

	@Override
	public Employee getById(int id) {
		String query = "select id, name, role from Employee where id = ?";
		JdbcTemplate jdbcTemplate = new JdbcTemplate(dataSource);

		//使用 RowMapper 匿名類,我們可以創建一個獨立的 RowMapper 以便重複使用
		Employee emp = jdbcTemplate.queryForObject(query, new Object[]{id}, new RowMapper(){

			@Override
			public Employee mapRow(ResultSet rs, int rowNum)
					throws SQLException {
				Employee emp = new Employee();
				emp.setId(rs.getInt("id"));
				emp.setName(rs.getString("name"));
				emp.setRole(rs.getString("role"));
				return emp;
			}});

		return emp;
	}

	@Override
	public void update(Employee employee) {
		String query = "update Employee set name=?, role=? where id=?";
		JdbcTemplate jdbcTemplate = new JdbcTemplate(dataSource);
		Object[] args = new Object[] {employee.getName(), employee.getRole(), employee.getId()};

		int out = jdbcTemplate.update(query, args);
		if(out !=0){
			System.out.println("Employee updated with id="+employee.getId());
		}else System.out.println("No Employee found with id="+employee.getId());
	}

	@Override
	public void deleteById(int id) {

		String query = "delete from Employee where id=?";
		JdbcTemplate jdbcTemplate = new JdbcTemplate(dataSource);

		int out = jdbcTemplate.update(query, id);
		if(out !=0){
			System.out.println("Employee deleted with id="+id);
		}else System.out.println("No Employee found with id="+id);
	}

	@Override
	public List getAll() {
		String query = "select id, name, role from Employee";
		JdbcTemplate jdbcTemplate = new JdbcTemplate(dataSource);
		List empList = new ArrayList();

		List> empRows = jdbcTemplate.queryForList(query);

		for(Map empRow : empRows){
			Employee emp = new Employee();
			emp.setId(Integer.parseInt(String.valueOf(empRow.get("id"))));
			emp.setName(String.valueOf(empRow.get("name")));
			emp.setRole(String.valueOf(empRow.get("role")));
			empList.add(emp);
		}
		return empList;
	}

}
上面代碼中關於 Spring JdbcTemplate 的重要點如下:
- 使用對象數組傳遞 PreparedStatement 參數,我們也可以使用 PreparedStatementSetter 實現,但是使用對象數組似乎更容易。
- 與打開和關閉連接、語句或結果集相關的代碼。所有這些都由 Spring JdbcTemplate 類在內部處理。
- 在 queryForObject() 方法中使用 RowMapper 匿名類實現將 ResultSet 數據映射到 Employee bean 對象。
- queryForList() 方法返回 Map 列表,其中 Map 包含與列名對應的行數據並來自與標準匹配的數據庫行的值。
使用Spring JdbcTemplate 實現,我們只需在 Spring Bean 配置文件中更改 employeeDAO 類,如下所示。
<bean id="employeeDAO" class="com.journaldev.spring.jdbc.dao.EmployeeDAOJDBCTemplateImpl">
	<property name="dataSource" ref="dataSource" />
</bean>
當您運行主類時,Spring JdbcTemplate 實現的輸出將與正常的 JDBC 實現類似。 這就是Spring JDBC示例教程的全部內容,從下面的鏈接下載示例項目並進行更多學習。
Source:
https://www.digitalocean.com/community/tutorials/spring-jdbc-example


