歡迎來到Spring IoC示例教程。Spring框架基於控制反轉原則構建。依賴注入是實現應用中IoC的技術。
Spring IoC
 今天我們將深入了解Spring IoC容器。同時,我們還將瀏覽Spring Bean。下面是Spring IoC教程不同部分的快速導覽的目錄。
Spring IoC容器
Spring IoC 是實現對象之間鬆散耦合的機制。為了實現鬆散耦合和對象在運行時的動態綁定,對象的依賴是由其他組件對象注入的。Spring IoC 容器是一個程序,它將依賴注入到對象中,使其準備好供我們使用。我們已經了解了如何使用 Spring 依賴注入來實現 IoC。Spring IoC 容器類位於 org.springframework.beans 和 org.springframework.context 包中。Spring IoC 容器提供了不同的方法來解耦對象之間的依賴關係。BeanFactory 是 Spring IoC 容器的根接口。ApplicationContext 是 BeanFactory 接口的子接口,它提供了 Spring AOP 功能、i18n 等。ApplicationContext 的一些有用的子接口包括 ConfigurableApplicationContext 和 WebApplicationContext。Spring 框架提供了許多有用的 ApplicationContext 實現類,我們可以使用這些實現類來獲取 Spring 上下文和 Spring Bean。一些常用的 ApplicationContext 實現類包括:
- AnnotationConfigApplicationContext:如果我們在獨立的 Java 應用程序中使用 Spring,並使用註解進行配置,則可以使用此類來初始化容器並獲取 Bean 對象。
- ClassPathXmlApplicationContext:如果我们在独立应用程序中有Spring Bean配置XML文件,那么我们可以使用此类加载文件并获取容器对象。
- FileSystemXmlApplicationContext:与ClassPathXmlApplicationContext类似,只是可以从文件系统的任何位置加载XML配置文件。
- AnnotationConfigWebApplicationContext和XmlWebApplicationContext用于Web应用程序。
通常,如果您正在开发Spring MVC应用程序并且您的应用程序已配置使用Spring框架,则当应用程序启动时,Spring IoC容器将初始化,当请求Bean时,依赖项将自动注入。然而,对于独立应用程序,您需要在应用程序的某个地方初始化容器,然后使用它来获取Spring Bean。
Spring Bean
Spring Bean没什么特别的,通过Spring容器初始化的Spring框架中的任何对象都被称为Spring Bean。只要通过提供配置元数据信息配置为通过容器初始化的普通Java POJO类都可以是Spring Bean。
Spring Bean作用域
有五個範圍定義了Spring Beans。
- singleton – 對於每個容器將只創建一個bean的實例。這是spring beans的默認範圍。在使用此範圍時,請確保bean沒有共享的實例變量,否則可能會導致數據一致性問題。
- prototype – 每次請求bean時都會創建一個新的實例。
- request – 這與原型範圍相同,但是它是為Web應用程序而設計的。對於每個HTTP請求將創建bean的新實例。
- session – 容器將為每個HTTP會話創建一個新的bean。
- global-session – 這用於為Portlet應用程序創建全局會話bean。
Spring Framework是可擴展的,我們也可以創建自己的範圍。然而,大多數情況下,我們都使用框架提供的範圍就足夠了。
Spring Bean配置
Spring Framework提供了三種配置bean供應用程序使用的方式。
- 基於註釋的配置 – 通過使用@Service或@Component註釋。可以使用@Scope註釋提供作用域詳細信息。
- 基於XML的配置 – 通過創建Spring配置XML文件來配置bean。如果您使用Spring MVC框架,則可以通過在web.xml文件中編寫一些樣板代碼,自動加載基於xml的配置。
- 基於Java的配置 – 從Spring 3.0開始,我們可以使用Java程序配置Spring bean。用於基於Java的配置的一些重要註釋包括@Configuration,@ComponentScan和@Bean。
Spring IoC和Spring Bean示例項目
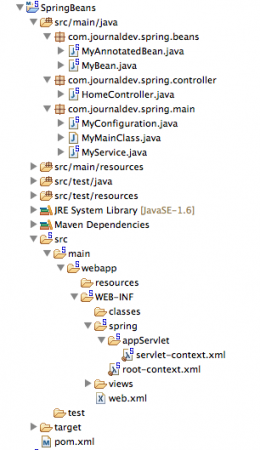
讓我們來看看 Spring IoC 容器和 Spring Bean 配置的不同方面,並使用一個簡單的 Spring 專案來進行。就我的例子而言,我正在 Spring Tool Suite 中創建一個 Spring MVC 專案。如果你對 Spring Tool Suite 和 Spring MVC 是新手,請閱讀 Spring MVC Tutorial with Spring Tool Suite。最終專案結構如下圖所示。  讓我們來依次查看 Spring IoC 和 Spring Bean 專案的不同組件。
基於 XML 的 Spring Bean 配置
MyBean 是一個簡單的 Java POJO 類。
package com.journaldev.spring.beans;

public class MyBean {

	private String name;

	public String getName() {
		return name;
	}
	public void setName(String name) {
		this.name = name;
	}

}
Spring 配置 XML 文件
servlet-context.xml 代碼:
<?xml version="1.0" encoding="UTF-8"?>
<beans:beans xmlns="https://www.springframework.org/schema/mvc"
	xmlns:xsi="https://www.w3.org/2001/XMLSchema-instance"
	xmlns:beans="https://www.springframework.org/schema/beans"
	xmlns:context="https://www.springframework.org/schema/context"
	xsi:schemaLocation="https://www.springframework.org/schema/mvc https://www.springframework.org/schema/mvc/spring-mvc.xsd
		https://www.springframework.org/schema/beans https://www.springframework.org/schema/beans/spring-beans.xsd
		https://www.springframework.org/schema/context https://www.springframework.org/schema/context/spring-context.xsd">

	<!-- DispatcherServlet Context: defines this servlet's request-processing infrastructure -->

	<!-- Enables the Spring MVC @Controller programming model -->
	<annotation-driven />

	<!-- Handles HTTP GET requests for /resources/** by efficiently serving up static resources in the ${webappRoot}/resources directory -->
	<resources mapping="/resources/**" location="/resources/" />

	<!-- Resolves views selected for rendering by @Controllers to .jsp resources in the /WEB-INF/views directory -->
	<beans:bean class="org.springframework.web.servlet.view.InternalResourceViewResolver">
		<beans:property name="prefix" value="/WEB-INF/views/" />
		<beans:property name="suffix" value=".jsp" />
	</beans:bean>

	<context:component-scan base-package="com.journaldev.spring" />

	<beans:bean name="myBean" class="com.journaldev.spring.beans.MyBean" scope="singleton" ></beans:bean>

</beans:beans>
注意,MyBean 是使用 bean 元素配置的,作用域為 singleton。
基於注解的 Spring Bean 配置
package com.journaldev.spring.beans;

import org.springframework.context.annotation.Scope;
import org.springframework.stereotype.Service;
import org.springframework.web.context.WebApplicationContext;

@Service
@Scope(WebApplicationContext.SCOPE_REQUEST)
public class MyAnnotatedBean {

	private int empId;

	public int getEmpId() {
		return empId;
	}

	public void setEmpId(int empId) {
		this.empId = empId;
	}

}
MyAnnotatedBean 使用 @Service 进行配置,并将范围设置为 Request。
Spring IoC 控制器类
HomeController 类将处理应用程序主页的 HTTP 请求。我们将通过 WebApplicationContext 容器将我们的 Spring beans 注入到这个控制器类中。
package com.journaldev.spring.controller;

import java.text.DateFormat;
import java.util.Date;
import java.util.Locale;

import org.springframework.beans.factory.annotation.Autowired;
import org.springframework.context.annotation.Scope;
import org.springframework.stereotype.Controller;
import org.springframework.ui.Model;
import org.springframework.web.bind.annotation.RequestMapping;
import org.springframework.web.bind.annotation.RequestMethod;

import com.journaldev.spring.beans.MyAnnotatedBean;
import com.journaldev.spring.beans.MyBean;

@Controller
@Scope("request")
public class HomeController {

	private MyBean myBean;

	private MyAnnotatedBean myAnnotatedBean;

	@Autowired
	public void setMyBean(MyBean myBean) {
		this.myBean = myBean;
	}

	@Autowired
	public void setMyAnnotatedBean(MyAnnotatedBean obj) {
		this.myAnnotatedBean = obj;
	}

	/**
	 * Simply selects the home view to render by returning its name.
	 */
	@RequestMapping(value = "/", method = RequestMethod.GET)
	public String home(Locale locale, Model model) {
		System.out.println("MyBean hashcode="+myBean.hashCode());
		System.out.println("MyAnnotatedBean hashcode="+myAnnotatedBean.hashCode());

		Date date = new Date();
		DateFormat dateFormat = DateFormat.getDateTimeInstance(DateFormat.LONG, DateFormat.LONG, locale);

		String formattedDate = dateFormat.format(date);

		model.addAttribute("serverTime", formattedDate );

		return "home";
	}

}
部署描述符
我们需要为 Spring 框架配置我们的应用程序,以便加载配置元数据并初始化上下文。
<?xml version="1.0" encoding="UTF-8"?>
<web-app version="2.5" xmlns="https://java.sun.com/xml/ns/javaee"
	xmlns:xsi="https://www.w3.org/2001/XMLSchema-instance"
	xsi:schemaLocation="https://java.sun.com/xml/ns/javaee https://java.sun.com/xml/ns/javaee/web-app_2_5.xsd">

	<!-- The definition of the Root Spring Container shared by all Servlets and Filters -->
	<context-param>
		<param-name>contextConfigLocation</param-name>
		<param-value>/WEB-INF/spring/root-context.xml</param-value>
	</context-param>

	<!-- Creates the Spring Container shared by all Servlets and Filters -->
	<listener>
		<listener-class>org.springframework.web.context.ContextLoaderListener</listener-class>
	</listener>

	<!-- Processes application requests -->
	<servlet>
		<servlet-name>appServlet</servlet-name>
		<servlet-class>org.springframework.web.servlet.DispatcherServlet</servlet-class>
		<init-param>
			<param-name>contextConfigLocation</param-name>
			<param-value>/WEB-INF/spring/appServlet/servlet-context.xml</param-value>
		</init-param>
		<load-on-startup>1</load-on-startup>
	</servlet>

	<servlet-mapping>
		<servlet-name>appServlet</servlet-name>
		<url-pattern>/</url-pattern>
	</servlet-mapping>

</web-app>
几乎所有上面的配置都是由 STS 工具自动生成的样板代码。
运行 Spring IoC Bean 示例应用程序
现在,当您启动 Web 应用程序时,主页将加载,并在刷新页面多次时,控制台将打印以下日志。
MyBean hashcode=118267258
MyAnnotatedBean hashcode=1703899856
MyBean hashcode=118267258
MyAnnotatedBean hashcode=1115599742
MyBean hashcode=118267258
MyAnnotatedBean hashcode=516457106
請注意,MyBean被配置為singleton,因此容器始終返回相同的實例,並且hashcode始終相同。同樣,對於每個請求,都會創建一個具有不同hashcode的新實例的MyAnnotatedBean。
基於Java的Spring Bean配置
對於獨立應用程序,我們可以使用基於注釋或基於XML的配置。唯一要求是在我們使用之前在程序中的某個地方初始化上下文。
package com.journaldev.spring.main;

import java.util.Date;

public class MyService {

	public void log(String msg){
		System.out.println(new Date()+"::"+msg);
	}
}
MyService是一個簡單的Java類,裡面包含一些方法。
package com.journaldev.spring.main;

import org.springframework.context.annotation.Bean;
import org.springframework.context.annotation.ComponentScan;
import org.springframework.context.annotation.Configuration;

@Configuration
@ComponentScan(value="com.journaldev.spring.main")
public class MyConfiguration {

	@Bean
	public MyService getService(){
		return new MyService();
	}
}
用於初始化Spring容器的基於注釋的配置類。
package com.journaldev.spring.main;

import org.springframework.context.annotation.AnnotationConfigApplicationContext;

public class MyMainClass {

	public static void main(String[] args) {

		AnnotationConfigApplicationContext ctx = new AnnotationConfigApplicationContext(
				MyConfiguration.class);
		MyService service = ctx.getBean(MyService.class);

		service.log("Hi");

		MyService newService = ctx.getBean(MyService.class);
		System.out.println("service hashcode="+service.hashCode());
		System.out.println("newService hashcode="+newService.hashCode());
		ctx.close();
	}

}
A simple test program where we are initializing the AnnotationConfigApplicationContext context and then using getBean() method to get the instance of MyService. Notice that I am calling getBean method two times and printing the hashcode. Since there is no scope defined for MyService, it should be a singleton and hence hashcode should be the same for both the instances. When we run the above application, we get following console output confirming our understanding.
Sat Dec 28 22:49:18 PST 2013::Hi
service hashcode=678984726
newService hashcode=678984726
如果您正在尋找基於XML的配置,只需創建Spring XML配置文件,然後使用以下代碼片段初始化上下文。
ClassPathXmlApplicationContext context = new ClassPathXmlApplicationContext(
                "applicationContext.xml");
        MyService app = context.getBean(MyService.class);
這就是Spring IoC示例教程、Spring Bean範疇和配置詳細信息的全部內容。從下面的鏈接中下載Spring IoC和Spring Bean示例項目,並通過使用它進行更好的理解。
Source:
https://www.digitalocean.com/community/tutorials/spring-ioc-bean-example-tutorial


