


Spring Boot Redis Cache
 在這篇文章中,我們將建立一個範例的Spring Boot應用程式並將其與Redis緩存集成。雖然Redis是一個開源的內存資料結構存儲,用作數據庫、緩存和消息代理,但本課程僅演示緩存集成。我們將使用Spring Initializr工具快速設置項目。
Spring Boot Redis項目設置
我們將使用Spring Initializr工具快速設置項目。我們將使用如下3個依賴項: 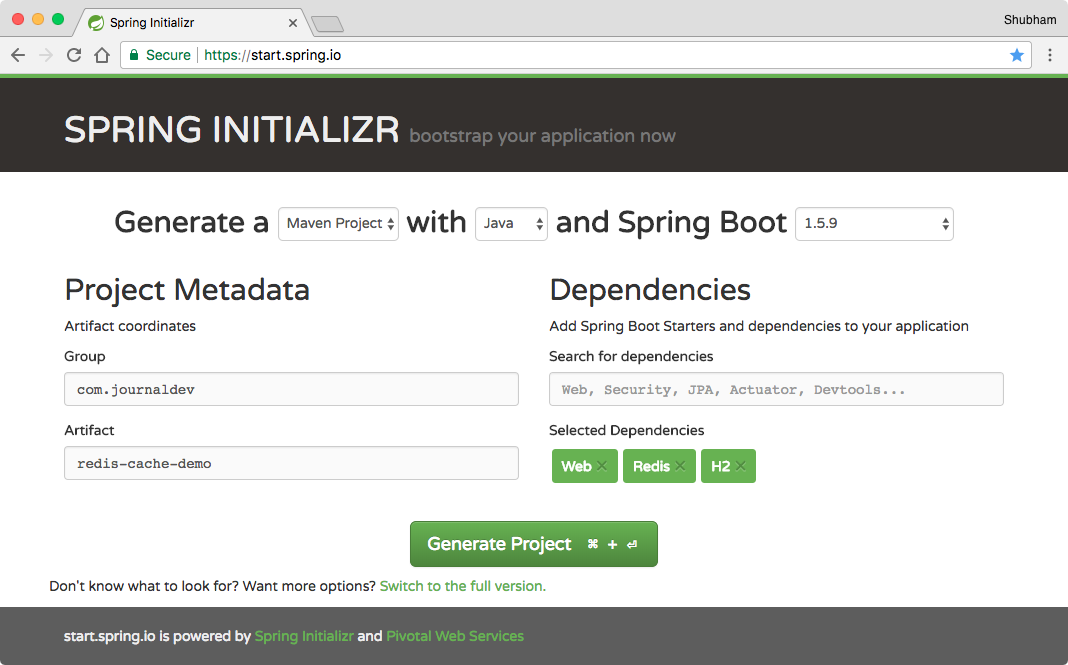 下載項目並解壓縮。我們使用H2數據庫依賴項,因為我們將使用嵌入式數據庫,該數據庫一旦應用程式停止就會丟失所有數據。
Spring Boot Redis Cache Maven 依賴
雖然我們已經使用該工具完成了設置,但如果你想手動設置,我們使用 Maven 构建系統為這個項目,這裡是我們使用的依賴:
<parent>
  <groupId>org.springframework.boot</groupId>
  <artifactId>spring-boot-starter-parent</artifactId>
  <version>1.5.9.RELEASE</version>
  <relativePath/> <!-- lookup parent from repository -->
</parent>
<properties>
  <project.build.sourceEncoding>UTF-8</project.build.sourceEncoding>
  <project.reporting.outputEncoding>UTF-8</project.reporting.outputEncoding>
  <java.version>1.8</java.version>
</properties>
<dependencies>
  <dependency>
     <groupId>org.springframework.boot</groupId>
     <artifactId>spring-boot-starter-data-redis</artifactId>
  </dependency>

  <dependency>
     <groupId>org.springframework.boot</groupId>
     <artifactId>spring-boot-starter-web</artifactId>
  </dependency>

  <dependency>
     <groupId>org.springframework.boot</groupId>
     <artifactId>spring-boot-starter-test</artifactId>
     <scope>test</scope>
  </dependency>

  <!-- for JPA support -->
  <dependency>
    <groupId>org.springframework.boot</groupId>
    <artifactId>spring-boot-starter-data-jpa</artifactId>
  </dependency>

  <!-- for embedded database support -->
  <dependency>
    <groupId>com.h2database</groupId>
    <artifactId>h2</artifactId>
    <scope>runtime</scope>
  </dependency>

</dependencies>

<build>
  <plugins>
     <plugin>
        <groupId>org.springframework.boot</groupId>
        <artifactId>spring-boot-maven-plugin</artifactId>
     </plugin>
  </plugins>
</build>
請確保從 Maven 中央庫使用穩定版本的 Spring Boot。
定義模型
為了將對象保存到 Redis 數據庫中,我們定義了一個具有基本字段的 Person 模型對象:
package com.journaldev.rediscachedemo;

import javax.persistence.*;
import java.io.Serializable;

@Entity
public class User implements Serializable {

    private static final long serialVersionUID = 7156526077883281623L;

    @Id
    @SequenceGenerator(name = "SEQ_GEN", sequenceName = "SEQ_USER", allocationSize = 1)
    @GeneratedValue(strategy = GenerationType.SEQUENCE, generator = "SEQ_GEN")
    private Long id;
    private String name;
    private long followers;

    public User() {
    }

    public User(String name, long followers) {
        this.name = name;
        this.followers = followers;
    }

    // 標準的 getters 和 setters

    @Override
    public String toString() {
        return String.format("User{id=%d, name='%s', followers=%d}", id, name, followers);
    }
}
它是一個標準的 POJO,帶有 getters 和 setters。
配置 Redis Cache
使用 Spring Boot 和 Maven 中已經準備好的必要依賴,我們可以在我們的 application.properties 文件中僅用三行配置本地 Redis 實例,如下:
# Redis 配置
spring.cache.type=redis
spring.redis.host=localhost
spring.redis.port=6379
還要在 Spring Boot 主類上使用 @EnableCaching 注解:
package com.journaldev.rediscachedemo;

import org.slf4j.Logger;
import org.slf4j.LoggerFactory;
import org.springframework.beans.factory.annotation.Autowired;
import org.springframework.boot.CommandLineRunner;
import org.springframework.boot.SpringApplication;
import org.springframework.boot.autoconfigure.SpringBootApplication;
import org.springframework.cache.annotation.EnableCaching;

@SpringBootApplication
@EnableCaching
public class Application implements CommandLineRunner {

  private final Logger LOG = LoggerFactory.getLogger(getClass());
  private final UserRepository userRepository;

  @Autowired
  public Application(UserRepository userRepository) {
    this.userRepository = userRepository;
  }

  public static void main(String[] args) {
    SpringApplication.run(Application.class, args);
  }

  @Override
  public void run(String... strings) {
    // 在此處填充嵌入式數據庫
    LOG.info("Saving users. Current user count is {}.", userRepository.count());
    User shubham = new User("Shubham", 2000);
    User pankaj = new User("Pankaj", 29000);
    User lewis = new User("Lewis", 550);

    userRepository.save(shubham);
    userRepository.save(pankaj);
    userRepository.save(lewis);
    LOG.info("Done saving users. Data: {}.", userRepository.findAll());
  }
}
我們已添加了一個 CommandLineRunner,因為我們想要在嵌入式 H2 數據庫中填充一些示例數據。
定義存儲庫
在展示 Redis 如何工作之前,我們將只是定義一個用於 JPA 相關功能的存儲庫:
package com.journaldev.rediscachedemo;

import org.springframework.data.jpa.repository.JpaRepository;
import org.springframework.stereotype.Repository;

@Repository
public interface UserRepository extends JpaRepository { }
目前它沒有任何方法調用,因為我們不需要。
定義控制器
控制器是調用 Redis 緩存以執行操作的地方。實際上,這是最好的地方,因為作為一個緩存直接與之關聯,請求甚至不必進入服務代碼等待緩存結果。這是控制器的基本結構:
package com.journaldev.rediscachedemo;

import org.slf4j.Logger;
import org.slf4j.LoggerFactory;
import org.springframework.beans.factory.annotation.Autowired;
import org.springframework.cache.annotation.CacheEvict;
import org.springframework.cache.annotation.CachePut;
import org.springframework.cache.annotation.Cacheable;
import org.springframework.web.bind.annotation.*;

@RestController
public class UserController {

  private final Logger LOG = LoggerFactory.getLogger(getClass());

  private final UserRepository userRepository;

  @Autowired
  public UserController(UserRepository userRepository) {
    this.userRepository = userRepository;
  }
   ...
}
現在,要將某些內容放入緩存中,我們使用 @Cacheable 注釋:
@Cacheable(value = "users", key = "#userId", unless = "#result.followers < 12000")
@RequestMapping(value = "/{userId}", method = RequestMethod.GET)
public User getUser(@PathVariable String userId) {
  LOG.info("Getting user with ID {}.", userId);
  return userRepository.findOne(Long.valueOf(userId));
}
在上面的映射中,getUser 方法將一個人放入名為 ‘users’ 的緩存中,通過鍵 ‘userId’ 識別該人,並且僅存儲具有大於 12000 的關注者的用戶。這確保了緩存中存儲了非常受歡迎且經常被查詢的用戶。此外,我們在 API 調用中故意添加了一條日誌語句。此時讓我們從 Postman 發出一些 API 調用。這些是我們進行的調用:
localhost:8090/1
localhost:8090/1
localhost:8090/2
localhost:8090/2
如果我們注意日誌,這些就是它們:
... : Getting user with ID 1.
... : Getting user with ID 1.
... : Getting user with ID 2.
發現了嗎? 我們進行了四個 API 調用,但只有三個日誌記錄存在。這是因為ID為2的用戶有29000個追隨者,所以它的數據已經被緩存。這意味著當對它進行 API 調用時,數據是從緩存返回的,並且沒有為此進行 DB 調用!
更新緩存
緩存值也應該在其實際對象值更新時更新。這可以使用 @CachePut 注釋來完成:
@CachePut(value = "users", key = "#user.id")
@PutMapping("/update")
public User updatePersonByID(@RequestBody User user) {
  userRepository.save(user);
  return user;
}
通過這種方式,一個人再次通過他的 ID 來識別並更新結果。
清除緩存
如果要從實際的數據庫中刪除一些數據,那麼將它保留在緩存中就沒有意義了。 我們可以使用 @CacheEvict 注釋清除緩存數據:
@CacheEvict(value = "users", allEntries=true)
@DeleteMapping("/{id}")
public void deleteUserByID(@PathVariable Long id) {
  LOG.info("deleting person with id {}", id);
  userRepository.delete(id);
}
在最後一個映射中,我們只是驅逐了緩存項目,並沒有做其他事情。
運行 Spring Boot Redis 緩存應用程序
我們可以僅使用一個命令來運行此應用:
mvn spring-boot:run
Redis 緩存限制
雖然 Redis 非常快,但在 64 位系統上仍然沒有對存儲任意數量的數據進行限制。它只能在 32 位系統上存儲 3GB 的數據。更多可用的內存可能會導致更高的命中率,但一旦 Redis 佔用了過多的內存,這種情況就會停止。當緩存大小達到內存限制時,舊數據將被刪除以為新數據腾出空間。
摘要
在本課程中,我們看了 Redis 緩存提供的快速數據交互功能,以及如何使用最小但強大的配置將其與 Spring Boot 集成。歡迎在下面留下評論。
Source:
https://www.digitalocean.com/community/tutorials/spring-boot-redis-cache