


在本系列中,我們詳細探討了至少兩種存取控制方法:ugo/rwx權限(管理使用者與群組-第3部分)和存取控制清單(在檔案系統上配置ACL-第7部分)。
雖然作為第一層權限和存取控制機制是必要的,但它們存在一些限制,這些限制由安全增強型Linux(簡稱SELinux)來解決。
其中一個限制是,使用者可能會通過粗糙的chmod命令使文件或目錄暴露於安全漏洞,從而導致訪問權利的意外傳播。結果,由該使用者啟動的任何進程都可以任意使用由該使用者擁有的文件,最終可能是惡意或受損的軟件可以獲得對整個系統的根級訪問權限。
考慮到這些限制,美國國家安全局(NSA)首次設計了SELinux,這是一種靈活的強制存取控制方法,用於限制進程對系統對象(如文件、目錄、網絡端口等)的訪問或執行其他操作的能力,以達到最少權限模型,稍後可以根據需要進行修改。簡言之,系統的每個元素僅被賦予所需的訪問權限。
在 RHEL 7 中,SELinux 已經納入到核心中,並且默認啟用了 強制 模式。在本文中,我們將簡要解釋與 SELinux 及其運作相關的基本概念。
SELinux 模式
SELinux 可以以三種不同的方式運作:
- 強制:基於 SELinux 政策規則拒絕訪問,這是一套控制安全引擎的指南。
- 寬容:SELinux 不會拒絕訪問,但是如果在強制模式下運行,則會記錄被拒絕的操作。
- 已禁用(不用解釋)。
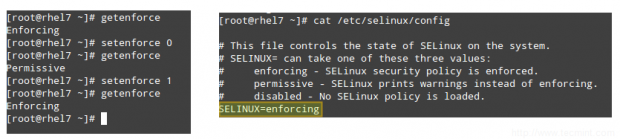
使用 getenforce 命令可以顯示 SELinux 的當前模式,而使用 setenforce(後跟 1 或 0)可在當前會話中將模式更改為 強制 或 寬容。
為了在登出和重新啟動後保持持久性,您需要編輯 /etc/selinux/config 文件並將 SELINUX 變量設置為 enforcing、permissive 或 disabled:
# getenforce
# setenforce 0
# getenforce
# setenforce 1
# getenforce
# cat /etc/selinux/config
通常,您會使用 setenforce 在 SELinux 模式之間切換(從強制到寬容,再切回去)作為首個故障排除步驟。如果 SELinux 目前設置為 強制,而在您遇到某個問題時將其設置為 寬容 後問題消失了,您可以確信這是一個 SELinux 權限問題。
SELinux Contexts
A SELinux context consists of an access control environment where decisions are made based on SELinux user, role, and type (and optionally a level):
- A SELinux user complements a regular Linux user account by mapping it to a SELinux user account, which in turn is used in the SELinux context for processes in that session, in order to explicitly define their allowed roles and levels.
- 角色的概念充當域和SELinux使用者之間的中介,它定義了哪些進程域和文件類型可以被訪問。這將保護您的系統免受特權升級攻擊的威脅。
- A type defines an SELinux file type or an SELinux process domain. Under normal circumstances, processes are prevented from accessing files that other processes use, and and from accessing other processes, thus access is only allowed if a specific SELinux policy rule exists that allows it.
讓我們通過以下示例來了解所有這些是如何工作的。
示例 1:更改sshd守護程序的默認端口
在《保護SSH – 第8部分》中,我們解釋了將sshd監聽的默認端口更改為保護您的服務器免受外部攻擊的第一個安全措施之一。讓我們編輯/etc/ssh/sshd_config文件並將端口設置為9999:
Port 9999
保存更改,並重新啟動sshd:
# systemctl restart sshd
# systemctl status sshd
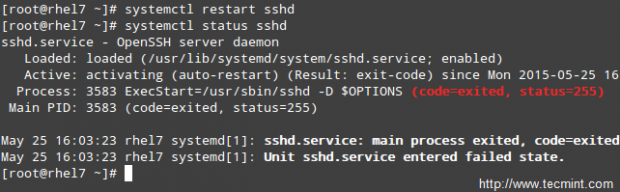
您可以看到,sshd啟動失敗了。但是發生了什麼事?
A quick inspection of /var/log/audit/audit.log indicates that sshd has been denied permissions to start on port 9999 (SELinux log messages include the word “AVC” so that they might be easily identified from other messages) because that is a reserved port for the JBoss Management service:
# cat /var/log/audit/audit.log | grep AVC | tail -1

此時,您可以禁用SELinux(但不要這樣做!),如前所述,然後嘗試重新啟動sshd,它應該可以正常運行。但是,semanage工具可以告訴我們我們需要更改什麼才能夠在我們選擇的任何端口上啟動sshd而不會出現問題。
運行,
# semanage port -l | grep ssh
以獲得SELinux允許sshd監聽的端口列表。
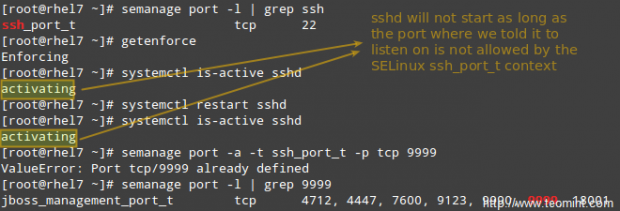
因此,讓我們在/etc/ssh/sshd_config中更改端口為Port 9998,將端口添加到ssh_port_t上下文,然後重新啟動服務:
# semanage port -a -t ssh_port_t -p tcp 9998
# systemctl restart sshd
# systemctl is-active sshd

正如您所看到的,這次服務成功啟動了。這個例子說明了 SELinux 控制 TCP 埠號到其自身的埠類型內部定義。
EXAMPLE 2: 允許 httpd 發送 access sendmail
這是 SELinux 管理一個進程訪問另一個進程的示例。如果您要在 RHEL 7 服務器上實施 mod_security 和 mod_evasive 以及 Apache,您需要允許 httpd 訪問 sendmail 以便在 (D)DoS 攻擊發生時發送郵件通知。在以下命令中,如果您不希望更改在重新啟動時持久存在,請省略 -P 標誌。
# semanage boolean -1 | grep httpd_can_sendmail
# setsebool -P httpd_can_sendmail 1
# semanage boolean -1 | grep httpd_can_sendmail

從上面的例子中可以看出,SELinux 布爾值 設置(或僅布爾值)是嵌入到 SELinux 策略中的真/假規則。您可以使用 semanage boolean -l 列出所有布爾值,或者將其通過管道傳遞給 grep 以過濾輸出。
EXAMPLE 3: 從默認目錄以外的目錄提供靜態網站
假設您正在使用一個不同於默認目錄(/var/www/html)的目錄來提供靜態網站,比如說 /websites(如果您將網絡文件存儲在共享網絡驅動器上,並且需要將其掛載到 /websites,這可能是一種情況)。
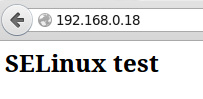
a). Create an index.html file inside /websites with the following contents:
<html>
<h2>SELinux test</h2>
</html>
如果您這樣做,
# ls -lZ /websites/index.html
你会看到 index.html 文件已被标记为 default_t SELinux 类型,Apache 无法访问:

b). Change the DocumentRoot directive in /etc/httpd/conf/httpd.conf to /websites and don’t forget to update the corresponding Directory block. Then, restart Apache.
c). Browse to http://<web server IP address>, and you should get a 503 Forbidden HTTP response.
d). Next, change the label of /websites, recursively, to the httpd_sys_content_t type in order to grant Apache read-only access to that directory and its contents:
# semanage fcontext -a -t httpd_sys_content_t "/websites(/.*)?"
e). Finally, apply the SELinux policy created in d):
# restorecon -R -v /websites
现在重新启动 Apache 并浏览到 http://<web server IP address>,你会看到 HTML 文件正确显示:
摘要
在本文中,我们已经介绍了 SELinux 的基础知识。请注意,由于主题的广泛性,在一篇文章中无法提供详尽的解释,但我们相信本指南中概述的原则将帮助您进一步学习更高级的主题,如果您愿意的话。
如果可以的话,我想推荐两个必备的资源供您参考: NSA SELinux 页面 和 RHEL 7 SELinux 用户和管理员 指南。
如果您有任何问题或意见,请随时告诉我们。
Source:
https://www.tecmint.com/selinux-essentials-and-control-filesystem-access/