


本系列部落格文章的第二部分,將探討如何使用Memphis.dev建立現代的事件驅動系統。
上一篇部落格文章介紹了一種參考實現,用於從PostgreSQL資料庫捕獲變更資料捕獲(CDC)事件,使用Debezium Server和Memphis.dev。通過用Memphis.dev替換Apache Kafka,該解決方案大幅減少了運營資源和開銷——節省了成本並讓開發人員能夠專注於構建新功能。
然而,PostgreSQL並非唯一常用的資料庫。Debezium提供了連接器,支援多種資料庫,包括非關聯式文件資料庫MongoDB。MongoDB深受開發者歡迎,尤其是那些使用動態編程語言的開發者,因為它避免了物件-關係阻抗失配。開發者可以直接在資料庫中存儲、查詢和更新物件。
在本文中,我們將展示如何將CDC解決方案適配到MongoDB。
解決方案概覽
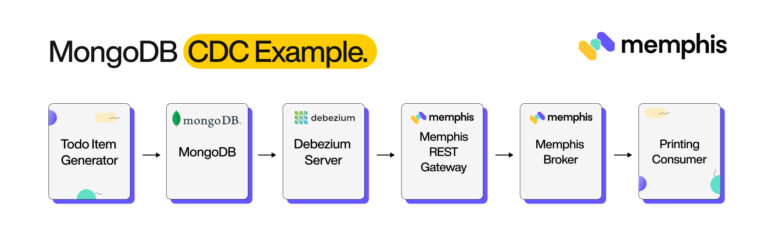
在此,我們描述了使用Memphis.dev提供變更資料捕獲事件的參考解決方案的架構。該架構與我們之前的部落格文章中描述的相同,除了將PostgreSQL替換為MongoDB。
A Todo Item generator script writes randomly generated records to MongoDB. Debezium Server receives CDC events from MongoDB and forwards them to the Memphis REST gateway through the HTTP client sink. The Memphis REST gateway adds the messages to a station in Memphis.dev. Lastly, a consumer script polls Memphis. dev for new messages and prints them to the console.
- 待辦事項產生器: 每0.5秒在MongoDB集合中插入一個隨機生成的待辦事項。每個待辦事項包含描述、建立時間戳、可選的截止日期和完成狀態。
- MongoDB: 配置有一個數據庫,包含一個集合(todo_items)。
- Debezium Server: 配置有MongoDB源和HTTP客戶端接收器的Debezium Server實例。
- Memphis.dev REST Gateway: 使用默認配置。
- Memphis.dev: 配置有一個站台(todo-cdc-events)和一個用戶(todocdcservice)。
- 打印消費者: 一個使用Memphis.dev Python SDK消費消息並將其打印到控制台的腳本。
開始使用
實施教程可在Memphis Example Solutions存儲庫的mongodb-debezium-cdc-example目錄中找到。Docker Compose將需要運行它。
運行實施
建立Debezium Server、打印消費者及數據庫設置(表格與用戶創建)的Docker映像。
目前實施依賴於Debezium Server的預發布版本以支持JWT認證。將直接從Debezium和Debezium Server倉庫的主分支構建Docker映像。請注意,此步驟可能需要相當長的時間(約20分鐘)來運行。當Debezium Server 2.3.0發布後,我們將轉而使用上游Docker映像。
步驟1:構建映像
$ docker compose build --pull --no-cache步驟2:啟動Memphis.dev Broker與REST Gateway
啟動Memphis.dev broker與REST gateway。注意Memphis-rest-gateway服務依賴於Memphis broker服務,因此broker服務也將同時啟動。
$ docker compose up -d memphis-rest-gateway
[+] Running 4/4
 ⠿ Network mongodb-debezium-cdc-example_default                   Created                                                        0.0s
 ⠿ Container mongodb-debezium-cdc-example-memphis-metadata-1      Healthy                                                        6.0s
 ⠿ Container mongodb-debezium-cdc-example-memphis-1               Healthy                                                       16.8s
 ⠿ Container mongodb-debezium-cdc-example-memphis-rest-gateway-1  Started
步驟3:在Memphis.dev中創建一個Station及相應用戶
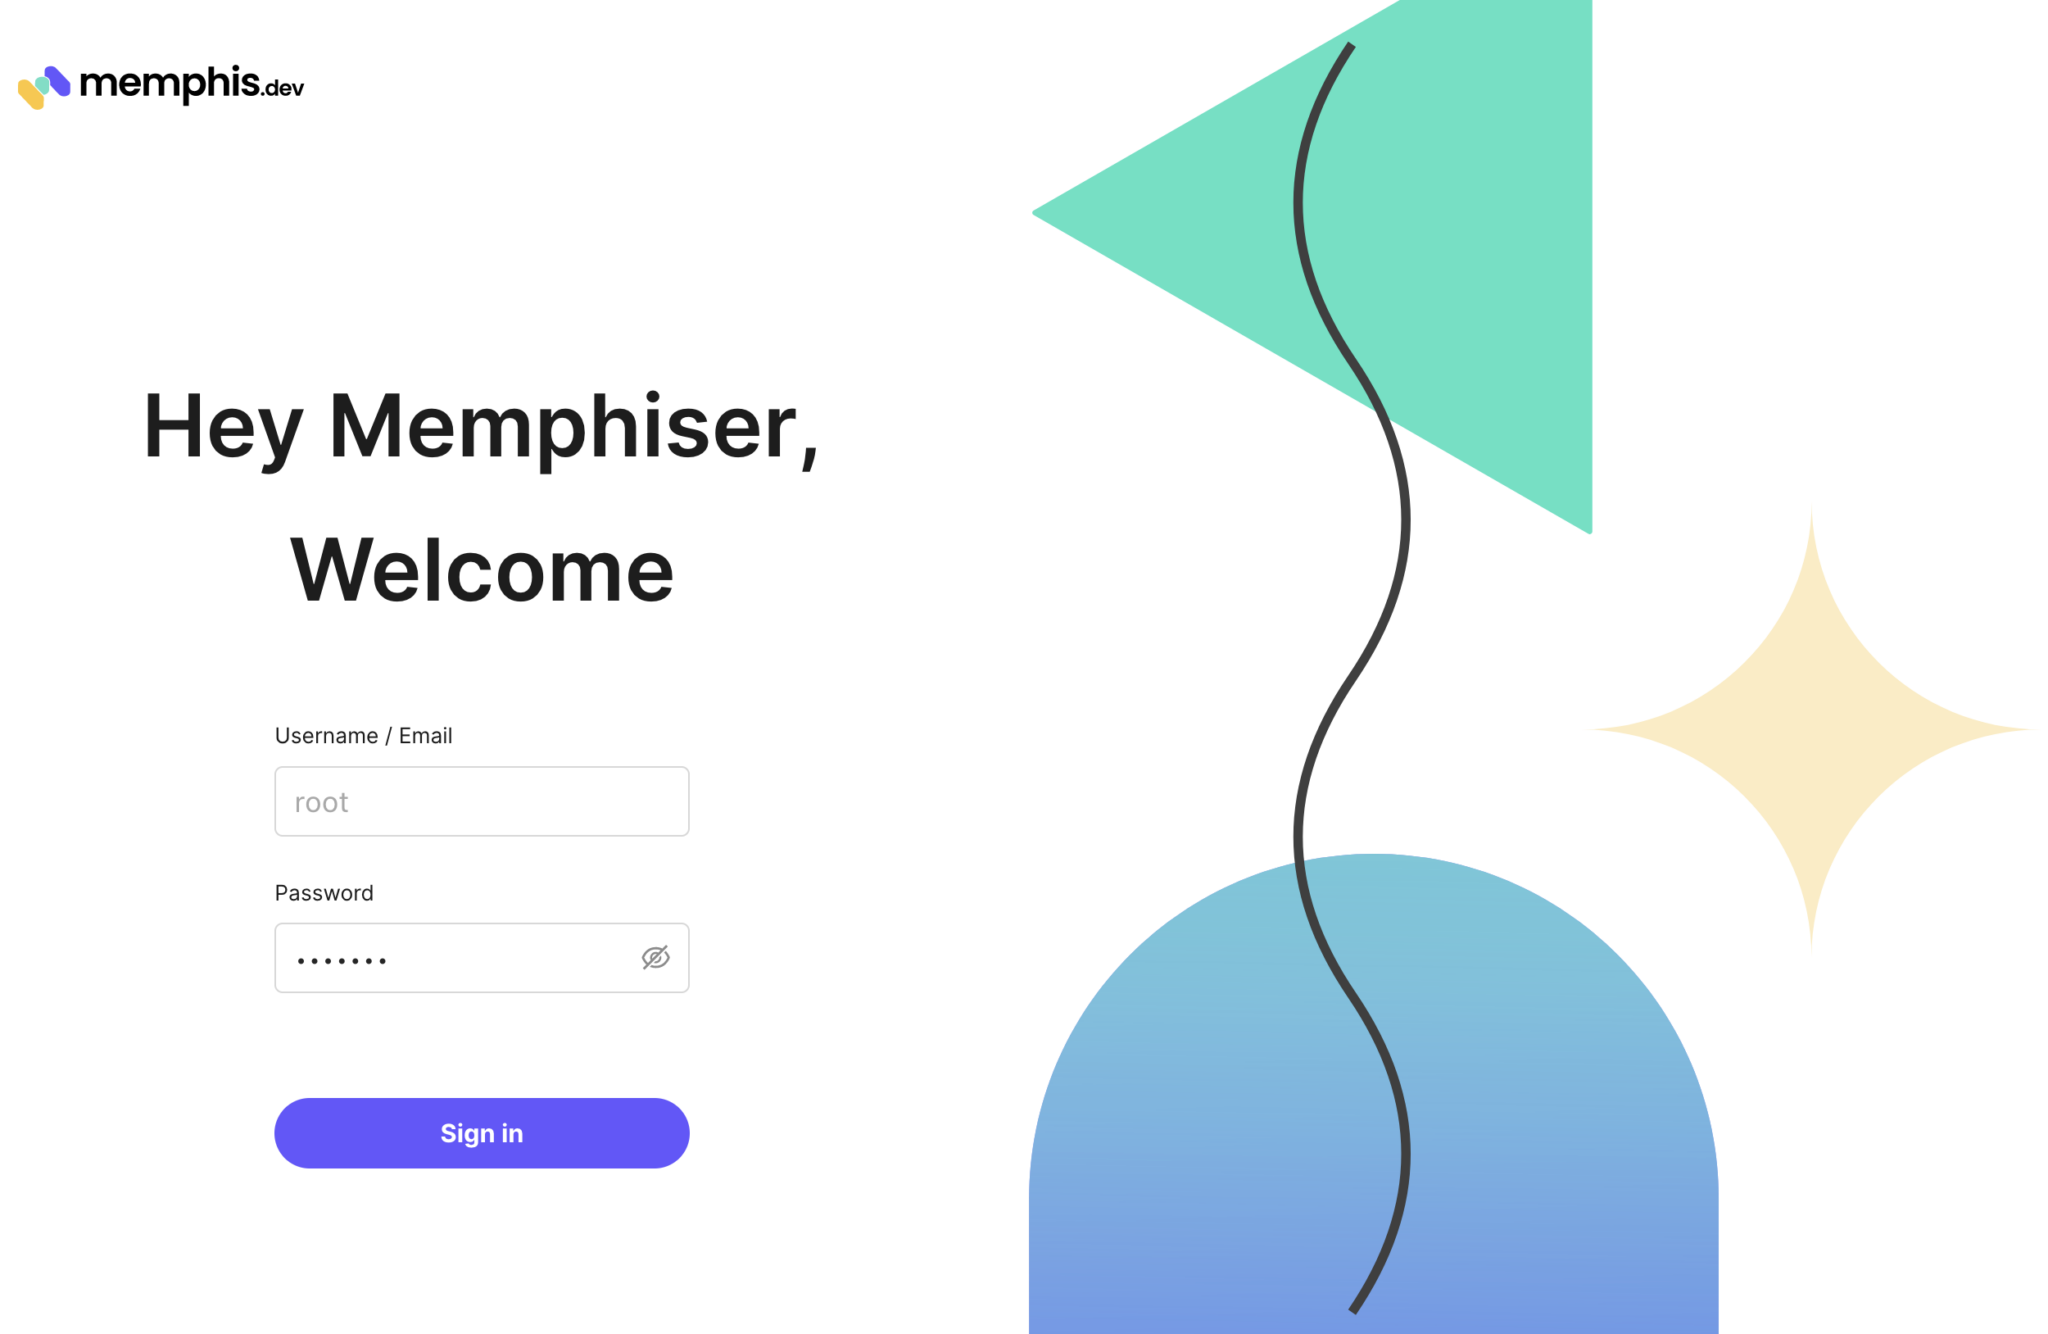
在Memphis.dev中,消息被送達至“stations”,其相當於消息代理中使用的“topics”。在瀏覽器中訪問localhost:9000。點擊頁面底部的“使用root登錄”鏈接。
使用root(用戶名)和memphis(密碼)登錄。
按照嚮導創建一個名為todo-cdc-events的station。
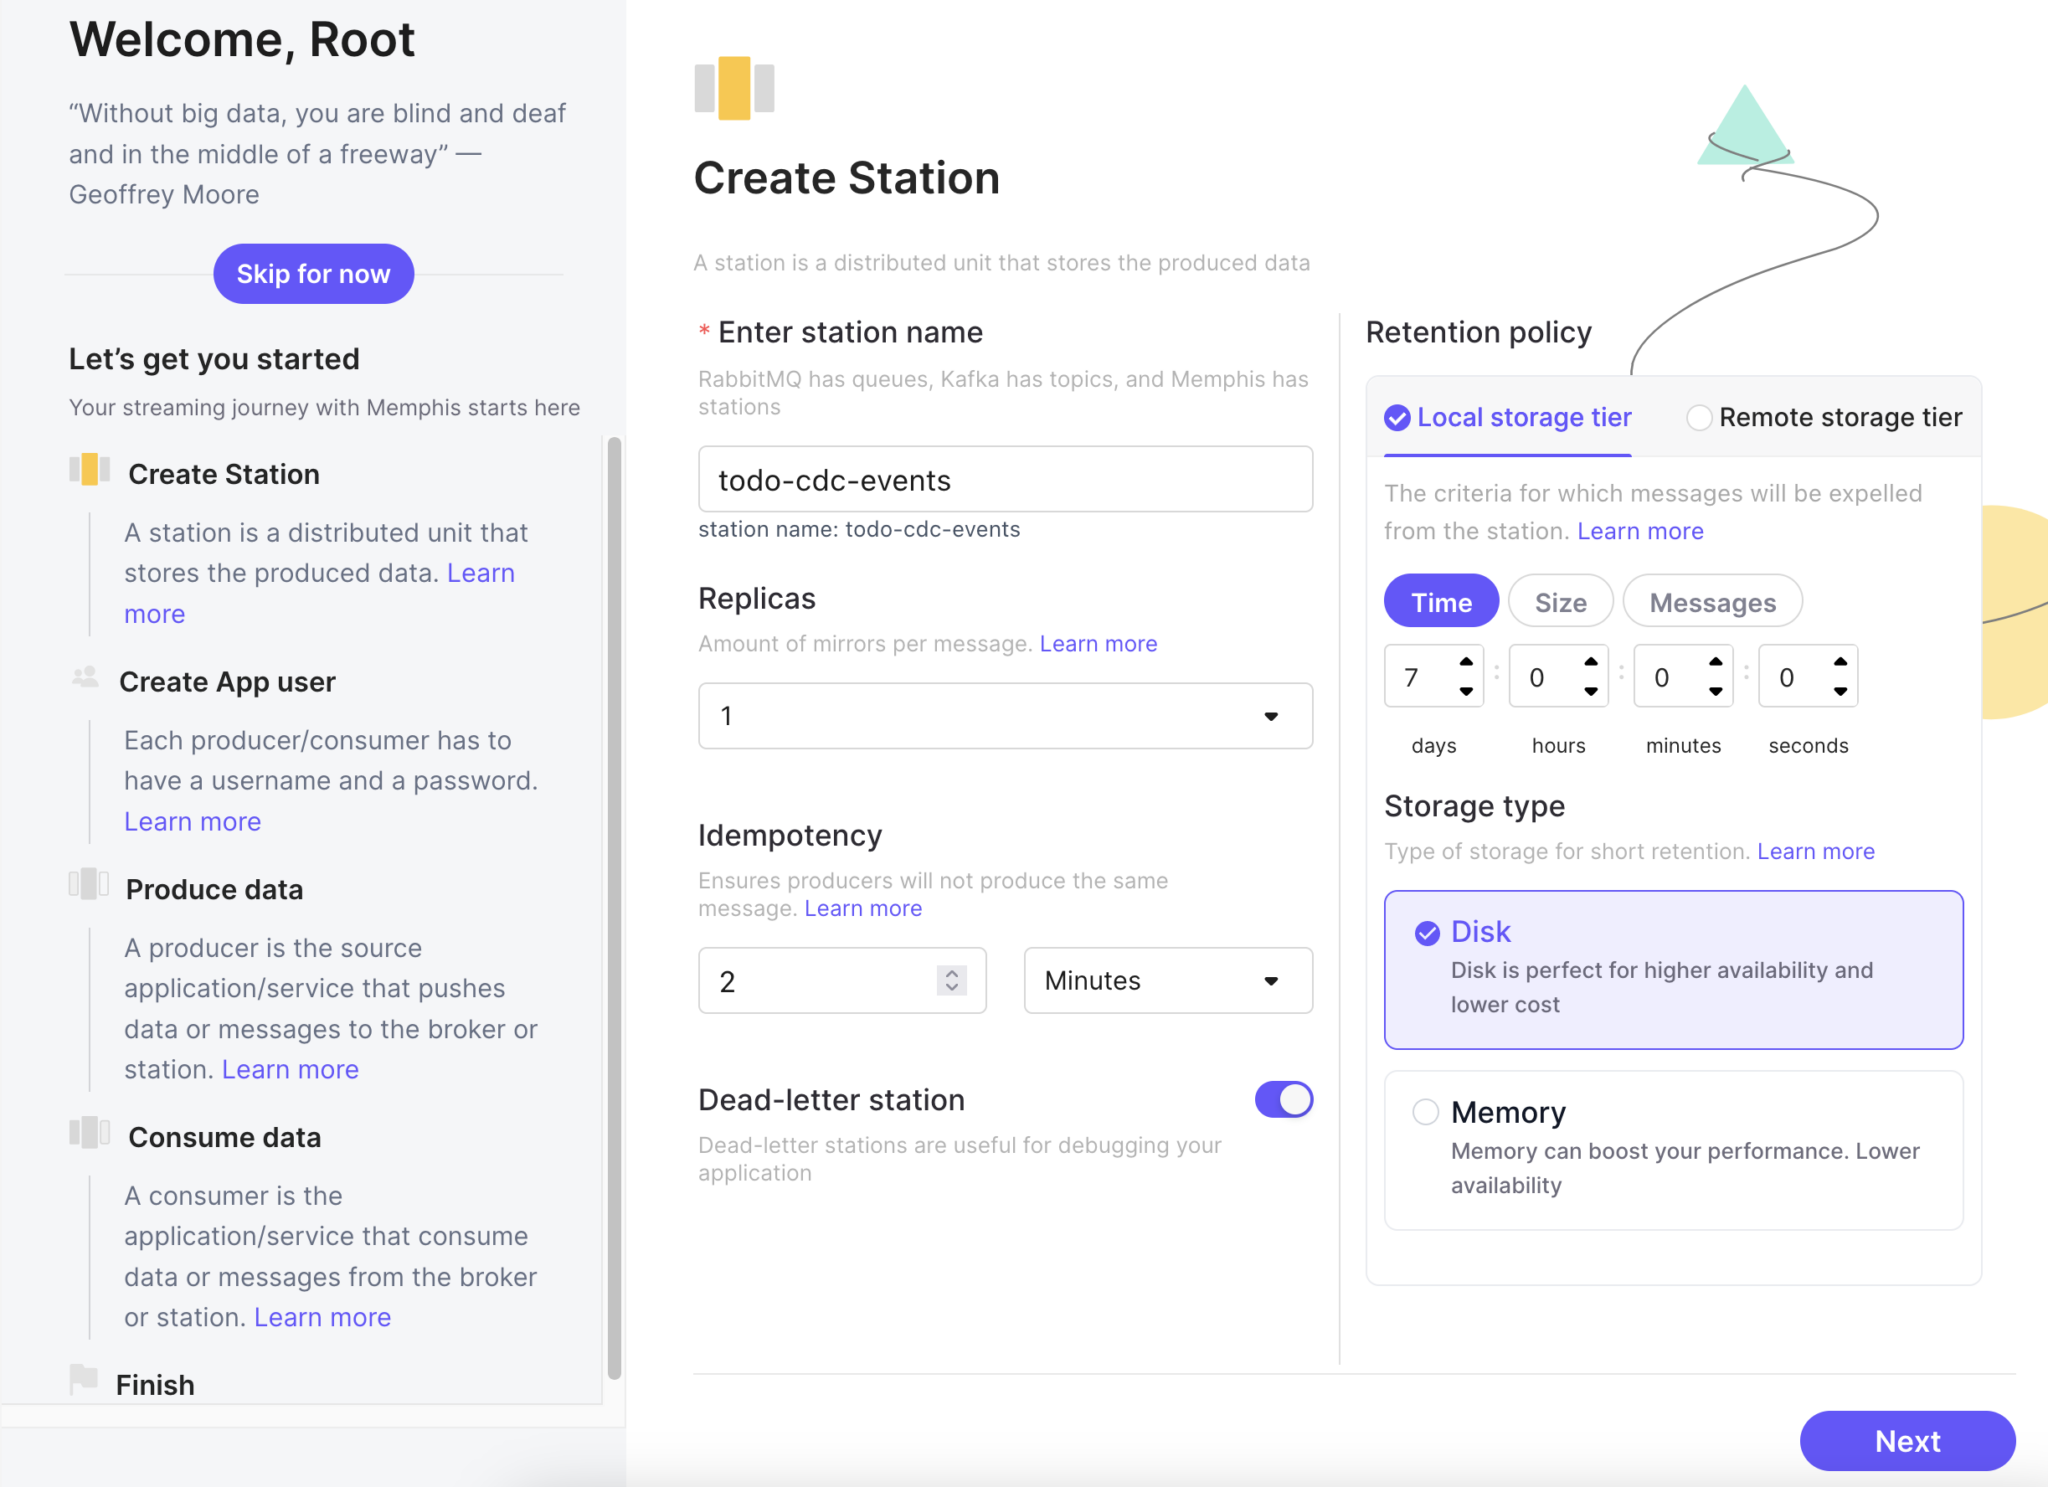
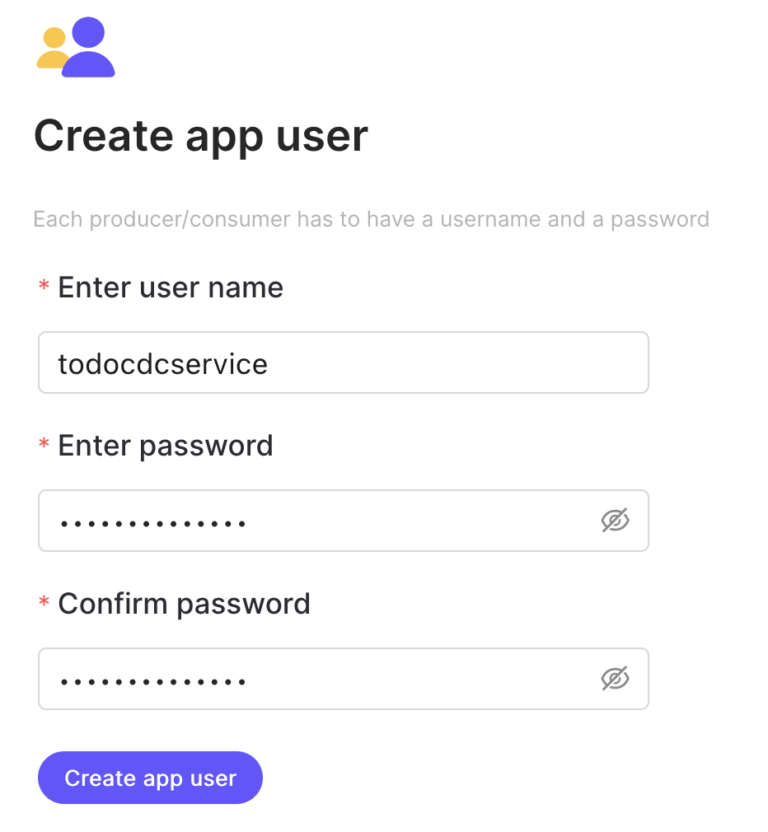
建立一個名為 todocdcservice 的使用者,並設定與密碼相同的值。
點擊“下一步”直至完成嚮導:

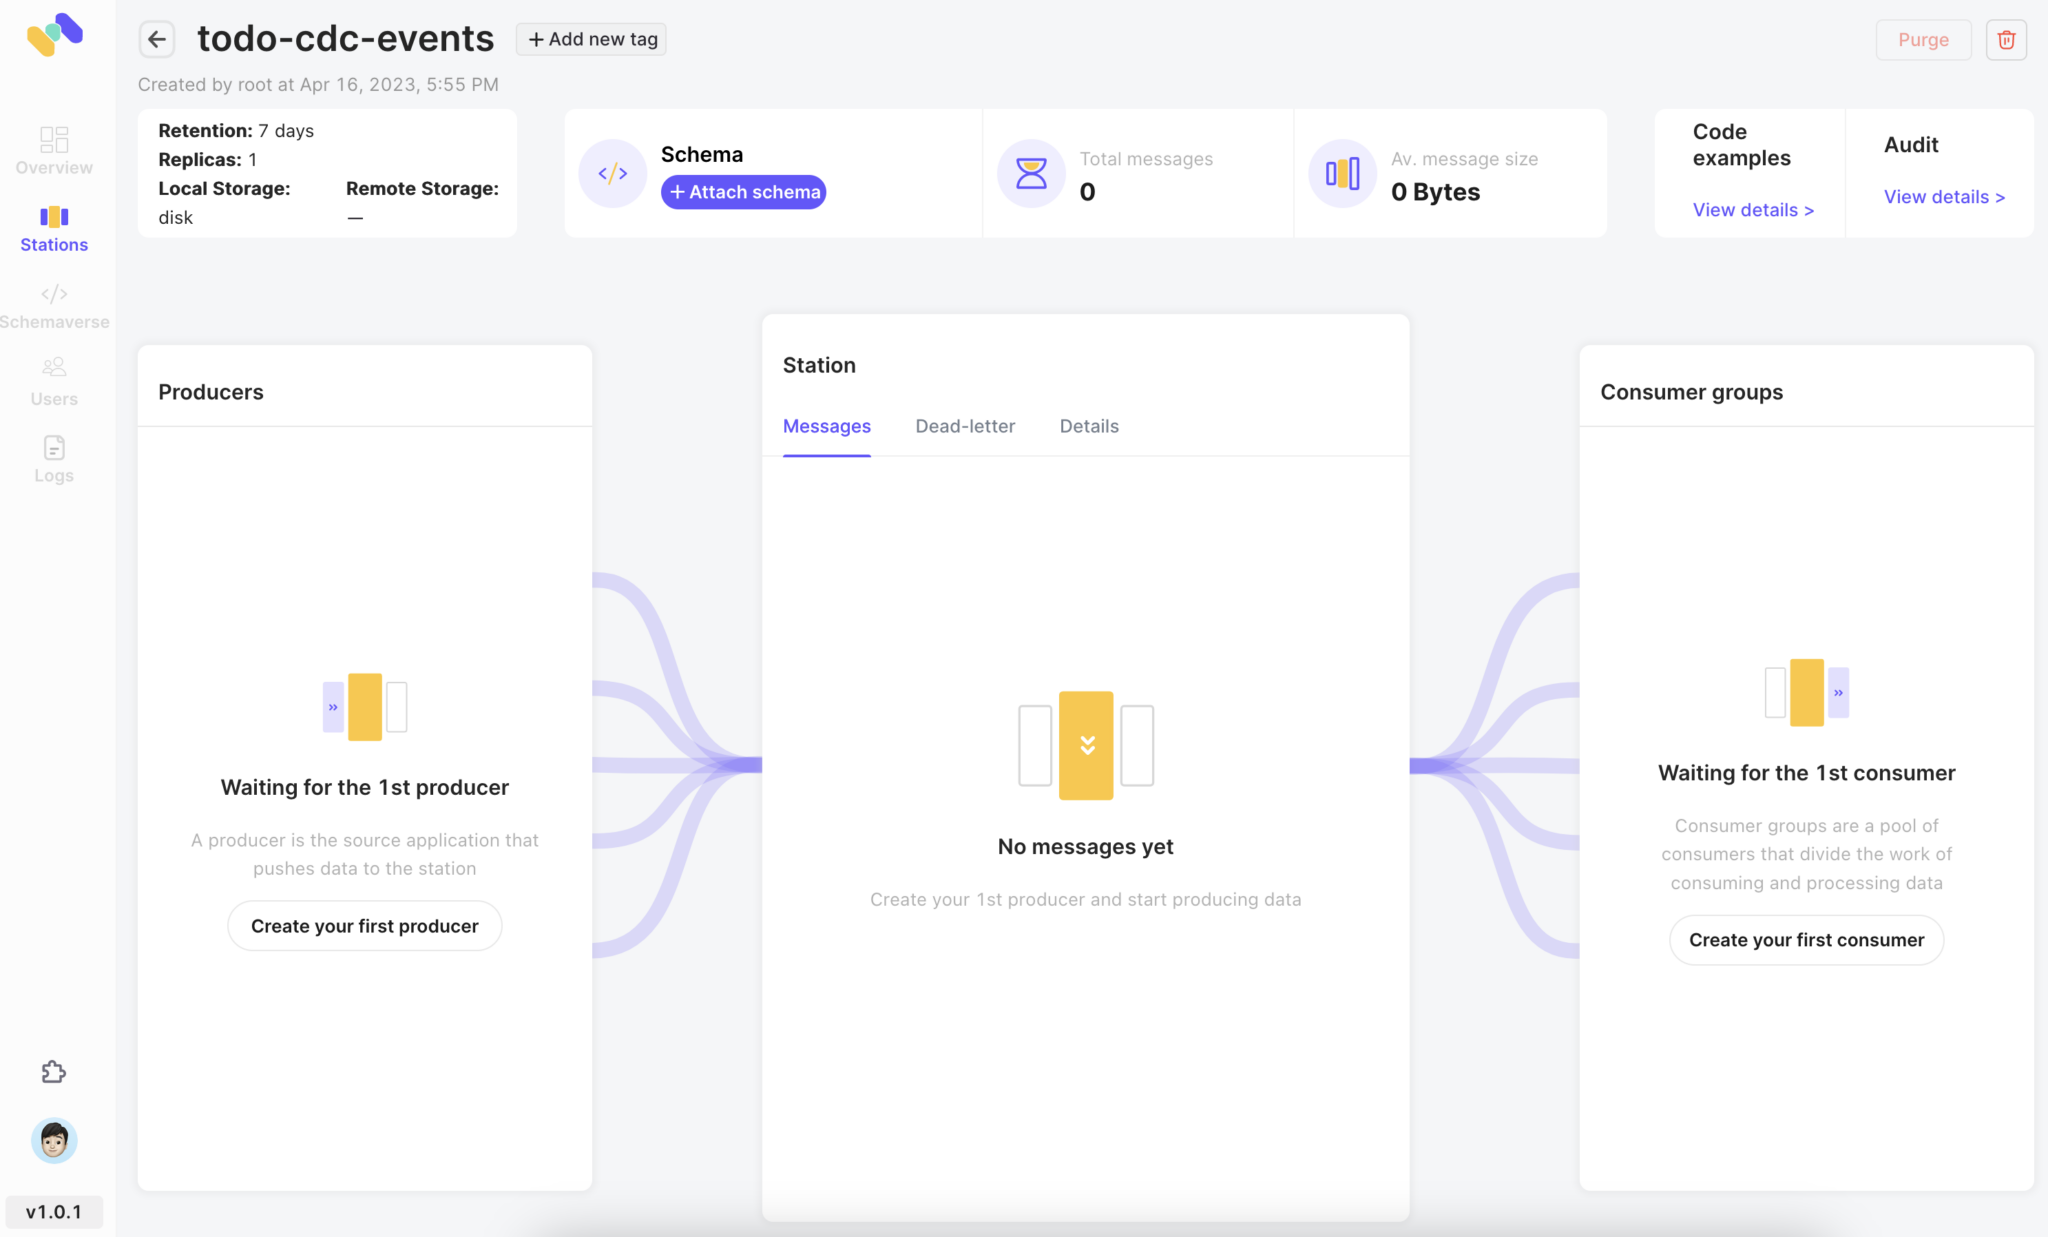
點擊“前往站點概覽”以進入站點概覽頁面。
步驟4:啟動列印消費者
我們使用 Memphis.dev Python SDK 創建了一個消費者腳本,該腳本輪詢 todo-cdc-events 站點並將消息打印到控制台。
$ docker compose up -d printing-consumer
[+] Running 3/3
 ⠿ Container mongodb-debezium-cdc-example-memphis-metadata-1  Hea...                                                             0.5s
 ⠿ Container mongodb-debezium-cdc-example-memphis-1           Healthy                                                            1.0s
 ⠿ Container printing-consumer                                Started
步驟5:啟動和配置 MongoDB
為了捕捉變更,必須啟用 MongoDB 的複製功能。以下是幾個步驟:
- 必須設定複製集名稱。這可以通過在命令行或配置文件中傳遞複製集名稱來完成。在Docker Compose 文件中,我們使用命令行參數–replSet rs0來設定複製集名稱以運行 MongoDB。
- 當使用複製功能並啟用授權時,必須為每個副本實例提供一個共用的金鑰檔案。我們依據MongoDB文件中的指示生成了一個金鑰檔案,接著建立了一個映像,該映像擴展了官方的MongoDB映像並包含該金鑰檔案。
- 一旦MongoDB運行,就需要初始化複製集。我們使用一個腳本在啟動時配置實例,該腳本呼叫replSetInitiate命令,並提供複製集中每個MongoDB實例的IP地址和端口號。此命令促使MongoDB實例彼此通訊並選出一個領導者。
一般來說,複製集用於提高可靠性(高可用性)。大多數文件描述了如何設置具有多個MongoDB實例的複製集。在我們的情況下,Debezium的MongoDB連接器利用複製功能來捕捉數據變更事件。儘管我們經歷了配置複製集的步驟,但我們僅使用一個MongoDB實例。
該 待辦事項生成腳本 每半秒創建一個新的待辦事項。欄位值是隨機生成的。這些項目被添加到名為“todo_items”的MongoDB集合中。
在Docker Compose文件中,待辦事項生成腳本配置為依賴於處於健康狀態的Mongodb實例和數據庫設置腳本的順利完成。通過啟動待辦事項生成腳本,Docker Compose也將啟動MongoDB並運行數據庫設置腳本。
$ docker compose up -d todo-generator
[+] Running 3/3
 ⠿ Container mongodb                 Healthy                                                                                     8.4s
 ⠿ Container mongodb-database-setup  Exited                                                                                      8.8s
 ⠿ Container mongodb-todo-generator  Started
步驟6:啟動Debezium Server
最後需要啟動的服務是 Debezium Server。該服務器通過一個 Java屬性文件 配置了MongoDB的源連接器和HTTP客戶端接收器連接器:
debezium.sink.type=http
debezium.sink.http.url=http://memphis-rest-gateway:4444/stations/todo-cdc-events/produce/single
debezium.sink.http.time-out.ms=500
debezium.sink.http.retries=3
debezium.sink.http.authentication.type=jwt
debezium.sink.http.authentication.jwt.username=todocdcservice
debezium.sink.http.authentication.jwt.password=todocdcservice
debezium.sink.http.authentication.jwt.url=http://memphis-rest-gateway:4444/
debezium.source.connector.class=io.debezium.connector.mongodb.MongoDbConnector
debezium.source.mongodb.connection.string=mongodb://db
debezium.source.mongodb.user=root
debezium.source.mongodb.password=mongodb
debezium.source.offset.storage.file.filename=data/offsets.dat
debezium.source.offset.flush.interval.ms=0
debezium.source.topic.prefix=tutorial
debezium.format.key=json
debezium.format.value=json
quarkus.log.console.json=false
大多數選項都是不言自明的。HTTP客戶端接收URL值得詳細解釋。Memphis.dev REST網關預期接收具有以下格式的POST請求路徑:
/stations/{station}/produce/{quantity}
其中 {station} 佔位符被替換為要發送消息到的站點名稱。{quantity} 佔位符被替換為值single(單條消息)或batch(多條消息)。
訊息(們)作為POST請求的載荷傳遞。REST閘道支援三種訊息格式(純文字、JSON或協定緩衝區)。內容類型標頭欄位的值(text/, application/json, application/x-protobuf)決定了載荷的解釋方式。
Debezium Server的HTTP Client接收器生成的REST請求與這些模式一致。請求使用POST動詞;每個請求包含一個JSON編碼的訊息作為載荷,且內容類型標頭設置為application/JSON。我們使用todo-CDC-events作為站點名稱,並在端點URL中使用單一數量值來路由訊息並指示REST閘道應如何解釋請求:
http://memphis-rest-gateway:4444/stations/todo-cdc-events/produce/single
屬性debezium.sink.http.authentication.type=jwt表示HTTP Client接收器應使用JWT認證。用戶名和密碼屬性不言自明,但debezium.sink.http.authentication.jwt.The URL屬性需要一些解釋。初始令牌通過/auth/authenticate端點獲取,而認證刷新則通過單獨的/auth/refreshToken端點進行。HTTP Client中的JWT認證將適當的端點附加到給定的基礎URL上。
可以使用以下命令啟動Debezium Server:
$ docker compose up -d debezium-server
[+] Running 5/5
 ⠿ Container mongodb                                              Healthy                                                        1.5s
 ⠿ Container mongodb-debezium-cdc-example-memphis-metadata-1      Healthy                                                        0.5s
 ⠿ Container mongodb-debezium-cdc-example-memphis-1               Healthy                                                        1.0s
 ⠿ Container mongodb-debezium-cdc-example-memphis-rest-gateway-1  Running                                                        0.0s
 ⠿ Container debezium-server                                      Started
步驟7:確認系統運作正常
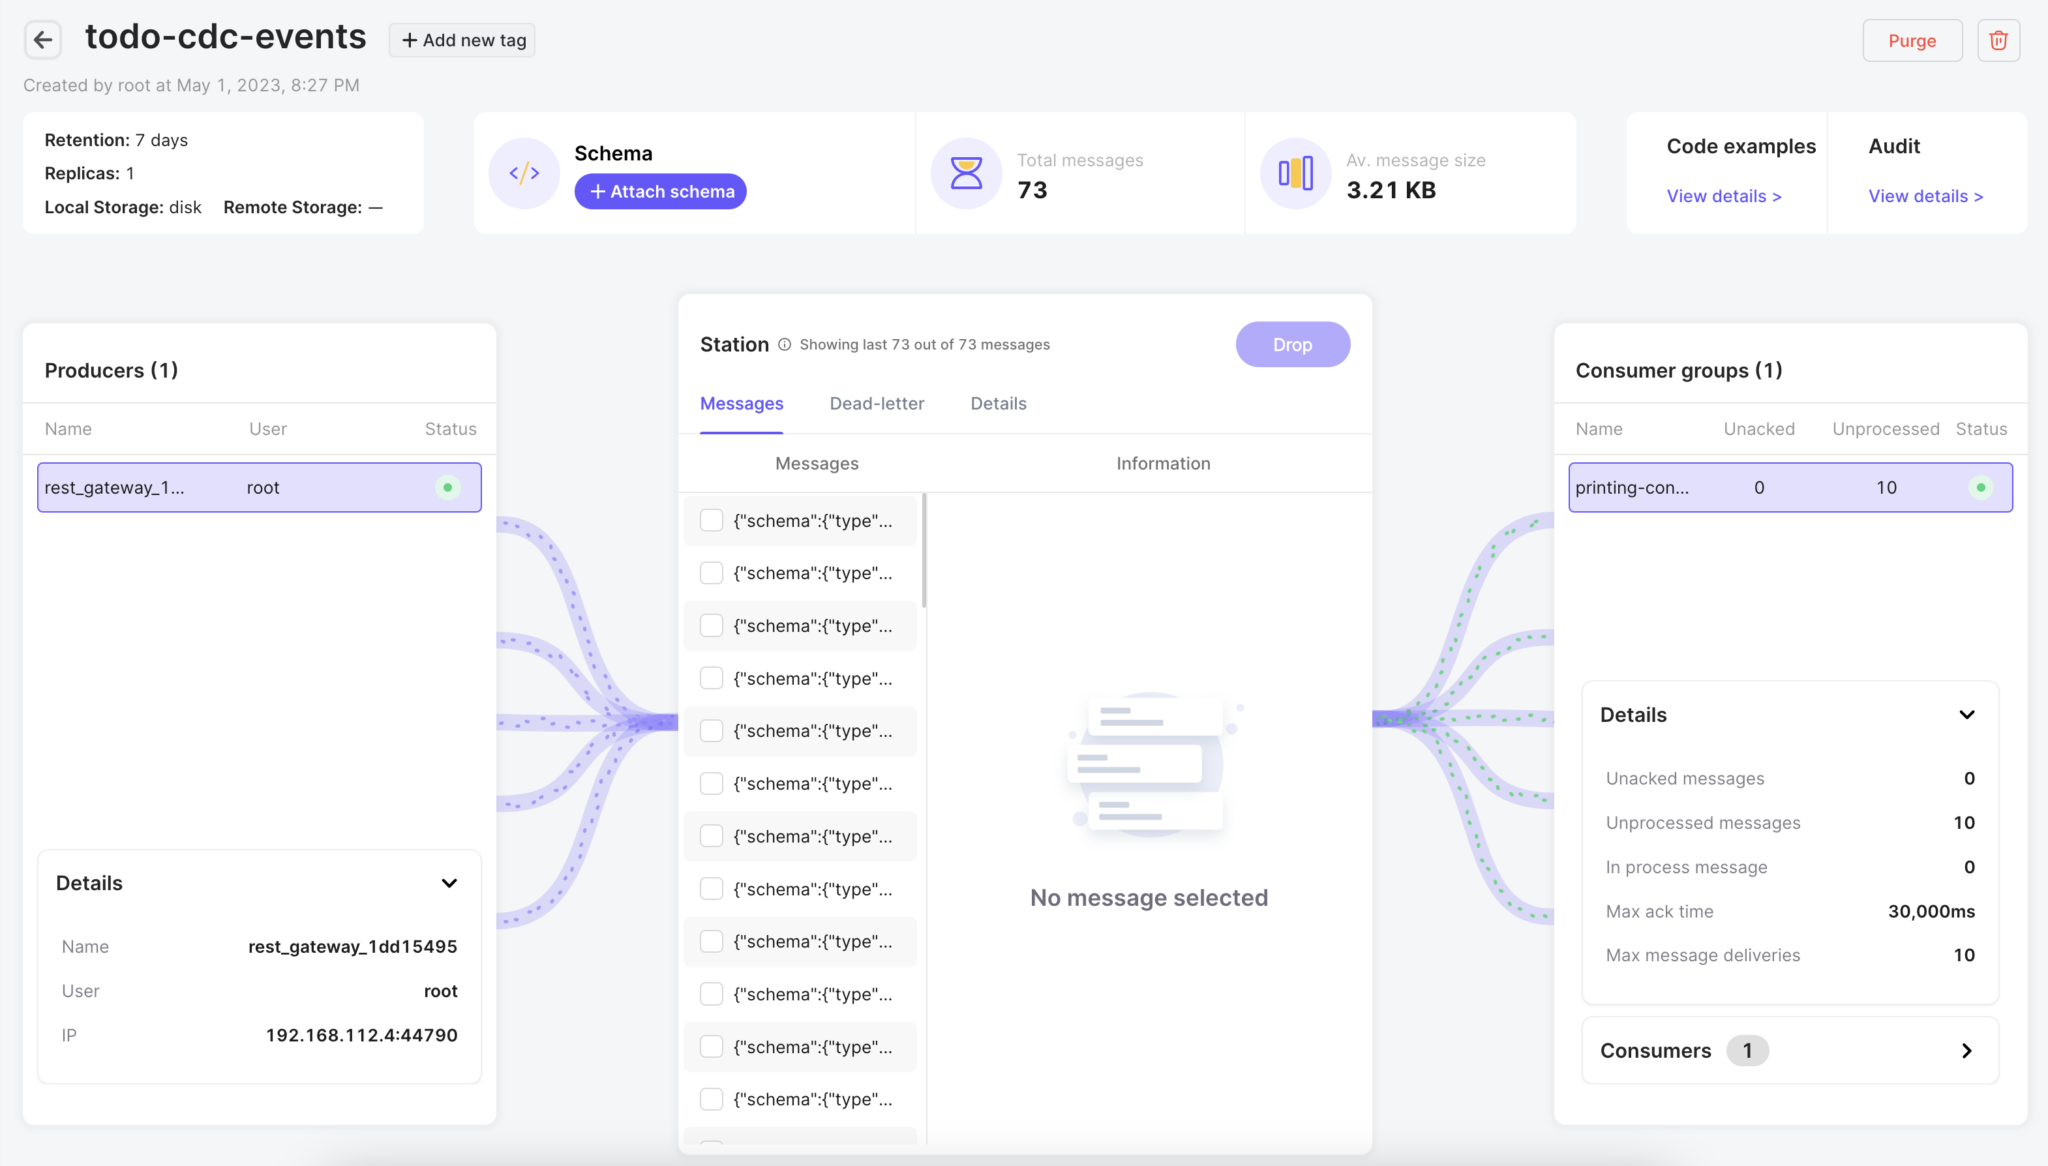
在Memphis.dev網頁介面的todo-cdc-events站點概覽螢幕中檢查,以確認生產者和消費者已連接,且訊息正在傳遞。
此外,請列印printing-consumer容器日誌:
$ docker logs --tail 2 printing-consumer訊息:
bytearray(b'{"schema":{"type":"struct","fields":[{"type":"string","optional":true,"name":"io.debezium.data.Json","version":1,"field":"before"},{"type":"string","optional":true,"name":"io.debezium.data.Json","version":1,"field":"after"},{"type":"struct","fields":[{"type":"array","items":{"type":"string","optional":false},"optional":true,"field":"removedFields"},{"type":"string","optional":true,"name":"io.debezium.data.Json","version":1,"field":"updatedFields"},{"type":"array","items":{"type":"struct","fields":[{"type":"string","optional":false,"field":"field"},{"type":"int32","optional":false,"field":"size"}],"optional":false,"name":"io.debezium.connector.mongodb.changestream.truncatedarray","version":1},"optional":true,"field":"truncatedArrays"}],"optional":true,"name":"io.debezium.connector.mongodb.changestream.updatedescription","version":1,"field":"updateDescription"},{"type":"struct","fields":[{"type":"string","optional":false,"field":"version"},{"type":"string","optional":false,"field":"connector"},{"type":"string","optional":false,"field":"name"},{"type":"int64","optional":false,"field":"ts_ms"},{"type":"string","optional":true,"name":"io.debezium.data.Enum","version":1,"parameters":{"allowed":"true,last,false,incremental"},"default":"false","field":"snapshot"},{"type":"string","optional":false,"field":"db"},{"type":"string","optional":true,"field":"sequence"},{"type":"string","optional":false,"field":"rs"},{"type":"string","optional":false,"field":"collection"},{"type":"int32","optional":false,"field":"ord"},{"type":"string","optional":true,"field":"lsid"},{"type":"int64","optional":true,"field":"txnNumber"},{"type":"int64","optional":true,"field":"wallTime"}],"optional":false,"name":"io.debezium.connector.mongo.Source","field":"source"},{"type":"string","optional":true,"field":"op"},{"type":"int64","optional":true,"field":"ts_ms"},{"type":"struct","fields":[{"type":"string","optional":false,"field":"id"},{"type":"int64","optional":false,"field":"total_order"},{"type":"int64","optional":false,"field":"data_collection_order"}],"optional":true,"name":"event.block","version":1,"field":"transaction"}],"optional":false,"name":"tutorial.todo_application.todo_items.Envelope"},"payload":{"before":null,"after":"{\\"_id\\": {\\"$oid\\": \\"645fe9eaf4790c34c8fcc2ec\\"},\\"creation_timestamp\\": {\\"$date\\": 1684007402475},\\"due_date\\": {\\"$date\\": 1684266602475},\\"description\\": \\"GMZVMKXVKOWIOEAVRYWR\\",\\"completed\\": false}","updateDescription":null,"source":{"version":"2.3.0-SNAPSHOT","connector":"mongodb","name":"tutorial","ts_ms":1684007402000,"snapshot":"false","db":"todo_application","sequence":null,"rs":"rs0","collection":"todo_items","ord":1,"lsid":null,"txnNumber":null,"wallTime":1684007402476},"op":"c","ts_ms":1684007402478,"transaction":null}}')CDC訊息格式
接收到的訊息以JSON格式呈現。這些訊息包含兩個頂層欄位(schema和payload)。schema描述了記錄的結構(欄位名稱和類型),而payload則描述了對記錄的更改。payload物件本身包含兩個欄位(before和after),分別表示更改前後的記錄值。
對於MongoDB,Debezium Server將記錄編碼為序列化JSON字串:
{
"before" : null,

"after" : "{\\"_id\\": {\\"$oid\\": \\"645fe9eaf4790c34c8fcc2ed\\"},\\"creation_timestamp\\": {\\"$date\\": 1684007402978},\\"due_date\\": {\\"$date\\": 1684266602978},\\"description\\": \\"buy milk\\",\\"completed\\": false}"
}
這將對訊息的下游處理產生影響,我們將在本系列未來的部落格文章中進行描述。
恭喜!您現已擁有一個實際案例,展示如何使用Debezium Server從MongoDB資料庫捕捉數據變更事件,並將這些事件傳輸至Memphis.dev進行下游處理。
第三部分即將推出!
Source:
https://dzone.com/articles/part-2-change-data-capture-cdc-for-mongodb-with-de