


JUnit5 教程
在這個 Junit 教程中,我們將通過示例介紹 JUnit5 的基礎知識和其新特性。在 Java 的世界中,JUnit 是一個流行的框架,用於對 Java 代碼實施單元測試。JUnit 主要幫助開發人員自行在 JVM 上測試他們的代碼。
JUnit5 架構
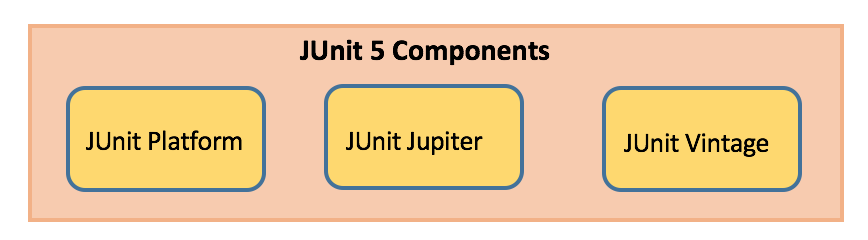
JUnit 平台
- 在 JVM 上啟動測試框架
- 具有 TestEngine API,用於構建運行在 JUnit 平台上的測試框架
JUnit Jupiter
- 結合了新的編程模型來編寫測試和擴展模型來擴展功能
- 新增註釋,如
@BeforeEach、@AfterEach、@AfterAll、@BeforeAll等。
JUnit Vintage
- 提供支援以在新平台上執行先前的JUnit版本3和4測試
JUnit Maven依賴
為了在項目中實現基於JUnit5的測試案例,將以下依賴項添加到項目的pom.xml文件中:
- JUnit 5庫
<dependency>
     <groupId>org.junit.jupiter</groupId>
     <artifactId>junit-jupiter-engine</artifactId>
     <version>5.1.1</version>
     <scope>test</scope>
</dependency>
<dependency>
     <groupId>org.junit.platform</groupId>
     <artifactId>junit-platform-runner</artifactId>
     <version> 1.1.1</version>
     <scope>test</scope>
</dependency>
- JUnit5 Maven Surefire提供程序,用於在IDE不支援JUnit5時執行單元測試(如果IDE支援,則此點不需要)
<plugin>
     <artifactId>maven-surefire-plugin</artifactId>
     <version>2.19.1</version>
     <dependencies>
          <dependency>
               <groupId>org.junit.platform</groupId>
               <artifactId>junit-platform-surefire-provider</artifactId>
               <version>1.0.2</version>
          </dependency>
     </dependencies>
</plugin>
JUnit5新功能
它在運行時需要Java 8或更高版本。但仍然可以測試使用先前Java版本編譯的代碼。它引入了各種新功能。
JUnit 注解
以下是一些常用的注解,提供在其中:
| Annotation | Description |
|---|---|
| @Test | Denotes a test method |
| @DisplayName | Declares a custom display name for the test class or test method |
| @BeforeEach | Denotes that the annotated method should be executed before each test method |
| @AfterEach | Denotes that the annotated method should be executed after each test method |
| @BeforeAll | Denotes that the annotated method should be executed before all test methods |
| @AfterAll | Denotes that the annotated method should be executed after all test methods |
| @Disable | Used to disable a test class or test method |
| @Nested | Denotes that the annotated class is a nested, non-static test class |
| @Tag | Declare tags for filtering tests |
| @ExtendWith | Register custom extensions |
package com.journaldev;

import org.junit.jupiter.api.AfterAll;
import org.junit.jupiter.api.AfterEach;
import org.junit.jupiter.api.BeforeAll;
import org.junit.jupiter.api.BeforeEach;
import org.junit.jupiter.api.Disabled;
import org.junit.jupiter.api.DisplayName;
import org.junit.jupiter.api.Test;

public class JUnit5Sample1Test {

  @BeforeAll
  static void beforeAll() {
    System.out.println("**--- Executed once before all test methods in this class ---**");
  }

  @BeforeEach
  void beforeEach() {
    System.out.println("**--- Executed before each test method in this class ---**");
  }

  @Test
  void testMethod1() {
    System.out.println("**--- Test method1 executed ---**");
  }

  @DisplayName("Test method2 with condition")
  @Test
  void testMethod2() {
    System.out.println("**--- Test method2 executed ---**");
  }

  @Test
  @Disabled("implementation pending")
  void testMethod3() {
	  System.out.println("**--- Test method3 executed ---**");
  }

  @AfterEach
  void afterEach() {
    System.out.println("**--- Executed after each test method in this class ---**");
  }

  @AfterAll
  static void afterAll() {
    System.out.println("**--- Executed once after all test methods in this class ---**");
  }


}
我们可以在 Eclipse 中运行上述 JUnit 测试类 -> 运行为 -> JUnit 测试。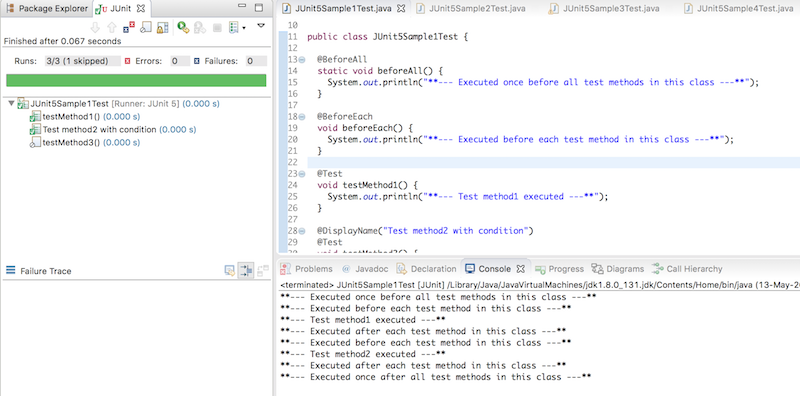
JUnit 断言
每个测试方法都必须针对条件进行真实性评估,使用断言使得测试可以继续执行。JUnit Jupiter 断言保存在 org.junit.jupiter.api.Assertions 类中。所有方法都是静态的。
| Assertion | Description |
|---|---|
| assertEquals(expected, actual) | Fails when expected does not equal actual |
| assertFalse(expression) | Fails when expression is not false |
| assertNull(actual) | Fails when actual is not null |
| assertNotNull(actual) | Fails when actual is null |
| assertAll() | Group many assertions and every assertion is executed even if one or more of them fails |
| assertTrue(expression) | Fails if expression is not true |
| assertThrows() | Class to be tested is expected to throw an exception |
@Test
void testAssertEqual() {
	 assertEquals("ABC", "ABC");
	 assertEquals(20, 20, "optional assertion message");
	 assertEquals(2 + 2, 4);
}

@Test
void testAssertFalse() {
	 assertFalse("FirstName".length() == 10);
	 assertFalse(10 > 20, "assertion message");
}

@Test
void testAssertNull() {
     String str1 = null;
	 String str2 = "abc";
	 assertNull(str1);
	 assertNotNull(str2);
}

@Test
void testAssertAll() {
	 String str1 = "abc";
	 String str2 = "pqr";
	 String str3 = "xyz";
	 assertAll("numbers",
	      () -> assertEquals(str1,"abc"),
		  () -> assertEquals(str2,"pqr"),
		  () -> assertEquals(str3,"xyz")
	 );
	 //取消下面的代码注释并理解每个断言的执行
     /*assertAll("numbers",
		  () -> assertEquals(str1,"abc"),
		  () -> assertEquals(str2,"pqr1"),
		  () -> assertEquals(str3,"xyz1")
	 );*/
}

@Test
void testAssertTrue() {
	 assertTrue("FirstName".startsWith("F"));
	 assertTrue(10  {
	      throw new IllegalArgumentException("Illegal Argument Exception occured");
	 });
	 assertEquals("Illegal Argument Exception occured", exception.getMessage());
}
JUnit5 导入
它的测试类需要 org.junit.jupiter.api.Test 导入语句而不是 org.junit.Test。此外,测试方法不需要是公共的和本地包。
import org.junit.jupiter.api.Test;
JUnit5 假設
假設是位於 org.junit.jupiter.api.Assumptions 類中的靜態方法。它們僅在指定條件滿足時執行測試,否則測試將被中止。中止的測試不會導致構建失敗。當假設失敗時,將拋出 org.opentest4j.TestAbortedException,並跳過該測試。
| Assumptions | Description |
|---|---|
| assumeTrue | Execute the body of lamda when the positive condition hold else test will be skipped |
| assumeFalse | Execute the body of lamda when the negative condition hold else test will be skipped |
| assumingThat | Portion of the test method will execute if an assumption holds true and everything after the lambda will execute irrespective of the assumption in assumingThat() holds |
@Test
void testAssumeTrue() {
     boolean b = 'A' == 'A';
     assumeTrue(b);
     assertEquals("Hello", "Hello");
}

@Test
@DisplayName("test executes only on Saturday")
public void testAssumeTrueSaturday() {
     LocalDateTime dt = LocalDateTime.now();
     assumeTrue(dt.getDayOfWeek().getValue() == 6);
     System.out.println("further code will execute only if above assumption holds true");
}

@Test
void testAssumeFalse() {
     boolean b = 'A' != 'A';
     assumeFalse(b);
     assertEquals("Hello", "Hello");
}

@Test
void testAssumeFalseEnvProp() {
     System.setProperty("env", "prod");
     assumeFalse("dev".equals(System.getProperty("env")));
     System.out.println("further code will execute only if above assumption hold");
}

@Test
void testAssumingThat() {
     System.setProperty("env", "test");
     assumingThat("test".equals(System.getProperty("env")),
          () -> {
               assertEquals(10, 10);
               System.out.println("perform below assertions only on the test env");
               });

     assertEquals(20, 20);
     System.out.println("perform below assertions on all env");
}
JUnit 嵌套測試類
嵌套測試允許創建嵌套類並執行其中的所有測試方法。內部類必須是非靜態的。只需為內部類加上 @Nested 註釋,其中的所有測試方法都將被執行。
@BeforeAll
static void beforeAll() {
     System.out.println("**--- JUnit5Sample4Test :: beforeAll :: Executed once before all test methods ---**");
}

@BeforeEach
void beforeEach() {
	 System.out.println("**--- JUnit5Sample4Test :: beforeEach :: Executed before each test method ---**");
}

@AfterEach
void afterEach() {
	 System.out.println("**--- JUnit5Sample4Test :: afterEach :: Executed after each test method ---**");
}

@AfterAll
static void afterAll() {
	 System.out.println("**--- JUnit5Sample4Test :: afterAll :: Executed after all test method ---**");
}

     @Nested
     class InnerClass {

          @BeforeEach
          void beforeEach() {
               System.out.println("**--- InnerClass :: beforeEach :: Executed before each test method ---**");
          }

          @AfterEach
          void afterEach() {
        	   System.out.println("**--- InnerClass :: afterEach :: Executed after each test method ---**");
          }

          @Test
          void testMethod1() {
        	   System.out.println("**--- InnerClass :: testMethod1 :: Executed test method1 ---**");
          }

          @Nested
          class InnerMostClass {

               @BeforeEach
               void beforeEach() {
                    System.out.println("**--- InnerMostClass :: beforeEach :: Executed before each test method ---**");
               }

               @AfterEach
               void afterEach() {
            	    System.out.println("**--- InnerMostClass :: afterEach :: Executed after each test method ---**");
               }

               @Test
               void testMethod2() {
            	    System.out.println("**--- InnerMostClass :: testMethod2 :: Executed test method2 ---**");
               }
        }
    }
JUnit 測試異常
有時候,方法在特定條件下預期會拋出異常。如果給定的方法沒有拋出指定的異常,assertThrows 將使測試失敗。
Throwable exception = assertThrows(IllegalArgumentException.class, () -> {
     throw new IllegalArgumentException("Illegal Argument Exception occured");
});
assertEquals("Illegal Argument Exception occured", exception.getMessage());
JUnit 測試執行
單元測試可以以多種方式執行,以下是其中兩種方式:
- 使用 Eclipse IDE Oxygen.3a (4.7.3a) Release,打開要執行的測試檔案。右鍵點擊檔案,選擇”Runs As”,然後選擇”JUnit Test”
- 在 Windows 命令提示字元上使用 mvn test 指令
摘要
我們已經探索了 JUnit5 及其新功能,並提供了一些示例。我們還看了如何使用 JUnit 注解、斷言、假設、異常並撰寫巢狀測試類別。
您可以從我們的 GitHub 存儲庫下載完整的範例專案。
Source:
https://www.digitalocean.com/community/tutorials/junit5-tutorial