


在本文中,我們將解釋如何在 LEMP 堆疊(Linux、Nginx、MariaDB、PHP)以及 PHP-FPM 安裝在 RHEL/CentOS 7/6 和 Fedora 26-29 伺服器上,使用 yum 和 dnf 套件管理器。
在這個過程中,我們將安裝並啟用 Epel、Remi、Nginx 和 MariaDB 儲存庫,以便能夠安裝這些套件的最新版本。
閱讀更多: 在 CentOS 7 上安裝 Apache、MySQL 8 或 MariaDB 10 和 PHP 7
步驟 1:安裝 EPEL 和 Remi 儲存庫
EPEL(企業 Linux 的額外套件)是一個基於社群的儲存庫,為基於 RHEL 的 Linux 發行版提供附加軟體套件。
Remi 是一個儲存庫,您可以在其中找到 Fedora 和 Enterprise Linux 發行版中安裝的 PHP 堆疊(完整功能)的最新版本。
在 RHEL/CentOS 7
# yum update && yum install epel-release
# rpm -Uvh http://rpms.famillecollet.com/enterprise/remi-release-7.rpm

------ For RHEL 7 Only ------
# subscription-manager repos --enable=rhel-7-server-optional-rpms
在 RHEL/CentOS 6
# yum update && yum install epel-release
# rpm -Uvh http://rpms.famillecollet.com/enterprise/remi-release-6.rpm

------ For RHEL 6 Only ------
# subscription-manager repos --enable=rhel-6-server-optional-rpms
在 Fedora 24-29
# rpm -Uvh http://rpms.remirepo.net/fedora/remi-release-29.rpm  [On Fedora 29]
# rpm -Uvh http://rpms.remirepo.net/fedora/remi-release-28.rpm  [On Fedora 28]
# rpm -Uvh http://rpms.remirepo.net/fedora/remi-release-27.rpm  [On Fedora 27]
# rpm -Uvh http://rpms.remirepo.net/fedora/remi-release-26.rpm  [On Fedora 26]
# rpm -Uvh http://rpms.remirepo.net/fedora/remi-release-25.rpm  [On Fedora 25]
# rpm -Uvh http://rpms.remirepo.net/fedora/remi-release-24.rpm  [On Fedora 24]
第2步:安裝Nginx和MariaDB存儲庫
只有在
對於RHEL 7/6:
[nginx]
name=nginx repo
baseurl=http://nginx.org/packages/rhel/$releasever/$basearch/
gpgcheck=0
enabled=1
對於CentOS 7/6:
[nginx]
name=nginx repo
baseurl=http://nginx.org/packages/centos/$releasever/$basearch/
gpgcheck=0
enabled=1
要啟用
[mariadb]
name = MariaDB
baseurl = http://yum.mariadb.org/10.1/centos7-amd64
gpgkey=https://yum.mariadb.org/RPM-GPG-KEY-MariaDB
gpgcheck=1
第4步:安裝Ngnix和MariaDB
Nginx(Engine X)是一個開源、強大、輕量級且高性能的Web服務器,反向代理服務器,也是用於HTTP、SMTP、POP3和IMAP協議的郵件代理服務器。有關更多詳細信息,請訪問http://wiki.nginx.org/Overview。
MariaDB是著名MySQL的一個分支,是全球最流行的關係型數據庫管理系統(RDBMS)之一。它完全由社區開發,因此旨在保持FOSS並與GPL兼容。
要安裝Ngnix和MariaDB,運行以下命令。
----------- Installing on RHEL/CentOS 7/6 -----------
# yum --enablerepo=remi install nginx MariaDB-client MariaDB-server php php-common php-fpm

----------- Installing on Fedora -----------
# dnf --enablerepo=remi install nginx MariaDB-client MariaDB-server php php-common php-fpm
第3步:使用Remi存儲庫安裝PHP
PHP(超文字預處理器)是一種適合網頁開發的免費開源伺服器端腳本語言。它可用於為網站生成動態網頁,並且最常見於*nix伺服器中。PHP的優勢之一是通過使用各種模組可以輕鬆擴展。
要安裝PHP,首先需要通過安裝yum-utils來啟用Remi存儲庫,這是一組用於管理yum存儲庫和套件的實用程序集。
# yum install yum-utils
安裝完成後,您可以使用yum-utils提供的yum-config-manager來將Remi存儲庫啟用為安裝不同PHP版本的默認存儲庫,如下所示。
例如,要安裝PHP 7.x版本,請使用以下命令。
------------- On CentOS & RHEL -------------
# yum-config-manager --enable remi-php70 && yum install php       [Install PHP 7.0]
# yum-config-manager --enable remi-php71 && yum install php       [Install PHP 7.1]
# yum-config-manager --enable remi-php72 && yum install php       [Install PHP 7.2]
# yum-config-manager --enable remi-php73 && yum install php       [Install PHP 7.3]

------------- On Fedora -------------
# dnf --enablerepo=remi install php70      [Install PHP 7.0]
# dnf --enablerepo=remi install php71      [Install PHP 7.1]
# dnf --enablerepo=remi install php72      [Install PHP 7.2]
# dnf --enablerepo=remi install php73      [Install PHP 7.3]
接下來,我們將安裝所有這些PHP模組。
------ On RHEL/CentOS 7/6 ------
# yum --enablerepo=remi install php-mysqlnd php-pgsql php-fpm php-pecl-mongo php-pdo php-pecl-memcache php-pecl-memcached php-gd php-xml php-mbstring php-mcrypt php-pecl-apcu php-cli php-pear

------ On Fedora ------
# dnf --enablerepo=remi install php-mysqlnd php-pgsql php-fpm php-pecl-mongo php-pdo php-pecl-memcache php-pecl-memcached php-gd php-xml php-mbstring php-mcrypt php-pecl-apcu php-cli php-pear
第6步:停止並禁用Apache服務
默認情況下,Apache和Nginx在同一端口(TCP 80)上監聽。因此,如果您的伺服器中安裝了Apache,您需要停止它並禁用/遮罩它(將服務鏈接到/dev/null的更強版本)以使用Nginx,或者如果您不打算再使用它,則可以將其刪除。
# systemctl stop httpd
# systemctl disable httpd
or
# systemctl mask httpd
第7步:啟動/停止Nginx、MariaDB和PHP-FPM
----------- Enable Nginx, MariaDB and PHP-FPM on Boot -----------
# systemctl enable nginx
# systemctl enable mariadb
# systemctl enable php-fpm

----------- Start Nginx, MariaDB and PHP-FPM -----------
# systemctl start nginx
# systemctl start mariadb
# systemctl start php-fpm
第8步:配置Nginx和PHP-FPM
讓我們現在在/srv/www/下為您的網站(一個虛擬主機,或者在Nginx中稱為服務器塊)創建一個目錄結構。在這個示例中,我們將使用www.tecmint.com,但如果您想要,請隨意選擇另一個域和主目錄。
# mkdir -p /srv/www/tecmint/public_html
# mkdir /srv/www/tecmint/logs
# chown -R nginx:nginx /srv/www/tecmint
步驟9:配置Nginx虛擬主機目錄
正如您所知,從同一台機器運行多個站點的能力是主要Web服務器的一個顯著特點。現在讓我們繼續創建目錄來存儲我們的服務器塊(在Apache中稱為虛擬主機)/etc/nginx下。
# mkdir /etc/nginx/sites-available
# mkdir /etc/nginx/sites-enabled
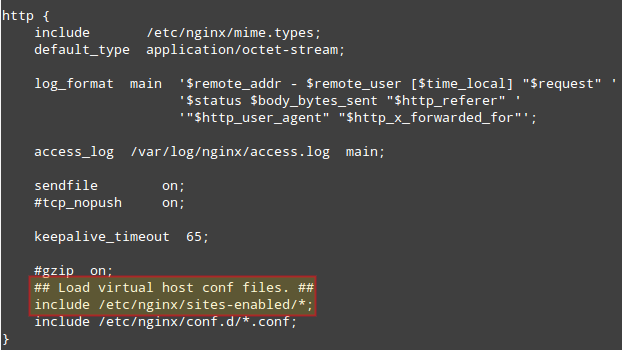
以下這行代碼必須插入到/etc/nginx/nginx.conf中的http塊關閉之前,這將確保Nginx運行時將考慮/etc/nginx/sites-enabled目錄中的配置文件:
## Load virtual host conf files. ##
include /etc/nginx/sites-enabled/*;
要為tecmint.com創建服務器塊,請將以下代碼添加到/etc/nginx/sites-available/tecmint(當您輸入完整路徑以啟動您首選的文本編輯器時,將創建此文件)。這是一個基本的虛擬主機配置文件。
server {
	listen 80 default;
	server_name tecmint;
	access_log /srv/www/tecmint/logs/access.log;
	error_log /srv/www/tecmint/logs/error.log;
	root /srv/www/tecmint/public_html;
	location ~* \.php$ {
	fastcgi_index   index.php;
	fastcgi_pass    127.0.0.1:9000;
	include         fastcgi_params;
	fastcgi_param   SCRIPT_FILENAME    $document_root$fastcgi_script_name;
	fastcgi_param   SCRIPT_NAME        $fastcgi_script_name;
	}
}
“激活”虛擬主機的過程包括從tecmint虛擬主機的定義創建一個符號鏈接到/etc/nginx/sites-enabled。
# ln -s /etc/nginx/sites-available/tecmint /etc/nginx/sites-enabled/tecmint
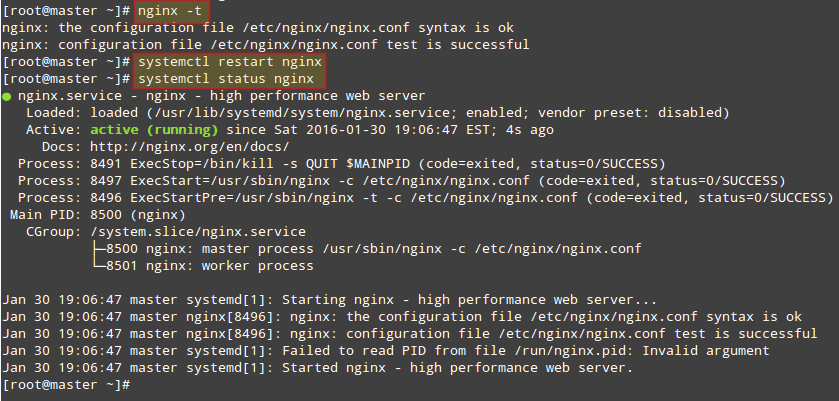
為了實際應用我們一直在進行的更改,現在我們需要重新啟動Nginx。在這樣做之前檢查配置文件是否存在語法錯誤有時是有用的:
# nginx -t
# systemctl restart nginx
# systemctl status nginx
要访问您新创建的虚拟主机,您需要将以下行添加到/etc/hosts,作为域名解析的基本方法。
192.168.0.18 www.tecmint.com tecmint.com
第10步:测试Nginx、MySQL、PHP和PHP-FPM
让我们继续使用经典的方式测试PHP。在/srv/www/tecmint/public_html/下创建一个名为test.php的文件,并添加以下代码行。
phpinfo()函数显示有关当前PHP安装的大量信息:
<?php
	phpinfo();
?>
现在将您的网络浏览器指向http://tecmint/test.php,检查已安装模块和其他软件的存在:
恭喜!您现在拥有一个LEMP堆栈的可用安装。如果出现意外情况,请随时使用下面的表单与我们联系。问题和建议也受欢迎。
Source:
https://www.tecmint.com/install-nginx-mariadb-php-rhel-centos-fedora/