


LibreNMS是一個開源、強大且功能豐富的基於PHP的自動發現網絡監控系統,使用SNMP協議。它支持多種操作系統,包括Linux、FreeBSD,以及包括Cisco、Juniper、Brocade、Foundry、HP等在內的網絡設備。
LibreNMS功能:
- 它可以使用這些協議自動發現整個網絡:CDP、FDP、LLDP、OSPF、BGP、SNMP和ARP。
- 具有適合移動設備的Web UI,可自定義儀表板。
- 支持Unix代理。
- 支持水平擴展,可隨網絡擴展。
- 支持高度靈活和可定製的警報系統;通過電子郵件、irc、slack等發送通知。
- 支持API管理、繪製和檢索系統中的數據。
- 提供流量計費系統。
- 還支持Android和iOS應用程序,提供核心功能。
- 支持與NfSen、collectd、SmokePing、RANCID和Oxidized集成。
- 支持多種身份驗證方法,如MySQL、HTTP、LDAP、Radius和Active Directory。
- 支持自動更新和許多其他功能。
在安裝在Linux系統上之前,您可以使用在線演示版LibreNMS進行測試。
Demo URL: https://demo.librenms.org/
Username: demo
Password: demo
測試環境:
在本教程中,我们将学习如何在新安装的Ubuntu或CentOS Linux上安装LibreNMS网络监控工具(相同的指令也适用于Debian和RHEL基础发行版)。
注意:本文中的所有指令都应以root用户身份运行,如果不是,请使用sudo命令获取root用户权限。
步骤1:安装所需软件包
1.首先使用默认软件包管理器安装所有所需软件包,如下所示。
在Ubuntu/Debian上
$ sudo apt install composer fping git graphviz imagemagick mariadb-client mariadb-server mtr-tiny nginx-full nmap php7.0-cli php7.0-curl php7.0-fpm php7.0-gd php7.0-mcrypt php7.0-mysql php7.0-snmp php7.0-xml php7.0-zip python-memcache python-mysqldb rrdtool snmp snmpd whois
在CentOS/RHEL上
# yum install epel-release
# rpm -Uvh https://mirror.webtatic.com/yum/el7/webtatic-release.rpm
# yum install composer cronie fping git ImageMagick jwhois mariadb mariadb-server mtr MySQL-python net-snmp net-snmp-utils nginx nmap php72w php72w-cli php72w-common php72w-curl php72w-fpm php72w-gd php72w-mysql php72w-process php72w-snmp php72w-xml php72w-zip python-memcached rrdtool
2.安装所有软件包后,将启动并启用nginx、php-fpm、mariadb和snmp服务,以便在启动时自动启动(这通常是Ubuntu的情况),否则,您可以运行以下命令来启动和启用它们。
------------ On Debian/Ubuntu ------------
$ sudo systemctl nginx start php7.0-fpm mysql snmp
$ sudo systemctl enable nginx php7.0-fpm mysql snmp

------------ On CentOS/RHEL ------------
# systemctl nginx start php-fpm mariadb snmpd
# systemctl enable nginx php-fpm mariadb snmpd
步骤2:安装LibreNMS监控工具
3. 接下來,使用useradd命令創建一個名為librenms的系統用戶;其中-M標誌禁用創建用戶的主目錄,-r啟用創建系統帳戶。然後將librenms用戶添加到www-data組(在Ubuntu上)或nginx組(在CentOS上)。
------------ On Debian/Ubuntu ------------
$ sudo useradd librenms -d /opt/librenms -M -r
$ sudo usermod -a -G librenms www-data

------------ On CentOS/RHEL ------------
# useradd librenms -d /opt/librenms -M -r
# usermod -a -G librenms nginx
4. 然後按照以下步驟使用composer命令安裝LibreNMS。
------------ On Debian/Ubuntu ------------
$ cd /opt
$ sudo composer create-project --no-dev --keep-vcs librenms/librenms librenms dev-master

------------ On CentOS/RHEL ------------
# cd /opt
# composer create-project --no-dev --keep-vcs librenms/librenms librenms dev-master
步驟3:創建 LibreNMS 數據庫
5. 在開始使用MariaDB服務器之前,您需要保護您的安裝,運行二進製包中提供的安全腳本。它將要求您設置根密碼,刪除匿名用戶,禁用遠程根登錄並刪除測試數據庫。
您可以通過執行以下命令啟動該腳本,並使用yes/y回答所有問題。
$ sudo mysql_secure_installation   [On Debian/Ubuntu]
# mysql_secure_installation        [On CentOS/RHEL]
6. 然後登錄到MariaDB數據庫,為 LibreNMS 創建一個數據庫(請記得在生產環境中使用強大/安全的密碼)。
$ sudo mysql -u root -p
MariaDB [(none)]> CREATE DATABASE librenms CHARACTER SET utf8 COLLATE utf8_unicode_ci;
MariaDB [(none)]> CREATE USER 'librenms'@'localhost' IDENTIFIED BY '=@!#@%$libre';
MariaDB [(none)]> GRANT ALL PRIVILEGES ON librenms.* TO 'librenms'@'localhost';
MariaDB [(none)]> FLUSH PRIVILEGES;
MariaDB [(none)]> exit
7. 然後暫時禁用MySQL的嚴格模式(與 MySQL 嚴格模式的兼容性尚未添加)。
$ sudo vim /etc/mysql/mariadb.conf.d/50-server.cnf    [On Debian/Ubuntu]
# vi /etc/my.cnf        [On CentOS/RHEL]
請在[mysqld]部分中添加以下內容。
innodb_file_per_table=1
sql-mode=""
lower_case_table_names=0
然後重新啟動數據庫服務器以生效更改。
$ sudo systemctl restart mysql     [On Debian/Ubuntu]
# systemctl restart mariadb        [On CentOS/RHEL]
步驟4:配置並啟動 PHP-FPM
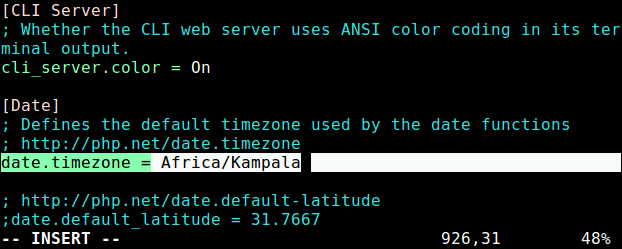
8. 接下來,在php.ini中將date.timezone設置為您當前的時區,例如“Africa/Kampala”,如下圖所示。
------------ On Debian/Ubuntu ------------
$ sudo vim /etc/php/7.0/fpm/php.ini
$ sudo vim /etc/php/7.0/cli/php.ini

------------ On CentOS/RHEL ------------
# vi /etc/php.ini
9. 接下來,在Ubuntu中啟用mcrypt PHP模塊,並按如下所示重新啟動php-fpm。
------------ On Debian/Ubuntu ------------
$ sudo phpenmod mcrypt
$ sudo systemctl restart php7.0-fpm
10. 在CentOS/RHEL上,您需要在php-fpm配置文件中進行以下更改。
# vi /etc/php-fpm.d/www.conf
進行以下更改。
;user = apache
user = nginx

group = apache   ; keep group as apache

;listen = 127.0.0.1:9000
listen = /var/run/php-fpm/php7.2-fpm.sock

listen.owner = nginx
listen.group = nginx
listen.mode = 0660
11. 按照下面所示重新啟動php-fpm服務。
# systemctl restart php-fpm
第5步:為LibreNMS配置Nginx
12. 在此步驟中,您需要為librenms配置一個Nginx服務器塊,以便訪問Web UI。創建一個.conf文件,如下所示。
$ sudo vim /etc/nginx/conf.d/librenms.conf     [On Debian/Ubuntu]
# vi /etc/nginx/conf.d/librenms.conf           [On CentOS/RHEL]
添加以下配置,根據需要編輯server_name。
server {
 listen      80;
 server_name librenms.example.com;
 root        /opt/librenms/html;
 index       index.php;

 charset utf-8;
 gzip on;
 gzip_types text/css application/javascript text/javascript application/x-javascript image/svg+xml text/plain text/xsd text/xsl text/xml image/x-icon;
 location / {
  try_files $uri $uri/ /index.php?$query_string;
 }
 location /api/v0 {
  try_files $uri $uri/ /api_v0.php?$query_string;
 }
 location ~ \.php {
  include fastcgi.conf;
  fastcgi_split_path_info ^(.+\.php)(/.+)$;
  fastcgi_pass unix:/var/run/php/php7.0-fpm.sock;
 }
 location ~ /\.ht {
  deny all;
 }
}
13. 然後保存並退出文件。同時刪除默認的服務器塊配置並重新啟動Nginx服務器。
------------ On Debian/Ubuntu ------------
$ sudo rm /etc/nginx/sites-enabled/default
$ sudo systemctl restart nginx

------------ On CentOS/RHEL ------------
# systemctl restart nginx
注意:在CentOS/RHEL上,如果這是您唯一托管的站點,您需要禁用默認站點部分。從/etc/nginx/nginx.conf文件中刪除服務器部分。
14. 同樣在CentOS/RHEL上,您需要安裝SELinux的策略工具並使用以下命令配置LibreNMS所需的contexts。
------------ On CentOS/RHEL ------------
# yum install policycoreutils-python
# semanage fcontext -a -t httpd_sys_content_t '/opt/librenms/logs(/.*)?'
# semanage fcontext -a -t httpd_sys_rw_content_t '/opt/librenms/logs(/.*)?'
# restorecon -RFvv /opt/librenms/logs/
# semanage fcontext -a -t httpd_sys_content_t '/opt/librenms/rrd(/.*)?'
# semanage fcontext -a -t httpd_sys_rw_content_t '/opt/librenms/rrd(/.*)?'
# restorecon -RFvv /opt/librenms/rrd/
# setsebool -P httpd_can_sendmail=1
# setsebool -P httpd_execmem 1
15. 通過創建文件http_fping.tt來允許fping,文件內容如下。
module http_fping 1.0;

require {
type httpd_t;
class capability net_raw;
class rawip_socket { getopt create setopt write read };
}

#============= httpd_t ==============
allow httpd_t self:capability net_raw;
allow httpd_t self:rawip_socket { getopt create setopt write read };
16. 然後運行以下命令。
------------ On CentOS/RHEL ------------
# checkmodule -M -m -o http_fping.mod http_fping.tt
# semodule_package -o http_fping.pp -m http_fping.mod
# semodule -i http_fping.pp
17. 如果您正在使用CentOS/RHEL上的防火牆,請通過防火牆啟用HTTP/HTTPS訪問。
------------ On CentOS/RHEL ------------
# firewall-cmd --zone public --add-service http
# firewall-cmd --permanent --zone public --add-service http
# firewall-cmd --zone public --add-service https
# firewall-cmd --permanent --zone public --add-service https
第6步:為LibreNMS配置SNMPD
18. 現在使用示例snmp配置創建您的配置文件並打開進行編輯,如下所示。
------------ On Debian/Ubuntu ------------
$ sudo cp /opt/librenms/snmpd.conf.example /etc/snmp/snmpd.conf
$ sudo vim /etc/snmp/snmpd.conf

------------ On CentOS/RHEL ------------
# cp /opt/librenms/snmpd.conf.example /etc/snmp/snmpd.conf
# vi /etc/snmp/snmpd.conf
找到字符串RANDOMSTRINGGOESHERE並將其更改為您自己的community string,如屏幕截圖所示。

19. 接下來,在您的系統上下載一個shell腳本,該腳本有助於檢測操作系統以及如果是Linux,它將檢測您正在使用的Linux發行版:
------------ On Debian/Ubuntu ------------
$ sudo curl -o /usr/bin/distro https://raw.githubusercontent.com/librenms/librenms-agent/master/snmp/distro
$ sudo chmod +x /usr/bin/distro
$ sudo systemctl restart snmpd

------------ On CentOS/RHEL ------------
# curl -o /usr/bin/distro https://raw.githubusercontent.com/librenms/librenms-agent/master/snmp/distro
# chmod +x /usr/bin/distro
# systemctl restart snmpd
第7步:創建Cron並配置Logrotate
20. 現在運行以下命令來設置LibreNMS的cron作業。
# cp /opt/librenms/librenms.nonroot.cron /etc/cron.d/librenms
21. 接下來,所有LibreNMS日誌都記錄在/opt/librenms/logs中,您需要配置這些日誌以進行自動輪換,使用提供的logrotate配置文件,如下所示。
# cp /opt/librenms/misc/librenms.logrotate /etc/logrotate.d/librenms
然後在LibreNMS安裝根目錄和日誌文件上設置適當的權限。
------------ On Debian/Ubuntu ------------
$ sudo chown -R librenms:librenms  /opt/librenms
$ sudo setfacl -d -m g::rwx /opt/librenms/rrd /opt/librenms/logs
$ sudo setfacl -R -m g::rwx /opt/librenms/rrd /opt/librenms/logs

------------ On CentOS/RHEL ------------
# chown -R librenms:librenms /opt/librenms
# setfacl -d -m g::rwx /opt/librenms/rrd /opt/librenms/logs
# setfacl -R -m g::rwx /opt/librenms/rrd /opt/librenms/logs
第8步:訪問LibreNMS Web安裝程序
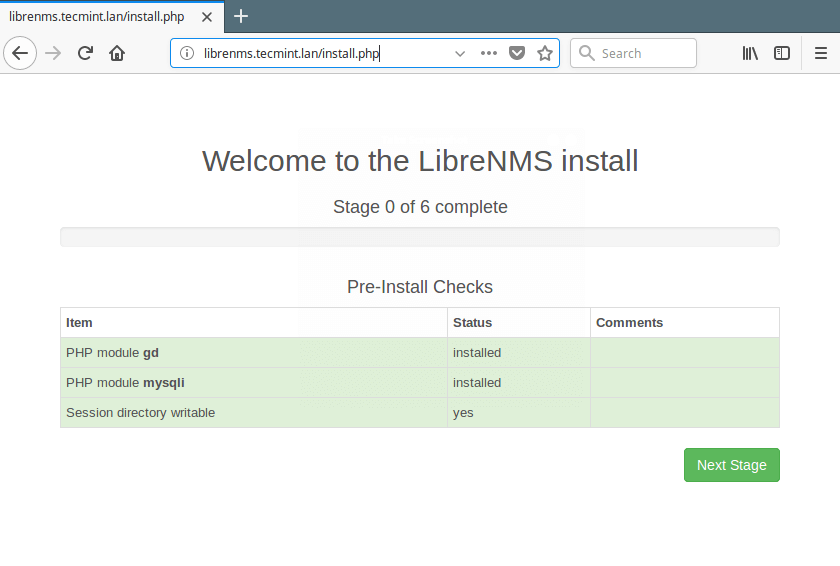
22. 接下來,使用以下URL訪問Web安裝程序並按照屏幕上的說明進行操作。
http://librenms.tecmint.lan/install.php
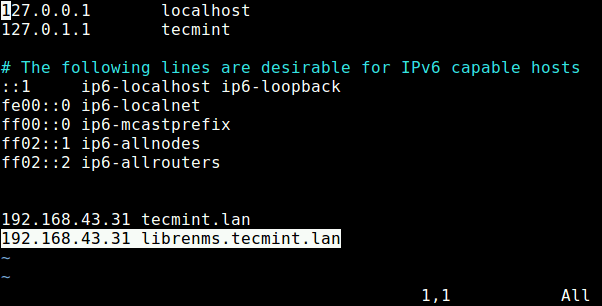
為了在本地機器上使此地址能夠運作,您需要在上線之前為本地域名解析或測試目的設置一個本地 DNS,使用主機檔 (/etc/hosts)。
192.168.43.31 tecmint.lan
192.168.43.31 librenms.tecmint.lan
23. 您將看到安裝歡迎頁面,如下方截圖所示,點擊下一階段以繼續。
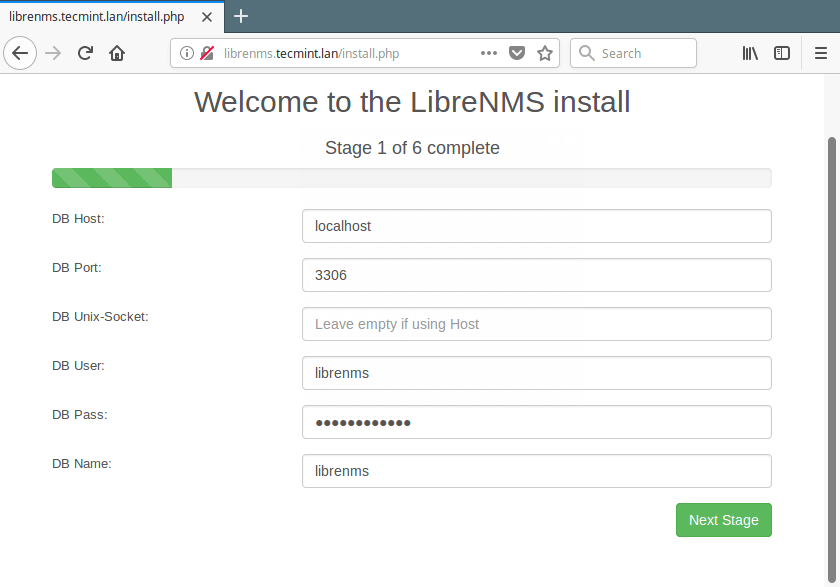
24. 然後輸入 LibreNMS 資料庫的設置 (資料庫主機、端口、用戶名和用戶密碼),並點擊下一階段以繼續。
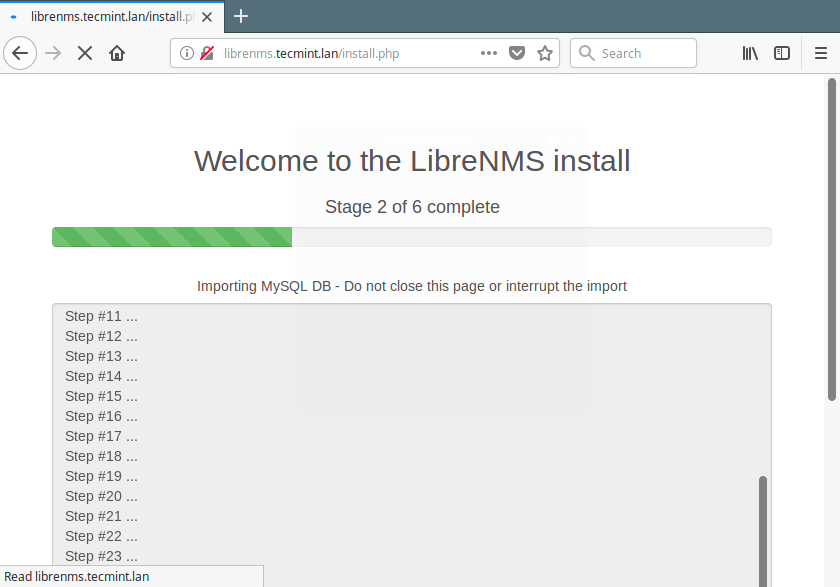
25. 網頁安裝程式現在將開始導入 MySQL 資料庫,這將需要一些時間。請注意,該過程將在某些時候暫停,只需點擊重試以繼續導入過程。
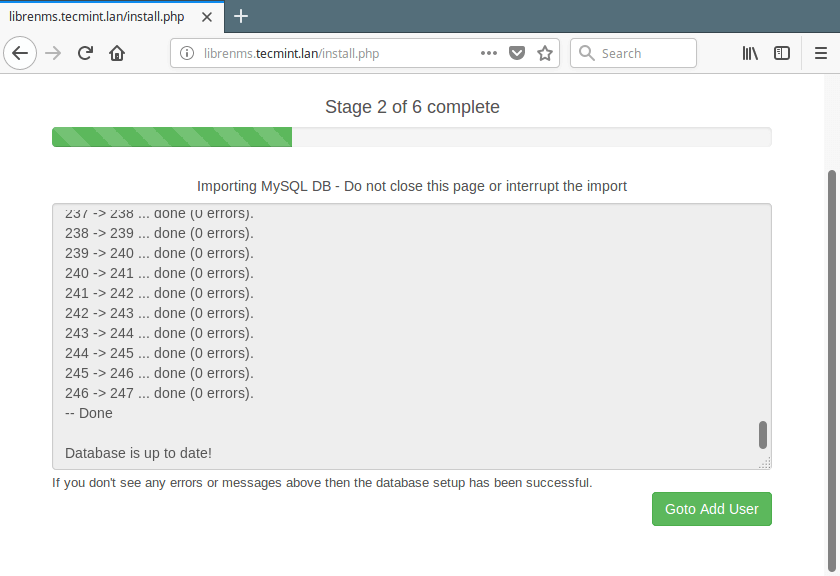
26. 一旦資料庫導入完成,您應該會看到消息“資料庫已更新!”,如下方截圖所示。然後點擊前往新增使用者以繼續。
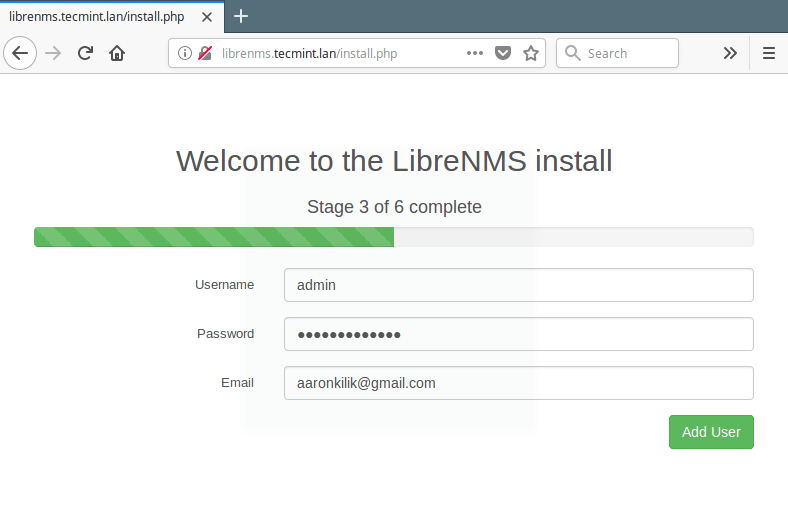
27. 接下來,添加一個LibreNMS使用者,指定用戶名、密碼和電子郵件,然後點擊新增使用者以生效更改。
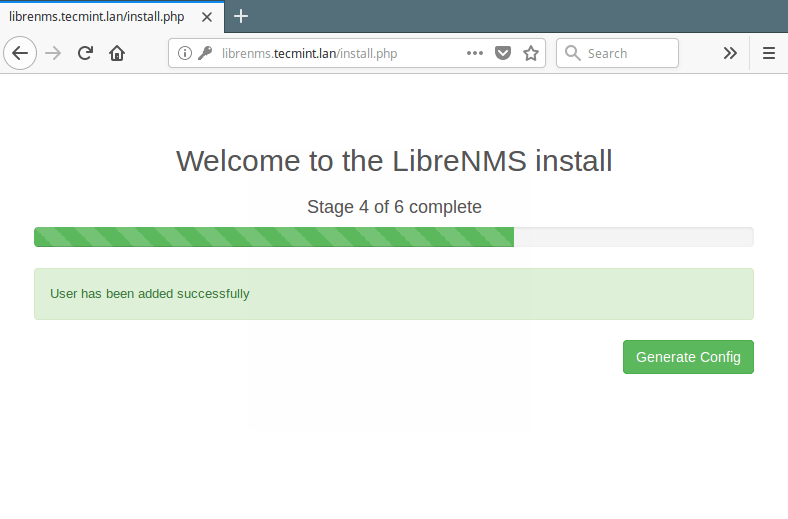
28. 現在點擊創建系統的LibreNMS配置,點擊生成配置。
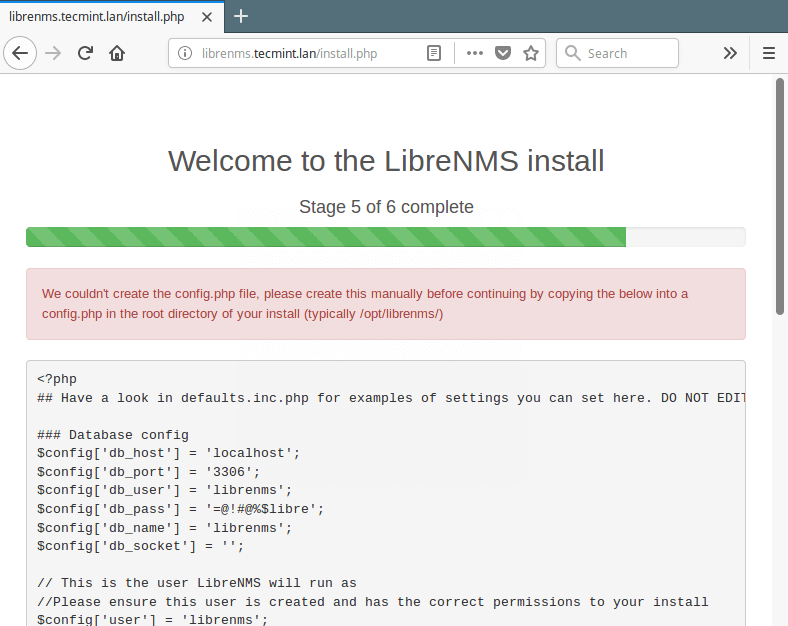
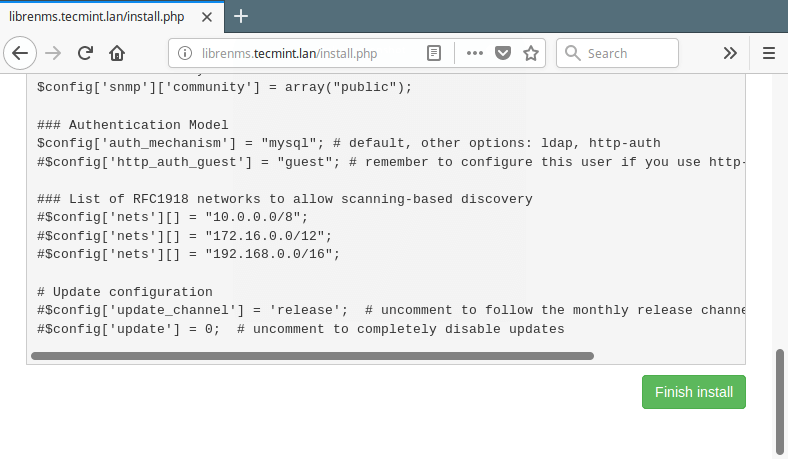
29. 一旦配置生成,如前一個截圖所示,複製它並將其保存在安裝的根目錄中,保存在一個名為/opt/librenms/config.php的文件中。
# vi /opt/librenms/config.php
<?php
## Have a look in defaults.inc.php for examples of settings you can set here. DO NOT EDIT defaults.inc.php!

### Database config
$config['db_host'] = 'localhost';
$config['db_port'] = '3306';
$config['db_user'] = 'librenms';
$config['db_pass'] = '=@!#@%$libre';
$config['db_name'] = 'librenms';
$config['db_socket'] = '';

// This is the user LibreNMS will run as
//Please ensure this user is created and has the correct permissions to your install
$config['user'] = 'librenms';

### Locations - it is recommended to keep the default
#$config['install_dir']  = "/opt/librenms";

### This should *only* be set if you want to *force* a particular hostname/port
### It will prevent the web interface being usable form any other hostname
#$config['base_url']        = "http://librenms.company.com";

### Enable this to use rrdcached. Be sure rrd_dir is within the rrdcached dir
### and that your web server has permission to talk to rrdcached.
#$config['rrdcached']    = "unix:/var/run/rrdcached.sock";

### Default community
$config['snmp']['community'] = array("public");

### Authentication Model
$config['auth_mechanism'] = "mysql"; # default, other options: ldap, http-auth
#$config['http_auth_guest'] = "guest"; # remember to configure this user if you use http-auth

### List of RFC1918 networks to allow scanning-based discovery
#$config['nets'][] = "10.0.0.0/8";
#$config['nets'][] = "172.16.0.0/12";
#$config['nets'][] = "192.168.0.0/16";

# Update configuration
#$config['update_channel'] = 'release';  # uncomment to follow the monthly release channel
#$config['update'] = 0;  # uncomment to completely disable updates
30.保存並關閉檔案。然後返回網絡安裝程序,點擊完成安裝繼續安裝過程。
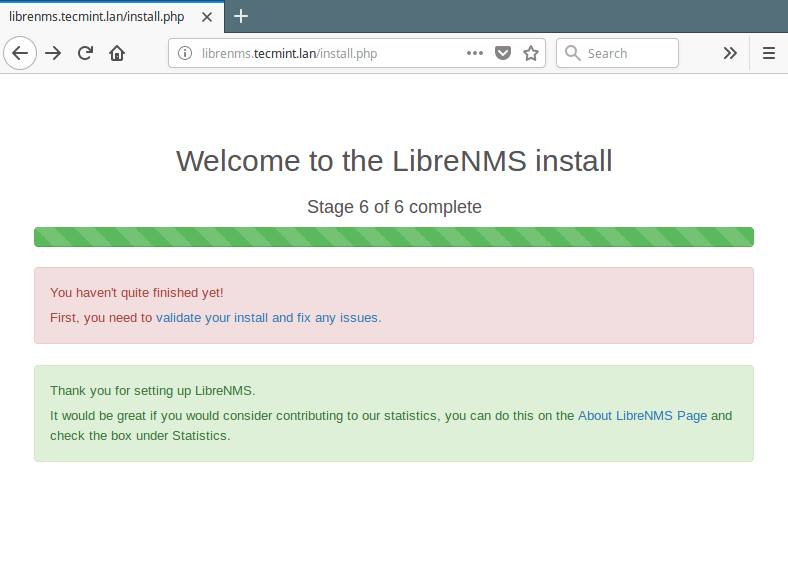
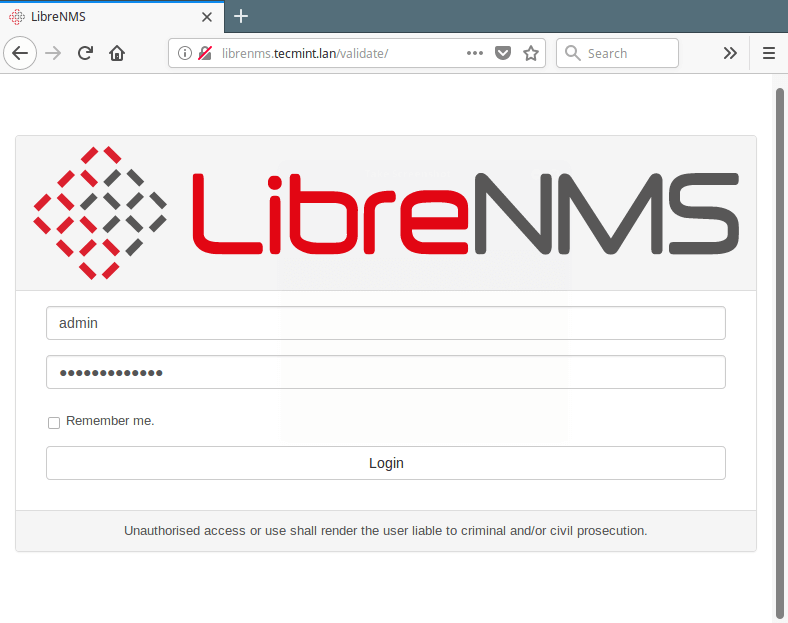
31.現在您的LibreNMS安裝完成,您可以點擊“驗證安裝並修復任何問題”,登錄頁面應該出現。
32.接下來,輸入您的用戶憑據以訪問驗證頁面。
33.從安裝驗證過程中,LibreNMS發現了兩個問題,一個是尚未添加設備(這只是一個警告),其次,我們尚未對手動添加的配置文件(/opt/librenms/config.php)設置適當的權限,如下圖所示。
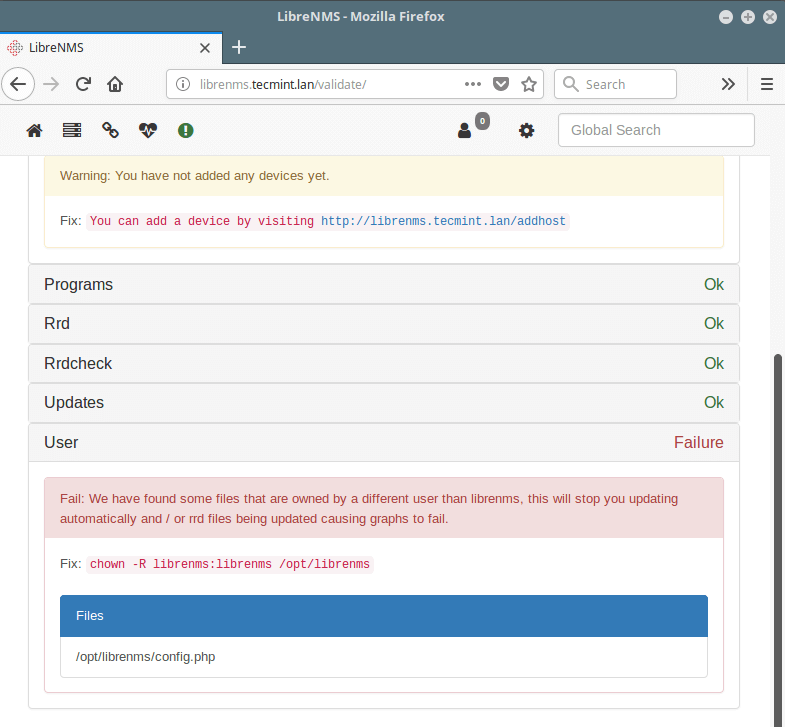
現在運行以下命令以設置配置文件的正確權限。
$ sudo chown -R librenms:librenms /opt/librenms/config.php
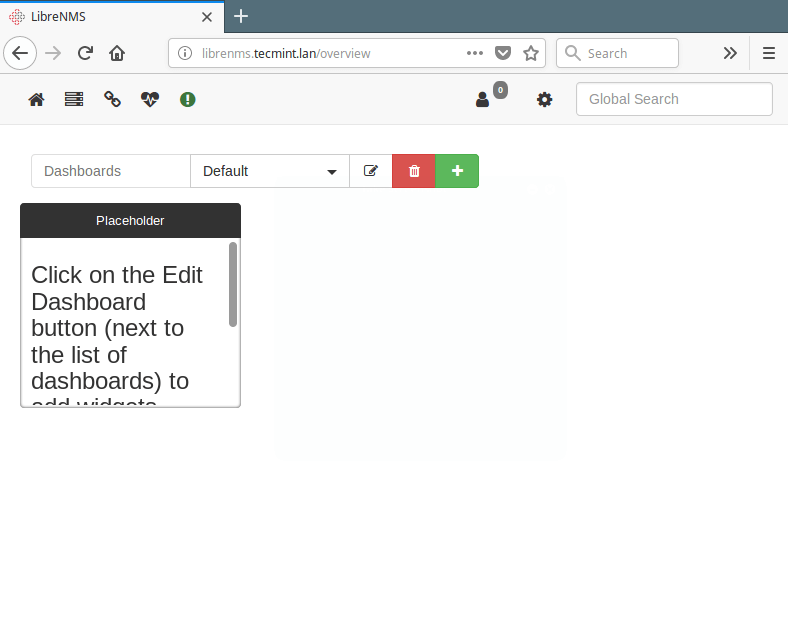
34.要添加設備,請前往:http://librenms.tecmint.lan/addhost。添加設備後,您可以轉到主頁面並添加各種儀表板。
就是這樣!您可以在LibreNMS文檔中找到更多信息,包括安裝和設置,網址是https://docs.librenms.org/。
LibreNMS是一個功能齊全的網絡監控系統,支持各種網絡硬件。我們希望這是一個清晰的安裝指南,如果您有任何問題,請通過下面的反饋表格與我們聯繫。
Source:
https://www.tecmint.com/install-librenms-monitoring-on-ubuntu-centos/