


作者選擇了自由和開源基金作為Write for DOnations計畫的捐贈接受者。
介紹
當多人在不同地點同時進行相同的 Terraform 項目工作時,正確處理基礎架構代碼和項目狀態以避免覆蓋錯誤至關重要。解決方案是將狀態存儲在遠程而不是本地。遠程系統對團隊的所有成員都是可用的,他們可以在工作時鎖定狀態。
其中一個遠端後端是pg,它將狀態存儲在 PostgreSQL 數據庫中。在本教程過程中,您將與DigitalOcean 管理的數據庫一起使用它來確保數據的可用性。
Terraform 也支持 Hashicorp 的官方托管雲服務,稱為Terraform Cloud——這是一個專有的應用程序,將您的團隊工作同步到一個地方,並提供用於配置和管理的用戶界面。
在本教程中,您將在 Terraform Cloud 中創建一個組織,並將其連接到您的項目。然後,您將使用您的組織來設置工作區和資源。您將把狀態存儲在受管理的雲中,以便它始終可用。您還將設置帶有相應的受管理 PostgreSQL 數據庫的 pg 後端。
先決條件
- A DigitalOcean Personal Access Token, which you can create via the DigitalOcean Control Panel. You can find instructions in the DigitalOcean product documents, How to Create a Personal Access Token.
- 在本地計算機上安裝了 Terraform。完成了 如何使用 Terraform 與 DigitalOcean 教程的 第 1 步。
- 如果您想使用
pg後端,您需要創建一個可訪問的 受管理的 PostgreSQL 數據庫集群。有關更多信息,請訪問 快速入門指南。您可以為本教程使用單獨的數據庫。 - 如果您想使用 Hashicorp 的受管理雲,您需要一個具有 Terraform Cloud 帳戶。您可以在他們的 註冊頁面 上創建一個。
注意:我們特別使用 Terraform 1.1.3 測試了此教程。
在托管的PostgreSQL数据库中存储状态
在这个部分,您将设置一个项目,部署一个Droplet并使用pg提供程序将状态存储在DigitalOcean托管的PostgreSQL数据库中。此提供程序支持状态锁定,因此状态永远不会被同时发生的两个或更多的更改覆盖。
首先创建一个名为terraform-team-pg的目录,您将在其中存储项目:
导航到它:
您将首先定义提供程序,然后传入数据库的连接字符串和digitalocean模块。创建并打开provider.tf进行编辑:
添加以下行:
在这里,您需要digitalocean提供程序,并定义接受连接字符串的pg后端。然后,您定义do_token变量并将其传递给digitalocean提供程序的实例。
請記得將your_db_connection_string替換為您在DigitalOcean控制面板中從操作中找到的托管數據庫的連接字符串,然後選擇連接詳情,並從下拉菜單中選擇連接字符串。然後保存並關閉文件
警告:為了繼續,在您的數據庫的設置中,確保您正在運行Terraform的機器的IP地址在白名單中。
運行以下命令初始化項目:
輸出將類似於以下內容:
OutputInitializing the backend...

Successfully configured the backend "pg"! Terraform will automatically
use this backend unless the backend configuration changes.

Initializing provider plugins...
- Finding digitalocean/digitalocean versions matching "~> 2.0"...
- Installing digitalocean/digitalocean v2.16.0...
- Installed digitalocean/digitalocean v2.16.0 (signed by a HashiCorp partner, key ID F82037E524B9C0E8)

Partner and community providers are signed by their developers.
If you'd like to know more about provider signing, you can read about it here:
https://www.terraform.io/docs/cli/plugins/signing.html

Terraform has created a lock file .terraform.lock.hcl to record the provider
selections it made above. Include this file in your version control repository
so that Terraform can guarantee to make the same selections by default when
you run "terraform init" in the future.

Terraform has been successfully initialized!
...
Terraform成功初始化了後端,這意味著它已連接到數據庫。
接下來,在名為droplets.tf的文件中定義Droplet。通過運行以下命令創建並打開它進行編輯:
添加以下行:
此代碼將在fra1區域部署一個名為web-1的Droplet,運行Ubuntu 20.04,具有1GB RAM和一個CPU核心。這是您需要定義的所有內容,因此請保存並關閉文件。
您將需要將您的DigitalOcean令牌放入環境變量中。創建一個,將your_do_token替換為您的令牌:
為了檢查與數據庫的連接是否正常工作,請嘗試規劃配置:
輸出將類似於以下內容:
Terraform 報告沒有錯誤,並如常計劃了操作。它成功連接到您的 PostgreSQL 數據庫並存儲了其狀態。現在,多個人可以同時在此工程上工作,而項目保持同步。
在 Terraform Cloud 中存儲狀態
在這一步中,您將創建一個項目,該項目部署一個 Droplet,並使用 Terraform Cloud 作為其後端,使用 cloud 提供程序。這包括在 Terraform Cloud 中創建組織和 工作區,編寫基礎架構代碼,並對其進行計劃。
創建組織
Terraform Cloud 允許您擁有多個 組織,這些組織包含您的工作區和模塊。付費計劃的組織可以擁有多個具有訪問級別控制功能的團隊,而您將使用的免費計劃僅提供一個組織中的一個團隊。您可以邀請團隊成員加入組織。
首先前往Terraform Cloud並登入。如果您尚未創建組織,系統將提示您進行創建。
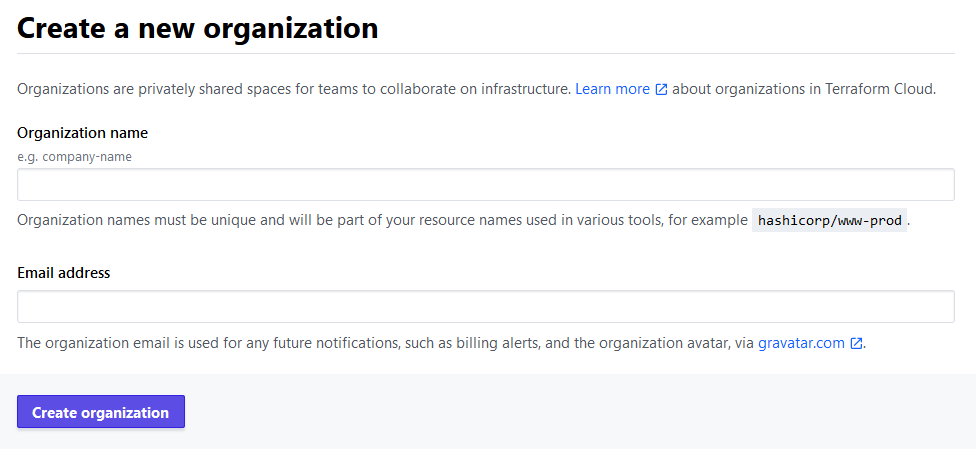
輸入您選擇的組織名稱,請記住它必須在Terraform Cloud中的所有名稱中是唯一的。如果名稱已經存在,您將收到一個錯誤。電子郵件地址應該已經填入您帳戶的地址。完成後,點擊創建組織按鈕繼續。
然後系統將要求您選擇工作區的類型。
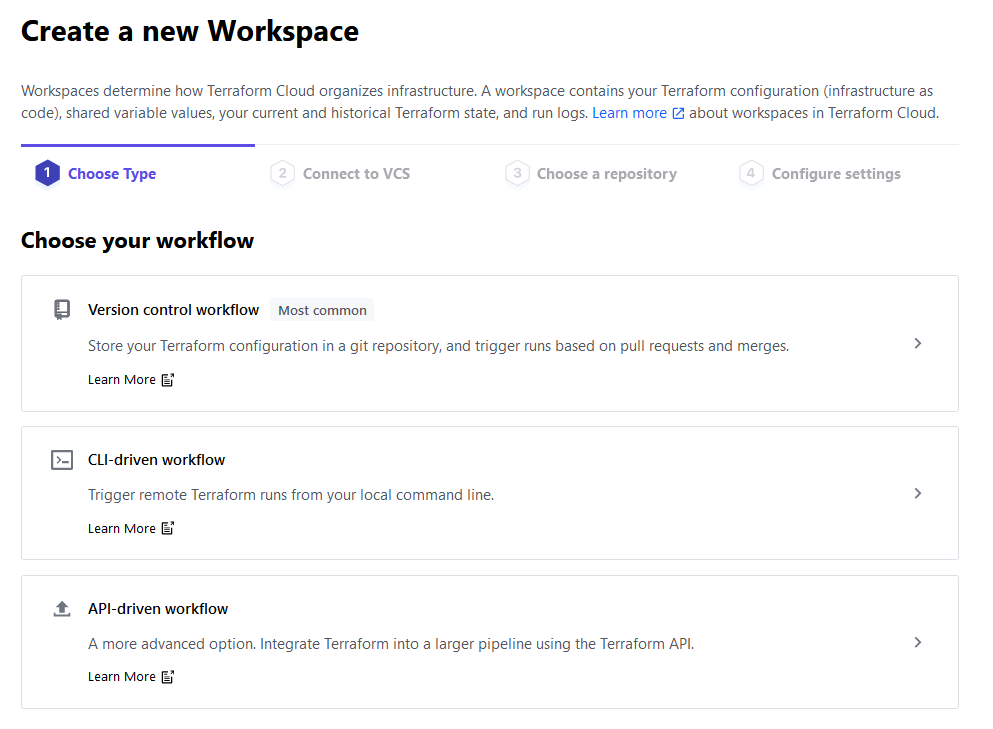
因為您將使用命令行與Terraform Cloud進行交互,所以請選擇CLI驅動的工作流程選項。然後,輸入工作區的名稱,並將描述留空。
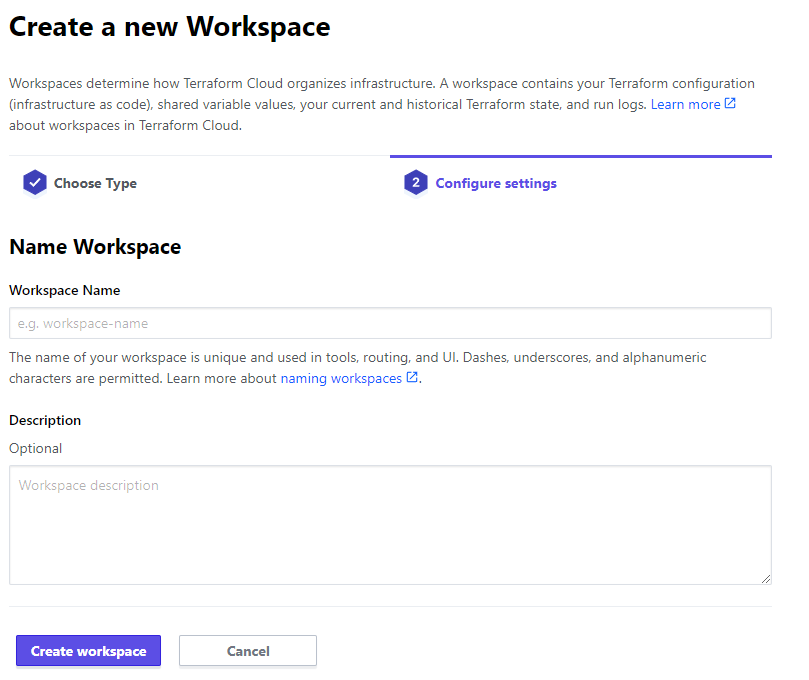
輸入您選擇的工作區名稱(我們將其稱為sammy),然後點擊創建工作區以完成組織創建過程。然後,系統將引導您到工作區設置頁面。
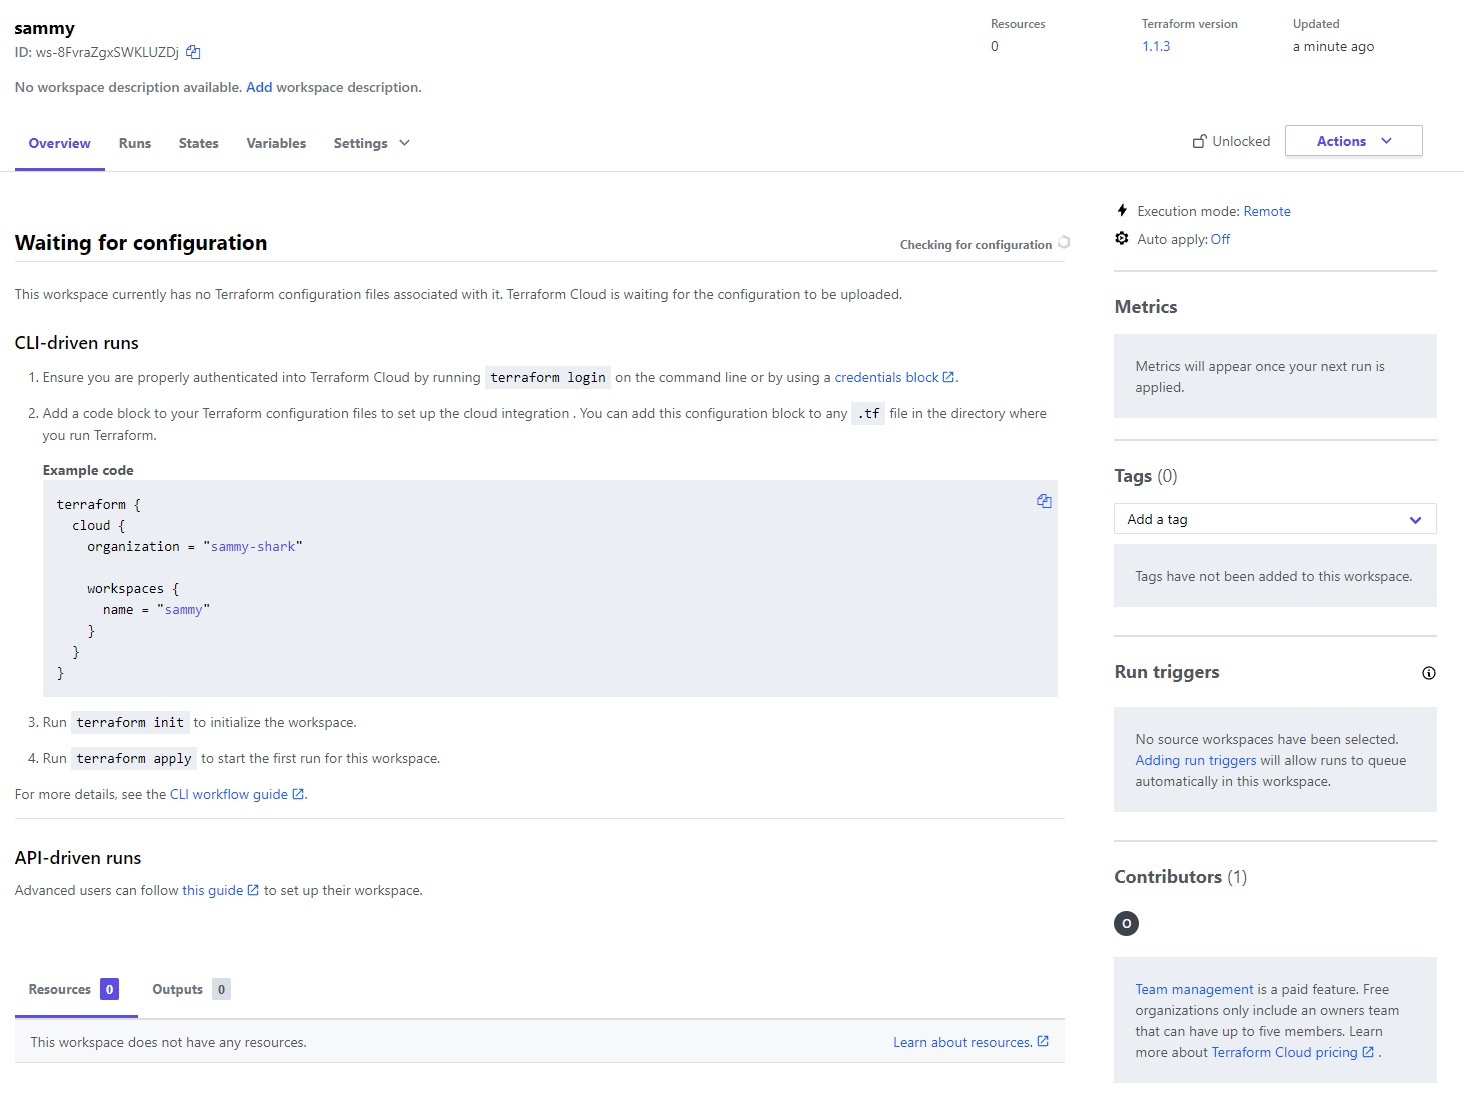
您現在已經創建了您的工作區,它是您組織的一部分。由於您剛剛創建了它,您的工作區不包含任何基礎設施代碼。在界面的中心部分,Terraform Cloud為您提供了連接到此工作區的起始指示。
在連接到它之前,您需要配置雲將用於執行命令的Terraform版本。要設置它,請點擊概述旁邊的設置下拉菜單,然後從列表中選擇通用。頁面打開後,導航到Terraform版本下拉菜單並選擇1.1.3(本教程使用的版本)。

然後,點擊保存設置按鈕以保存更改。
要將您的項目連接到組織和工作區,您首先需要使用命令行進行登錄。在運行命令之前,請前往令牌頁面創建一個新的訪問令牌,該令牌將為您的服務器提供訪問權限。您將收到一個提示來創建API令牌。
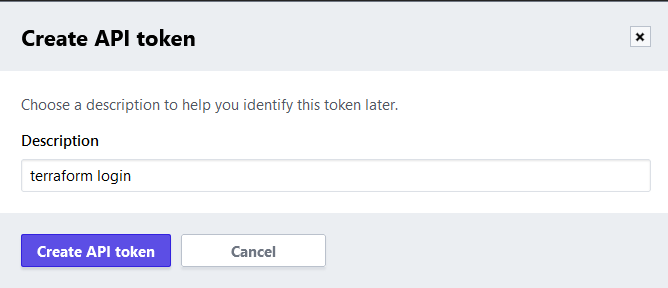
默認描述是正確的,因此點擊創建API令牌以創建它。
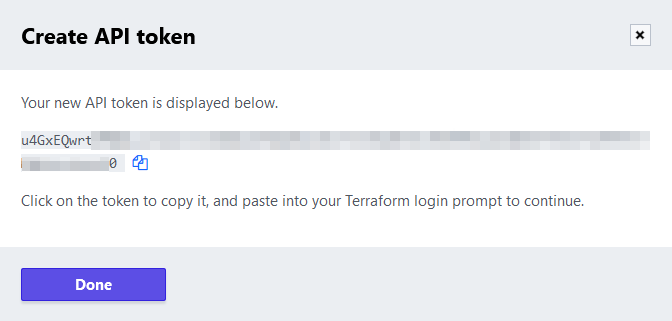
單擊令牌值,或其後的圖標,以複製API令牌。您將使用此令牌將您的項目連接到您的Terraform Cloud帳戶。
在命令行中,運行以下命令以登錄:
您將收到以下輸出:
OutputTerraform will request an API token for app.terraform.io using your browser.

If login is successful, Terraform will store the token in plain text in
the following file for use by subsequent commands:
    /home/sammy/.terraform.d/credentials.tfrc.json

Do you want to proceed?
  Only 'yes' will be accepted to confirm.
...
Terraform正在警告您令牌將被本地存儲。當它提示您時輸入yes:
Output---------------------------------------------------------------------------------

Open the following URL to access the tokens page for app.terraform.io:
    https://app.terraform.io/app/settings/tokens?source=terraform-login


---------------------------------------------------------------------------------

Generate a token using your browser, and copy-paste it into this prompt.

Terraform will store the token in plain text in the following file
for use by subsequent commands:
    /home/sammy/.terraform.d/credentials.tfrc.json

Token for app.terraform.io:
  Enter a value:
粘貼您已復制的令牌,並確認按ENTER。Terraform將顯示成功消息:
Output...
                                          -
                                          -----                           -
                                          ---------                      --
                                          ---------  -                -----
                                           ---------  ------        -------
                                             -------  ---------  ----------
                                                ----  ---------- ----------
                                                  --  ---------- ----------
   Welcome to Terraform Cloud!                     -  ---------- -------
                                                      ---  ----- ---
   Documentation: terraform.io/docs/cloud             --------   -
                                                      ----------
                                                      ----------
                                                       ---------
                                                           -----
                                                               -


   New to TFC? Follow these steps to instantly apply an example configuration:

   $ git clone https://github.com/hashicorp/tfc-getting-started.git
   $ cd tfc-getting-started
   $ scripts/setup.sh
您已配置本地Terraform安裝以訪問您的Terraform Cloud帳戶。您現在將創建一個部署Droplet的項目,並配置它以使用Terraform Cloud來存儲其狀態。
設置專案
首先,創建一個名為 terraform-team-cloud 的目錄,您將在其中存儲該項目:
進入該目錄:
為了設置您的項目,您需要:
- 定義並配置
cloud提供程序,該提供程序與 Terraform Cloud 進行交互。 - 要能夠部署 DigitalOcean 資源,需要使用
digitalocean提供程序。 - 定義並初始化您將使用的變數。
您將提供程序和模塊需求規範存儲在名為 provider.tf 的文件中。通過運行以下命令創建並打開它進行編輯:
添加以下行:
在這裡,您首先指定了您的 Terraform 版本。然後,您將 digitalocean 提供程序視為必需項,並將後端設置為 cloud。對於 organization 和 workspaces.name,請將突出顯示的值替換為您指定的名稱。
接下來,您定義了一個名為 do_token 的變數,並將其傳遞給後面創建的 digitalocean 提供程序。您現在已配置項目以連接到組織,因此請保存並關閉文件。
使用以下命令初始化您的項目:
輸出將類似於這樣:
OutputInitializing Terraform Cloud...

Initializing provider plugins...
- Finding digitalocean/digitalocean versions matching "~> 2.0"...
- Installing digitalocean/digitalocean v2.18.0...
- Installed digitalocean/digitalocean v2.18.0 (signed by a HashiCorp partner, key ID F82037E524B9C0E8)

Partner and community providers are signed by their developers.
If you'd like to know more about provider signing, you can read about it here:
https://www.terraform.io/docs/cli/plugins/signing.html

Terraform has created a lock file .terraform.lock.hcl to record the provider
selections it made above. Include this file in your version control repository
so that Terraform can guarantee to make the same selections by default when
you run "terraform init" in the future.

Terraform Cloud has been successfully initialized!
...
由於 Droplet 的定義與之前的項目相同,您可以運行以下命令將其複製過去:
最後,您將定義變量值。 cloud 提供商不支持通過命令行傳遞值給變量,因此您必須使用變量文件傳遞它們,或者在 Terraform Cloud 中設置它們。 Terraform 從文件名以 .auto.tfvars 結尾的文件中讀取變量值。創建並打開一個名為 vars.auto.tfvars 的文件進行編輯,在其中您將定義 do_token 變量:
添加以下行,將 your_do_token 替換為您的 DigitalOcean API 令牌:
完成後,保存並關閉文件。Terraform 在計劃操作時會自動讀取此文件。
您的項目現已完成並設置為使用 Terraform Cloud 作為其後端。您現在將計劃並應用 Droplet,並查看在 Cloud 應用中的反映。
應用配置
在本教程的第1步中,您使用 terraform plan 命令計劃了一個項目。由於 Terraform Cloud 項目定義了相同的資源,您可以跳過再次計劃它,並直接將其應用到 Terraform Cloud。
您可以通過運行以下命令來應用該項目以更新它:
你會注意到,輸出與使用local作為後端時不同:
當使用cloud後端時,Terraform 不會在本地機器上計劃或應用配置。相反,它將這些任務委派給 Terraform Cloud,並且只將輸出即時流式傳輸到控制台。
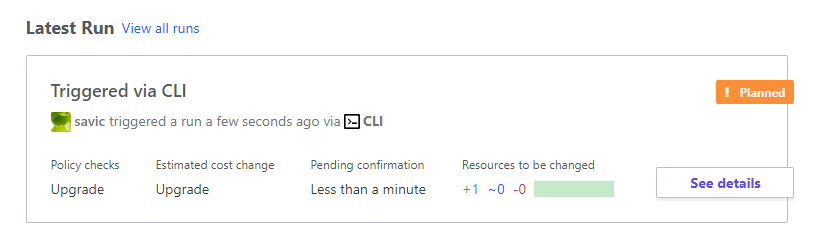
在提示時輸入yes。Terraform 很快將完成應用配置,然後您可以導航到 Terraform Cloud 網站上的工作區,以查看它應用了新的操作。
您現在可以運行以下命令來銷毀已部署的資源:
在這一節中,您將您的專案連接到 Terraform Cloud,使專案的狀態在中央位置對您的團隊可用。這允許狀態被分享並同步給所有有權訪問該專案的人,從而實現更流暢的體驗。
結論
在本教程中,您使用了兩種不同的後端:Terraform Cloud,這是 Hashicorp 為 Terraform 提供的托管雲服務;以及pg,它允許您將專案的狀態存儲在 PostgreSQL 數據庫中。您使用了 DigitalOcean 的托管 PostgreSQL 數據庫,您可以在幾分鐘內使用 Terraform 進行配置和使用。
有關 Terraform Cloud 功能的更多信息,請查看官方文檔。
本教程是如何使用 Terraform 管理基礎設施系列的一部分。該系列涵蓋了多個 Terraform 主題,從首次安裝 Terraform 到管理複雜項目。
Source:
https://www.digitalocean.com/community/tutorials/how-to-use-terraform-within-your-team