


介紹
Ruby on Rails是一個用Ruby編寫的Web應用程序框架,為開發人員提供了一種具有偏見的應用程序開發方法。使用Rails,開發人員可以獲得:
- 用於處理路由、有狀態的數據和資產管理等事項的約定。
- A firm grounding in the model-view-controller (MCV) architectural pattern, which separates an application’s logic, located in models, from the presentation and routing of application information.
隨著您將複雜性添加到Rails應用程序中,您可能會與多個模型一起工作,這些模型代表應用程序的業務邏輯並與數據庫進行接口。添加相關模型意味著在它們之間建立有意義的關係,這些關係將影響信息通過應用程序的控制器傳遞的方式,以及信息如何通過視圖捕獲和呈現給用戶。
在本教程中,您將在現有的提供有關鯊魚事實的Rails應用程序的基礎上進行擴展。該應用程序已經具有處理鯊魚數據的模型,但您將添加一個嵌套資源,用於個別鯊魚的帖子。這將允許用戶擴展有關個別鯊魚的更廣泛的思想和意見。
先決條件
要完成本教程,您需要:
- A local machine or development server running Ubuntu 18.04. Your development machine should have a non-root user with administrative privileges and a firewall configured with
ufw. For instructions on how to set this up, see our Initial Server Setup with Ubuntu 18.04 tutorial. - Node.js和npm已安装在您的本地计算机或开发服务器上。本教程使用Node.js版本10.16.3和npm版本6.9.0。有关在Ubuntu 18.04上安装Node.js和npm的指导,请按照在Ubuntu 18.04上安装Node.js的PPA部分中的说明进行操作。
- 您的本地计算机或开发服务器上已安装了Ruby、rbenv和Rails,按照在Ubuntu 18.04上使用rbenv安装Ruby on Rails的步骤1-4。本教程使用Ruby 2.5.1、rbenv 1.1.2和Rails 5.2.3。
- 已安装SQLite,并按照构建Ruby on Rails应用程序中的说明创建了一个基本的鲨鱼信息应用程序。
步骤1 — 构建嵌套模型
我們的應用將利用Active Record關聯來建立Shark和Post模型之間的關係:帖子將屬於特定的鯊魚,而每個鯊魚可以有多個帖子。因此,我們的Shark和Post模型將通過belongs_to和has_many關聯相關聯。
構建應用程序的第一步是創建一個Post模型和相關資源。為此,我們可以使用rails generate scaffold命令,該命令將為我們提供一個模型、一個用於修改數據庫架構的數據庫遷移、一個控制器、一組完整的視圖以管理標準的創建、讀取、更新和刪除(CRUD)操作,以及用於部分、輔助工具和測試的模板。我們需要修改這些資源,但使用scaffold命令會節省一些時間和精力,因為它生成了一個我們可以用作起點的結構。
首先,確保您位於先決條件中創建的Rails項目的sharkapp目錄中:
使用以下命令創建您的Post資源:
rails generate scaffold Post body:text shark:references
使用body:text,我們告訴Rails在posts數據庫表中包含一個body字段 – 這個表對應到Post模型。我們還包括:references關鍵字,它設置了Shark和Post模型之間的關聯。具體來說,這將確保在posts數據庫中添加代表sharks數據庫中每個鯊魚條目的外鍵。
執行命令後,您將看到確認應用程序所生成的資源的輸出。在繼續之前,您可以檢查數據庫遷移文件,查看您的模型和數據庫表之間現在存在的關係。使用以下命令查看文件的內容,請確保將自己遷移文件上的時間戳替換為這裡顯示的時間戳:
您將看到以下輸出:
Outputclass CreatePosts < ActiveRecord::Migration[5.2]
  def change
    create_table :posts do |t|
      t.text :body
      t.references :shark, foreign_key: true

      t.timestamps
    end
  end
end
如您所見,該表包含一個鯊魚外鍵列。此鍵將採用model_name_id的形式 – 在我們的案例中為shark_id。
Rails還在其他地方建立了模型之間的關係。使用以下命令查看新生成的Post模型:
cat app/models/post.rb
Outputclass Post < ApplicationRecord
  belongs_to :shark
end
belongs_to關聯在模型之間建立了一種關係,在這種關係中,聲明模型的單個實例屬於指定模型的單個實例。對於我們的應用程序,這意味著一個帖子屬於一個鯊魚。
除了設置這個關係之外,《code>rails generate scaffold 命令還為帖子創建了路由和視圖,就像我們在步驟 3中為鯊魚資源所做的那樣。
這是一個有用的開始,但我們需要配置一些額外的路由並鞏固Shark 模型的 Active Record 關聯,以便模型和路由之間的關係按預期工作。
步驟 2 — 指定父模型的嵌套路由和關聯
Rails 已經通過rails generate scaffold 命令中的:references 關鍵字在我們的Post 模型中設置了belongs_to 關聯,但為了使該關係正常工作,我們需要在Shark 模型中指定一個has_many 關聯。我們還需要對 Rails 為我們提供的默認路由進行更改,以便將帖子資源設置為鯊魚資源的子資源。
要將has_many關聯添加到Shark模型,請使用app/models/shark.rb文件:
將以下代碼添加到文件中,以建立鯊魚和帖子之間的關係:
class Shark < ApplicationRecord
  has_many :posts
  validates :name, presence: true, uniqueness: true
  validates :facts, presence: true
end
這裡值得思考的一件事是,當特定的鯊魚被刪除時,帖子會發生什麼情況。我們可能不希望與已刪除的鯊魚關聯的帖子在數據庫中保留。為確保與特定鯊魚關聯的任何帖子在該鯊魚被刪除時被刪除,我們可以在關聯中包含dependent選項。
將以下代碼添加到文件中,以確保對給定鯊魚的destroy操作刪除任何關聯的帖子:
class Shark < ApplicationRecord
  has_many :posts , dependent: :destroy
  validates :name, presence: true, uniqueness: true
  validates :facts, presence: true
end
完成這些更改後,請保存並關閉文件。如果您使用CTRL+X,Y,然後ENTER來完成此操作。
接下來,打開您的config/routes.rb文件以修改資源路由之間的關係:
目前,文件如下所示:
Rails.application.routes.draw do
  resources :posts
  resources :sharks

  root 'sharks#index'
  # 有關此文件中可用DSL的詳細信息,請參閱http://guides.rubyonrails.org/routing.html
end
當前代碼確立了我們路由之間的獨立關係,我們想要表達的是鯊魚和其關聯帖子之間的一種依賴關係。
讓我們更新路由聲明,將:sharks設為:posts的父級。將文件中的代碼更新為以下內容:
Rails.application.routes.draw do
  resources :sharks do
    resources :posts
end
  root 'sharks#index'
  # 有關此文件中可用DSL的詳細信息,請參閱http://guides.rubyonrails.org/routing.html
end
編輯完畢後保存並關閉文件。
完成這些更改後,您可以繼續更新您的posts控制器。
步驟3 — 更新帖子控制器
我們模型之間的關聯提供了可用於創建與特定鯊魚相關聯的新帖子實例的方法。要使用這些方法,我們需要將它們添加到我們的帖子控制器中。
打開帖子控制器文件:
目前,文件看起來像這樣:
class PostsController < ApplicationController
  before_action :set_post, only: [:show, :edit, :update, :destroy]

  # 獲取 /posts 路徑
  # 獲取 /posts 路徑.json
  def index
    @posts = Post.all
  end

  # 獲取 /posts 路徑/1
  # 獲取 /posts 路徑/1.json
  def show
  end

  # 獲取 /posts 路徑/new
  def new
    @post = Post.new
  end

  # 獲取 /posts 路徑/1/edit
  def edit
  end

  # 提交 /posts 路徑
  # 提交 /posts 路徑.json
  def create
    @post = Post.new(post_params)

    respond_to do |format|
      if @post.save
        format.html { redirect_to @post, notice: 'Post was successfully created.' }
        format.json { render :show, status: :created, location: @post }
      else
        format.html { render :new }
        format.json { render json: @post.errors, status: :unprocessable_entity }
      end
    end
  end

  # 更新 /posts/1 路徑
  # 更新 /posts/1 路徑.json
  def update
    respond_to do |format|
      if @post.update(post_params)
        format.html { redirect_to @post, notice: 'Post was successfully updated.' }
        format.json { render :show, status: :ok, location: @post }
      else
        format.html { render :edit }
        format.json { render json: @post.errors, status: :unprocessable_entity }
      end
    end
  end

  # 刪除 /posts/1 路徑
  # 刪除 /posts/1 路徑.json
  def destroy
    @post.destroy
    respond_to do |format|
      format.html { redirect_to posts_url, notice: 'Post was successfully destroyed.' }
      format.json { head :no_content }
    end
  end

  private
    # 使用回調函數在操作間共享公共設置或約束。
    def set_post
      @post = Post.find(params[:id])
    end

    # 不要相信來自可怕的互聯網的參數,只允許通過白名單。
    def post_params
      params.require(:post).permit(:body, :shark_id)
    end
end
與我們的 sharks 控制器一樣,這個控制器的方法與相關聯的 Post 類的實例一起工作。例如,new 方法創建 Post 類的新實例,index 方法獲取該類的所有實例,set_post 方法使用 find 和 params 來選擇特定的 id 進行帖子。但是,如果我們希望我們的帖子實例與特定的 shark 實例相關聯,那麼我們將需要修改此代碼,因為目前 Post 類正在作為一個獨立的實體運行。
我們的修改將使用兩個東西:
- 添加
belongs_to和has_many关联到我们的模型后,我们可以使用的方法。具体来说,现在我们可以访问build方法,这要归功于我们在Shark模型中定义的has_many关联。该方法将允许我们使用存在于我们的posts数据库中的shark_id外键,创建与特定鲨鱼对象关联的一组帖子对象。 - 我们创建嵌套
posts路由时可以使用的路由和路由辅助程序。有关在资源之间创建嵌套关系时可用的示例路由的完整列表,请参阅 Rails 文档。目前,我们只需知道对于每个特定的鲨鱼 —— 比如说sharks/1—— 将会有一个关联到该鲨鱼的帖子的路由:sharks/1/posts。还会有像shark_posts_path(@shark)和edit_sharks_posts_path(@shark)这样的路由辅助程序,它们引用这些嵌套路由。
在文件中,我们将首先编写一个名为 get_shark 的方法,在控制器中的每个操作之前运行该方法。此方法将通过 shark_id 查找鲨鱼实例,并创建一个本地的 @shark 实例变量。有了这个变量,在其他方法中就可以将帖子与特定的鲨鱼关联起来。
在文件底部的其他private方法之上添加以下方法:
. . .
private
  def get_shark
@shark = Shark.find(params[:shark_id])
end
  # 使用回调函数在操作之间共享常见设置或约束。
. . .
接下来,在现有过滤器之前,在文件顶部添加相应的过滤器:
class PostsController < ApplicationController
  before_action :get_shark
这将确保get_shark在文件中定义的每个操作之前运行。
接下来,您可以使用此@shark实例重写index方法。我们不想获取Post类的所有实例,而是想让此方法返回与特定鲨鱼实例关联的所有帖子实例。
将index方法修改如下:
. . .
  def index
    @posts = @shark.posts
  end
. . .
new方法需要类似的修改,因为我们希望将新的帖子实例与特定的鲨鱼关联起来。为了实现这一点,我们可以利用build方法以及我们的本地@shark实例变量。
将new方法更改如下:
. . .
  def new
    @post = @shark.posts.build
  end
. . .
此方法创建一个与get_shark方法中的特定鲨鱼实例关联的帖子对象。
接下来,我们将处理与new最紧密相关的方法:create。 create方法有两个作用:使用用户在new表单中输入的参数构建一个新的帖子实例,并且如果没有错误,则保存该实例并使用路由助手将用户重定向到可以查看新帖子的位置。在出现错误的情况下,它会再次呈现new模板。
將create方法更新如下:
  def create
    @post = @shark.posts.build(post_params)

        respond_to do |format|
         if @post.save
            format.html { redirect_to shark_posts_path(@shark), notice: 'Post was successfully created.' }
            format.json { render :show, status: :created, location: @post }
         else
            format.html { render :new }
            format.json { render json: @post.errors, status: :unprocessable_entity }
      end
    end
  end
接下來,看一下update方法。這個方法使用了一個@post實例變量,該變量在方法本身中並沒有被明確設置。這個變量從哪裡來呢?
請查看文件頂部的過濾器。第二個自動生成的before_action過濾器提供了答案:
class PostsController < ApplicationController
  before_action :get_shark
  before_action :set_post, only: [:show, :edit, :update, :destroy]
  . . .
update方法(像show,edit和destroy一樣)從set_post方法中獲取一個@post變量。該方法,在我們的其他private方法下列在get_shark方法之下,目前看起來是這樣的:
. . .
private
. . .
  def set_post
    @post = Post.find(params[:id])
  end
. . .
根據我們在文件其他地方使用的方法,我們需要修改這個方法,使@post指向與特定鯊魚關聯的一個帖子實例。在這裡要牢記build方法 – 由於我們模型之間的關聯,以及這些關聯帶來的方法(如build),我們每個帖子實例都是與特定鯊魚關聯的對象集合的一部分。因此,當查詢特定帖子時,我們會查詢與特定鯊魚關聯的帖子集合。
將set_post更新如下:
. . .
private
. . .
  def set_post
    @post = @shark.posts.find(params[:id])
  end
. . .
不是通過id找到整個Post類的特定實例,而是在與特定鯊魚關聯的帖子集合中尋找匹配的id。
有了這個更新的方法,我們可以看一下update和destroy方法。
update方法利用了set_post中的@post實例變量,並將其與用戶在edit表單中輸入的post_params一起使用。在成功的情況下,我們希望Rails將用戶重定向回與特定鯊魚相關聯的帖子的index視圖。在出現錯誤的情況下,Rails將再次渲染edit模板。
在這種情況下,我們唯一需要做的更改是redirect_to語句,以處理成功的更新。將其更新為重定向到shark_post_path(@shark),這將重定向到所選鯊魚帖子的index視圖:
. . .
  def update
    respond_to do |format|
      if @post.update(post_params)
        format.html { redirect_to shark_post_path(@shark), notice: 'Post was successfully updated.' }
        format.json { render :show, status: :ok, location: @post }
      else
        format.html { render :edit }
        format.json { render json: @post.errors, status: :unprocessable_entity }
      end
    end
  end
. . .
接下來,我們將對destroy方法進行類似的更改。在成功的情況下,將redirect_to方法更新為重定向請求到shark_posts_path(@shark):
. . .
  def destroy
    @post.destroy
     respond_to do |format|
      format.html { redirect_to shark_posts_path(@shark), notice: 'Post was successfully destroyed.' }
      format.json { head :no_content }
    end
  end
. . .
這是我們將要進行的最後一次更改。現在,您有一個看起來像這樣的帖子控制器文件:
class PostsController < ApplicationController
  before_action :get_shark
  before_action :set_post, only: [:show, :edit, :update, :destroy]

  #獲取/文章
  #獲取/文章.json
  def index
    @posts = @shark.posts
  end

  #獲取/文章/1
  #獲取/文章/1.json
  def show
  end

  #獲取/文章/new
  def new
    @post = @shark.posts.build
  end

  #獲取/文章/1/edit
  def edit
  end

  #發布/文章
  #發布/文章.json
  def create
    @post = @shark.posts.build(post_params)

        respond_to do |format|
         if @post.save
            format.html { redirect_to shark_posts_path(@shark), notice: 'Post was successfully created.' }
            format.json { render :show, status: :created, location: @post }
         else
            format.html { render :new }
            format.json { render json: @post.errors, status: :unprocessable_entity }
      end
    end
  end

  #PATCH/PUT /文章/1
  #PATCH/PUT /文章/1.json
  def update
    respond_to do |format|
      if @post.update(post_params)
        format.html { redirect_to shark_post_path(@shark), notice: 'Post was successfully updated.' }
        format.json { render :show, status: :ok, location: @post }
      else
        format.html { render :edit }
        format.json { render json: @post.errors, status: :unprocessable_entity }
      end
    end
  end

  #刪除/文章/1
  #刪除/文章/1.json
  def destroy
    @post.destroy
    respond_to do |format|
      format.html { redirect_to shark_posts_path(@shark), notice: 'Post was successfully destroyed.' }
      format.json { head :no_content }
    end
  end

  private

   def get_shark
     @shark = Shark.find(params[:shark_id])
   end
    # 使用回調在視圖模板和數據庫之間共享公共設置或約束。
    def set_post
      @post = @shark.posts.find(params[:id])
    end

    # 不要信任來自可怕的互聯網的參數,只允許通過白名單。
    def post_params
      params.require(:post).permit(:body, :shark_id)
    end
end
控制器管理如何將信息從視圖模板傳遞到數據庫,反之亦然。我們的控制器現在反映了我們的Shark和Post模型之間的關係,其中帖子與特定的鯊魚相關聯。我們可以繼續修改視圖模板本身,用戶將在其中傳遞並修改關於特定鯊魚的帖子信息。
步驟4 — 修改視圖
我們的視圖模板修訂將涉及更改與帖子相關的模板,並修改我們的鯊魚show視圖,因為我們希望用戶能看到與特定鯊魚相關聯的帖子。
讓我們從我們的帖子的基礎模板開始:被多個帖子模板重複使用的form局部。現在打開該表單:
與其僅將post模型傳遞給form_with表單輔助程序,我們將同時傳遞shark和post模型,並將post設置為子資源。
將文件的第一行更改為以下內容,以反映我們的鯊魚和貼文資源之間的關係:
<%= form_with(model: [@shark, post], local: true) do |form| %>
. . .
接下來,刪除相關鯊魚的shark_id列表部分,因為這在視圖中並不是必要信息。
完成的表單,包括我們對第一行的編輯,並且不包含已刪除的shark_id部分,將如下所示:
<%= form_with(model: [@shark, post], local: true) do |form| %>
  <% if post.errors.any? %>
    <div id="error_explanation">
      <h2><%= pluralize(post.errors.count, "error") %> prohibited this post from being saved:</h2>

      <ul>
      <% post.errors.full_messages.each do |message| %>
        <li><%= message %></li>
      <% end %>
      </ul>
    </div>
  <% end %>

  <div class="field">
    <%= form.label :body %>
    <%= form.text_area :body %>
  </div>

  <div class="actions">
    <%= form.submit %>
  </div>
<% end %>
編輯完成後保存並關閉文件。
接下來,打開index視圖,該視圖將顯示與特定鯊魚相關聯的貼文:
多虧了rails generate scaffold命令,Rails已經生成了模板的大部分內容,其中包括一個表格,顯示每個貼文的body字段及其相關聯的shark。
然而,與我們已經修改的其他代碼一樣,該模板將貼文視為獨立實體,而我們希望利用模型之間的關聯以及這些關聯提供給我們的集合和輔助方法。
在表格的主體中進行以下更新:
首先,將post.shark更新為post.shark.name,這樣表格將包括相關鯊魚的名稱字段,而不是鯊魚對象本身的識別信息:
. . .
  <tbody>
    <% @posts.each do |post| %>
      <tr>
        <td><%= post.body %></td>
        <td><%= post.shark.name %></td>
. . .
接下來,將Show重定向更改為直接將用戶定向到相關鯊魚的show視圖,因為他們很可能希望有一種方法返回原始鯊魚。 我們可以利用我們在控制器中設置的@shark實例變量,在這裡,因為Rails使在控制器中創建的實例變量對所有視圖都可用。 我們還將更改鏈接的文本,從Show更改為Show Shark,以便用戶更好地理解其功能。
將此行更新為以下內容:
. . .
  <tbody>
    <% @posts.each do |post| %>
      <tr>
        <td><%= post.body %></td>
        <td><%= post.shark.name %></td>
        <td><%= link_to 'Show Shark', [@shark] %></td>
在下一行中,我們希望確保用戶在編輯帖子時被路由到正確的嵌套路徑。 這意味著用戶不會被導向到posts/post_id/edit,而是將被導向到sharks/shark_id/posts/post_id/edit。 為此,我們將使用shark_post_path路由輔助程序和我們的模型,Rails將將其視為URL。 我們還將更新鏈接文本,以使其功能更清晰。
將Edit行更新為如下所示:
. . .
  <tbody>
    <% @posts.each do |post| %>
      <tr>
        <td><%= post.body %></td>
        <td><%= post.shark.name %></td>
        <td><%= link_to 'Show Shark', [@shark] %></td>
        <td><%= link_to 'Edit Post', edit_shark_post_path(@shark, post) %></td>
接下來,讓我們對Destroy鏈接進行類似的更改,更新字符串中的功能,並添加我們的shark和post資源:
. . .
  <tbody>
    <% @posts.each do |post| %>
      <tr>
        <td><%= post.body %></td>
        <td><%= post.shark.name %></td>
        <td><%= link_to 'Show Shark', [@shark] %></td>
        <td><%= link_to 'Edit Post', edit_shark_post_path(@shark, post) %></td>
        <td><%= link_to 'Destroy Post', [@shark, post], method: :delete, data: { confirm: 'Are you sure?' } %></td>
最後,在表單底部,我們將希望更新New Post路徑,以便用戶在想要創建新帖子時進入適當的嵌套路徑。 將文件的最後一行更新為使用new_shark_post_path(@shark)路由輔助程序:
. . .
<%= link_to 'New Post', new_shark_post_path(@shark) %>
最終的文件將如下所示:
<p id="notice"><%= notice %></p>

<h1>Posts</h1>

<table>
  <thead>
    <tr>
      <th>Body</th>
      <th>Shark</th>
      <th colspan="3"></th>
    </tr>
  </thead>

  <tbody>
    <% @posts.each do |post| %>
      <tr>
        <td><%= post.body %></td>
        <td><%= post.shark.name %></td>
        <td><%= link_to 'Show Shark', [@shark] %></td>
        <td><%= link_to 'Edit Post', edit_shark_post_path(@shark, post) %></td>
        <td><%= link_to 'Destroy Post', [@shark, post], method: :delete, data: { confirm: 'Are you sure?' } %></td>
      </tr>
    <% end %>
  </tbody>
</table>

<br>

<%= link_to 'New Post', new_shark_post_path(@shark) %>
完成編輯後請儲存並關閉文件。
我們對於帖子檢視的其他編輯不會像這麼多,因為我們的其他檢視使用了我們已經編輯過的form部分。然而,我們需要更新其他帖子模板中的link_to參考,以反映我們對form部分所做的更改。
打開app/views/posts/new.html.erb:
更新文件底部的link_to參考,以使用shark_posts_path(@shark)助手:
. . .
<%= link_to 'Back', shark_posts_path(@shark) %>
完成此更改後,請儲存並關閉文件。
接下來,打開edit模板:
除了Back路徑外,我們將更新Show以反映我們的巢狀資源。將文件的最後兩行更改如下:
. . .
<%= link_to 'Show', [@shark, @post] %> |
<%= link_to 'Back', shark_posts_path(@shark) %>
儲存並關閉文件。
接下來,打開show模板:
nano app/views/posts/show.html.erb
對文件底部的Edit和Back路徑進行以下編輯:
. . .
<%= link_to 'Edit', edit_shark_post_path(@shark, @post) %> |
<%= link_to 'Back', shark_posts_path(@shark) %>
完成後,請儲存並關閉文件。
作為最後一步,我們將更新我們鯊魚的show視圖,以便為個別鯊魚顯示帖子。立即打開該文件:
我們在這裡的編輯包括在表單中添加一個Posts部分和文件底部添加一個Add Post鏈接。
以下是給定鯊魚的Facts。我們將新增一個新的部分,透過迭代與這個鯊魚相關的文章集合中的每個實例,輸出每篇文章的body。
在表單的Facts部分下面添加以下代碼,在文件底部的重定向上面:
. . .
<p>
  <strong>Facts:</strong>
  <%= @shark.facts %>
</p>

<h2>Posts</h2>
<% for post in @shark.posts %>
    <ul>
      <li><%= post.body %></li>
  </ul>
<% end %>

<%= link_to 'Edit', edit_shark_path(@shark) %> |
. . .
接下來,新增一個新的重定向,讓用戶可以為這個特定的鯊魚添加一篇新文章:
. . .
<%= link_to 'Edit', edit_shark_path(@shark) %> |
<%= link_to 'Add Post', shark_posts_path(@shark) %> |
<%= link_to 'Back', sharks_path %>
當您完成編輯後,請保存並關閉文件。
您現在已經對應用程序的模型、控制器和視圖進行了更改,以確保帖子始終與特定的鯊魚相關聯。作為最後一步,我們可以對Post模型添加一些驗證,以保證保存到數據庫中的數據的一致性。
第5步 – 添加驗證並測試應用程序
在步驟 5中的如何建立一個 Ruby on Rails 應用程式中,您為您的Shark模型添加了驗證,以確保將數據保存到sharks資料庫中時的一致性和統一性。現在我們將採取類似的步驟來確保對posts資料庫的保證。
打開定義Post模型的文件:
在這裡,我們希望確保文章不是空的,也不重複其他用戶可能發表的內容。為了實現這一目標,請在文件中添加以下行:
class Post < ApplicationRecord
  belongs_to :shark
  validates :body, presence: true, uniqueness: true
end
完成編輯後保存並關閉文件。
完成最後的更改後,您已準備好運行遷移並測試應用程式。
首先,運行遷移:
然後啟動您的伺服器。如果您正在本地工作,可以運行以下命令:
如果您正在開發伺服器上工作,請運行以下命令:
轉到您應用程式的根目錄,位於http://localhost:3000 或 http://your_server_ip:3000。
先決 Rails 項目教程引導您完成添加和編輯大白鯊條目。如果您沒有添加其他鯊魚,應用程式首頁將如下所示:
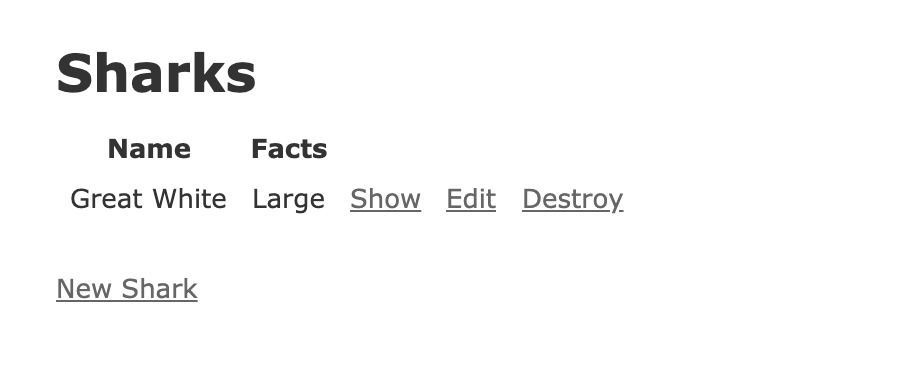
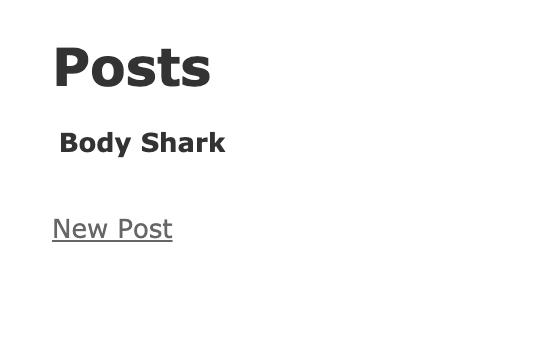
點擊 顯示 旁邊的 大白鯊 名稱。這將帶您到這隻鯊魚的 顯示 檢視。您將看到鯊魚的名稱及其資訊,以及一個沒有內容的 帖子 標題。讓我們添加一篇帖子來填充此表單的這一部分。
點擊 添加帖子 在 帖子 標題下方。這將帶您到帖子 索引 檢視,在那裡您將有機會選擇 新帖子:
感謝您在 步驟6 中設置的驗證機制,您可能會被要求使用您在該步驟中創建的用戶名和密碼進行驗證,具體取決於您是否創建了新的會話。
點擊 新帖子,這將帶您到您的帖子 新 模板:
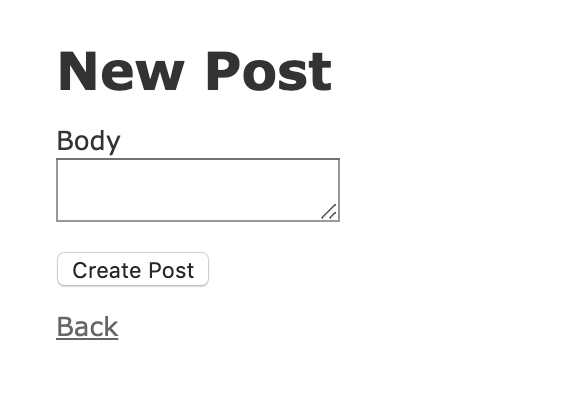
在 主體 欄位中,輸入“這些鯊魚很可怕!”
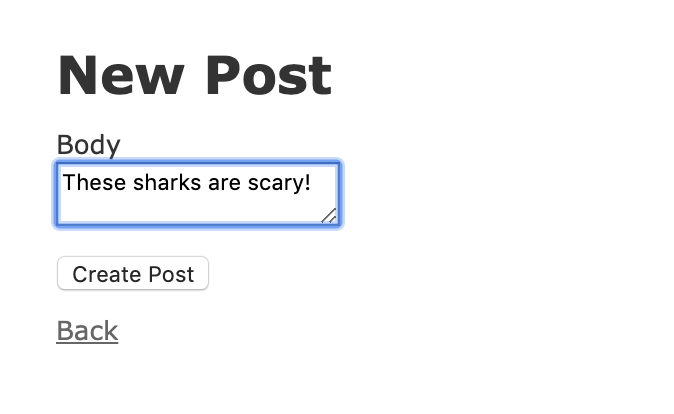
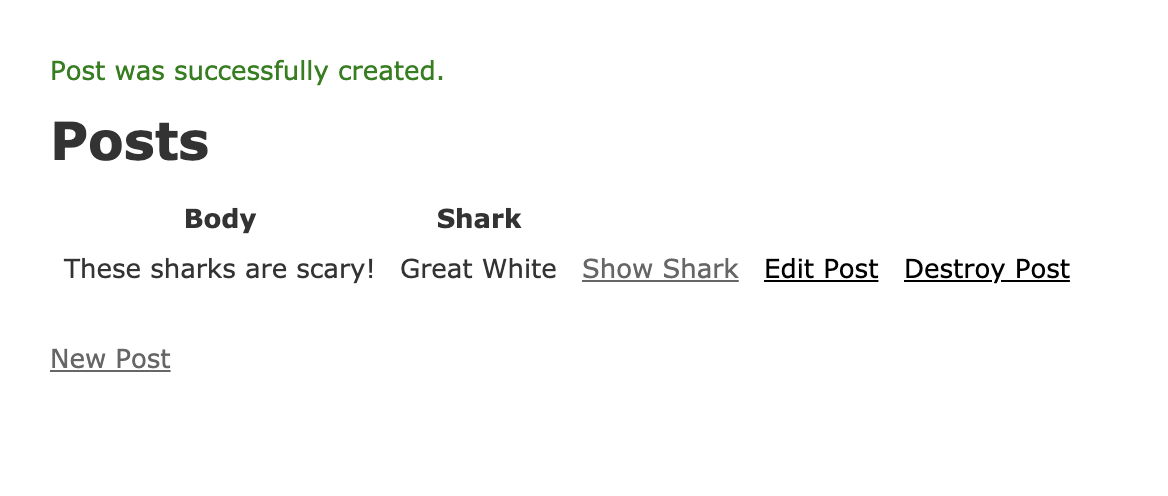
點擊 創建帖子。您將被重定向到屬於這隻鯊魚的所有帖子的 索引 檢視:
有了我們的帖子資源後,我們現在可以測試我們的數據驗證,以確保只有所需的數據保存到數據庫中。
從 索引 檢視中,點擊 新帖子。在新表單的 主體 欄位中,嘗試再次輸入“這些鯊魚很可怕!”:
點擊創建帖子。您將看到以下錯誤:
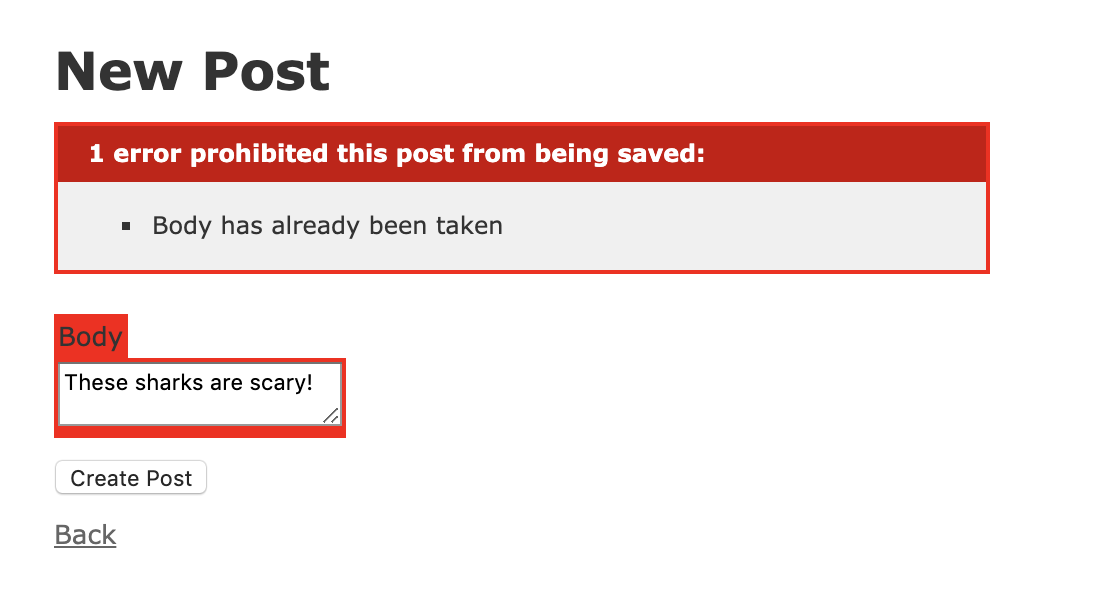
點擊返回返回主帖子頁面。
為了測試我們的其他驗證,再次點擊新帖子。將帖子留空並點擊創建帖子。您將看到以下錯誤:
![]()
憑藉您的嵌套資源和驗證正常運作,您現在有一個可作為進一步開發起點的運作良好的Rails應用程式。
結論
有了您的Rails應用程式,您現在可以開始處理樣式和開發其他前端組件等事項。如果您想了解更多有關路由和嵌套資源的信息,Rails文檔是一個很好的起點。
要了解如何將前端框架與您的應用程式集成,請參閱如何使用React前端設置Ruby on Rails項目。