今天我們將研究在Hibernate中的一對一映射。我們將使用注釋和XML配置來查看Hibernate一對一映射的示例。
Hibernate中的一對一映射
 大多數情況下,數據庫表是彼此關聯的。關聯有許多形式 – 一對一,一對多和多對多是在廣泛層面上的。這些可以進一步分為單向和雙向映射。今天我們將探討使用Hibernate一對一映射來實現,使用XML配置以及使用注釋配置。
Hibernate一對一映射示例數據庫設置
首先,我們需要在數據庫表中設置一對一映射。我們將為我們的示例創建兩個表 – 交易表和客戶表。這兩個表將具有一對一映射。交易表將是主表,我們將在客戶表中使用外鍵進行一對一映射。我提供的是MySQL腳本,這是我用於本教程的數據庫。如果您使用其他數據庫,請確保相應更改腳本。
-- 創建交易表
CREATE TABLE `Transaction` (
  `txn_id` int(11) unsigned NOT NULL AUTO_INCREMENT,
  `txn_date` date NOT NULL,
  `txn_total` decimal(10,0) NOT NULL,
  PRIMARY KEY (`txn_id`)
) ENGINE=InnoDB AUTO_INCREMENT=16 DEFAULT CHARSET=utf8;

-- 創建客戶表
CREATE TABLE `Customer` (
  `txn_id` int(11) unsigned NOT NULL,
  `cust_name` varchar(20) NOT NULL DEFAULT '',
  `cust_email` varchar(20) DEFAULT NULL,
  `cust_address` varchar(50) NOT NULL DEFAULT '',
  PRIMARY KEY (`txn_id`),
  CONSTRAINT `customer_ibfk_1` FOREIGN KEY (`txn_id`) REFERENCES `Transaction` (`txn_id`)
) ENGINE=InnoDB DEFAULT CHARSET=utf8;
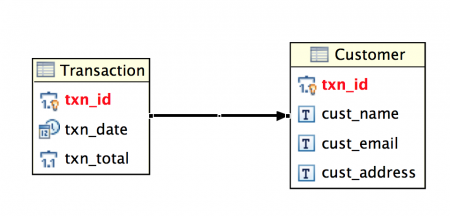
上述表之間的一對一映射的實體關係圖(ERD)如下圖所示。 我們的數據庫設置已經就緒,現在讓我們繼續進行Hibernate一對一示例項目。
Hibernate一對一映射示例項目結構
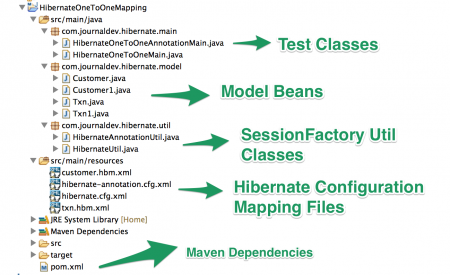
建立一個簡單的Maven項目在你的Java IDE中,我正在使用Eclipse。我們最終的項目結構將看起來像下面的圖片。 首先我們會看一下基於XML的Hibernate一對一映射的示例,然後我們將使用註釋來實現相同的事情。
Hibernate Maven 依賴項
我們最終的pom.xml文件如下。
<project xmlns="https://maven.apache.org/POM/4.0.0" xmlns:xsi="https://www.w3.org/2001/XMLSchema-instance" xsi:schemaLocation="https://maven.apache.org/POM/4.0.0 https://maven.apache.org/xsd/maven-4.0.0.xsd">
  <modelVersion>4.0.0</modelVersion>
  <groupId>com.journaldev.hibernate</groupId>
  <artifactId>HibernateOneToOneMapping</artifactId>
  <version>0.0.1-SNAPSHOT</version>
  <dependencies>
  	<dependency>
  		<groupId>org.hibernate</groupId>
  		<artifactId>hibernate-core</artifactId>
  		<version>4.3.5.Final</version>
  	</dependency>
  	<dependency>
  		<groupId>mysql</groupId>
  		<artifactId>mysql-connector-java</artifactId>
  		<version>5.0.5</version>
  	</dependency>
  </dependencies>
</project>
依賴項僅用於Hibernate和mysql java驅動程序。請注意,我正在使用Hibernate最新版本4.3.5.Final 和MySQL java驅動程序基於我的MySQL數據庫服務器版本(5.0.5) 。Hibernate 4使用JBoss日誌記錄,它會自動作為傳遞依賴導入。您可以在項目的Maven依賴項中確認它。如果您使用的是舊版Hibernate,您可能需要添加slf4j依賴項。
Hibernate一對一映射模型類
用於Hibernate一對一映射的模型類以反映數據庫表將如下所示。
package com.journaldev.hibernate.model;

import java.util.Date;

public class Txn {

	private long id;
	private Date date;
	private double total;
	private Customer customer;

	@Override
	public String toString(){
		return id+", "+total+", "+customer.getName()+", "+customer.getEmail()+", "+customer.getAddress();
	}
	public long getId() {
		return id;
	}
	public void setId(long id) {
		this.id = id;
	}
	public Date getDate() {
		return date;
	}
	public void setDate(Date date) {
		this.date = date;
	}
	public double getTotal() {
		return total;
	}
	public void setTotal(double total) {
		this.total = total;
	}
	public Customer getCustomer() {
		return customer;
	}
	public void setCustomer(Customer customer) {
		this.customer = customer;
	}

}
package com.journaldev.hibernate.model;

public class Customer {

	private long id;
	private String name;
	private String email;
	private String address;

	private Txn txn;

	public long getId() {
		return id;
	}
	public void setId(long id) {
		this.id = id;
	}
	public String getName() {
		return name;
	}
	public void setName(String name) {
		this.name = name;
	}
	public String getEmail() {
		return email;
	}
	public void setEmail(String email) {
		this.email = email;
	}
	public String getAddress() {
		return address;
	}
	public void setAddress(String address) {
		this.address = address;
	}
	public Txn getTxn() {
		return txn;
	}
	public void setTxn(Txn txn) {
		this.txn = txn;
	}

}
由於我們正在使用基於 XML 的配置進行映射,上述模型類別是簡單的 POJO 類別或具有 getter-setter 方法的 Java Beans。我使用類別名稱作為 Txn,以避免混淆,因為 Hibernate API 將類別名稱定為 Transaction。
Hibernate 一對一映射配置
讓我們為 Txn 和 Customer 表格創建 Hibernate 一對一映射配置檔案。txn.hbm.xml
<?xml version="1.0"?>
<!DOCTYPE hibernate-mapping PUBLIC "-//Hibernate/Hibernate Mapping DTD 3.0//EN"
	"https://hibernate.org/dtd/hibernate-mapping-3.0.dtd">
<hibernate-mapping>
	<class name="com.journaldev.hibernate.model.Txn" table="TRANSACTION" >
		<id name="id" type="long">
			<column name="txn_id" />
			<generator class="identity" />
		</id>
		<property name="date" type="date">
			<column name="txn_date" />
		</property>
		<property name="total" type="double">
			<column name="txn_total" />
		</property>
		<one-to-one name="customer" class="com.journaldev.hibernate.model.Customer"
			cascade="save-update" />
	</class>

</hibernate-mapping>
上面需要注意的重點是用於客戶屬性的 Hibernate one-to-one 元素。customer.hbm.xml
<?xml version="1.0" encoding="UTF-8"?>
<!DOCTYPE hibernate-mapping PUBLIC "-//Hibernate/Hibernate Mapping DTD 3.0//EN"
"https://hibernate.org/dtd/hibernate-mapping-3.0.dtd" >
<hibernate-mapping>

	<class name="com.journaldev.hibernate.model.Customer" table="CUSTOMER">
		<id name="id" type="long">
			<column name="txn_id" />
			<generator class="foreign">
				<param name="property">txn</param>
			</generator>
		</id>
		<one-to-one name="txn" class="com.journaldev.hibernate.model.Txn"
			constrained="true"></one-to-one>

		<property name="name" type="string">
			<column name="cust_name"></column>
		</property>
		<property name="email" type="string">
			<column name="cust_email"></column>
		</property>
		<property name="address" type="string">
			<column name="cust_address"></column>
		</property>
	</class>

</hibernate-mapping>
generator class=“foreign” 是用於 Hibernate 外鍵 實現的重要部分。
Hibernate 配置檔案
這是用於基於 XML 的 Hibernate 映射配置的 Hibernate 配置檔案。hibernate.cfg.xml
<?xml version="1.0" encoding="UTF-8"?>
<!DOCTYPE hibernate-configuration PUBLIC
		"-//Hibernate/Hibernate Configuration DTD 3.0//EN"
		"https://hibernate.org/dtd/hibernate-configuration-3.0.dtd">
<hibernate-configuration>
    <session-factory>
        <property name="hibernate.connection.driver_class">com.mysql.jdbc.Driver</property>
        <property name="hibernate.connection.password">pankaj123</property>
        <property name="hibernate.connection.url">jdbc:mysql://localhost/TestDB</property>
        <property name="hibernate.connection.username">pankaj</property>
        <property name="hibernate.dialect">org.hibernate.dialect.MySQLDialect</property>

        <property name="hibernate.current_session_context_class">thread</property>
        <property name="hibernate.show_sql">true</property>

        <mapping resource="txn.hbm.xml"/>
        <mapping resource="customer.hbm.xml"/>
    </session-factory>
</hibernate-configuration>
Hibernate 配置檔案很簡單,它包含數據庫連接屬性和 Hibernate 映射資源。
Hibernate SessionFactory 實用程式
這是創建 Hibernate SessionFactory 實例的實用程式類。
package com.journaldev.hibernate.util;

import org.hibernate.SessionFactory;
import org.hibernate.boot.registry.StandardServiceRegistryBuilder;
import org.hibernate.cfg.Configuration;
import org.hibernate.service.ServiceRegistry;

public class HibernateUtil {

	private static SessionFactory sessionFactory;

	private static SessionFactory buildSessionFactory() {
        try {
            // 從 hibernate.cfg.xml 創建 SessionFactory
        	Configuration configuration = new Configuration();
        	configuration.configure("hibernate.cfg.xml");
        	System.out.println("Hibernate Configuration loaded");

        	ServiceRegistry serviceRegistry = new StandardServiceRegistryBuilder().applySettings(configuration.getProperties()).build();
        	System.out.println("Hibernate serviceRegistry created");

        	SessionFactory sessionFactory = configuration.buildSessionFactory(serviceRegistry);

            return sessionFactory;
        }
        catch (Throwable ex) {
            System.err.println("Initial SessionFactory creation failed." + ex);
            ex.printStackTrace();
            throw new ExceptionInInitializerError(ex);
        }
    }

	public static SessionFactory getSessionFactory() {
		if(sessionFactory == null) sessionFactory = buildSessionFactory();
        return sessionFactory;
    }
}
就是這樣,讓我們寫一個測試程序來測試基於 XML 配置的 Hibernate 一對一映射。
Hibernate 一對一映射 XML 配置測試程序
在 Hibernate 一對一映射示例測試程序中,首先我們將創建 Txn 對象並保存它。一旦保存到數據庫中,我們將使用生成的 ID 檢索 Txn 對象並打印它。
package com.journaldev.hibernate.main;

import java.util.Date;

import org.hibernate.Session;
import org.hibernate.SessionFactory;
import org.hibernate.Transaction;

import com.journaldev.hibernate.model.Customer;
import com.journaldev.hibernate.model.Txn;
import com.journaldev.hibernate.util.HibernateUtil;

public class HibernateOneToOneMain {

	public static void main(String[] args) {

		Txn txn = buildDemoTransaction();

		SessionFactory sessionFactory = null;
		Session session = null;
		Transaction tx = null;
		try{
		// 獲取 Session
		sessionFactory = HibernateUtil.getSessionFactory();
		session = sessionFactory.getCurrentSession();
		System.out.println("Session created");
		// 開始事務
		tx = session.beginTransaction();
		// 保存模型對象
		session.save(txn);
		// 提交事務
		tx.commit();
		System.out.println("Transaction ID="+txn.getId());

		// 獲取已保存的交易數據
		printTransactionData(txn.getId(), sessionFactory);

		}catch(Exception e){
			System.out.println("Exception occured. "+e.getMessage());
			e.printStackTrace();
		}finally{
			if(!sessionFactory.isClosed()){
				System.out.println("Closing SessionFactory");
				sessionFactory.close();
			}
		}
	}

	private static void printTransactionData(long id, SessionFactory sessionFactory) {
		Session session = null;
		Transaction tx = null;
		try{
			// 獲取 Session
			sessionFactory = HibernateUtil.getSessionFactory();
			session = sessionFactory.getCurrentSession();
			// 開始事務
			tx = session.beginTransaction();
			// 保存模型對象
			Txn txn = (Txn) session.get(Txn.class, id);
			// 提交事務
			tx.commit();
			System.out.println("Transaction Details=\n"+txn);

			}catch(Exception e){
				System.out.println("Exception occured. "+e.getMessage());
				e.printStackTrace();
			}
	}

	private static Txn buildDemoTransaction() {
		Txn txn = new Txn();
		txn.setDate(new Date());
		txn.setTotal(100);

		Customer cust = new Customer();
		cust.setAddress("Bangalore, India");
		cust.setEmail("[email protected]");
		cust.setName("Pankaj Kumar");

		txn.setCustomer(cust);

		cust.setTxn(txn);
		return txn;
	}

}
現在當我們運行上述 Hibernate 一對一映射測試程序時,我們會得到以下輸出。
Hibernate Configuration loaded
Hibernate serviceRegistry created
Session created
Hibernate: insert into TRANSACTION (txn_date, txn_total) values (?, ?)
Hibernate: insert into CUSTOMER (cust_name, cust_email, cust_address, txn_id) values (?, ?, ?, ?)
Transaction ID=19
Hibernate: select txn0_.txn_id as txn_id1_1_0_, txn0_.txn_date as txn_date2_1_0_, txn0_.txn_total as txn_tota3_1_0_,
customer1_.txn_id as txn_id1_0_1_, customer1_.cust_name as cust_nam2_0_1_, customer1_.cust_email as cust_ema3_0_1_,
customer1_.cust_address as cust_add4_0_1_ from TRANSACTION txn0_ left outer join CUSTOMER customer1_ on
txn0_.txn_id=customer1_.txn_id where txn0_.txn_id=?
Transaction Details=
19, 100.0, Pankaj Kumar, [email protected], Bangalore, India
Closing SessionFactory
如您所见,它运行正常,我们能够使用事务ID从两个表中检索数据。检查Hibernate内部用于获取数据的SQL,它使用连接操作从两个表中获取数据。
Hibernate一对一映射注解
在上面的部分中,我们看到如何使用基于XML的配置实现Hibernate一对一映射,现在让我们看看如何使用JPA和Hibernate注解来实现相同的功能。
Hibernate配置文件
hibernate-annotation.cfg.xml
<?xml version="1.0" encoding="UTF-8"?>
<!DOCTYPE hibernate-configuration PUBLIC
		"-//Hibernate/Hibernate Configuration DTD 3.0//EN"
		"https://hibernate.org/dtd/hibernate-configuration-3.0.dtd">
<hibernate-configuration>
    <session-factory>
        <property name="hibernate.connection.driver_class">com.mysql.jdbc.Driver</property>
        <property name="hibernate.connection.password">pankaj123</property>
        <property name="hibernate.connection.url">jdbc:mysql://localhost/TestDB</property>
        <property name="hibernate.connection.username">pankaj</property>
        <property name="hibernate.dialect">org.hibernate.dialect.MySQLDialect</property>

        <property name="hibernate.current_session_context_class">thread</property>
        <property name="hibernate.show_sql">true</property>

        <mapping class="com.journaldev.hibernate.model.Txn1"/>
        <mapping class="com.journaldev.hibernate.model.Customer1"/>
    </session-factory>
</hibernate-configuration>
Hibernate配置很简单,如您所见,我有两个模型类,我们将使用注解 – Txn1和Customer1。
Hibernate一对一映射注解示例模型类
對於Hibernate的一對一映射註釋配置,模型類是最重要的部分。讓我們來看看我們的模型類是如何的。
package com.journaldev.hibernate.model;

import java.util.Date;

import javax.persistence.Column;
import javax.persistence.Entity;
import javax.persistence.GeneratedValue;
import javax.persistence.GenerationType;
import javax.persistence.Id;
import javax.persistence.OneToOne;
import javax.persistence.Table;

import org.hibernate.annotations.Cascade;

@Entity
@Table(name="TRANSACTION")
public class Txn1 {

	@Id
	@GeneratedValue(strategy=GenerationType.IDENTITY)
	@Column(name="txn_id")
	private long id;

	@Column(name="txn_date")
	private Date date;

	@Column(name="txn_total")
	private double total;

	@OneToOne(mappedBy="txn")
	@Cascade(value=org.hibernate.annotations.CascadeType.SAVE_UPDATE)
	private Customer1 customer;

	@Override
	public String toString(){
		return id+", "+total+", "+customer.getName()+", "+customer.getEmail()+", "+customer.getAddress();
	}

        //Getter-Setter方法,為了清晰省略
}
請注意,大多數的註釋都來自Java Persistence API,因為Hibernate提供了它的實現。然而,對於級聯,我們需要使用Hibernate註釋org.hibernate.annotations.Cascade和枚舉org.hibernate.annotations.CascadeType。
package com.journaldev.hibernate.model;

import javax.persistence.Column;
import javax.persistence.Entity;
import javax.persistence.GeneratedValue;
import javax.persistence.Id;
import javax.persistence.OneToOne;
import javax.persistence.PrimaryKeyJoinColumn;
import javax.persistence.Table;

import org.hibernate.annotations.GenericGenerator;
import org.hibernate.annotations.Parameter;

@Entity
@Table(name="CUSTOMER")
public class Customer1 {

	@Id
	@Column(name="txn_id", unique=true, nullable=false)
	@GeneratedValue(generator="gen")
	@GenericGenerator(name="gen", strategy="foreign", parameters={@Parameter(name="property", value="txn")})
	private long id;

	@Column(name="cust_name")
	private String name;

	@Column(name="cust_email")
	private String email;

	@Column(name="cust_address")
	private String address;

	@OneToOne
	@PrimaryKeyJoinColumn
	private Txn1 txn;

        //Getter-Setter方法
}
請注意,我們需要使用@GenericGenerator,這樣id就是從txn中使用而不是生成它。
Hibernate SessionFactory實用類
創建SessionFactory與我們提供Hibernate映射的方式無關。我們用於創建SessionFactory的實用類如下所示。
package com.journaldev.hibernate.util;

import org.hibernate.SessionFactory;
import org.hibernate.boot.registry.StandardServiceRegistryBuilder;
import org.hibernate.cfg.Configuration;
import org.hibernate.service.ServiceRegistry;

public class HibernateAnnotationUtil {

	private static SessionFactory sessionFactory;

	private static SessionFactory buildSessionFactory() {
        try {
            //從hibernate-annotation.cfg.xml創建SessionFactory
        	Configuration configuration = new Configuration();
        	configuration.configure("hibernate-annotation.cfg.xml");
        	System.out.println("Hibernate Annotation Configuration loaded");

        	ServiceRegistry serviceRegistry = new StandardServiceRegistryBuilder().applySettings(configuration.getProperties()).build();
        	System.out.println("Hibernate Annotation serviceRegistry created");

        	SessionFactory sessionFactory = configuration.buildSessionFactory(serviceRegistry);

            return sessionFactory;
        }
        catch (Throwable ex) {
            System.err.println("Initial SessionFactory creation failed." + ex);
            ex.printStackTrace();
            throw new ExceptionInInitializerError(ex);
        }
    }

	public static SessionFactory getSessionFactory() {
		if(sessionFactory == null) sessionFactory = buildSessionFactory();
        return sessionFactory;
    }
}
Hibernate一對一映射註釋示例測試程序
這是我們Hibernate一對一映射註釋示例的簡單測試程序。
package com.journaldev.hibernate.main;

import java.util.Date;

import org.hibernate.Session;
import org.hibernate.SessionFactory;
import org.hibernate.Transaction;

import com.journaldev.hibernate.model.Customer1;
import com.journaldev.hibernate.model.Txn1;
import com.journaldev.hibernate.util.HibernateAnnotationUtil;

public class HibernateOneToOneAnnotationMain {

	public static void main(String[] args) {

		Txn1 txn = buildDemoTransaction();

		SessionFactory sessionFactory = null;
		Session session = null;
		Transaction tx = null;
		try{
		//取得會話
		sessionFactory = HibernateAnnotationUtil.getSessionFactory();
		session = sessionFactory.getCurrentSession();
		System.out.println("Session created using annotations configuration");
		//啟動交易
		tx = session.beginTransaction();
		//儲存模型物件
		session.save(txn);
		//提交交易
		tx.commit();
		System.out.println("Annotation Example. Transaction ID="+txn.getId());

		//取得已儲存的交易資料
		printTransactionData(txn.getId(), sessionFactory);
		}catch(Exception e){
			System.out.println("Exception occured. "+e.getMessage());
			e.printStackTrace();
		}finally{
			if(sessionFactory != null && !sessionFactory.isClosed()){
				System.out.println("Closing SessionFactory");
				sessionFactory.close();
			}
		}
	}

	private static void printTransactionData(long id, SessionFactory sessionFactory) {
		Session session = null;
		Transaction tx = null;
		try{
			//取得會話
			sessionFactory = HibernateAnnotationUtil.getSessionFactory();
			session = sessionFactory.getCurrentSession();
			//啟動交易
			tx = session.beginTransaction();
			//儲存模型物件
			Txn1 txn = (Txn1) session.get(Txn1.class, id);
			//提交交易
			tx.commit();
			System.out.println("Annotation Example. Transaction Details=\n"+txn);

			}catch(Exception e){
				System.out.println("Exception occured. "+e.getMessage());
				e.printStackTrace();
			}
	}

	private static Txn1 buildDemoTransaction() {
		Txn1 txn = new Txn1();
		txn.setDate(new Date());
		txn.setTotal(100);

		Customer1 cust = new Customer1();
		cust.setAddress("San Jose, USA");
		cust.setEmail("[email protected]");
		cust.setName("Pankaj Kr");

		txn.setCustomer(cust);

		cust.setTxn(txn);
		return txn;
	}

}
執行以上程式的輸出片段如下。
Hibernate Annotation Configuration loaded
Hibernate Annotation serviceRegistry created
Session created using annotations configuration
Hibernate: insert into TRANSACTION (txn_date, txn_total) values (?, ?)
Hibernate: insert into CUSTOMER (cust_address, cust_email, cust_name, txn_id) values (?, ?, ?, ?)
Annotation Example. Transaction ID=20
Hibernate: select txn1x0_.txn_id as txn_id1_1_0_, txn1x0_.txn_date as txn_date2_1_0_, txn1x0_.txn_total as txn_tota3_1_0_,
customer1x1_.txn_id as txn_id1_0_1_, customer1x1_.cust_address as cust_add2_0_1_, customer1x1_.cust_email as cust_ema3_0_1_,
customer1x1_.cust_name as cust_nam4_0_1_ from TRANSACTION txn1x0_ left outer join CUSTOMER customer1x1_ on
txn1x0_.txn_id=customer1x1_.txn_id where txn1x0_.txn_id=?
Annotation Example. Transaction Details=
20, 100.0, Pankaj Kr, [email protected], San Jose, USA
Closing SessionFactory
請注意輸出類似於基於Hibernate的一對一XML配置。這就是Hibernate一對一映射的範例,您可以從以下鏈接下載最終專案並進行更多學習。
Source:
https://www.digitalocean.com/community/tutorials/hibernate-one-to-one-mapping-example-annotation


