今天我們將研究在Hibernate中的一對多映射。我們將通過注釋和XML配置來研究Hibernate一對多映射示例。
在Hibernate中的一對多映射
 簡單來說,一對多映射意味著一個表中的一行可以映射到另一個表中的多行。例如,想象一個購物車系統,我們還有另一個項目表。一個購物車可以有多個項目,所以這裡我們有一對多映射。我們將使用購物車-項目的情景作為我們的Hibernate一對多映射示例。
在Hibernate中的一對多映射 – 數據庫設置
我們可以使用外鍵約束進行一對多映射。以下是我們的數據庫腳本Cart和Items表。我正在使用MySQL數據庫作為Hibernate一對多映射示例的示例。setup.sql
CREATE TABLE `Cart` (
  `cart_id` int(11) unsigned NOT NULL AUTO_INCREMENT,
  `total` decimal(10,0) NOT NULL,
  `name` varchar(10) DEFAULT NULL,
  PRIMARY KEY (`cart_id`)
) ENGINE=InnoDB AUTO_INCREMENT=5 DEFAULT CHARSET=utf8;

CREATE TABLE `Items` (
  `id` int(11) unsigned NOT NULL AUTO_INCREMENT,
  `cart_id` int(11) unsigned NOT NULL,
  `item_id` varchar(10) NOT NULL,
  `item_total` decimal(10,0) NOT NULL,
  `quantity` int(3) NOT NULL,
  PRIMARY KEY (`id`),
  KEY `cart_id` (`cart_id`),
  CONSTRAINT `items_ibfk_1` FOREIGN KEY (`cart_id`) REFERENCES `Cart` (`cart_id`)
) ENGINE=InnoDB AUTO_INCREMENT=7 DEFAULT CHARSET=utf8;
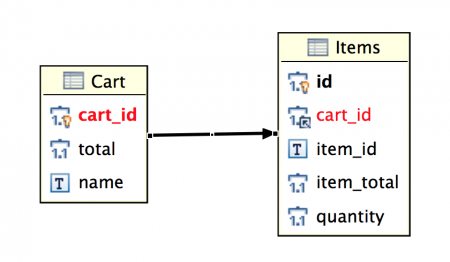
以下是Cart和Items表的ER图。 我们的数据库设置已经准备好了,现在让我们开始创建Hibernate的一对多映射示例项目。首先,我们将使用基于XML的配置,然后我们将使用Hibernate和JPA注解实现一对多映射。
Hibernate一对多映射项目结构
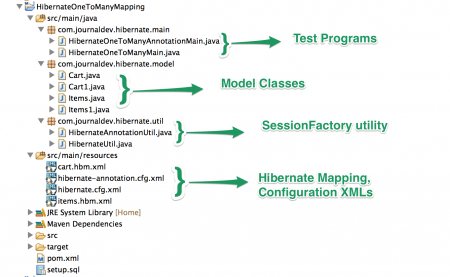
在Eclipse或您喜欢的IDE中创建一个简单的Maven项目,最终的项目结构将如下图所示。
Hibernate Maven依赖
我们的最终pom.xml文件包含了Hibernate和MySQL驱动程序的依赖项。Hibernate使用JBoss日志记录,并自动作为传递依赖项添加。
<project xmlns="https://maven.apache.org/POM/4.0.0" xmlns:xsi="https://www.w3.org/2001/XMLSchema-instance" xsi:schemaLocation="https://maven.apache.org/POM/4.0.0 https://maven.apache.org/xsd/maven-4.0.0.xsd">
  <modelVersion>4.0.0</modelVersion>
  <groupId>com.journaldev.hibernate</groupId>
  <artifactId>HibernateOneToManyMapping</artifactId>
  <version>0.0.1-SNAPSHOT</version>

  <dependencies>
  	<dependency>
  		<groupId>org.hibernate</groupId>
  		<artifactId>hibernate-core</artifactId>
  		<version>4.3.5.Final</version>
  	</dependency>
  	<dependency>
  		<groupId>mysql</groupId>
  		<artifactId>mysql-connector-java</artifactId>
  		<version>5.0.5</version>
  	</dependency>
  </dependencies>

</project>
請注意,我正在使用最新的Hibernate版本4.3.5.Final和根據我的數據庫安裝的MySQL驅動程序版本。
Hibernate一對多映射模型類
對於我們的表Cart和Items,我們有模型類來反映它們。Cart.java
package com.journaldev.hibernate.model;

import java.util.Set;

public class Cart {

	private long id;
	private double total;
	private String name;
	private Set<Items> items;

	public long getId() {
		return id;
	}
	public void setId(long id) {
		this.id = id;
	}
	public double getTotal() {
		return total;
	}
	public void setTotal(double total) {
		this.total = total;
	}
	public String getName() {
		return name;
	}
	public void setName(String name) {
		this.name = name;
	}
	public Set<Items> getItems() {
		return items;
	}
	public void setItems(Set<Items> items) {
		this.items = items;
	}

}
I am using Set of Items, so that every record is unique. We can also use List or Array for one to many mapping in hibernate. Items.java
package com.journaldev.hibernate.model;

public class Items {

	private long id;
	private String itemId;
	private double itemTotal;
	private int quantity;
	private Cart cart;

	//Hibernate需要無參數的構造函數
	public Items(){}

	public Items(String itemId, double total, int qty, Cart c){
		this.itemId=itemId;
		this.itemTotal=total;
		this.quantity=qty;
		this.cart=c;
	}
	public String getItemId() {
		return itemId;
	}
	public void setItemId(String itemId) {
		this.itemId = itemId;
	}
	public double getItemTotal() {
		return itemTotal;
	}
	public void setItemTotal(double itemTotal) {
		this.itemTotal = itemTotal;
	}
	public int getQuantity() {
		return quantity;
	}
	public void setQuantity(int quantity) {
		this.quantity = quantity;
	}
	public Cart getCart() {
		return cart;
	}
	public void setCart(Cart cart) {
		this.cart = cart;
	}
	public long getId() {
		return id;
	}
	public void setId(long id) {
		this.id = id;
	}

}
Items與Cart之間存在多對一的關係,因此我們不需要為Cart對象創建集合。
Hibernate SessionFactory實用類
我們有一個用於創建Hibernate SessionFactory的實用類。HibernateUtil.java
package com.journaldev.hibernate.util;

import org.hibernate.SessionFactory;
import org.hibernate.boot.registry.StandardServiceRegistryBuilder;
import org.hibernate.cfg.Configuration;
import org.hibernate.service.ServiceRegistry;

public class HibernateUtil {

	private static SessionFactory sessionFactory;

	private static SessionFactory buildSessionFactory() {
        try {
            //從hibernate.cfg.xml創建SessionFactory
        	Configuration configuration = new Configuration();
        	configuration.configure("hibernate.cfg.xml");
        	System.out.println("Hibernate Configuration loaded");

        	ServiceRegistry serviceRegistry = new StandardServiceRegistryBuilder().applySettings(configuration.getProperties()).build();
        	System.out.println("Hibernate serviceRegistry created");

        	SessionFactory sessionFactory = configuration.buildSessionFactory(serviceRegistry);

            return sessionFactory;
        }
        catch (Throwable ex) {
            System.err.println("Initial SessionFactory creation failed." + ex);
            ex.printStackTrace();
            throw new ExceptionInInitializerError(ex);
        }
    }

	public static SessionFactory getSessionFactory() {
		if(sessionFactory == null) sessionFactory = buildSessionFactory();
        return sessionFactory;
    }
}
Hibernate配置XML文件
我們的Hibernate配置XML文件包含數據庫信息和映射資源細節。hibernate.cfg.xml
<?xml version="1.0" encoding="UTF-8"?>
<!DOCTYPE hibernate-configuration PUBLIC
		"-//Hibernate/Hibernate Configuration DTD 3.0//EN"
		"https://hibernate.org/dtd/hibernate-configuration-3.0.dtd">
<hibernate-configuration>
    <session-factory>
        <property name="hibernate.connection.driver_class">com.mysql.jdbc.Driver</property>
        <property name="hibernate.connection.password">pankaj123</property>
        <property name="hibernate.connection.url">jdbc:mysql://localhost/TestDB</property>
        <property name="hibernate.connection.username">pankaj</property>
        <property name="hibernate.dialect">org.hibernate.dialect.MySQLDialect</property>

        <property name="hibernate.current_session_context_class">thread</property>
        <property name="hibernate.show_sql">true</property>

        <mapping resource="cart.hbm.xml"/>
        <mapping resource="items.hbm.xml"/>
    </session-factory>
</hibernate-configuration>
在 XML 配置中的 Hibernate 一对多映射示例
這是教程中最重要的部分,讓我們看看如何在 Hibernate 中對 Cart 和 Items 類進行一對多映射。 cart.hbm.xml
<?xml version="1.0"?>
<!DOCTYPE hibernate-mapping PUBLIC "-//Hibernate/Hibernate Mapping DTD 3.0//EN"
	"https://hibernate.org/dtd/hibernate-mapping-3.0.dtd">

<hibernate-mapping package="com.journaldev.hibernate.model">
	<class name="Cart" table="CART" >
		<id name="id" type="long">
			<column name="cart_id" />
			<generator class="identity" />
		</id>
		<property name="total" type="double">
			<column name="total" />
		</property>
		<property name="name" type="string">
			<column name="name" />
		</property>
		<set name="items" table="ITEMS" fetch="select">
			<key>
				<column name="cart_id" not-null="true"></column>
			</key>
			<one-to-many class="Items"/>
		</set>
	</class>

</hibernate-mapping>
重要的部分是 set 元素和其中的 one-to-many 元素。請注意,我們提供了用於一對多映射的鍵,即 cart_id。 items.hbm.xml
<?xml version="1.0" encoding="UTF-8"?>
<!DOCTYPE hibernate-mapping PUBLIC "-//Hibernate/Hibernate Mapping DTD 3.0//EN"
"https://hibernate.org/dtd/hibernate-mapping-3.0.dtd" >

<hibernate-mapping package="com.journaldev.hibernate.model">

	<class name="Items" table="ITEMS">
		<id name="id" type="long">
			<column name="id" />
			<generator class="identity" />
		</id>
		<property name="itemId" type="string">
			<column name="item_id"></column>
		</property>
		<property name="itemTotal" type="double">
			<column name="item_total"></column>
		</property>
		<property name="quantity" type="integer">
			<column name="quantity"></column>
		</property>

		<many-to-one name="cart" class="Cart">
			<column name="cart_id" not-null="true"></column>
		</many-to-one>
	</class>

</hibernate-mapping>
請注意,從 items 到 cart,這是多對一的關係。因此,我們需要使用 many-to-one 元素來表示 cart,並提供將與鍵映射的列名。因此,根據 Cart 的 Hibernate 映射配置,其鍵 cart_id 將用於映射。我們使用 XML 映射的 Hibernate 一對多映射示例的項目已準備就緒,讓我們編寫一個測試程序並檢查它是否正常工作。
Hibernate 一對多映射示例 – 測試程序
HibernateOneToManyMain.java
package com.journaldev.hibernate.main;

import java.util.HashSet;
import java.util.Set;

import org.hibernate.Session;
import org.hibernate.SessionFactory;
import org.hibernate.Transaction;

import com.journaldev.hibernate.model.Cart;
import com.journaldev.hibernate.model.Items;
import com.journaldev.hibernate.util.HibernateUtil;

public class HibernateOneToManyMain {

	public static void main(String[] args) {

		Cart cart = new Cart();
		cart.setName("MyCart");

		Items item1 = new Items("I1", 10, 1, cart);
		Items item2 = new Items("I2", 20, 2, cart);
		Set itemsSet = new HashSet();
		itemsSet.add(item1); itemsSet.add(item2);

		cart.setItems(itemsSet);
		cart.setTotal(10*1 + 20*2);

		SessionFactory sessionFactory = null;
		Session session = null;
		Transaction tx = null;
		try{
		//獲取會話
		sessionFactory = HibernateUtil.getSessionFactory();
		session = sessionFactory.getCurrentSession();
		System.out.println("Session created");
		//開始事務
		tx = session.beginTransaction();

		//保存模型對象
		session.save(cart);
		session.save(item1);
		session.save(item2);

		//提交事務
		tx.commit();
		System.out.println("Cart ID="+cart.getId());

		}catch(Exception e){
			System.out.println("Exception occured. "+e.getMessage());
			e.printStackTrace();
		}finally{
			if(!sessionFactory.isClosed()){
				System.out.println("Closing SessionFactory");
				sessionFactory.close();
			}
		}
	}

}
請注意,我們需要逐個保存Cart和Items對象。Hibernate將負責更新Items表中的外鍵。當我們執行上面的程序時,我們獲得以下輸出。
Hibernate Configuration loaded
Hibernate serviceRegistry created
Session created
Hibernate: insert into CART (total, name) values (?, ?)
Hibernate: insert into ITEMS (item_id, item_total, quantity, cart_id) values (?, ?, ?, ?)
Hibernate: insert into ITEMS (item_id, item_total, quantity, cart_id) values (?, ?, ?, ?)
Hibernate: update ITEMS set cart_id=? where id=?
Hibernate: update ITEMS set cart_id=? where id=?
Cart ID=6
Closing SessionFactory
請注意,Hibernate使用Update查詢來設置ITEMS表中的cart_id。
Hibernate一對多映射註釋
現在我們已經看到如何使用基於XML的配置在Hibernate中實現一對多映射,讓我們看看如何使用JPA註釋完成相同的事情。
Hibernate一對多映射示例註釋
Hibernate配置文件幾乎相同,只是映射元素變化了,因為我們使用註釋進行Hibernate一對多映射。 hibernate-annotation.cfg.xml
<?xml version="1.0" encoding="UTF-8"?>
<!DOCTYPE hibernate-configuration PUBLIC
		"-//Hibernate/Hibernate Configuration DTD 3.0//EN"
		"https://hibernate.org/dtd/hibernate-configuration-3.0.dtd">
<hibernate-configuration>
    <session-factory>
        <property name="hibernate.connection.driver_class">com.mysql.jdbc.Driver</property>
        <property name="hibernate.connection.password">pankaj123</property>
        <property name="hibernate.connection.url">jdbc:mysql://localhost/TestDB</property>
        <property name="hibernate.connection.username">pankaj</property>
        <property name="hibernate.dialect">org.hibernate.dialect.MySQLDialect</property>

        <property name="hibernate.current_session_context_class">thread</property>
        <property name="hibernate.show_sql">true</property>

        <mapping class="com.journaldev.hibernate.model.Cart1"/>
        <mapping class="com.journaldev.hibernate.model.Items1"/>
    </session-factory>
</hibernate-configuration>
Hibernate SessionFactory 實用程式類
SessionFactory 實用程式類幾乎相同,我們只需使用新的 Hibernate 配置檔案。HibernateAnnotationUtil.java
package com.journaldev.hibernate.util;

import org.hibernate.SessionFactory;
import org.hibernate.boot.registry.StandardServiceRegistryBuilder;
import org.hibernate.cfg.Configuration;
import org.hibernate.service.ServiceRegistry;

public class HibernateAnnotationUtil {

	private static SessionFactory sessionFactory;

	private static SessionFactory buildSessionFactory() {
        try {
            // 從 hibernate-annotation.cfg.xml 建立 SessionFactory
        	Configuration configuration = new Configuration();
        	configuration.configure("hibernate-annotation.cfg.xml");
        	System.out.println("Hibernate Annotation Configuration loaded");

        	ServiceRegistry serviceRegistry = new StandardServiceRegistryBuilder().applySettings(configuration.getProperties()).build();
        	System.out.println("Hibernate Annotation serviceRegistry created");

        	SessionFactory sessionFactory = configuration.buildSessionFactory(serviceRegistry);

            return sessionFactory;
        }
        catch (Throwable ex) {
            System.err.println("Initial SessionFactory creation failed." + ex);
            ex.printStackTrace();
            throw new ExceptionInInitializerError(ex);
        }
    }

	public static SessionFactory getSessionFactory() {
		if(sessionFactory == null) sessionFactory = buildSessionFactory();
        return sessionFactory;
    }
}
Hibernate 一對多映射註釋模型類
由於我們沒有基於 xml 的映射檔案,所有與映射相關的配置將在模型類中使用 JPA 註釋完成。如果你理解基於 xml 的映射,這非常簡單且相似。Cart1.java
package com.journaldev.hibernate.model;

import java.util.Set;

import javax.persistence.Column;
import javax.persistence.Entity;
import javax.persistence.GeneratedValue;
import javax.persistence.GenerationType;
import javax.persistence.Id;
import javax.persistence.OneToMany;
import javax.persistence.Table;

@Entity
@Table(name="CART")
public class Cart1 {

	@Id
	@GeneratedValue(strategy=GenerationType.IDENTITY)
	@Column(name="cart_id")
	private long id;

	@Column(name="total")
	private double total;

	@Column(name="name")
	private String name;

	@OneToMany(mappedBy="cart1")
	private Set items1;

// 屬性的 Getter Setter 方法
}
需要注意的重點是 OneToMany 註釋,其中使用 mappedBy 變數來定義在 Items1 類中將用於映射目的的屬性。因此,我們應該在 Items1 類中有一個名為 “cart1” 的屬性。別忘了包含所有的 getter-setter 方法。Items1.java
package com.journaldev.hibernate.model;

import javax.persistence.Column;
import javax.persistence.Entity;
import javax.persistence.GeneratedValue;
import javax.persistence.GenerationType;
import javax.persistence.Id;
import javax.persistence.JoinColumn;
import javax.persistence.ManyToOne;
import javax.persistence.Table;

@Entity
@Table(name="ITEMS")
public class Items1 {

	@Id
	@GeneratedValue(strategy=GenerationType.IDENTITY)
	@Column(name="id")
	private long id;

	@Column(name="item_id")
	private String itemId;

	@Column(name="item_total")
	private double itemTotal;

	@Column(name="quantity")
	private int quantity;

	@ManyToOne
	@JoinColumn(name="cart_id", nullable=false)
	private Cart1 cart1;

	// Hibernate 需要無參數構造函數
	public Items1(){}

	public Items1(String itemId, double total, int qty, Cart1 c){
		this.itemId=itemId;
		this.itemTotal=total;
		this.quantity=qty;
		this.cart1=c;
	}
// Getter Setter 方法
}
上面課程中最重要的一點是在Cart1類變量上的ManyToOne註釋,以及提供映射的列名的JoinColumn註釋。這就是使用模型類中的註釋在Hibernate中進行一對多映射的全部內容。與基於XML的配置進行比較,你會發現它們非常相似。讓我們編寫一個測試程序並執行它。
Hibernate一對多映射註釋示例測試程序
我們的測試程序就像基於xml的配置一樣,我們只是使用新的類來獲取Hibernate Session並將模型對象保存到數據庫中。HibernateOneToManyAnnotationMain.java
package com.journaldev.hibernate.main;

import java.util.HashSet;
import java.util.Set;

import org.hibernate.Session;
import org.hibernate.SessionFactory;
import org.hibernate.Transaction;

import com.journaldev.hibernate.model.Cart1;
import com.journaldev.hibernate.model.Items1;
import com.journaldev.hibernate.util.HibernateAnnotationUtil;

public class HibernateOneToManyAnnotationMain {

	public static void main(String[] args) {

		Cart1 cart = new Cart1();
		cart.setName("MyCart1");

		Items1 item1 = new Items1("I10", 10, 1, cart);
		Items1 item2 = new Items1("I20", 20, 2, cart);
		Set itemsSet = new HashSet();
		itemsSet.add(item1); itemsSet.add(item2);

		cart.setItems1(itemsSet);
		cart.setTotal(10*1 + 20*2);

		SessionFactory sessionFactory = null;
		Session session = null;
		Transaction tx = null;
		try{
		//獲取Session
		sessionFactory = HibernateAnnotationUtil.getSessionFactory();
		session = sessionFactory.getCurrentSession();
		System.out.println("Session created");
		//開始事務
		tx = session.beginTransaction();
		//保存模型對象
		session.save(cart);
		session.save(item1);
		session.save(item2);
		//提交事務
		tx.commit();
		System.out.println("Cart1 ID="+cart.getId());
		System.out.println("item1 ID="+item1.getId()+", Foreign Key Cart ID="+item1.getCart1().getId());
		System.out.println("item2 ID="+item2.getId()+", Foreign Key Cart ID="+item1.getCart1().getId());

		}catch(Exception e){
			System.out.println("Exception occured. "+e.getMessage());
			e.printStackTrace();
		}finally{
			if(!sessionFactory.isClosed()){
				System.out.println("Closing SessionFactory");
				sessionFactory.close();
			}
		}
	}

}
當我們執行上面的Hibernate一對多映射註釋示例測試程序時,我們獲得以下輸出。
Hibernate Annotation Configuration loaded
Hibernate Annotation serviceRegistry created
Session created
Hibernate: insert into CART (name, total) values (?, ?)
Hibernate: insert into ITEMS (cart_id, item_id, item_total, quantity) values (?, ?, ?, ?)
Hibernate: insert into ITEMS (cart_id, item_id, item_total, quantity) values (?, ?, ?, ?)
Cart1 ID=7
item1 ID=9, Foreign Key Cart ID=7
item2 ID=10, Foreign Key Cart ID=7
Closing SessionFactory
關於Hibernate一對多映射就是這些,從下面的鏈接下載示例項目並進行更多實驗。
Source:
https://www.digitalocean.com/community/tutorials/hibernate-one-to-many-mapping-annotation


