


Trino 是一個開源的分散式 SQL 查詢引擎,專為查詢分散在一個或多個異質資料源中的大型資料集而設計。Trino 旨在透過大量資料進行資料倉儲、ETL 和互動式分析,並產生報告。
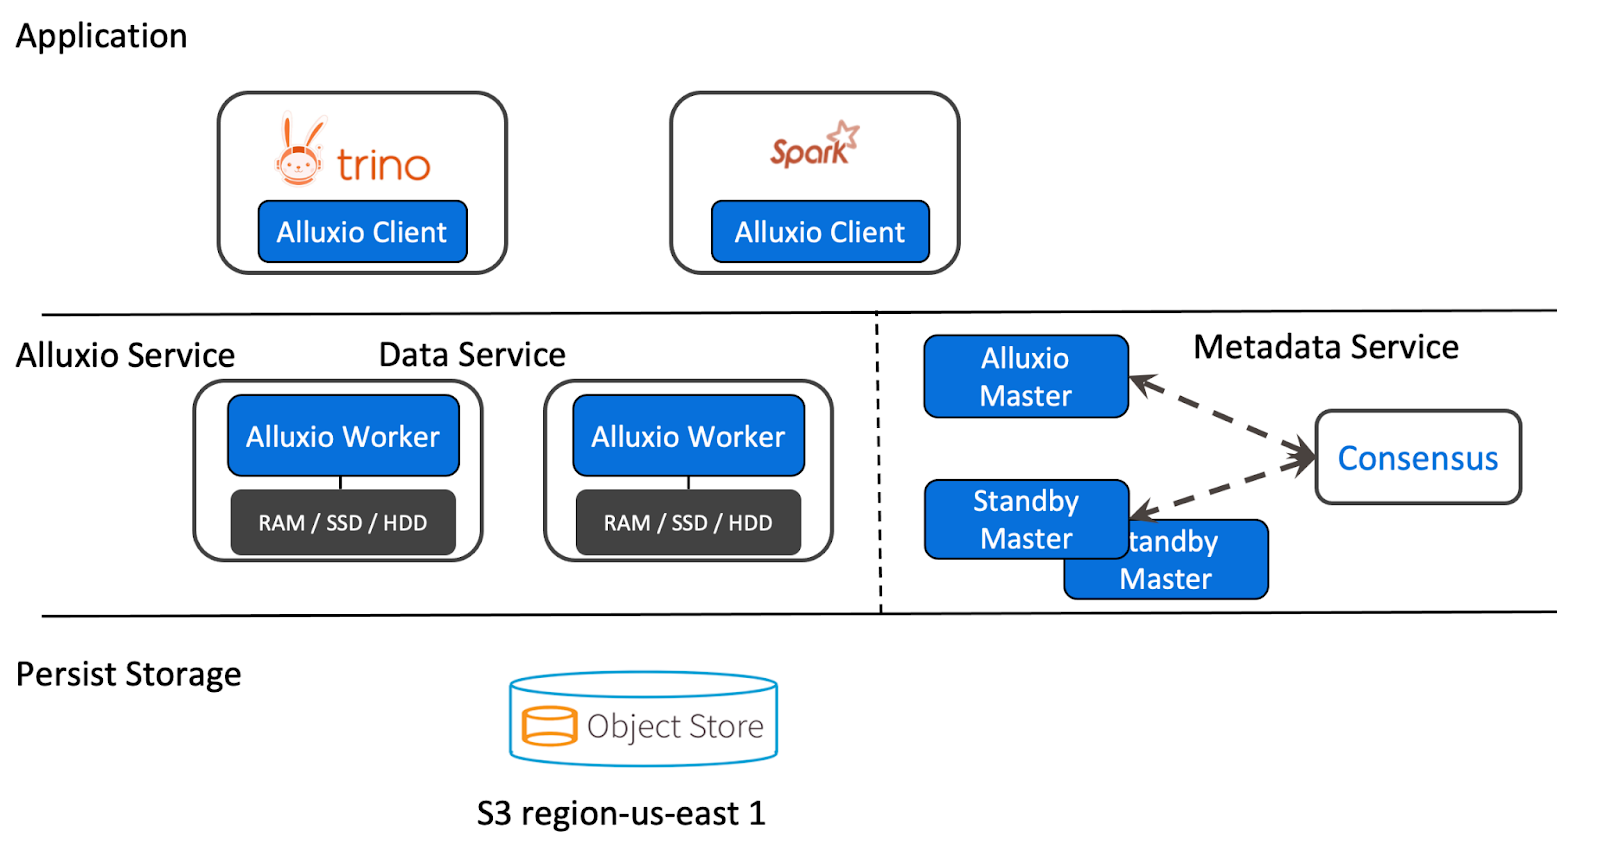
Alluxio 是一個開源的大規模分析和 AI 資料協調平台。Alluxio 位於 Trino 和 Apache Spark 等計算框架與 Amazon S3、Google Cloud Storage、HDFS 和 MinIO 等各種儲存系統之間。
本教程介紹如何部署 Alluxio 作為 Trino 使用 Iceberg 連接器的快取層。
為何 Trino 需要快取?
A small fraction of the petabytes of data you store is generating business value at any given time. Repeatedly scanning the same data and transferring it over the network consumes time, compute cycles, and resources. This issue is compounded when pulling data from disparate Trino clusters across regions or clouds. In these circumstances, caching solutions can significantly reduce the latency and cost of your queries.
Trino 的 Hive 連接器內建了 Rubix 快取引擎。雖然這個系統因為隨 Trino 提供而方便,但它僅限於 Hive 連接器,自 2020 年以來未維護,並且缺乏安全性功能及對額外計算引擎的支持。
Trino 搭配 Alluxio
Alluxio 將 Trino 連接到各種儲存系統,提供 API 和一個統一的命名空間供資料驅動應用程式使用。Alluxio 允許 Trino 無論資料來源為何,都能存取資料,並透明地將頻繁存取的資料(如常用表格)快取到 Alluxio 分散式儲存中。
透過 Iceberg 連接器在 MinIO 檔案儲存上使用 Alluxio 快取
我們已建立一個示範,展示如何配置 Alluxio 使用 MinIO 的寫入透過快取。這是通過使用 Iceberg 連接器並從 Trino 視角對表格的位置屬性進行單一更改來實現的。
在此示範中,Alluxio 運行於獨立伺服器上;然而,建議將其與 Trino 部署在同一節點上。這意味著 Alluxio 的所有配置將位於運行 Alluxio 的伺服器上,而 Trino 的配置則保持不變。運行 Alluxio 於外部的好處是不會與 Trino 競爭資源,但缺點是從 Alluxio 讀取數據時需透過網絡傳輸。確保 Trino 與 Alluxio 位於同一網絡對於性能至關重要。
跟隨此示範,複製位於 此處 的代碼。
Trino 配置
Trino 的配置與標準 Iceberg 配置相同。由於 Alluxio 運行於 Trino 外部,所需的配置僅在查詢時進行,而非啟動時。
Alluxio 配置
Alluxio的配置均可通过alluxio-site.properties文件设置。为确保所有配置集中于docker-compose.yml文件,我们通过ALLUXIO_JAVA_OPTS环境变量使用Java属性进行设置。本教程中,主节点称为领导者,工作节点称为跟随者。
主节点配置
alluxio.master.mount.table.root.ufs=s3://alluxio/领导者开放端口19998和19999,后者为Web UI端口。
工作节点配置
alluxio.worker.ramdisk.size=1G
alluxio.worker.hostname=alluxio-follower跟随者开放端口29999和30000,并设置用于Alluxio存储数据的共享内存,通过shm_size属性设置为1G,并参照alluxio.worker.ramdisk.size属性。
领导者与跟随者间的共享配置
alluxio.master.hostname=alluxio-leader

# Minio配置
alluxio.underfs.s3.endpoint=http://minio:9000
alluxio.underfs.s3.disable.dns.buckets=true
alluxio.underfs.s3.inherit.acl=false
aws.accessKeyId=minio
aws.secretKey=minio123

# 仅用于演示的配置
alluxio.security.authorization.permission.enabled=false`alluxio.master.hostname` 需在所有節點,無論是領導者還是追隨者上設置。大多數共享配置指向 Alluxio 到 `underfs`,在本例中是 MinIO。
alluxio.security.authorization.permission.enabled 設置為“false”,以保持 Docker 設置的簡單性。
注意:在生產或 CI/CD 環境中不建議這樣做。
運行服務
首先,你需要啟動服務。確保你位於 `trino-getting-started/iceberg/trino-alluxio-iceberg-minio` 目錄下。現在,運行以下命令:
docker-compose up -d你應該期望看到以下輸出。Docker 也可能需要下載 Docker 映像,然後你才能看到“Created/Started”消息,因此可能會有額外的輸出:
[+] Running 10/10
 ⠿ Network trino-alluxio-iceberg-minio_trino-network          Created                                                                                                                                                                                                      0.0s
 ⠿ Volume "trino-alluxio-iceberg-minio_minio-data"            Created                                                                                                                                                                                                      0.0s
 ⠿ Container trino-alluxio-iceberg-minio-mariadb-1            Started                                                                                                                                                                                                      0.6s
 ⠿ Container trino-alluxio-iceberg-minio-trino-coordinator-1  Started                                                                                                                                                                                                      0.7s
 ⠿ Container trino-alluxio-iceberg-minio-alluxio-leader-1     Started                                                                                                                                                                                                      0.9s
 ⠿ Container minio                                            Started                                                                                                                                                                                                      0.8s
 ⠿ Container trino-alluxio-iceberg-minio-alluxio-follower-1   Started                                                                                                                                                                                                      1.5s
 ⠿ Container mc                                               Started                                                                                                                                                                                                      1.4s
 ⠿ Container trino-alluxio-iceberg-minio-hive-metastore-1     Started
打開 Trino CLI
一旦完成,你可以登錄到 Trino 協調器節點。我們將通過使用exec命令並運行 `trino` CLI 可執行文件作為我們在那個容器上運行的命令來實現。注意容器 ID 是 `trino-alluxio-iceberg-minio-trino-coordinator-1`,因此你將運行的命令是:
<<<<<<< HEAD
docker container exec -it trino-alluxio-iceberg-minio-trino-coordinator-1 trino
=======
docker container exec -it trino-minio_trino-coordinator_1 trino
>>>>>>> alluxio當您開始此步驟時,啟動完成後應看到trino游標。完成時應如下所示:
trino>為了更好地理解此配置的工作原理,我們將使用CTAS (CREATE TABLE AS) 查詢創建一個Iceberg表,該查詢將數據從TPC連接器推送到指向MinIO的Iceberg。TPC連接器會即時生成數據,因此我們可以運行類似這樣的簡單測試。
首先,運行一個命令來顯示目錄,查看tpch和iceberg目錄,因為這些是我們將在CTAS查詢中使用的:
SHOW CATALOGS;您應該看到Iceberg目錄已註冊。
MinIO桶和Trino模式
啟動時,會在包含mc CLI的初始化容器上執行以下命令。這會在MinIO中創建一個名為/alluxio的桶,這為我們提供了一個寫入數據的位置,並且我們可以告訴Trino去哪裡找到它:
/bin/sh -c "
until (/usr/bin/mc config host add minio http://minio:9000 minio minio123) do echo '...waiting...' && sleep 1; done;
/usr/bin/mc rm -r --force minio/alluxio;
/usr/bin/mc mb minio/alluxio;
/usr/bin/mc policy set public minio/alluxio;
exit 0;
"注意:此桶將作為Alluxio的掛載點,因此Alluxio中的模式目錄alluxio://lakehouse/將映射到s3://alluxio/lakehouse/。
查詢Trino
接著,我們來建立指向MinIO桶的SCHEMA,並執行CTAS查詢。回到終端,建立iceberg.lakehouse SCHEMA。這將是首次呼叫metastore以保存schema位置於Alluxio命名空間中。注意,由於未將Alluxio設為預設檔案系統,我們需指定主機名alluxio-leader及埠19998。若希望Alluxio快取成為預設使用方式且對用戶管理DDL語句透明,請考慮此點:
CREATE SCHEMA iceberg.lakehouse
WITH (location = 'alluxio://alluxio-leader:19998/lakehouse/');現在我們已有一個參照Alluxio中儲存表的桶的SCHEMA,該桶與MinIO同步,我們可以建立第一個表:
選擇性:要查看查詢執行,請登入Trino UI並使用任何用戶名登錄(由於未設置安全性,故用戶名無關緊要):
使用CTAS查詢將微小生成的TPCH客戶數據移至MinIO。運行以下查詢,若願意,可在Trino UI上觀察其運行:
CREATE TABLE iceberg.lakehouse.customer
WITH (
  format = 'ORC',
  location = 'alluxio://alluxio-leader:19998/lakehouse/customer/'
)
AS SELECT * FROM tpch.tiny.customer;前往Alluxio UI及MinIO UI,瀏覽Alluxio與MinIO檔案。現在您將看到一個包含customer目錄的lakehouse目錄,其中含有Trino寫入Alluxio及Alluxio同步至MinIO的數據。
目前,在Alluxio和MinIO下有一個表格,您可以通過檢查以下內容來查詢這些數據:
SELECT * FROM iceberg.lakehouse.customer LIMIT 10;我們如何確保Trino實際上是從Alluxio而非MinIO讀取數據?讓我們刪除MinIO中的數據,並再次運行查詢以確保。一旦您刪除了這些數據,您應該仍然能看到數據返回。
停止服務
完成本教程後,您可以通過運行以下命令釋放用於此練習的資源:
docker-compose down結論
至此,您應該對Trino和Alluxio有了更好的理解,知道如何開始部署Trino和Alluxio,以及如何使用Alluxio緩存配合Iceberg連接器和MinIO文件存儲。希望您喜歡這篇文章。如果您有任何問題,請務必點讚並留言!
Source:
https://dzone.com/articles/get-started-with-trino-and-alluxio-in-five-minutes