


應用程式的安全性不僅僅是表面層次上授予或拒絕訪問的問題。作為開發者,您需要實現细粒度授权(FGA)以在更詳細、更細粒度的層面上管理權限。
FGA讓您能夠設置詳細的訪問控制,明確指定誰能在何種條件下進行何種操作。
在本文档中,您將學習如何使用Permit.io在Java和Spring Boot中實現细粒度授权。
以下是源代码(記住要給它一個星⭐)。
我希望您喜歡我之前的博客,該博客讲述了使用Stream和Next.js建立自定义视频会议应用程序的經歷。這些博客反映了我创建DevTools Academy的旅程,这是一个旨在幫助开发者發現驚人的開發工具的平台。
本教程是介绍我最近探索的另一个非常實用的開發工具的另一項努力。
目錄:
什麼是 允許证?
Permit.io 是一個全栈、即插即用的應用程式層級授權解決方案,它讓您可以在幾分鐘內實現一個
安全、靈活、授權層,讓您能把注意力集中在最重要的事情上。

前提
為了完全理解教程,您需要對 Java 和 Spring Boot 有基本的了解。您還需要以下內容:
- Permit.io: 一個簡化 FGA 实施的開發工具。
-
Spring Boot Starter Web:提供構建web應用程序所需的基礎组件,包括RESTful API。
-
Gradle:用於管理依賴的建构工具。
-
JDK 11 或更新版本:必須的Java開發套件版本,以編譯和執行你的Spring Boot應用程序。
-
Postman 或 cURL:用於測試你的
API端點的工具。
什麼是細粒度授權?
細粒度授權通過確定誰可以存取資源、存取範圍及特定條件來提供資源的訪問控制。
粗體授權(處理基於類別的存取,如用戶角色,如 “管理員” 或 “用戶“)相反,細粒度授權給你充分的彈性去定義在特定資源或行為甚至屬性上的存取。
在細粒度授權中存在3種 Policy 模型來管理授權;角色基於存取控制(RBAC),屬性基於存取控制(ABAC),以及關係基於存取控制(ReBAC)。
讓我們來看一下,這些方法的每個細節,以及你如何在你的應用程序中實現它們。
角色基於存取控制(RBAC)
RBAC是一種基於用戶在組織內的角色來控制資源存取的安全方法。此模型通過將用戶組織成角色,並根據這些定義的角色來管理存取控制,從而簡化權限管理。
RBAC 中的關鍵概念:
用戶:使用系統的人,如員工或客戶。
角色:基於他們的責任或任務,指派給用戶一群權限或存取權限的集合,如管理員、經理或客戶。
權限:用戶與資源交互時授予他們的權限,如讀取、寫入或刪除。
屬性基於存取控制(ABAC)
ABAC 是一個多功能且適應性強的訪問控制模型的縮寫,該模型的訪問控制決策是基於屬性,如用戶的詳細信息。ABAC 模型允許您根據用戶的屬性定義細粒度的授權。
ABAC 中的關鍵概念:
屬性: 用於進行訪問控制決策的特性或屬性。屬性通常可以分為以下几種:
-
用戶屬性: 關於用戶的資訊(例如,角色、部門、職位、年齡等)。
-
資源屬性: 資源的特性(例如,文件類型、數據分级等級、創建日期、所有者)。
-
行為屬性: 用戶嘗試進行的行為(例如,閱讀、寫入、刪除、批准)。
-
環境屬性: 關於訪問請求的背景資訊(例如,時間、地點、設備類型、IP 位址)。
基於關係的存取控制 (ReBAC)
ReBAC 是一個根據系統內實體之間的關係來授予存取权的存取控制系統。這種方法強調透過定義和管理存取控制,來映射用戶與資源及其他實體(如組織或群組)之間的關係。
ReBAC 的关键技术概念:
實體:用戶、資源(如文件和文档),及其他實體,如群組或組織單位。
關係:明确规定兩個實體之間的關係。例如,用戶可能是文件的所有者或團隊的成員。
策略:使用關係來決定存取權的規則。如果用戶與資源存在特定的關係,他們可以存取該資源或對其執行行為。
如何實現細粒度的授权
既然您已經對 RBAC、ABAC 和 ReBAC 有基本的了解,讓我們看看如何可以在电商應用中實現這些模型。
實現基於角色的存取控制
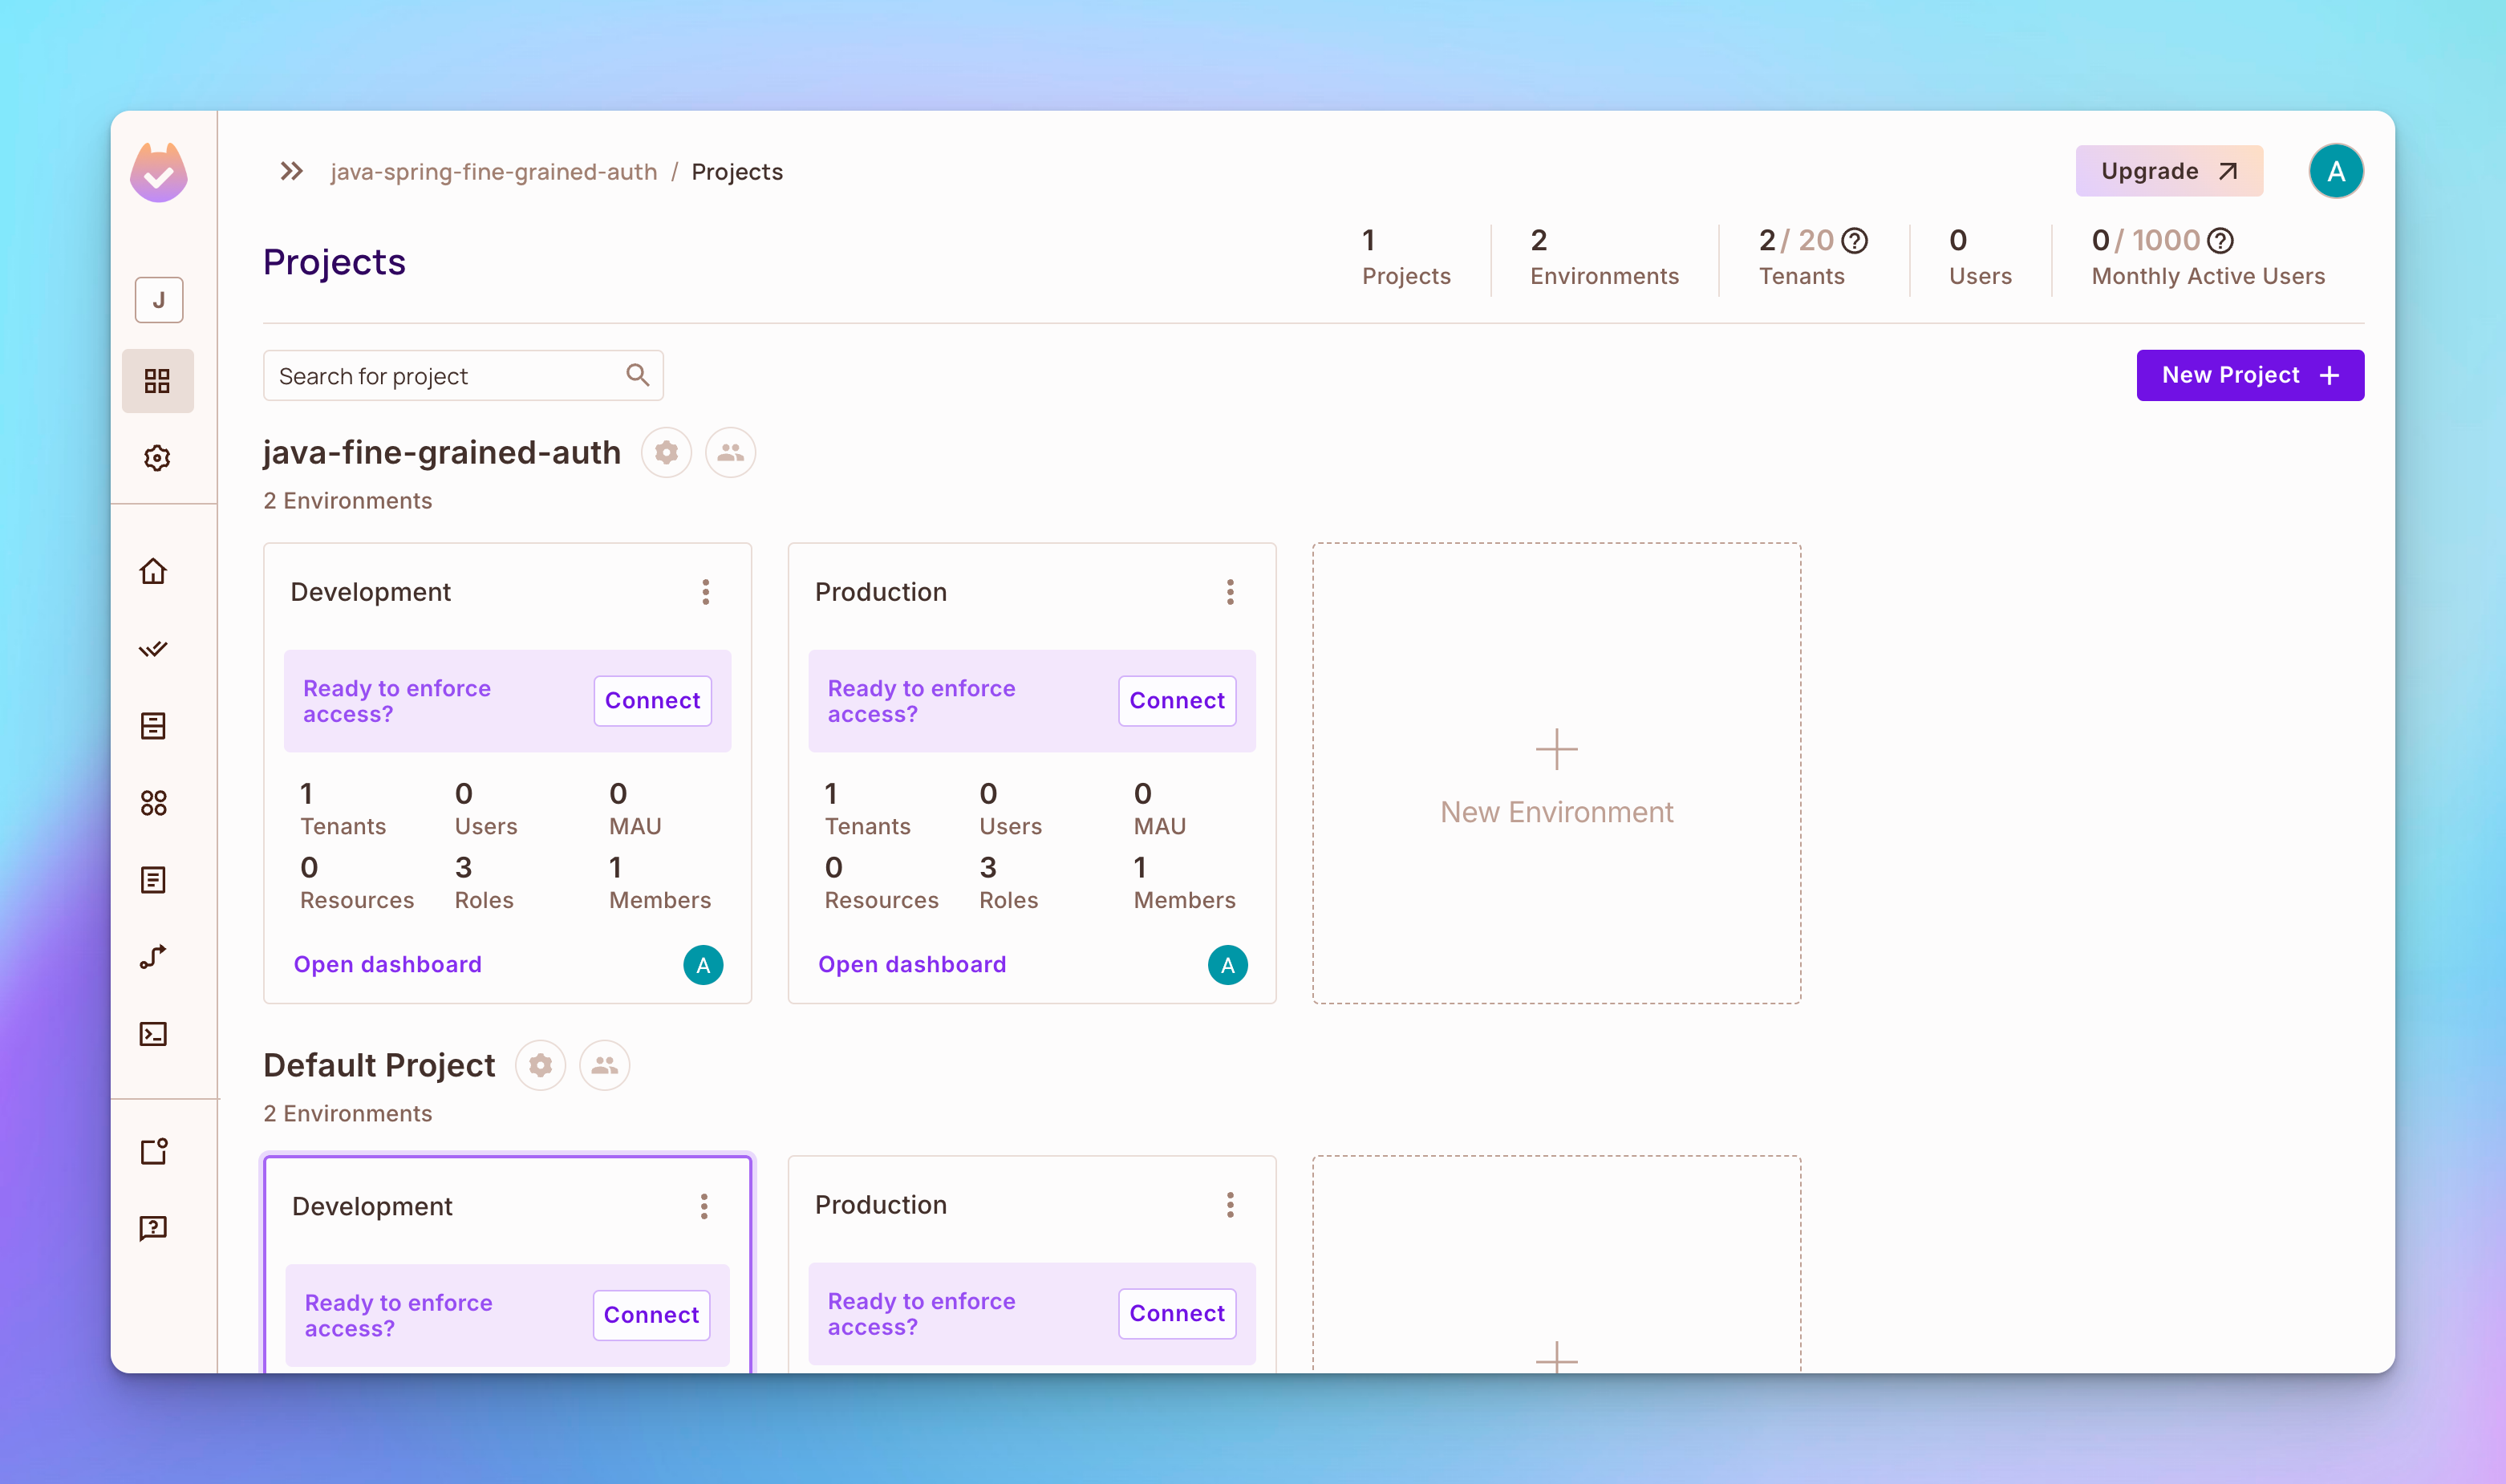
步驟 1:前往 Permit.io,然後建立帳號和工作空間。

預設情況下,您應該看到一個包含兩個環境的項目:開發和生產。
步驟 2: 創建一個資源名稱為產品。要創建資源,請打開左側導航列的策略標籤,然後打开頂部的資源標籤。然後,點擊創建資源按鈕,並為產品資源創建讀取、創建、更新和刪除操作。
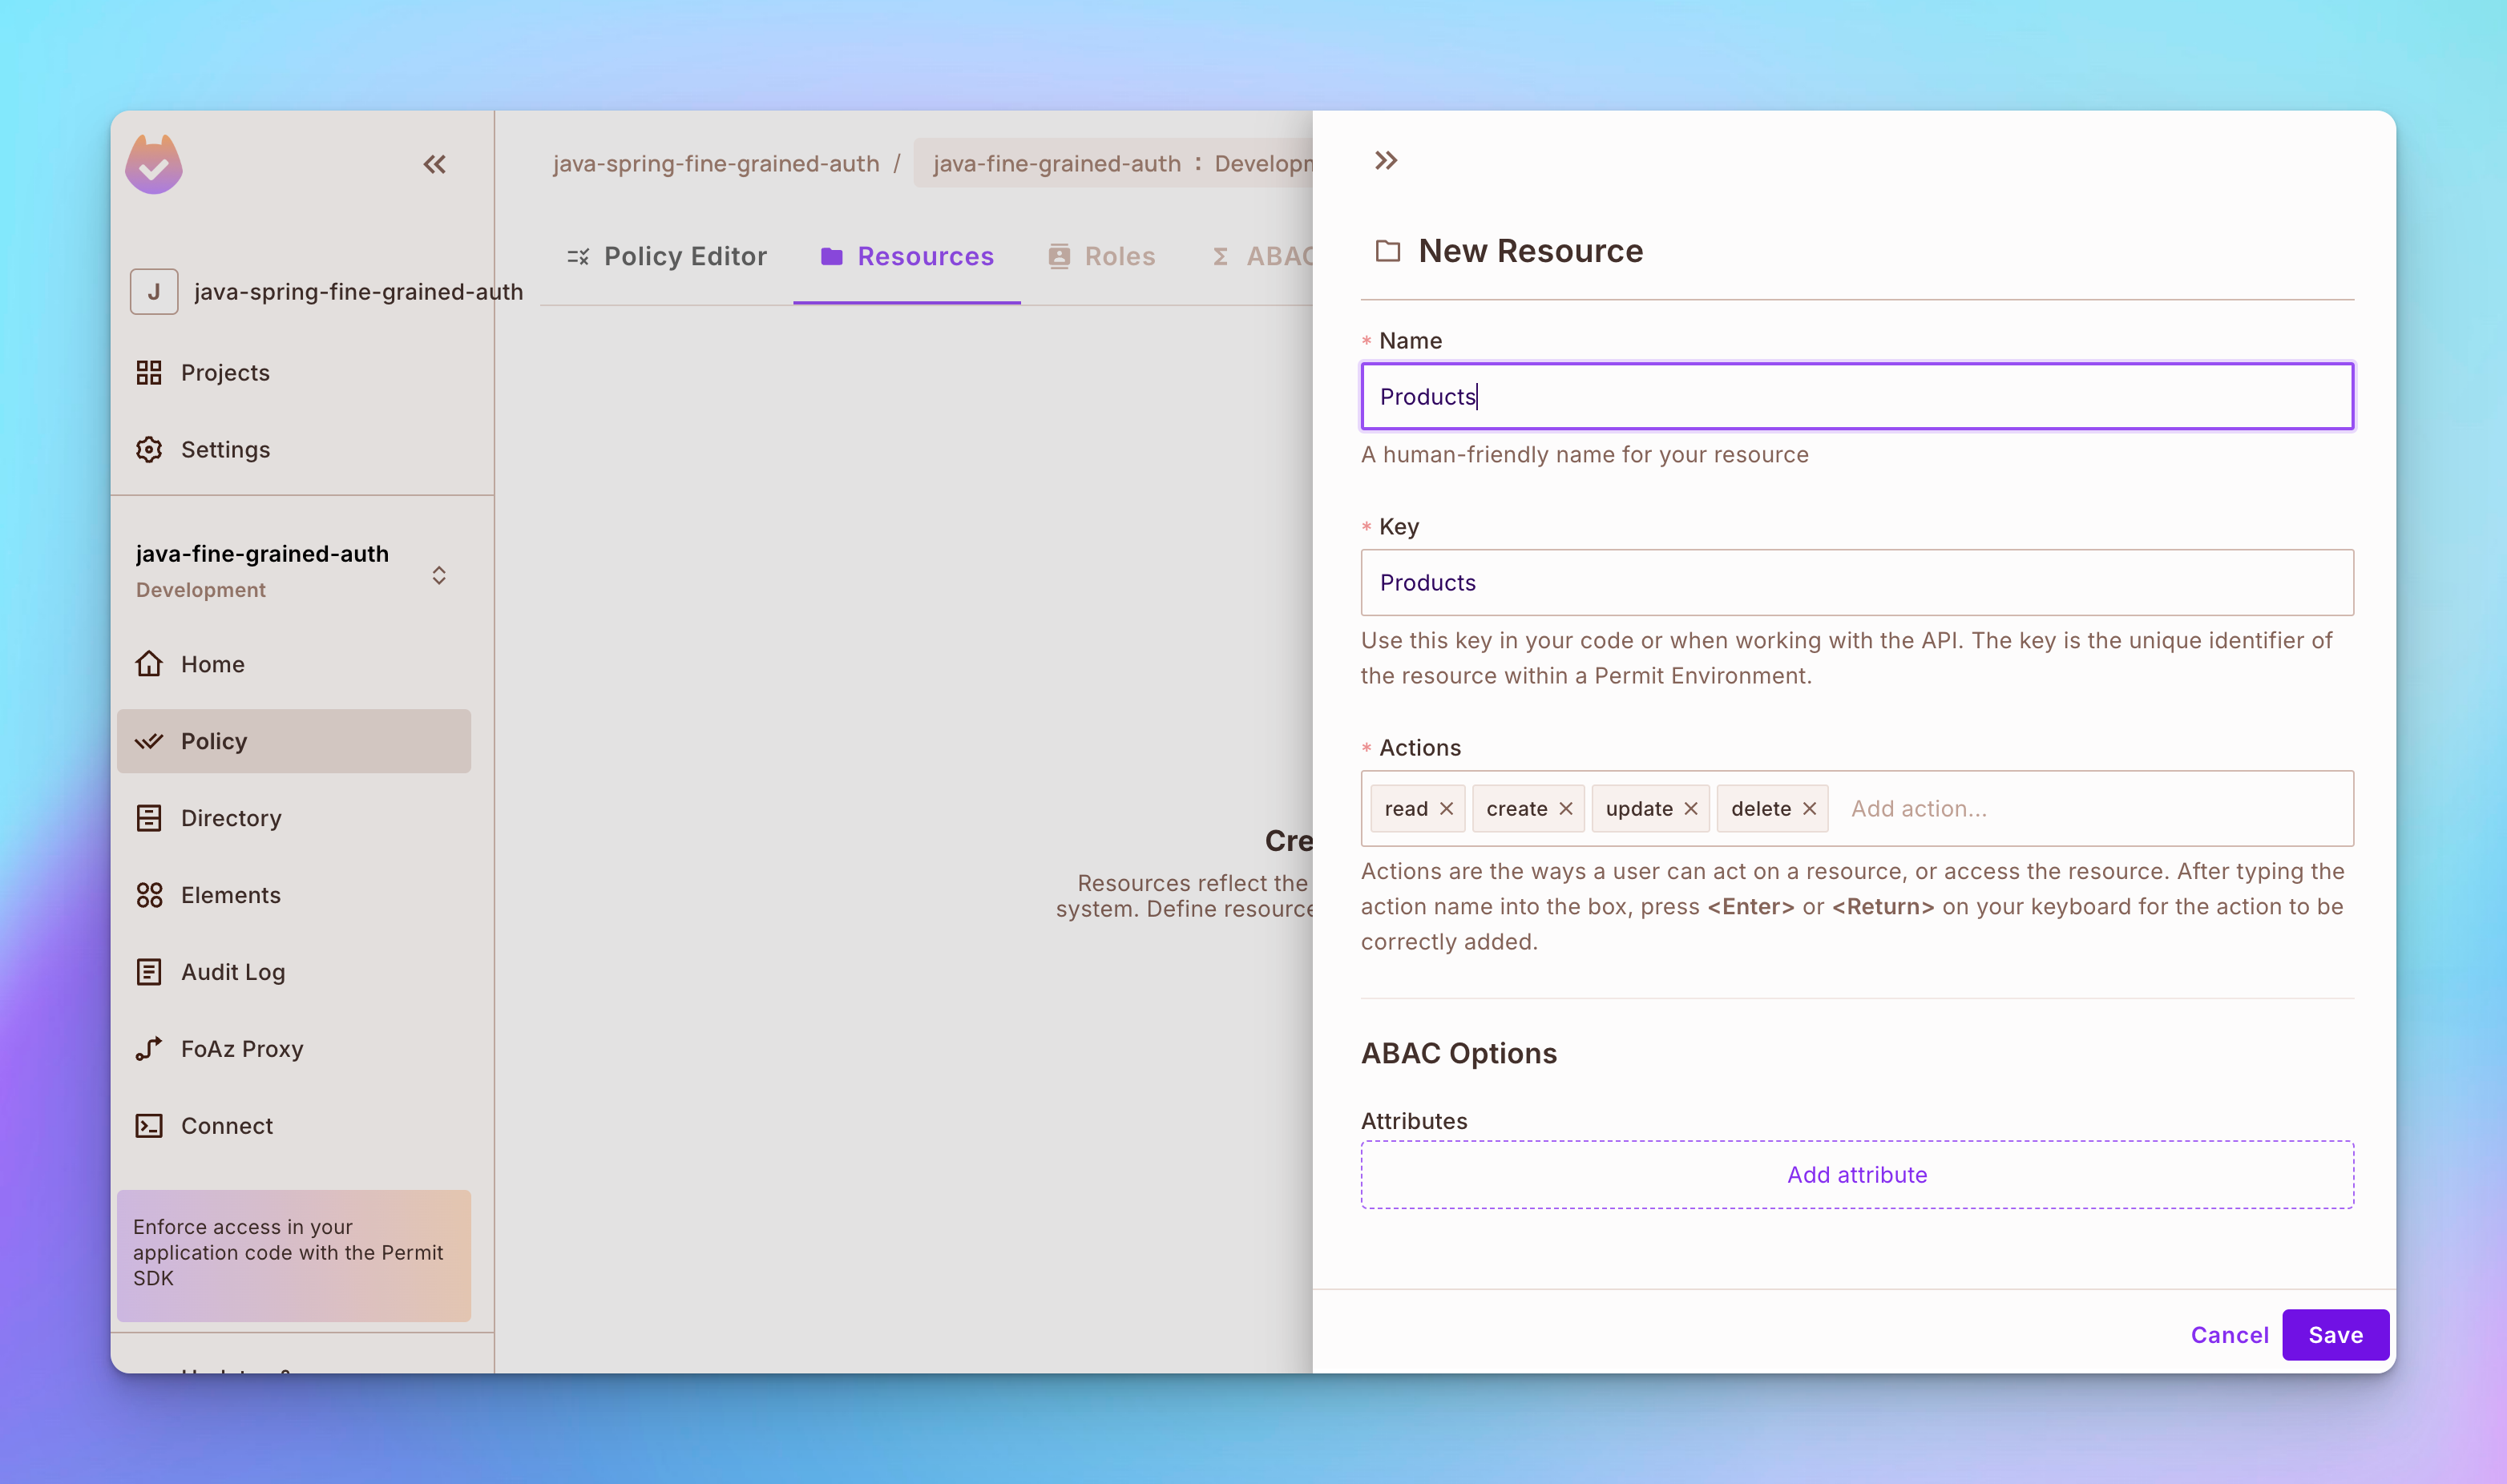
步驟 3: 創建另一個稱為評論的資源,並為其創建讀取、創建、更新和刪除操作。
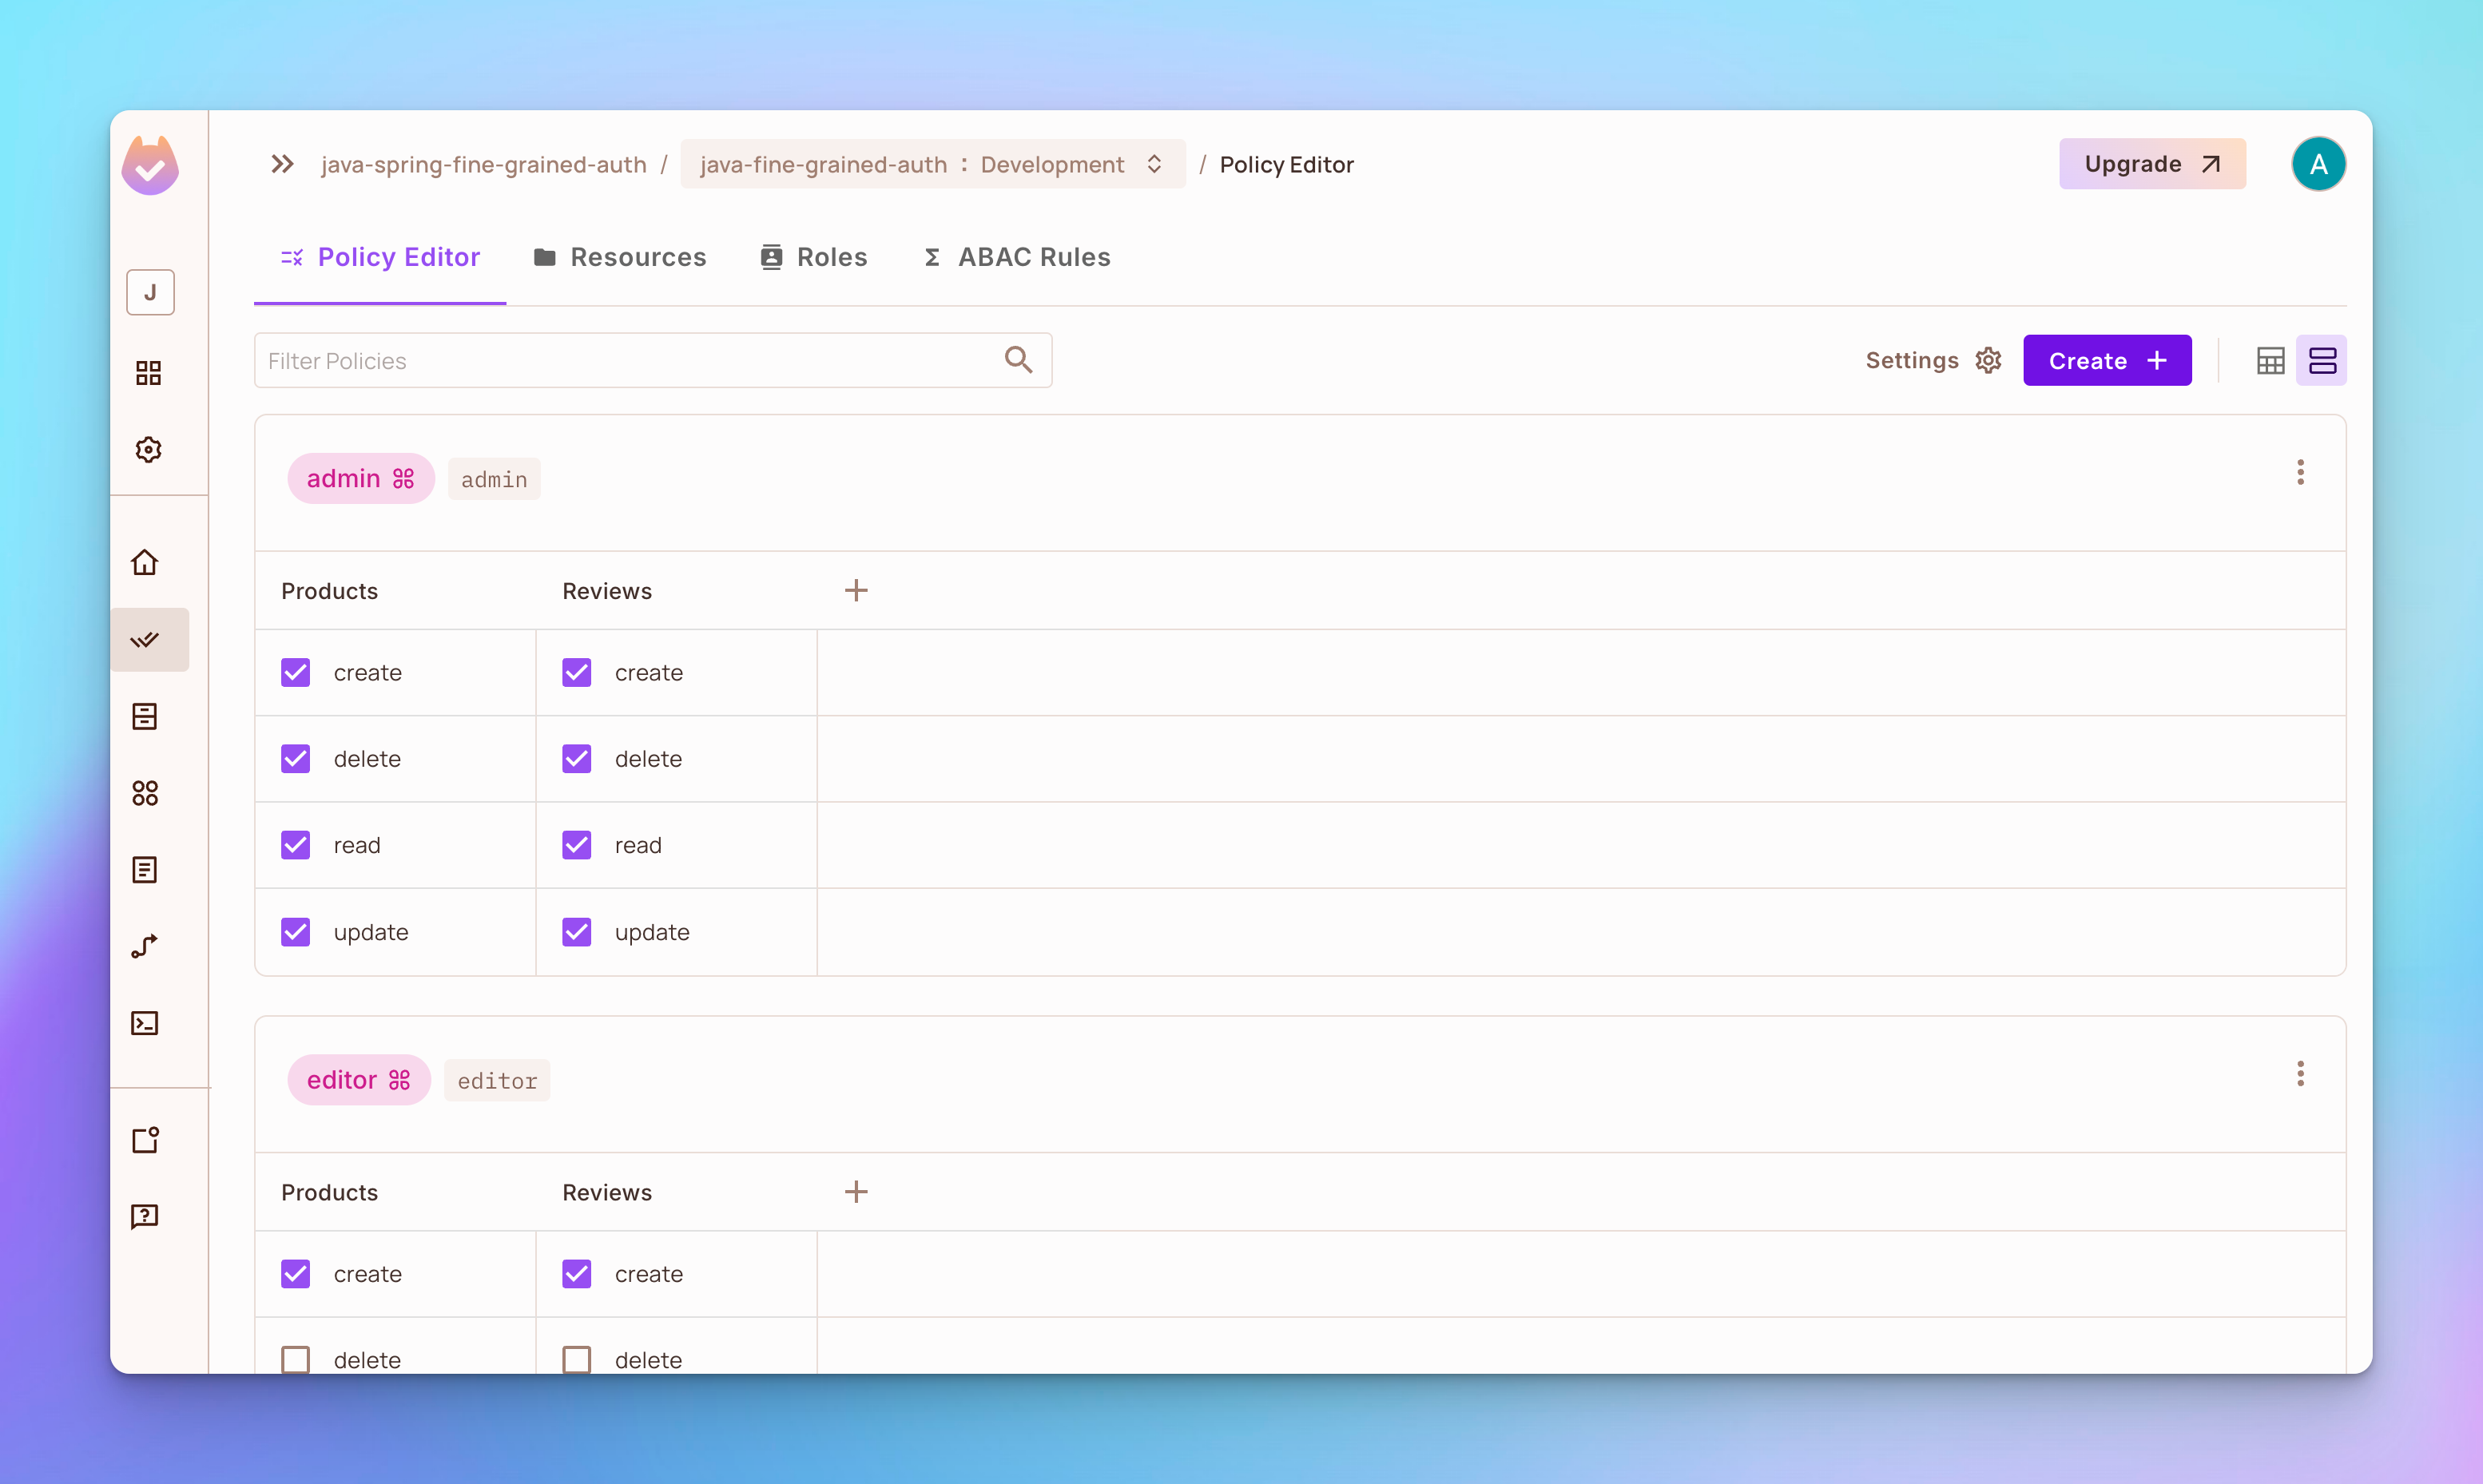
步驟 4: 打開策略編輯器標籤。您將看到已創建了3個角色,分別為管理員、編輯器和查看器。
-
管理員角色有權限對產品或評論進行
創建、刪除、讀取或更新。 -
角色
編輯器有權限對產品或評論進行創建、讀取或更新,但不能刪除任何內容。 -
角色
viewer具有创建和读取产品或评论的权限,但不具有删除或更新任何内容的权限。
实施基于属性的访问控制
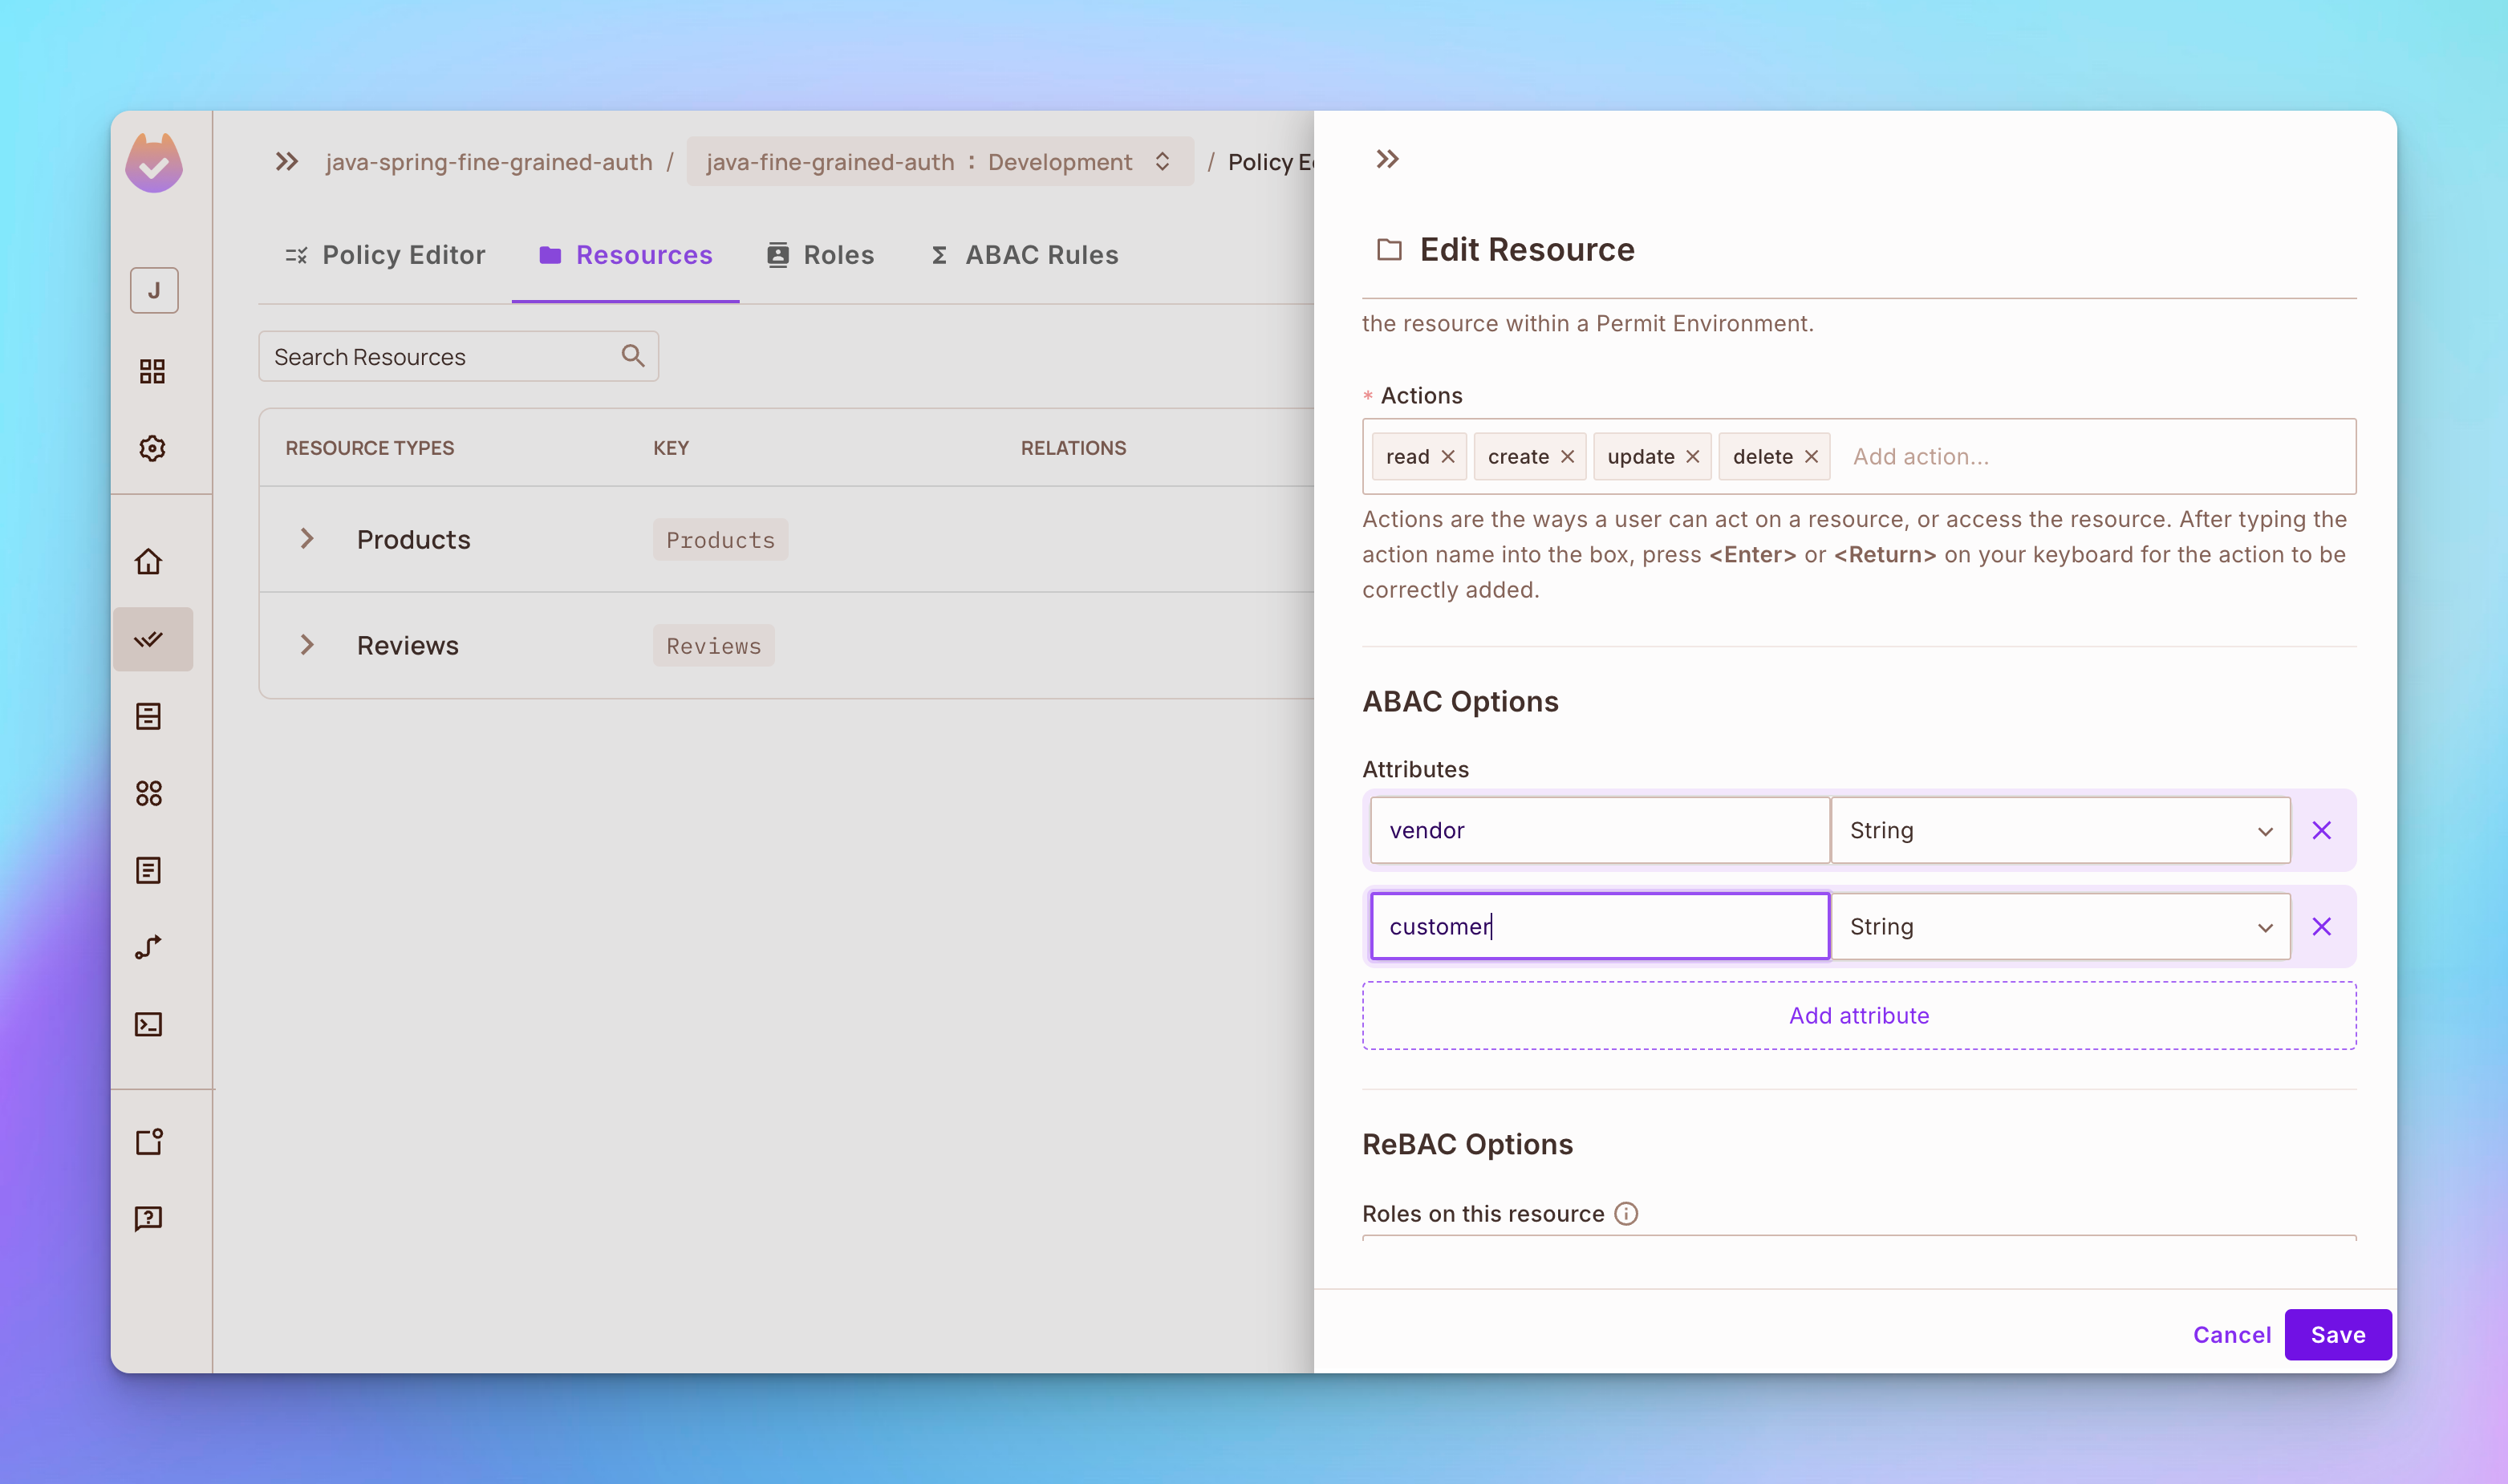
步骤 1:打开资源标签,然后点击添加属性按钮。
-
添加一个名为供应商的属性。
-
添加一个名为客户的属性。
步骤 2:打开ABAC规则标签,然后创建一个名为自有产品的新ABAC资源集,该资源集依赖于产品资源。之后,添加一个条件,仅授予基于供应商属性创建产品的用户权限。
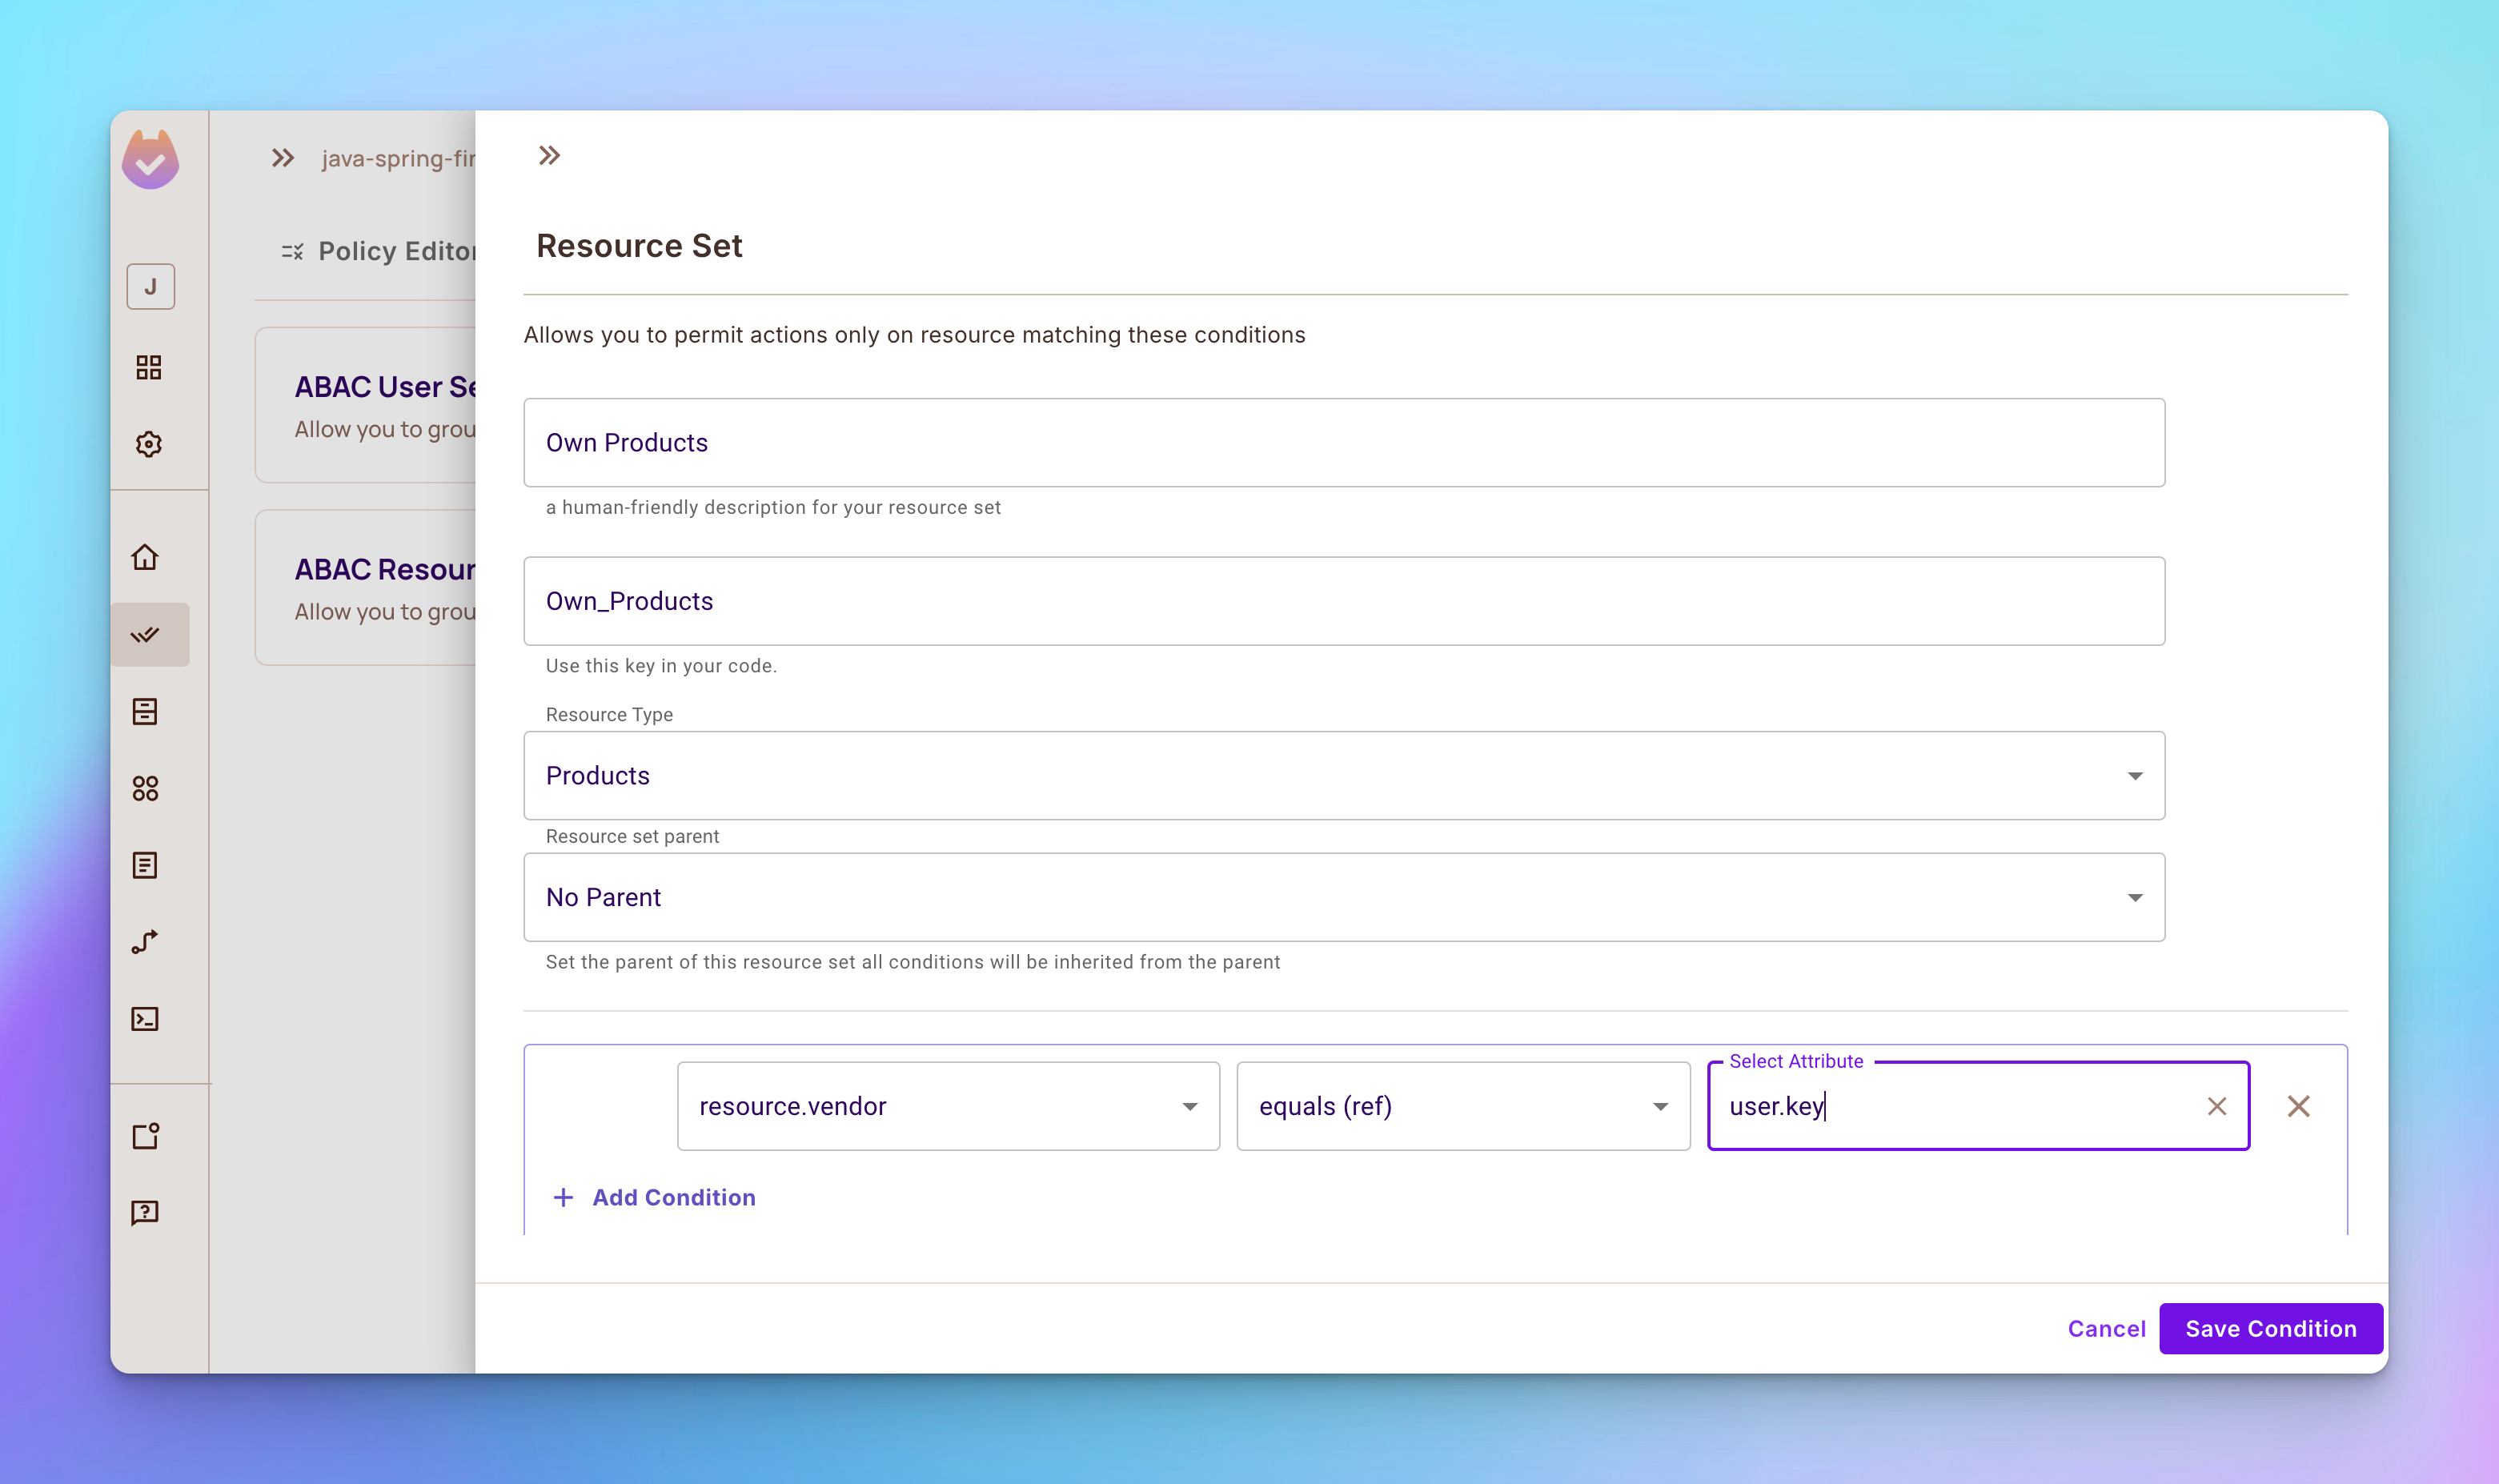
步骤 3:创建另一个名为自有评论的ABAC资源集,该资源集依赖于评论资源。
实施基于关系的访问控制
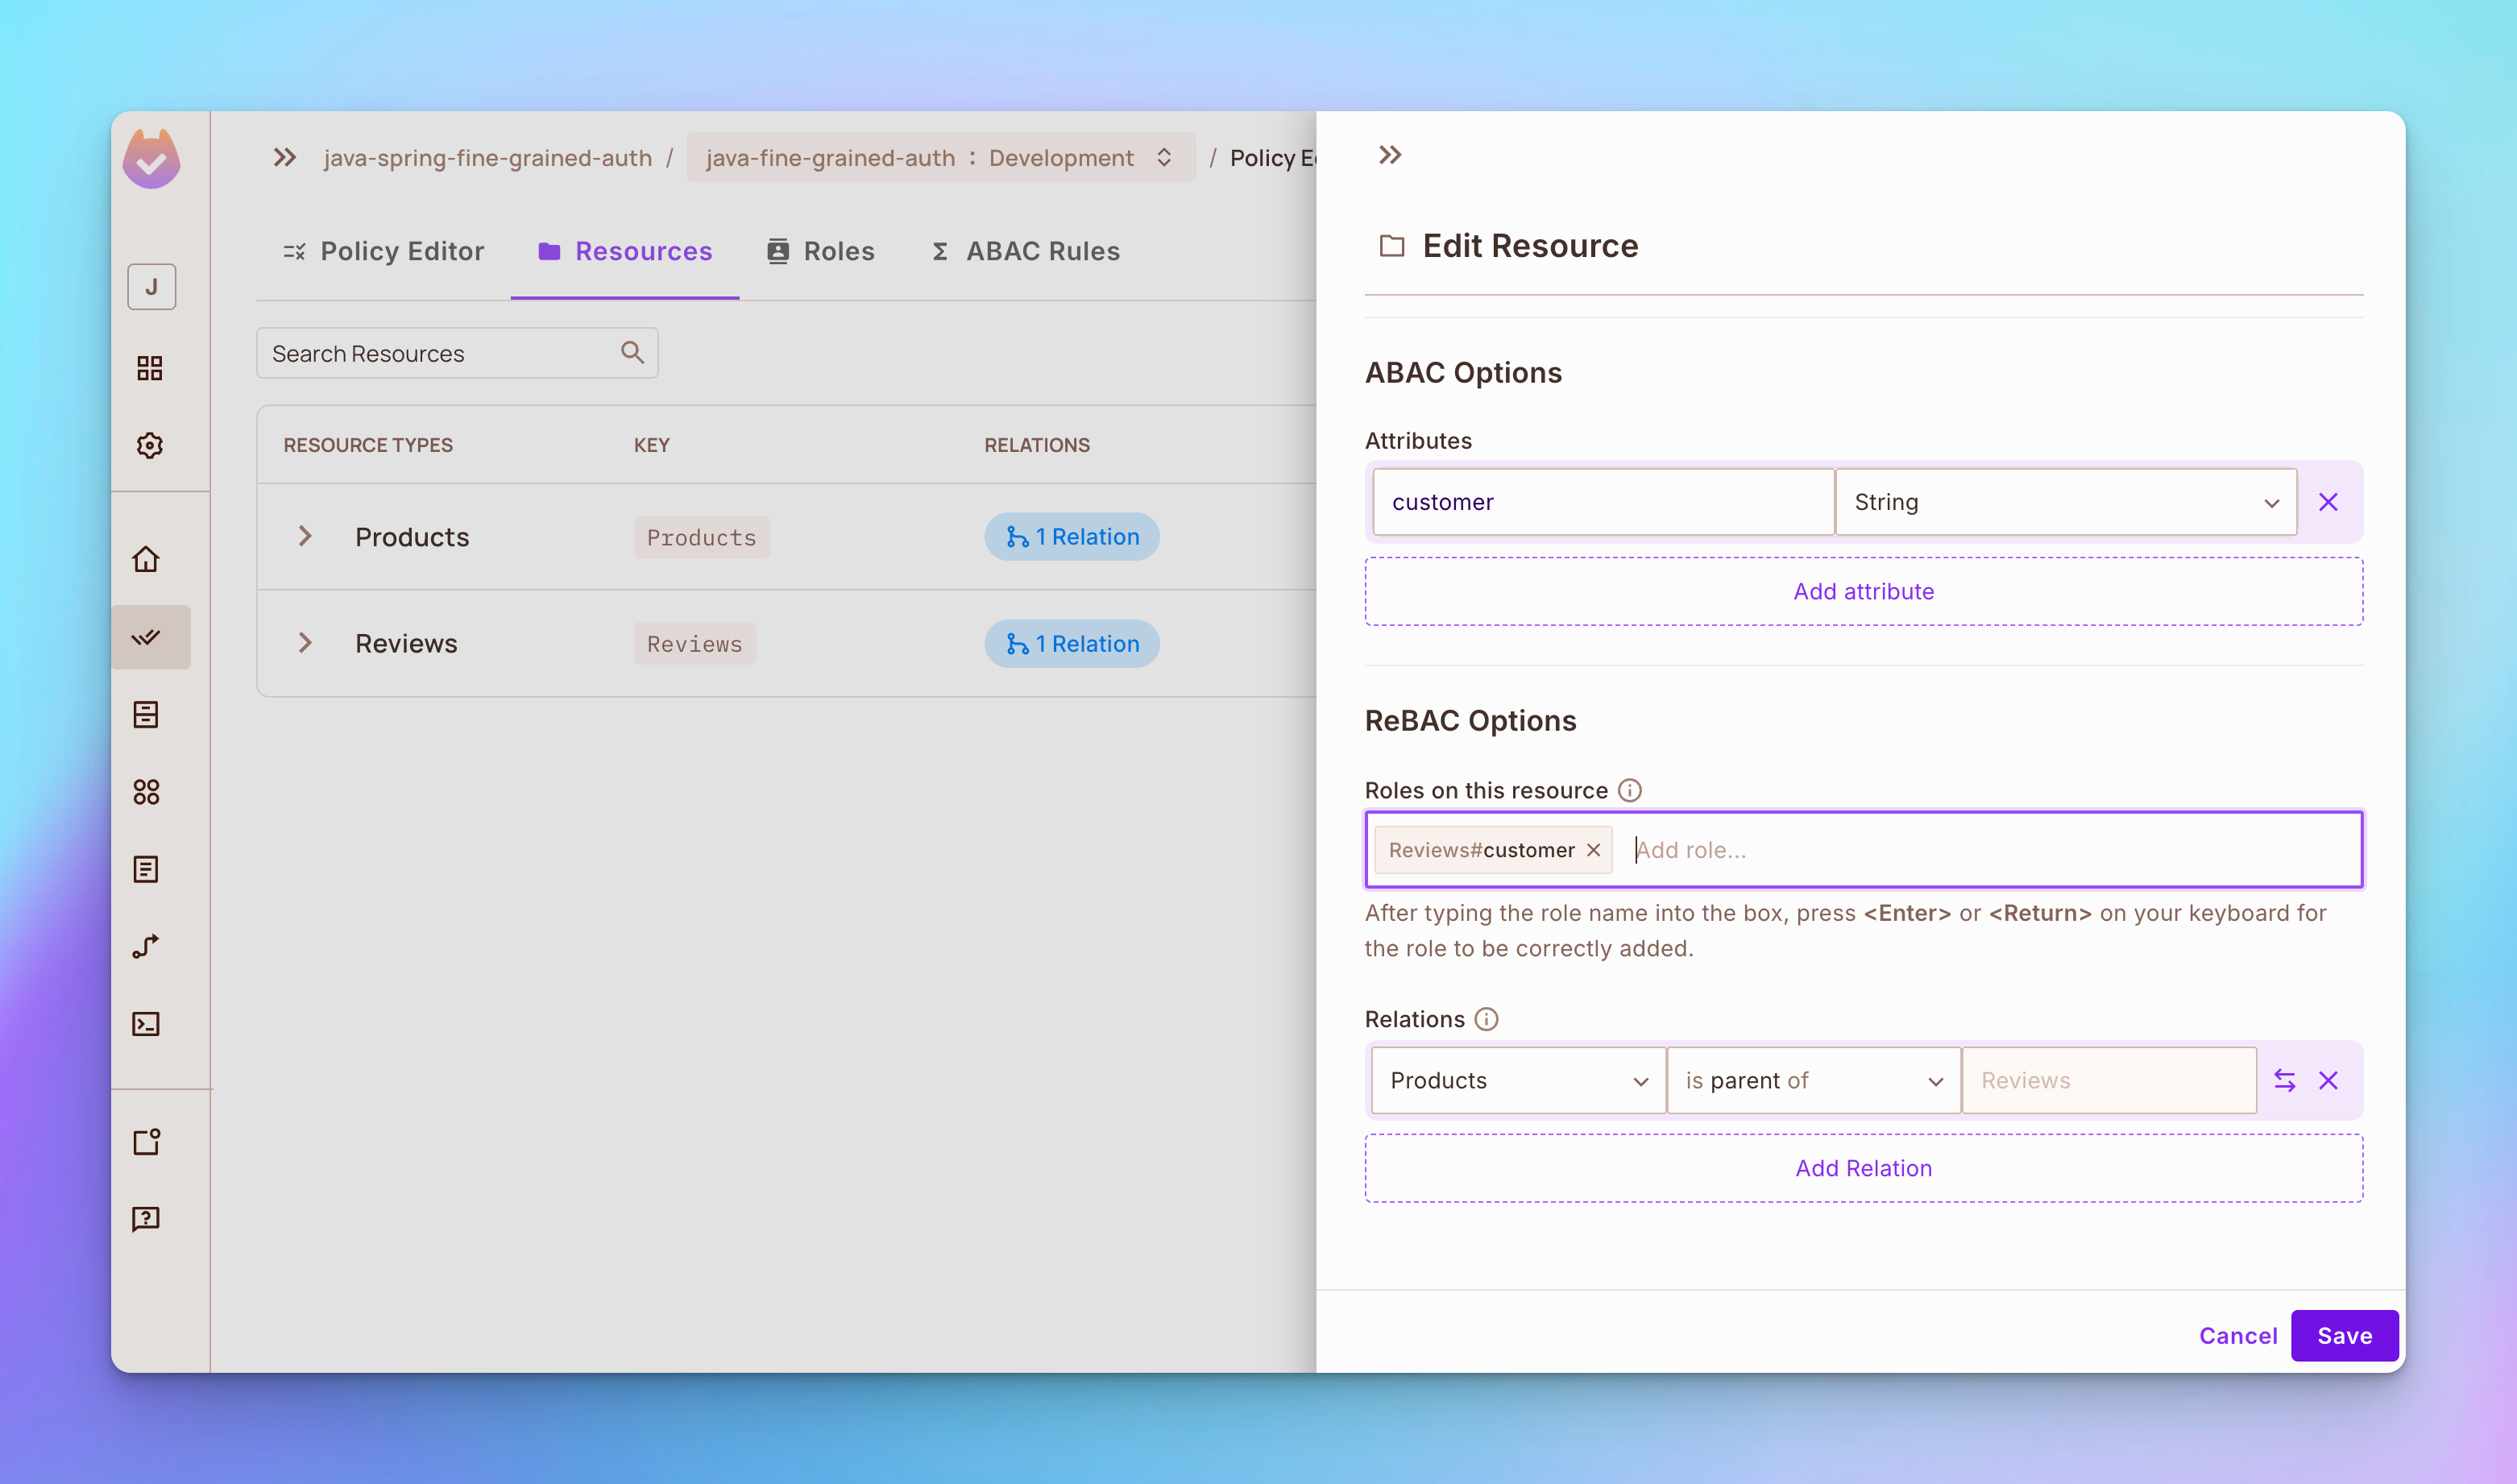
步骤 1:打开资源标签并编辑产品资源。在ReBAC选项部分添加角色供应商。然后在关系部分将产品设置为评论的父级。
步驟 2: 修改評論資源,在 ReBAC 選項區新增角色 customer,如下所示:
步驟 3: 移至 策略 編輯器 標籤並新增:
-
角色
vendor權限更新和刪除自己的產品。 -
角色
customer權限更新和刪除自己在產品上的評論。

如何在 Java 和 SpringBoot 中實現 FGA
既然我們已在 Permit.io 網頁介面中定義了 RBAC、ABAC 和 ReBAC 策略,讓我們學習如何使用 Permit.io API 在一個電子商務管理系統應用中執行它們。
接下來的代碼很多,所以請確保您閱讀了我在每個代碼區間留下的詳細註解。這些將幫助您更完全地理解此代碼的運作。
步驟 1: 設定電子商務應用程式
設定電子商務應用程式並將源代碼 git clone。
git clone https://github.com/tyaga001/java-spring-fine-grained-auth.git
安装 Permit 包 SDK
要在 build.graddle 文件中新增 SDK 的依賴區塊來安裝 Permit 包 SDK。
## Dependencies

To set up the necessary dependencies for your Spring Boot project, include the following in your `build.gradle` file:

```groovy
dependencies {
    implementation 'org.springframework.boot:spring-boot-starter-web'
    implementation 'org.springdoc:springdoc-openapi-starter-webmvc-ui:2.3.0'
    developmentOnly 'org.springframework.boot:spring-boot-devtools'
    testImplementation 'org.springframework.boot:spring-boot-starter-test'
    testRuntimeOnly 'org.junit.platform:junit-platform-launcher'

    // 在项目中新增這行程式以安裝 Permit.io Java SDK
    implementation 'io.permit:permit-sdk-java:2.0.0'
}
初始化 Permit SDK
您可以使用以下代碼初始化 Permit SDK 客戶端:
package com.boostmytool.store.config;

import io.permit.sdk.Permit;
import io.permit.sdk.PermitConfig;
import org.springframework.beans.factory.annotation.Value;
import org.springframework.context.annotation.Bean;
import org.springframework.context.annotation.Configuration;

@Configuration  // 將此類標記為 Spring IoC 的配置類
public class PermitClientConfig {

    @Value("${permit.api-key}")  // 从應用屬性中注入 Permit API 金鑰
    private String apiKey;

    @Value("${permit.pdp-url}")  // 从應用屬性中注入 Permit PDP (策略決策點) URL
    private String pdpUrl;

    /**
     * 使用自定義配置創建 Permit 客戶端實例
     * @return Permit 客戶端實例
     */
    @Bean
    public Permit permit() {
        return new Permit(
                new PermitConfig.Builder(apiKey)  // 使用 API 金鑰初始化 PermitConfig
                        .withPdpAddress(pdpUrl)   // 設定 PDP 地址
                        .withDebugMode(true)      // 開啟DEBUG 模式以進行詳細日志記錄
                        .build()                  // 建立 PermitConfig 物件
        );
    }
}
與 SDK 同步用戶
要開始實施权限,您應該首先將用戶與 Permit 同步,然後分配给他们一個角色。
在以下代碼中,UserService 類提供用戶登錄、註冊、角色分配和授權的方法,並為與 Permit API 互動時可能发生的錯誤處理異常。
package com.boostmytool.store.service;

import com.boostmytool.store.exception.ForbiddenAccessException;
import com.boostmytool.store.exception.UnauthorizedException;
import io.permit.sdk.Permit;
import io.permit.sdk.api.PermitApiError;
import io.permit.sdk.api.PermitContextError;
import io.permit.sdk.enforcement.Resource;
import io.permit.sdk.enforcement.User;
import org.springframework.stereotype.Service;

import java.io.IOException;

@Service  // 將此類別標記為 Spring 服務,使其成為元件扫瞄的候選
public class UserService {
    private final Permit permit;

    // 通過 Permit SDK 的構造函數注入
    public UserService(Permit permit) {
        this.permit = permit;
    }

    /**
     * 通過創建和返回 Permit 用戶物件來模擬用戶登錄。
     *
     * @param key 用戶的唯一键
     * @return 用戶物件
     */
    public Object login(String key) {
        return new User.Builder(key).build();
    }

    /**
     * 通過創建和同步新的 Permit 用戶來處理用戶註冊。
     *
     * @param key 用戶的唯一键
     * @return 創建並同步的用戶物件
     */
    public User signup(String key) {
        var user = new User.Builder(key).build();
        try {
            permit.api.users.sync(user);  // 將新用戶與 Permit 服務進行同步
        } catch (PermitContextError | PermitApiError | IOException e) {
            throw new RuntimeException("Failed to create user", e);  // 在用戶創建過程中處理異常
        }
        return user;
    }

    /**
     * 在 "default" 環境內為用戶分配角色。
     *
     * @param user 要分配角色的用戶物件
     * @param role 要分配的角色
     */
    public void assignRole(User user, String role) {
        try {
            permit.api.users.assignRole(user.getKey(), role, "default");  // 在 "default" 環境內分配角色
        } catch (PermitApiError | PermitContextError | IOException e) {
            throw new RuntimeException("Failed to assign role to user", e);  // 在角色分配過程中處理異常
        }
    }

    /**
     * 檢查用戶是否有權限在資源上執行特定動作。
     *
     * @param user 请求授权的用戶物件
     * @param action 需要授權的动作
     * @param resource 动作將被执行的資源
     * @throws UnauthorizedException 如果用戶未登錄
     * @throws ForbiddenAccessException 如果用戶被拒絶访问
     */
    public void authorize(User user, String action, Resource resource) {
        if (user == null) {
            throw new UnauthorizedException("Not logged in");  // 如果用戶未登錄,則抛出異常
        }
        try {
            var permitted = permit.check(user, action, resource);  // 执行授权检查
            if (!permitted) {
                throw new ForbiddenAccessException("Access denied");  // 如果访问被拒絶,則抛出異常
            }
        } catch (PermitApiError | IOException e) {
            throw new RuntimeException("Failed to authorize user", e);  // 在授權過程中處理異常
        }
    }
}
在以下的代碼中,UserController 類別揭露了用於用戶註冊和角色分配的 REST API 端點。它與 UserService 類別互動,以處理與用戶相關的商業邏輯,並提供適當的 HTTP 响应。
package com.boostmytool.store.controllers;

import com.boostmytool.store.exception.UnauthorizedException;
import com.boostmytool.store.service.UserService;
import io.permit.sdk.enforcement.User;
import jakarta.servlet.http.HttpServletRequest;
import org.springframework.web.bind.annotation.PostMapping;
import org.springframework.web.bind.annotation.RequestBody;
import org.springframework.web.bind.annotation.RequestMapping;
import org.springframework.web.bind.annotation.RestController;

@RestController  // 表示此類別處理 HTTP 請求並返回 JSON 响应
@RequestMapping("/api/users")  // 所有用戶相關操作的基礎 URL 路徑
public class UserController {
    private final UserService userService;

    // 建造函數注入 UserService,含有用戶操作的商業邏輯
    public UserController(UserService userService) {
        this.userService = userService;
    }

    /**
     * 處理用戶註冊請求。
     * 端點: POST /api/users/signup
     *
     * @param key 新区間用戶的唯一鍵
     * @return 創建的 User 物件
     */
    @PostMapping("/signup")
    public User signup(@RequestBody String key) {
        return userService.signup(key);  // 呼叫 UserService 的 signup 方法來建立新的用戶
    }

    /**
     * 處理將角色分配給已登錄的用戶。
     * 端點: POST /api/users/assign-role
     *
     * @param request HTTP 請求,用於取回當前用戶
     * @param role 將分配給當前用戶的角色
     */
    @PostMapping("/assign-role")
    public void assignRole(HttpServletRequest request, @RequestBody String role) {
        // 从請求屬性中取回當前用戶
        User currentUser = (User) request.getAttribute("user");

        // 如果用戶未登錄,則抛出異常
        if (currentUser == null) {
            throw new UnauthorizedException("Not logged in");
        }

        // 分配指定角色給當前用戶
        userService.assignRole(currentUser, role);
    }
}
創建 RBAC、ABAC 和 ReBAC 策略實施點
在下面的程式碼中,ProductService 類別管理等產品和評論的 CRUD 操作,透過 Permit API 處理權限和角色。
每個操作都包括用戶 授權 檢查,並為 Permit API 錯誤和找不到資源的情況提供適當的異常處理。
package com.boostmytool.store.service;

import com.boostmytool.store.exception.ResourceNotFoundException;
import com.boostmytool.store.model.Product;
import com.boostmytool.store.model.Review;
import io.permit.sdk.Permit;
import io.permit.sdk.api.PermitApiError;
import io.permit.sdk.api.PermitContextError;
import io.permit.sdk.enforcement.Resource;
import io.permit.sdk.enforcement.User;
import io.permit.sdk.openapi.models.RelationshipTupleCreate;
import io.permit.sdk.openapi.models.ResourceInstanceCreate;
import io.permit.sdk.openapi.models.RoleAssignmentCreate;
import org.springframework.stereotype.Service;

import java.io.IOException;
import java.util.ArrayList;
import java.util.HashMap;
import java.util.List;
import java.util.concurrent.atomic.AtomicInteger;

@Service  // 將此類別標記為Spring服務
public class ProductService {

    private final List<Product> products = new ArrayList<>();  // 用於存儲產品的內存列表
    private final AtomicInteger productIdCounter = new AtomicInteger();  // 用於生成唯一產品ID的計數器
    private final AtomicInteger reviewIdCounter = new AtomicInteger();   // 用於生成唯一評論ID的計數器

    // 用於創建許可資源實例(產品和評論)的構建器
    private final Resource.Builder productResourceBuilder = new Resource.Builder("product");
    private final Resource.Builder reviewResourceBuilder = new Resource.Builder("review");

    private final UserService userService;  // 用於處理與用戶相關的操作的服務
    private final Permit permit;  // 用於處理授權和資源管理的許可SDK實例

    // 用於注入依賴的構造函式
    public ProductService(UserService userService, Permit permit) {
        this.userService = userService;
        this.permit = permit;
    }

    // 用於為給定的操作授權用戶對資源的方法
    private void authorize(User user, String action, Resource resource) {
        userService.authorize(user, action, resource);
    }

    // 用於授權用戶對特定產品執行操作
    private void authorize(User user, String action, Product product) {
        var attributes = new HashMap<String, Object>();
        attributes.put("vendor", product.getVendor());  // 將供應商屬性添加到產品中
        userService.authorize(user, action, productResourceBuilder.withKey(product.getId().toString()).withAttributes(attributes).build());
    }

    // 用於授權用戶對特定評論執行操作
    private void authorize(User user, String action, Review review) {
        var attributes = new HashMap<String, Object>();
        attributes.put("customer", review.getCustomer());  // 將客戶屬性添加到評論中
        userService.authorize(user, action, reviewResourceBuilder.withKey(review.getId().toString()).withAttributes(attributes).build());
    }

    // 通過ID檢索產品,如果未找到則拋出異常
    private Product getProductById(int id) {
        return products.stream().filter(product -> product.getId().equals(id))
                .findFirst().orElseThrow(() -> new ResourceNotFoundException("Product with id " + id + " not found"));
    }

    // 檢索所有產品,檢查用戶是否有“讀取”產品的權限
    public List<Product> getAllProducts(User user) {
        authorize(user, "read", productResourceBuilder.build());  // 用戶必須具有“讀取”權限
        return new ArrayList<>(products);  // 返回產品列表的副本
    }

    // 通過ID檢索產品,檢查用戶是否有“讀取”該產品的權限
    public Product getProduct(User user, int id) {
        authorize(user, "read", productResourceBuilder.build());
        return getProductById(id);
    }

    // 添加新產品,授權用戶並在許可中創建資源實例和角色分配
    public Product addProduct(User user, String content) {
        authorize(user, "create", productResourceBuilder.build());  // 檢查用戶是否可以創建產品
        Product product = new Product(productIdCounter.incrementAndGet(), user.getKey(), content);  // 創建新產品

        try {
            // 在許可中創建資源實例並將“供應商”角色分配給該產品的用戶
            permit.api.resourceInstances.create(new ResourceInstanceCreate(product.getId().toString(), "product").withTenant("default"));
            permit.api.roleAssignments.assign(new RoleAssignmentCreate("vendor", user.getKey()).withResourceInstance("product:" + product.getId()).withTenant("default"));
        } catch (IOException | PermitApiError | PermitContextError e) {
            throw new RuntimeException("Failed to create resource instance or role assignment: " + e.getMessage());
        }

        products.add(product);  // 將產品添加到內存列表中
        return product;
    }

    // 更新產品的內容,檢查用戶是否有“更新”該產品的權限
    public Product updateProduct(User user, int id, String content) {
        Product product = getProductById(id);  // 通過ID獲取產品
        authorize(user, "update", product);  // 檢查用戶是否可以更新該產品
        product.setContent(content);  // 更新產品內容
        return product;
    }

    // 刪除產品,檢查用戶是否有“刪除”該產品的權限
    public void deleteProduct(User user, int id) {
        boolean isDeleted = products.removeIf(product -> {
            if (product.getId().equals(id)) {
                authorize(user, "delete", product);  // 檢查用戶是否可以刪除該產品
                return true;
            } else {
                return false;
            }
        });

        if (!isDeleted) {
            throw new ResourceNotFoundException("Product with id " + id + " not found");
        }

        try {
            permit.api.resourceInstances.delete("product:" + id);  // 從許可中刪除產品資源實例
        } catch (IOException | PermitApiError | PermitContextError e) {
            throw new RuntimeException(e);
        }
    }

    // 為產品添加評論,創建許可中的資源實例和關係
    public Review addReview(User user, int productId, String content) {
        authorize(user, "create", reviewResourceBuilder.build());  // 檢查用戶是否可以創建評論
        Product product = getProductById(productId);  // 通過ID獲取產品
        Review review = new Review(reviewIdCounter.incrementAndGet(), user.getKey(), content);  // 創建新評論

        try {
            // 為評論創建資源實例並與產品建立關係
            permit.api.resourceInstances.create(new ResourceInstanceCreate(review.getId().toString(), "review").withTenant("default"));
            permit.api.relationshipTuples.create(new RelationshipTupleCreate("product:" + productId, "parent", "review:" + review.getId()));
        } catch (IOException | PermitApiError | PermitContextError e) {
            throw new RuntimeException(e);
        }

        product.addReview(review);  // 將評論添加到產品中
        return review;
    }

    // 更新評論的內容,檢查用戶是否有“更新”該評論的權限
    public Review updateReview(User user, int productId, int reviewId, String content) {
        Product product = getProductById(productId);  // 通過ID獲取產品
        Review review = product.getReviews().stream().filter(c -> c.getId().equals(reviewId))
                .findFirst().orElseThrow(() -> new ResourceNotFoundException("Review with id " + reviewId + " not found"));

        authorize(user, "update", review);  // 檢查用戶是否可以更新該評論
        review.setContent(content);  // 更新評論內容
        return review;
    }

    // 刪除評論,檢查用戶是否有“刪除”該評論的權限
    public void deleteReview(User user, int productId, int reviewId) {
        Product product = getProductById(productId);  // 通過ID獲取產品
        boolean isDeleted = product.getReviews().removeIf(review -> {
            if (review.getId().equals(reviewId)) {
                authorize(user, "delete", review);  // 檢查用戶是否可以刪除該評論
                return true;
            } else {
                return false;
            }
        });

        if (!isDeleted) {
            throw new ResourceNotFoundException("Review with id " + reviewId + " not found");
        }

        try {
            permit.api.resourceInstances.delete("review:" + reviewId);  // 從許可中刪除評論資源實例
        } catch (IOException | PermitApiError | PermitContextError e) {
            throw new RuntimeException(e);
        }
    }
}
在以下的程式碼中,ProductController 類別處理與產品及其評論相關的 HTTP 請求。它揭露用於管理產品(如 creating、updating、deleting 和 retrieving)以及用於管理產品評論的端點。
package com.boostmytool.store.controllers;

import com.boostmytool.store.model.Product;
import com.boostmytool.store.model.Review;
import com.boostmytool.store.service.ProductService;
import io.permit.sdk.enforcement.User;
import jakarta.servlet.http.HttpServletRequest;
import org.springframework.beans.factory.annotation.Autowired;
import org.springframework.http.HttpStatus;
import org.springframework.web.bind.annotation.*;

import java.util.List;

@RestController  // 指明這個類別是一個 Spring REST 控制器
@RequestMapping("/api/products")  // 這個控制器中所有端點的基础 URL
public class ProductController {

    private final ProductService productService;  // 用於處理產品相關操作的 ProductService 實例

    @Autowired  // 自動注入 ProductService 物件
    public ProductController(ProductService productService) {
        this.productService = productService;
    }

    // GET 請求以检索所有產品
    @GetMapping
    public List<Product> getAllProducts(HttpServletRequest request) {
        User currentUser = (User) request.getAttribute("user");  // 从請求中獲取已驗證的使用者
        return productService.getAllProducts(currentUser);  // 呼叫 ProductService 以獲取用戶的所有產品
    }

    // GET 請求以通過其 ID 检索產品
    @GetMapping("/{id}")
    public Product getProductById(HttpServletRequest request, @PathVariable("id") int id) {
        User currentUser = (User) request.getAttribute("user");  // 从請求中獲取已驗證的使用者
        return productService.getProduct(currentUser, id);  // 呼叫 ProductService 以通過 ID 為用戶獲取產品
    }

    // POST 請求以新增一個新产品
    @PostMapping
    @ResponseStatus(HttpStatus.CREATED)  // 將回應狀態設置為 201 (已創建)
    public Product addProduct(HttpServletRequest request, @RequestBody String content) {
        User currentUser = (User) request.getAttribute("user");  // 从請求中獲取已驗證的使用者
        return productService.addProduct(currentUser, content);  // 呼叫 ProductService 以新增一個新产品
    }

    // PUT 請求以通過其 ID 更新現有的產品
    @PutMapping("/{id}")
    public Product updateProduct(HttpServletRequest request, @PathVariable("id") int id, @RequestBody String content) {
        User currentUser = (User) request.getAttribute("user");  // 从請求中獲取已驗證的使用者
        return productService.updateProduct(currentUser, id, content);  // 呼叫 ProductService 以通過 ID 更新產品
    }

    // DELETE 請求以通過其 ID 刪除產品
    @DeleteMapping("/{id}")
    public String deleteProduct(HttpServletRequest request, @PathVariable("id") int id) {
        User currentUser = (User) request.getAttribute("user");  // 从請求中獲取已驗證的使用者
        productService.deleteProduct(currentUser, id);  // 呼叫 ProductService 以通過 ID 刪除產品
        return "Deleted product with id " + id;  // 刪除後返回一個成功消息
    }

    // POST 請求以通過產品 ID 向產品新增一個新評論
    @PostMapping("/{id}/review")
    public Review addReview(HttpServletRequest request, @PathVariable("id") int id, @RequestBody String content) {
        User currentUser = (User) request.getAttribute("user");  // 从請求中獲取已驗證的使用者
        return productService.addReview(currentUser, id, content);  // 呼叫 ProductService 以向產品新增評論
    }

    // PUT 請求以通過產品和評論 ID 更新現有的評論
    @PutMapping("/{id}/review/{reviewId}")
    public Review updateReview(HttpServletRequest request, @PathVariable("id") int id, @PathVariable("reviewId") int reviewId, @RequestBody String content) {
        User currentUser = (User) request.getAttribute("user");  // 从請求中獲取已驗證的使用者
        return productService.updateReview(currentUser, id, reviewId, content);  // 呼叫 ProductService 以更新評論
    }

    // DELETE 請求以通過產品和評論 ID 刪除評論
    @DeleteMapping("/{id}/review/{reviewId}")
    public String deleteReview(HttpServletRequest request, @PathVariable("id") int id, @PathVariable("reviewId") int reviewId) {
        User currentUser = (User) request.getAttribute("user");  // 从請求中獲取已驗證的使用者
        productService.deleteReview(currentUser, id, reviewId);  // 呼叫 ProductService 以刪除評論
        return "Deleted review with id " + reviewId + " from product " + id;  // 刪除後返回一個成功消息
    }
}
步驟 2: 取得您的環境 API 金鑰
在 UI 控制面板中,複製活躍環境的 API 金鑰。
然後在 application.yaml 文件中新增環境的 API 金鑰 和 PDP URL。
permit:
  pdpUrl: 'http://localhost:7766'
  apiKey: "Your Permit environment API Key"
步驟 3: 部署決策點 (PDP)
決策點 (PDP) 已部署在您的 VPC 中,負責評估您的授權請求。PDP 將確保零延遲、高性能、高可用性及提升安全性。
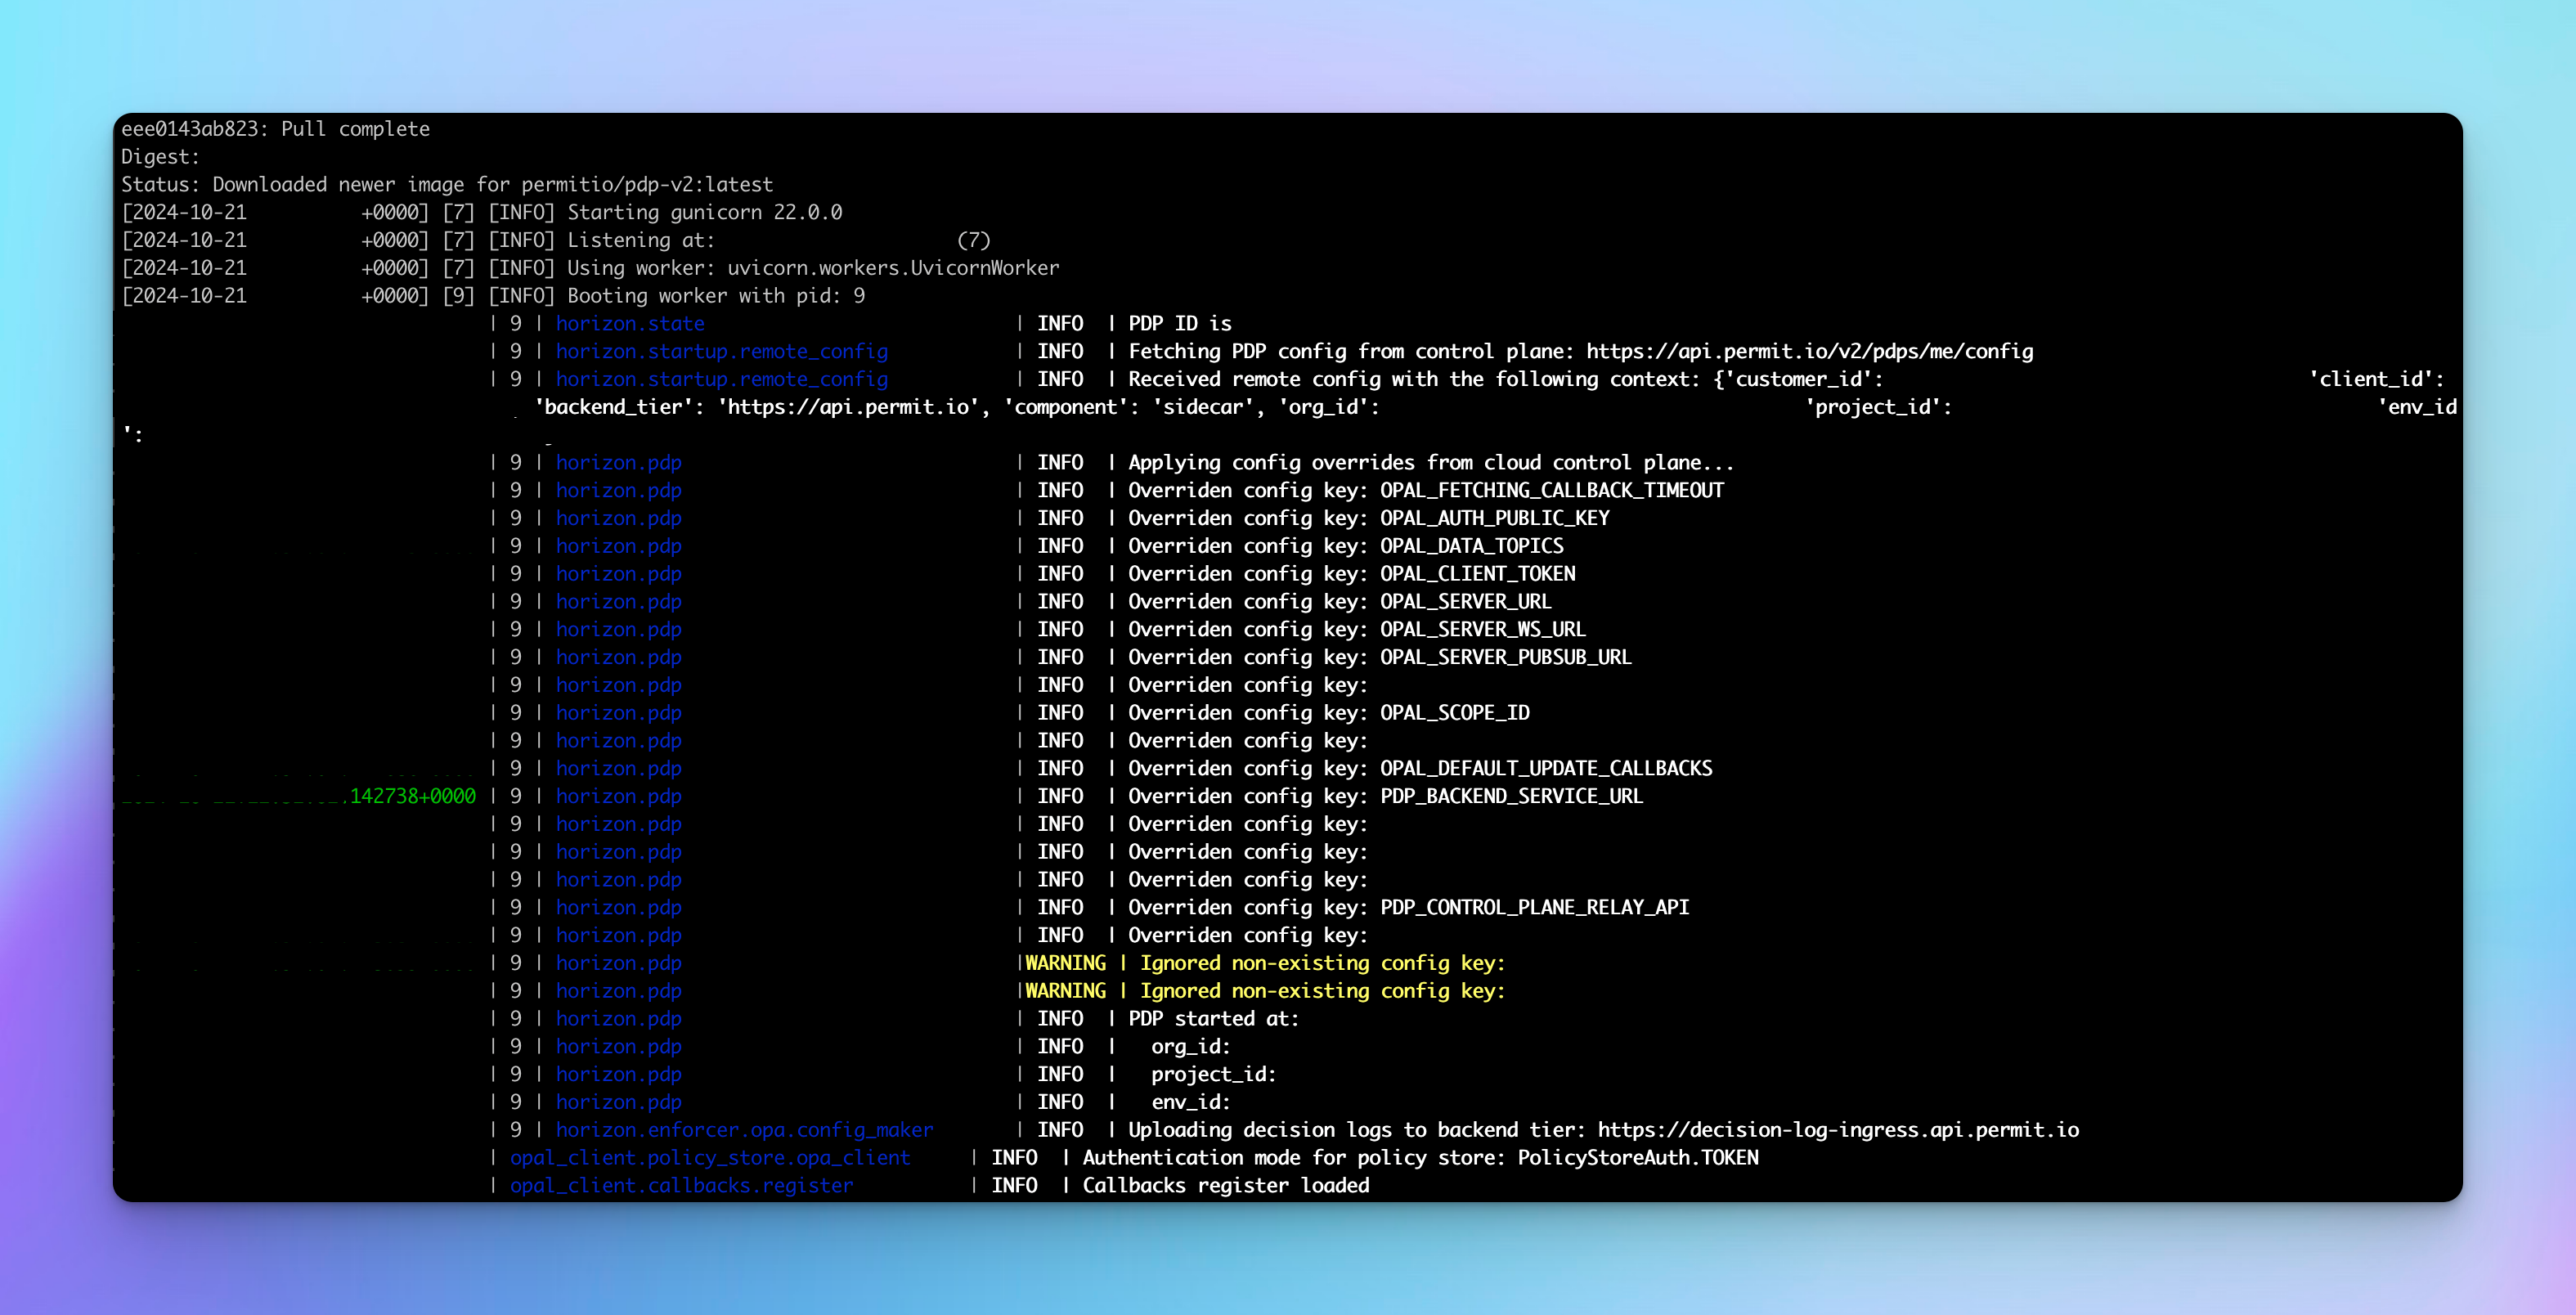
使用以下的命令從 Docker Hub 拉取 Permit.io PDP 容器。
docker pull permitio/pdp-v2:latest
然後運行該容器。
docker run -it -p 7766:7000 --env PDP_DEBUG=True --env PDP_API_KEY=<YOUR_API_KEY> permitio/pdp-v2:latest
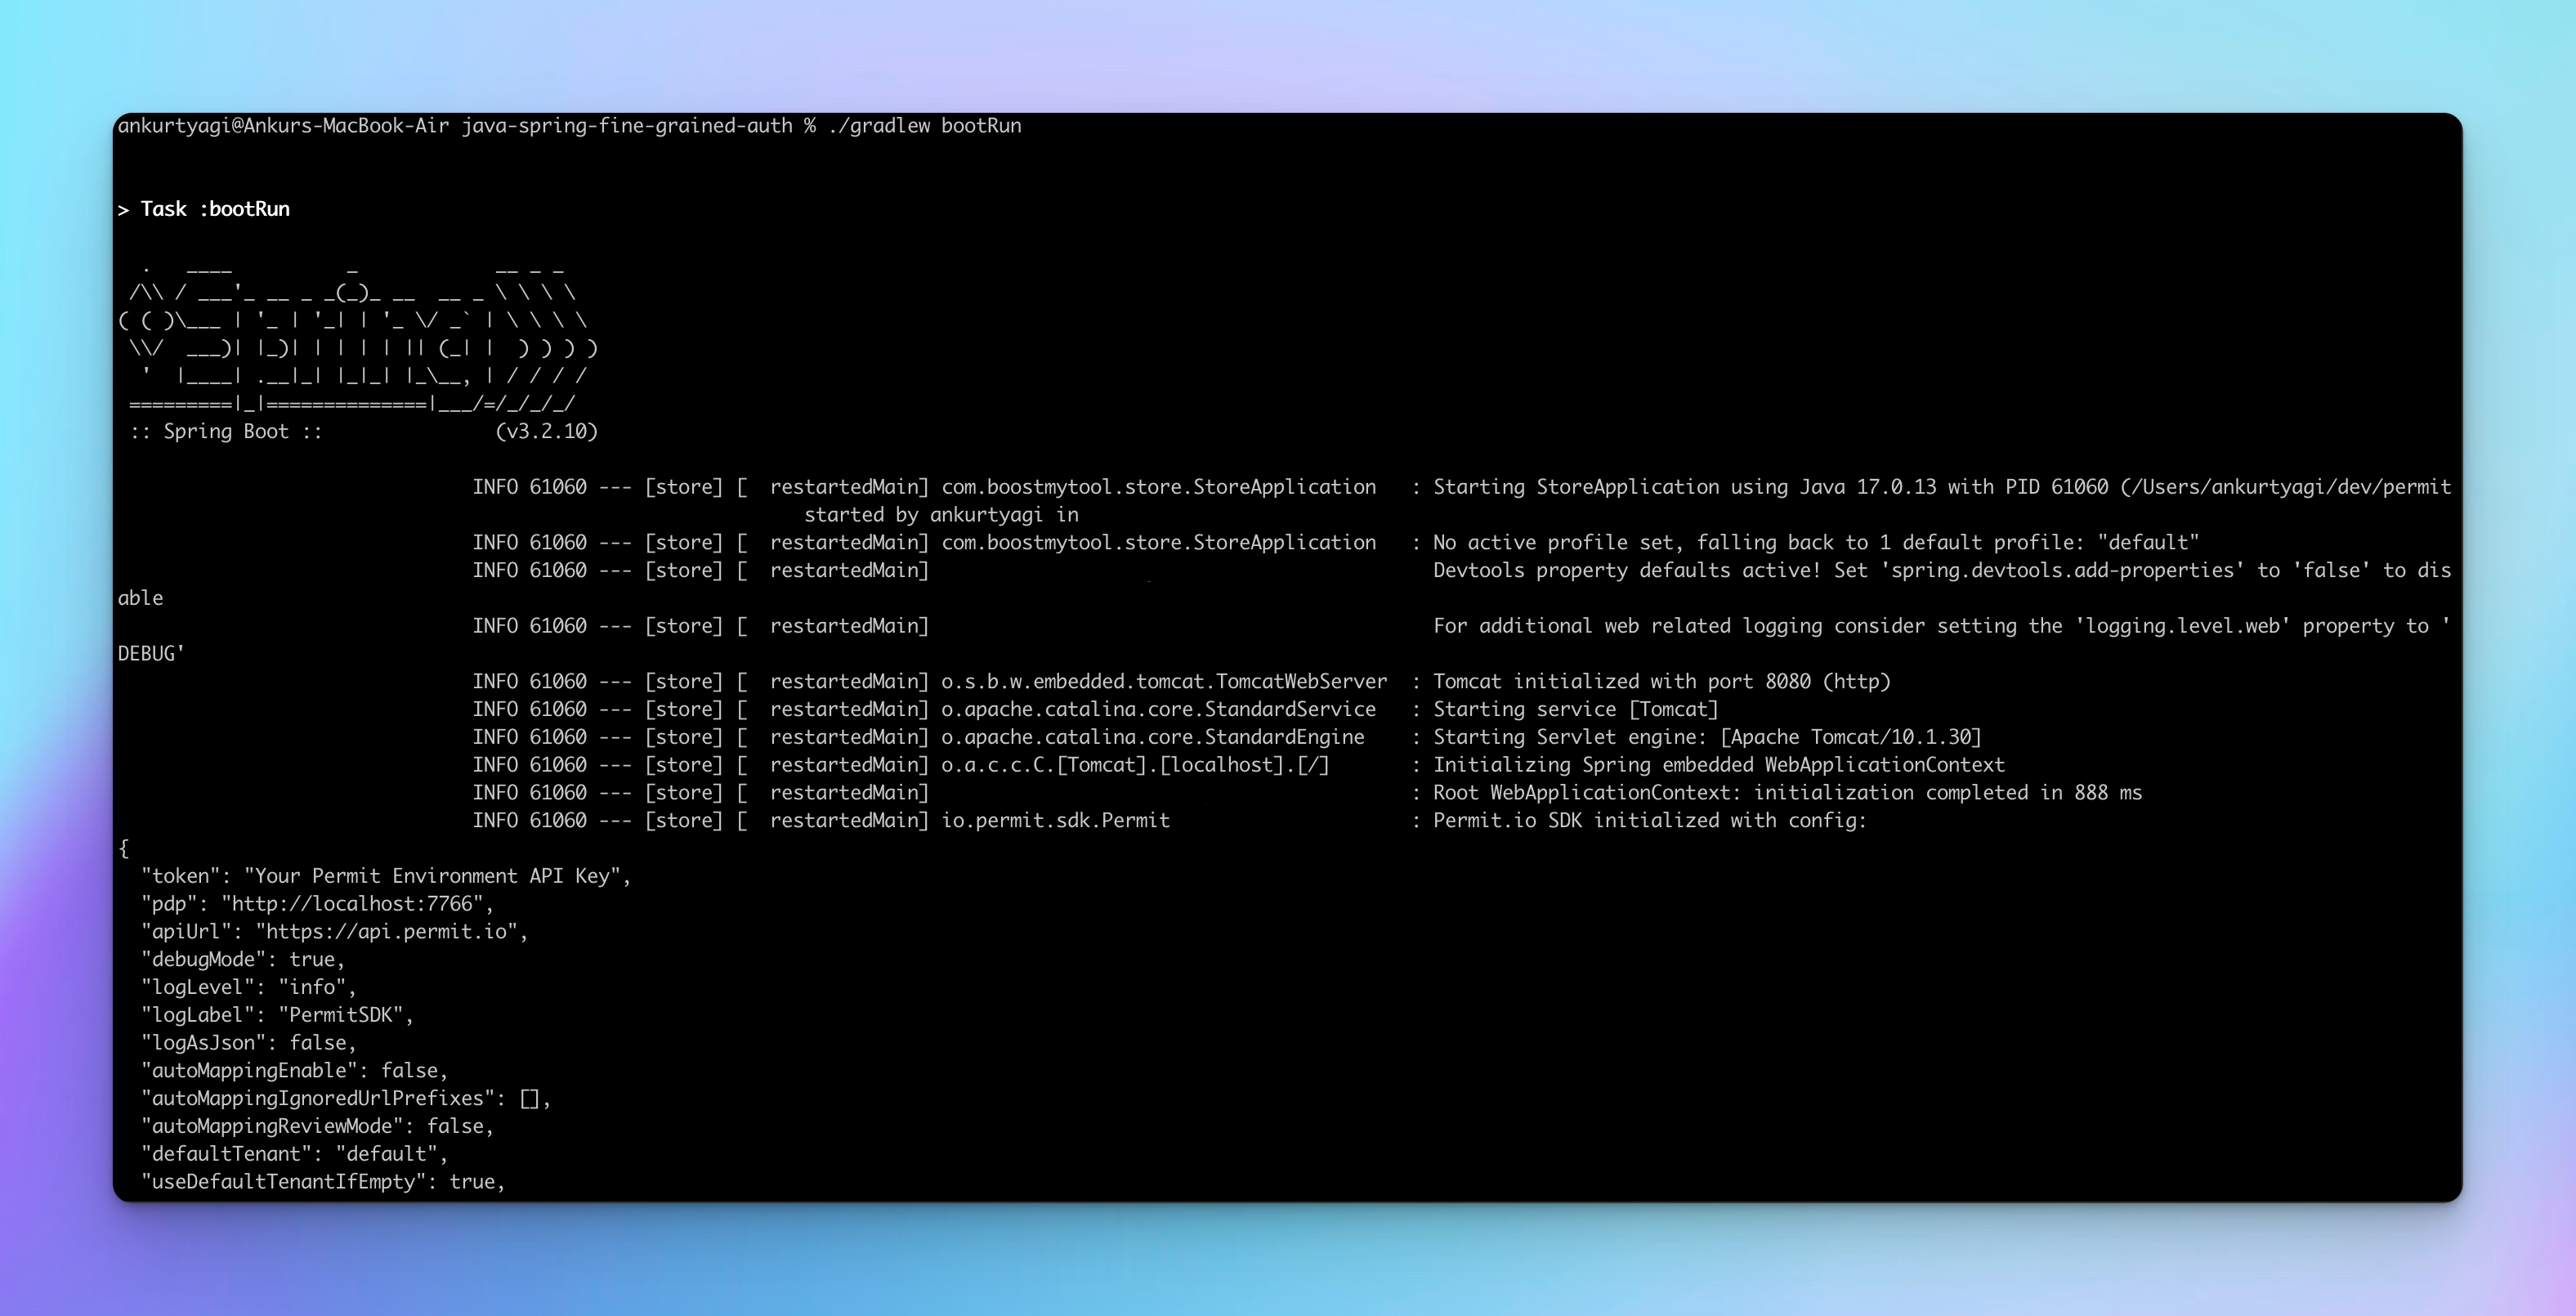
步驟 4: 運行應用程式
您可以使用以下的 Gradle 命令來運行應用程式:
./gradlew bootRun
查看和創建產品
現在讓我們使用 REQBIN 与應用程式的端點進行互動。
首先,使用 /api/users/signup 端點創建新的用戶。
curl -X POST "http://localhost:8080/api/users/signup" -H "Content-Type: application/json" -d 'johndoe'
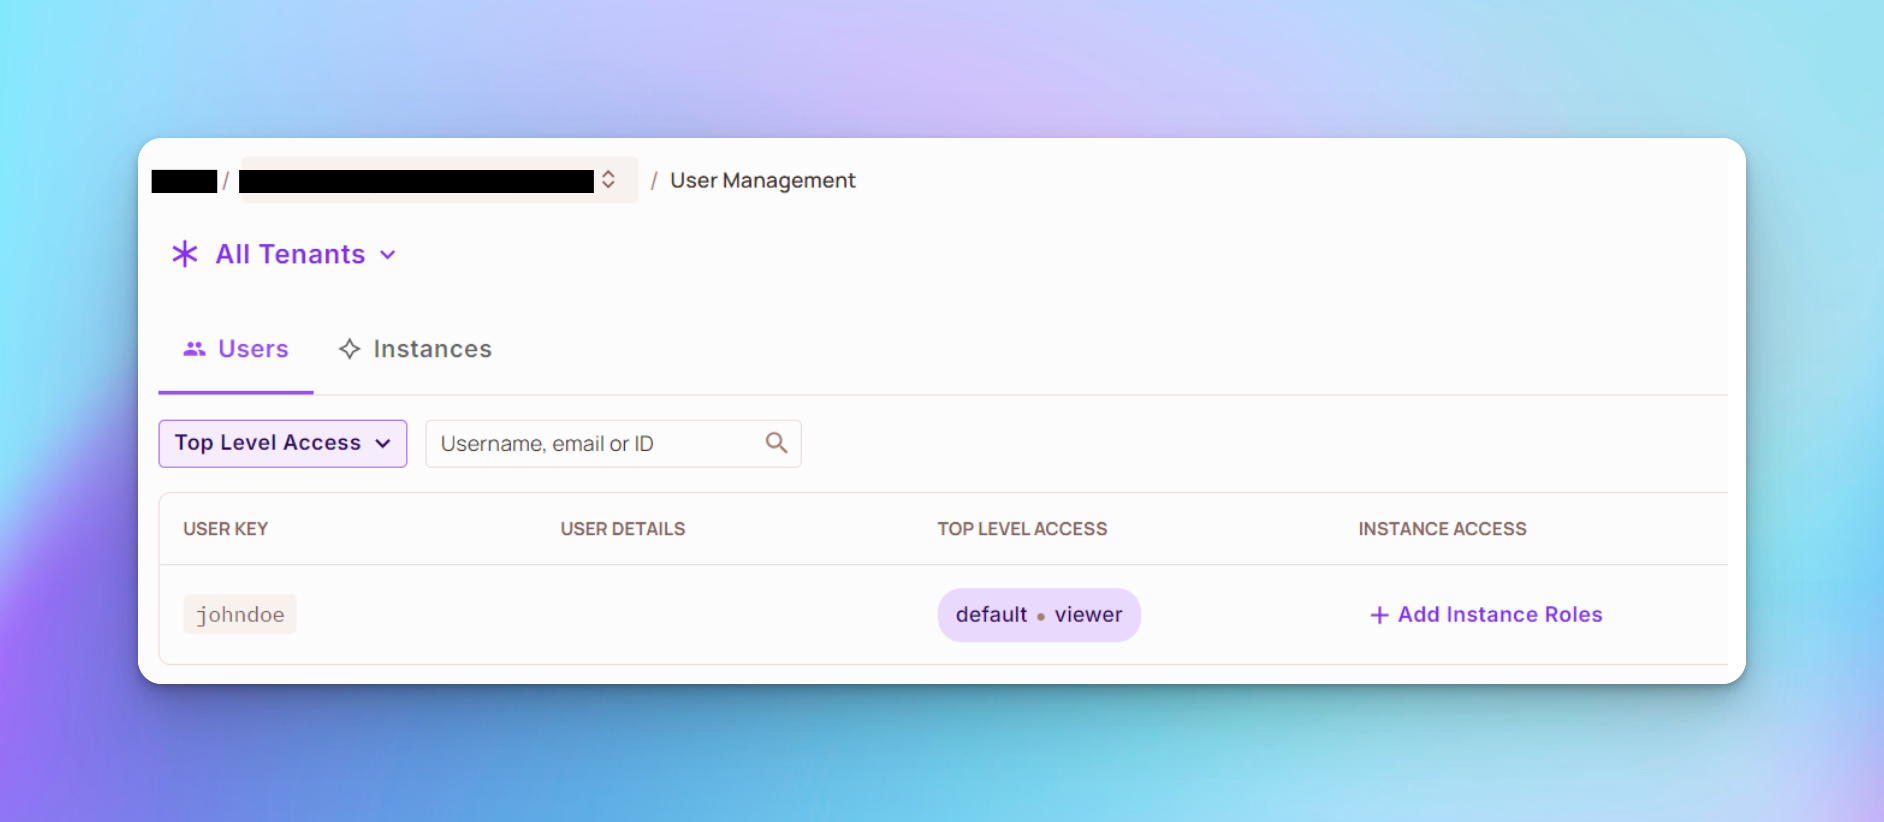
您應該能夠在您的 Permit 项目中,於「目錄 > 所有tenants」下查看該用戶。
最初,用戶沒有任何角色,因此無法做很多事情。例如,嘗試列出產品會導致403禁止回應,如下图所示。403錯誤代碼意味著用戶沒有權限訪問所请求的資源,這 Cases是本例中的產品。您可以在這裡了解更多關於401和403錯誤代碼的差異。

要讓用戶查看產品列表,可以使用以下命令為他們分配 viewer 角色:
curl -X POST "http://localhost:8080/api/users/assign-role" \
-H "Authorization: Bearer johndoe" \
-H "Content-Type: application/json" \
-d 'viewer'
您應該看到用戶 johndoe 已被分配為 viewer 角色,如下所示:
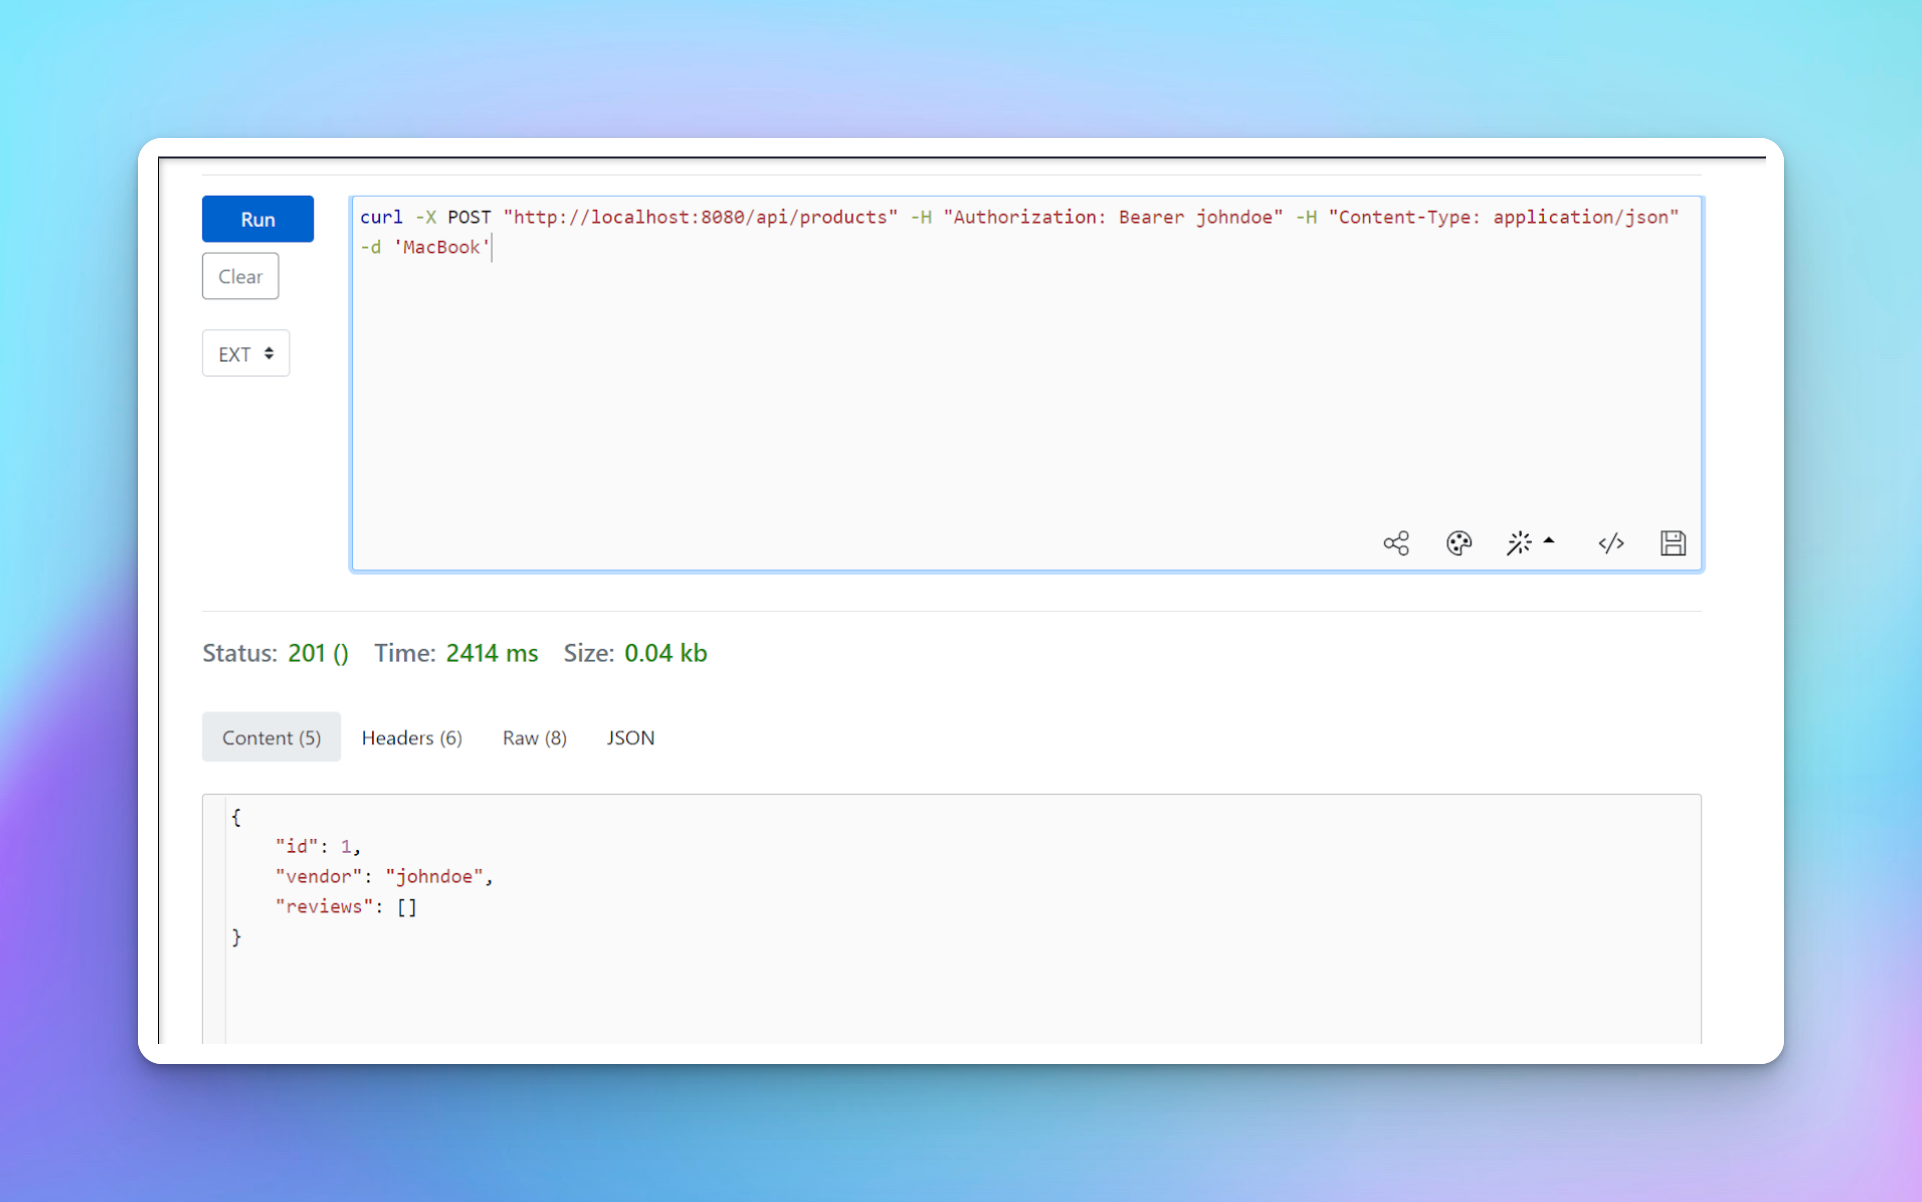
由於 viewer 能夠創建產品,因此可以使用以下命令使用用戶 johndoe 創建產品。
curl -X POST "http://localhost:8080/api/products" -H "Authorization: Bearer johndoe" -H "Content-Type: application/json" -d 'MacBook'
您應該看到已創建一個新产品,其 ID 为 1,並且用戶 johndoe 已作為供應商添加。
向產品添加評論
要向產品添加評論,請創建另一個稱為 jane 的用戶。
curl -X POST "http://localhost:8080/api/users/signup" -H "Content-Type: application/json" -d 'jane'
要讓用戶向產品添加評論,可以使用以下命令為他們分配 viewer 角色:
curl -X POST "http://localhost:8080/api/users/assign-role" \
-H "Authorization: Bearer jane" \
-H "Content-Type: application/json" \
-d 'viewer'
然後您可以使用以下命令向由 johndoe 添加的產品添加評論:
curl -X POST "http://localhost:8080/api/products/1/review" -H "Authorization: Bearer jane" -H "Content-Type: application/json" -d 'The product was in good quality'
恭喜您!您已完成本教程的項目。
下一步
既然您已經學習了如何使用 Permit.io 在您的 Java 和 Spring Boot 應用程序中實現細粒度授權,您可能會想要進一步探索。
這裡有一些寶貴的資源:
在我們結束之前
我希望您認為這篇教程很有價值。
以下是一些我最近的博客文章,您可能會喜歡:
若想了解更多關於惊艳的开发工具的教学,請一定要查看我的部落格 DTA。
在 Twitter 上跟我關注,以獲得我其他项目的实时更新。
祝你編程愉快。
Source:
https://www.freecodecamp.org/news/fine-grained-authorization-in-java-and-springboot/