


在第一部分的本系列中,我們探討了MongoDB,這是最可靠且強大的面向文件的NoSQL數據庫之一。在這裡的第二部分,我們將檢視另一個無法避免的NoSQL數據庫:Elasticsearch。
除了是一個受歡迎且強大的開源分布式NoSQL數據庫之外,Elasticsearch首先是一個搜索和分析了引擎。它基於Apache Lucene建立,這是最著名的搜索引擎Java庫,並能夠對結構化和非結構化數據進行實時搜索和分析操作。它被設計來有效地處理大量數據。
再一次,我們需要聲明這篇短文絕不是一篇關於Elasticsearch的教程。因此,讀者被強烈建議廣泛使用官方文件,以及Madhusudhan Konda(Manning,2023)的優秀著作”Elasticsearch in Action“來了解更多關於產品的架構和操作。在這裡,我們只是重現之前相同的用例,但這次使用的是MongoDB,而不是Elasticsearch。
那麼,我們來吧!
領域模型
下面的圖表顯示了我們的*customer-order-product*領域模型:
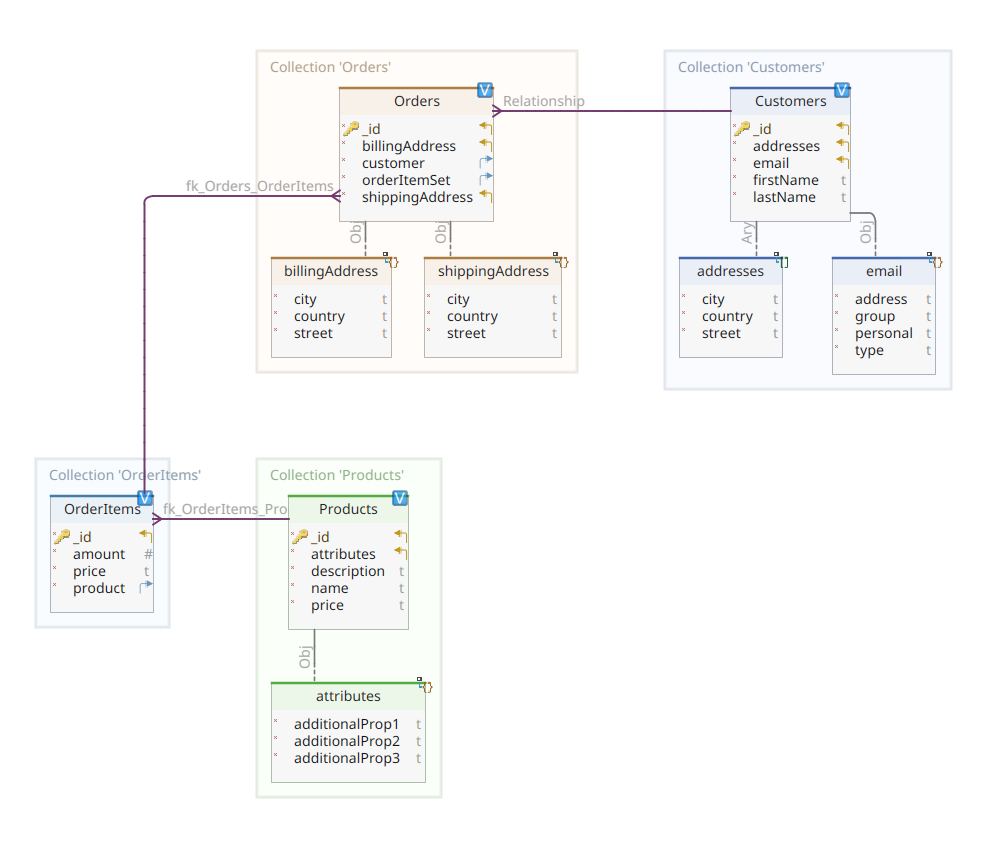
這個圖與第一部分中展示的圖相同。與MongoDB一樣,Elasticsearch也是一個文檔數據存儲,因此它期望文檔以JSON表示法呈現。唯一的區別在於,為了處理其數據,Elasticsearch需要將它們索引。
Elasticsearch數據存儲中有多種方式可以索引數據;例如,從關系數據庫中導入它們,從文件系統中提取它們,從實時源中流式傳輸它們等。但無論數據引入方法是什麼,最終都包含通過專門的客戶端調用Elasticsearch RESTful API。這樣的專門客戶端分為兩大類:
- 基於REST的客戶端,如
curl、Postman、Java、JavaScript、Node.js等的HTTP模塊。 - 編程語言SDK(軟件開發工具包):Elasticsearch為所有最常用的編程語言提供了SDK,包括但不限於Java、Python等。
使用Elasticsearch索引新文檔意味著通過對名為_doc的特殊RESTful API端點發出POST請求來創建它。例如,以下請求將創建一個新的Elasticsearch索引並在其中存儲一個新的客戶實例。
    POST customers/_doc/
    {
      "id": 10,
      "firstName": "John",
      "lastName": "Doe",
      "email": {
        "address": "[email protected]",
        "personal": "John Doe",
        "encodedPersonal": "John Doe",
        "type": "personal",
        "simple": true,
        "group": true
      },
      "addresses": [
        {
          "street": "75, rue Véronique Coulon",
          "city": "Coste",
          "country": "France"
        },
        {
          "street": "Wulfweg 827",
          "city": "Bautzen",
          "country": "Germany"
        }
      ]
}使用curl或Kibana控制台(我們稍後將看到)運行上述請求將產生以下結果:
    {
      "_index": "customers",
      "_id": "ZEQsJI4BbwDzNcFB0ubC",
      "_version": 1,
      "result": "created",
      "_shards": {
        "total": 2,
        "successful": 1,
        "failed": 0
      },
      "_seq_no": 1,
      "_primary_term": 1
    }
這是對POST請求的Elasticsearch標準回應。它確認已創建名為customers的索引,並有一個新的customer文檔,該文檔由系統自動生成的ID(在這個案例中為ZEQsJI4BbwDzNcFB0ubC)標識。
這裡還出現了其他有趣的參數,如_version和特別是_shards。無需過於詳盡地說明,Elasticsearch將索引創建為文檔的邏輯集合。就像將紙質文檔保存在文件櫃中一樣,Elasticsearch將文檔保存在索引中。每個索引由碎片(shards),組成,這些碎片是Apache Lucene的物理實例,負責在存儲中存取數據。它們可以是主要(primary)的,用於存儲文檔,或者是副本(replicas),正如其名所示,用於存儲主要碎片的副本。更多關於這方面的信息可以在Elasticsearch文檔中找到 – 當前,我們需要關注的是我們名為customers的索引由兩個碎片組成:當然,其中一個是主要的。
A final notice: the POST request above doesn’t mention the ID value as it is automatically generated. While this is probably the most common use case, we could have provided our own ID value. In each case, the HTTP request to be used isn’t POST anymore, but PUT.
回到我們的域模型圖,如您所見,它的中心文檔是Order,存儲在一個名為Orders的專門集合中。一個Order是OrderItem文檔的聚合,每個OrderItem都指向其相關的Product。一個Order文檔也引用了放置訂單的Customer。在Java中,這是這樣實現的:
    public class Customer
    {
      private Long id;
      private String firstName, lastName;
      private InternetAddress email;
      private Set<Address> addresses;
      ...
    }
上述代碼顯示了Customer類別的一個片段。這是一個簡單的POJO(Plain Old Java Object),具有如客戶ID、名和姓、電子郵件地址以及一組郵政地址等屬性。
讓我們現在來看看Order文件。
    public class Order
    {
      private Long id;
      private String customerId;
      private Address shippingAddress;
      private Address billingAddress;
      private Set<String> orderItemSet = new HashSet<>()
      ...
    }
在這裡,你可以注意到與MongoDB版本相比有一些差異。實際上,使用MongoDB時,我們使用的是與此訂單相關聯的客戶實例的引用。Elasticsearch中不存在這種引用概念,因此,我們使用此文件ID來在訂單和下訂的客戶之間建立關聯。同樣的,這也適用於orderItemSet屬性,它建立了訂單及其項目之間的關聯。
我們的剩餘領域模型非常相似,並基於同樣的規範化思想。例如,OrderItem文件:
    public class OrderItem
    {
      private String id;
      private String productId;
      private BigDecimal price;
      private int amount;
      ...
    }
在這裡,我們需要將產品與當前訂單項目相關聯。最後但同樣重要的是,我們有Product文件:
    public class Product
    {
      private String id;
      private String name, description;
      private BigDecimal price;
      private Map<String, String> attributes = new HashMap<>();
      ...
    }
數據倉庫
Quarkus Panache 大大地簡化了數據持久化的過程,它支持活動記錄和倉庫設計模式。在第1部分中,我們使用 Quarkus Panache 的 MongoDB 擴展來實現我們的數據倉庫,但目前還沒有針對 Elasticsearch 的等效 Quarkus Panache 擴展。因此,在等待可能的未來為 Elasticsearch 提供的 Quarkus 擴展時,我們這裡必須使用 Elasticsearch 專用的客戶端手動實現我們的數據倉庫。
Elasticsearch 是用 Java 寫的,因此毫不奇怪它提供了使用 Java 客戶端庫調用 Elasticsearch API 的本地支持。這個庫基於流暢 API 建構者設計模式,並提供了同步和異步處理模型。它至少需要 Java 8。
那麼,基於流暢 API 建構者的數據倉庫長什麼樣呢?以下是CustomerServiceImpl類的摘錄,該類作為Customer文件的數據倉庫。
    @ApplicationScoped
    public class CustomerServiceImpl implements CustomerService
    {
      private static final String INDEX = "customers";

      @Inject
      ElasticsearchClient client;

      @Override
      public String doIndex(Customer customer) throws IOException
      {
        return client.index(IndexRequest.of(ir -> ir.index(INDEX).document(customer))).id();
      }
      ...
我們可以看到,我們的數據倉庫實現必須是一個應用程序範疇的 CDI 豐富型,Elasticsearch Java 客戶端簡單地被注入,這要感謝quarkus-elasticsearch-java-client Quarkus 擴展。這種方式避免了我們否則必須使用的大量複雜功能。我們唯一需要聲明以能夠注入客戶端的是以下屬性:
quarkus.elasticsearch.hosts = elasticsearch:9200在這裡,elasticsearch 是我們在 docker-compose.yaml 檔案中與 Elastic search 資料庫伺服器關聯的 DNS(域名伺服器)名稱。9200 是伺服器用於監聽連接的 TCP 埠號。
上面 的 doIndex() 方法會在不存在時創建一個名為 customers 的新索引,並將代表 Customer 類實例的新文檔索引(存儲)到其中。索引過程是基於一個接受索引名和文檔正文作為輸入參數的 IndexRequest 來執行的。至於文檔 ID,它會自動生成並返回給調用者以供進一步參考。
下面的方法允許通過作為輸入參數給定的 ID 查找客戶:
      ...
      @Override
      public Customer getCustomer(String id) throws IOException
      {
        GetResponse<Customer> getResponse = client.get(GetRequest.of(gr -> gr.index(INDEX).id(id)), Customer.class);
        return getResponse.found() ? getResponse.source() : null;
      }
      ...
原則是相同的:使用這個 流式 API 建構模式,我們以與 IndexRequest 相同的方式構建一個 GetRequest 實例,並通過 Elasticsearch Java 客戶端運行它。我們數據倉庫的其他端點,允許我們進行完整的搜索操作或更新和刪除客戶,都是用同樣的方式設計的。
請花一些時間查看代碼以了解事物是如何運作的。
REST API
我們的MongoDB REST API接口很簡單就能實現,這要感謝quarkus-mongodb-rest-data-panache擴展,其中的注釋處理器自動生成了所有必需的端點。使用Elasticsearch時,我們還沒有享受到同樣的便利,因此需要手動實現。這不是大問題,因為我們可以注入之前數據倉庫的內容,如下所示:
    @Path("customers")
    @Produces(APPLICATION_JSON)
    @Consumes(APPLICATION_JSON)
    public class CustomerResourceImpl implements CustomerResource
    {
      @Inject
      CustomerService customerService;

      @Override
      public Response createCustomer(Customer customer, @Context UriInfo uriInfo) throws IOException
      {
        return Response.accepted(customerService.doIndex(customer)).build();
      }

      @Override
      public Response findCustomerById(String id) throws IOException
      {
        return Response.ok().entity(customerService.getCustomer(id)).build();
      }

      @Override
      public Response updateCustomer(Customer customer) throws IOException
      {
        customerService.modifyCustomer(customer);
        return Response.noContent().build();
      }

      @Override
      public Response deleteCustomerById(String id) throws IOException
      {
        customerService.removeCustomerById(id);
        return Response.noContent().build();
      }
    }
這是客戶REST API的實現。與訂單、訂單項目和產品相關的其他API實現類似。
現在讓我們看看如何運行和測試整個東西。
運行和測試我們的微服務
現在看我們實現的細節,讓我們看看如何運行和測試它。我們選擇使用docker-compose工具來進行。這是相關的docker-compose.yml文件:
    version: "3.7"
    services:
      elasticsearch:
        image: elasticsearch:8.12.2
        environment:
          node.name: node1
          cluster.name: elasticsearch
          discovery.type: single-node
          bootstrap.memory_lock: "true"
          xpack.security.enabled: "false"
          path.repo: /usr/share/elasticsearch/backups
          ES_JAVA_OPTS: -Xms512m -Xmx512m
        hostname: elasticsearch
        container_name: elasticsearch
        ports:
          - "9200:9200"
          - "9300:9300"
        ulimits:
        memlock:
          soft: -1
          hard: -1
        volumes:
          - node1-data:/usr/share/elasticsearch/data
        networks:
          - elasticsearch
      kibana:
        image: docker.elastic.co/kibana/kibana:8.6.2
        hostname: kibana
        container_name: kibana
        environment:
          - elasticsearch.url=http://elasticsearch:9200
          - csp.strict=false
        ulimits:
          memlock:
            soft: -1
            hard: -1
        ports:
          - 5601:5601
        networks:
          - elasticsearch
        depends_on:
          - elasticsearch
        links:
          - elasticsearch:elasticsearch
      docstore:
        image: quarkus-nosql-tests/docstore-elasticsearch:1.0-SNAPSHOT
        depends_on:
          - elasticsearch
          - kibana
        hostname: docstore
        container_name: docstore
        links:
          - elasticsearch:elasticsearch
          - kibana:kibana
        ports:
          - "8080:8080"
           - "5005:5005"
        networks:
          - elasticsearch
        environment:
          JAVA_DEBUG: "true"
          JAVA_APP_DIR: /home/jboss
          JAVA_APP_JAR: quarkus-run.jar
    volumes:
      node1-data:
      driver: local
    networks:
      elasticsearch:
這個文件指示docker-compose工具運行三個服務:
- A service named
elasticsearchrunning the Elasticsearch 8.6.2 database - A service named
kibanarunning the multipurpose web console providing different options such as executing queries, creating aggregations, and developing dashboards and graphs - A service named
docstorerunning our Quarkus microservice
現在,您可以檢查所有必需的進程是否正在運行:
    $ docker ps
    CONTAINER ID   IMAGE                                                     COMMAND                  CREATED      STATUS      PORTS                                                                                            NAMES
    005ab8ebf6c0   quarkus-nosql-tests/docstore-elasticsearch:1.0-SNAPSHOT   "/opt/jboss/containe…"   3 days ago   Up 3 days   0.0.0.0:5005->5005/tcp, :::5005->5005/tcp, 0.0.0.0:8080->8080/tcp, :::8080->8080/tcp, 8443/tcp   docstore
    9678c0a04307   docker.elastic.co/kibana/kibana:8.6.2                     "/bin/tini -- /usr/l…"   3 days ago   Up 3 days   0.0.0.0:5601->5601/tcp, :::5601->5601/tcp                                                        kibana
    805eba38ff6c   elasticsearch:8.12.2                                      "/bin/tini -- /usr/l…"   3 days ago   Up 3 days   0.0.0.0:9200->9200/tcp, :::9200->9200/tcp, 0.0.0.0:9300->9300/tcp, :::9300->9300/tcp             elasticsearch
    $
為了確認Elasticsearch服務器可用並能夠運行查詢,您可以連接到Kibana,訪問http://localhost:601。在頁面下滑並在偏好設置菜單中選擇Dev Tools後,您可以運行如下所示的查詢:

為了測試微服務,請按照以下步驟操作:
1. 克隆相關的GitHub倉庫:
$ git clone https://github.com/nicolasduminil/docstore.git2. 前往項目:
$ cd docstore3. 切換到正確的分支:
$ git checkout elastic-search4. 瀏覽:
$ mvn clean install5. 運行集成測試:
$ mvn -DskipTests=false failsafe:integration-test這最後一個命令將運行提供的17個整合測試,它們應該都會成功。您也可以使用Swagger UI界面進行測試,方法是在您偏好的瀏覽器中訪問 http://localhost:8080/q:swagger-ui。然後,為了測試端點,您可以使用位於 docstore-api 專案的 src/resources/data 目錄中的JSON文件中的payload。
享受吧!
Source:
https://dzone.com/articles/cruding-nosql-data-with-quarkus-part-two-elasticse