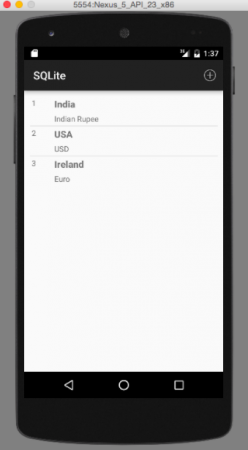
歡迎來到 Android SQLite 實例教程。Android SQLite 是存儲 Android 應用程序數據的首選方式。對於許多應用程序來說,SQLite 是應用程序的支柱,無論是直接使用還是通過某些第三方封裝器。以下是我們今天將使用 Android SQLite 數據庫創建的最終應用程序。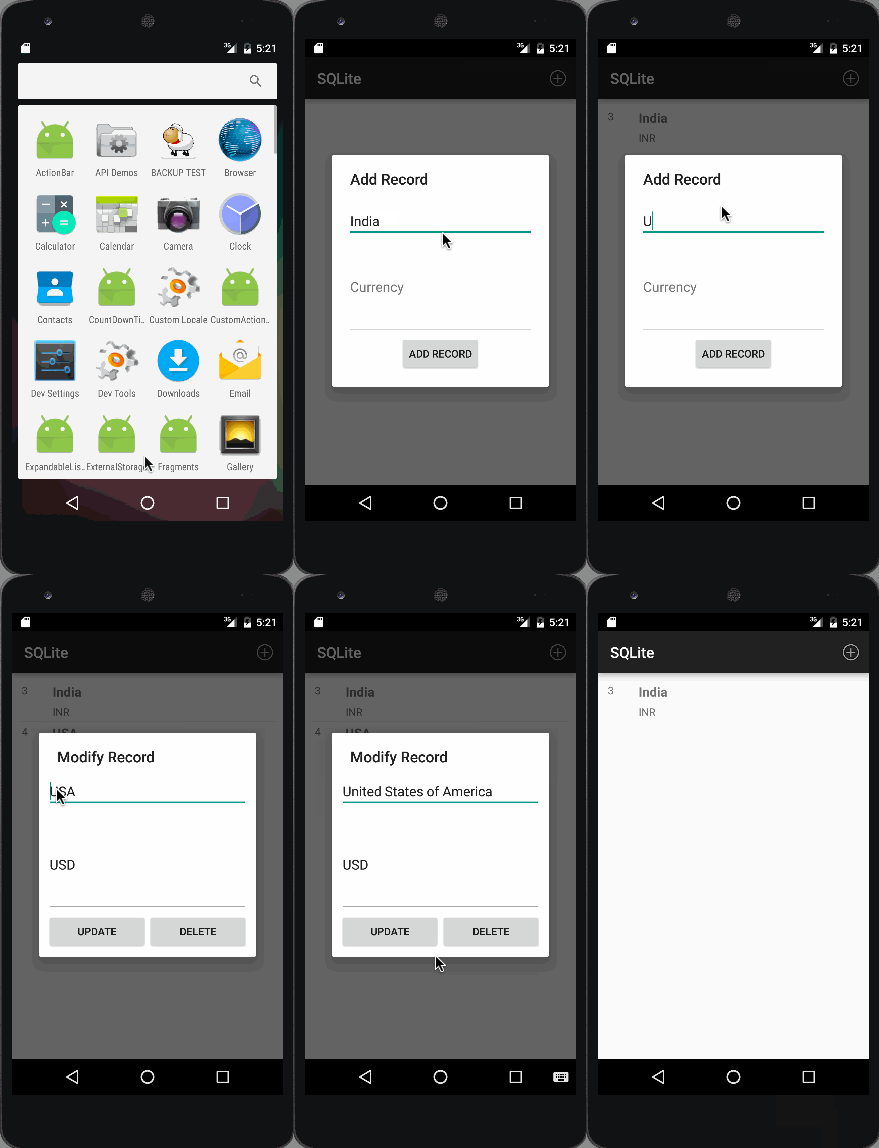
Android SQLite
Android SQLite 是一個非常輕量級的數據庫,它隨 Android OS 一起提供。Android SQLite 將清潔的 SQL 接口與非常小的內存佔用和適度的速度相結合。對於 Android,SQLite 是“內置於” Android 運行時中的,因此每個 Android 應用程序都可以創建自己的 SQLite 數據庫。Android SQLite 原生 API 不是 JDBC,因為對於內存受限的智能手機來說,JDBC 可能是太多的開銷。一旦成功創建了數據庫,它將位於 data/data//databases/,可從 Android 設備監視器中訪問。SQLite 是一個典型的 關聯數據庫,包含表(由行和列組成)、索引等。我們可以創建自己的表來按照需要保存數據。這種結構被稱為一個 模式。
Android SQLite SQLiteOpenHelper
Android 具有可用於處理變更的數據庫架構的功能,主要依賴於使用 SQLiteOpenHelper 類。 SQLiteOpenHelper 設計用於消除兩個非常常見的問題。
- 當應用程式第一次運行時 – 此時,我們尚未擁有數據庫。因此,我們將不得不創建表、索引、起始數據等。
- 當應用程式升級到新的架構時 – 我們的數據庫仍將保留在舊版應用程式的舊架構上。我們將有選擇來修改數據庫架構,以滿足應用程式其餘部分的需求。
SQLiteOpenHelper 封裝了這些邏輯,以根據我們的規格創建和升級數據庫。為此,我們需要創建 SQLiteOpenHelper 的自定義子類,至少實現以下三個方法。
-
構造函數:它接受上下文(例如,一個活動)、數據庫的名稱、可選的游標工廠(我們稍後會討論此問題)以及表示您正在使用的數據庫架構版本的整數(通常從 1 開始,然後增加)。
public DatabaseHelper(Context context) { super(context, DB_NAME, null, DB_VERSION); } -
onCreate(SQLiteDatabase db):當沒有數據庫且應用程序需要一個時調用它。它傳遞給我們一個
SQLiteDatabase對象,指向一個新創建的數據庫,我們可以用表和初始數據填充它。 -
onUpgrade(SQLiteDatabase db, int oldVersion, int newVersion):當我們需要的模式版本與數據庫的模式版本不匹配時調用它。它傳遞給我們一個SQLiteDatabase對象以及舊版本和新版本號。因此,我們可以找出將數據庫從舊模式轉換為新模式的最佳方法。
我們定義一個DBManager類來執行所有數據庫的CRUD(Create、Read、Update和Delete)操作。
打開和關閉 Android SQLite 資料庫連接
在執行任何資料庫操作之前,例如在表中插入、更新、刪除記錄,首先要通過調用getWritableDatabase()方法來打開資料庫連接,如下所示:
public DBManager open() throws SQLException {
        dbHelper = new DatabaseHelper(context);
        database = dbHelper.getWritableDatabase();
        return this;
    }
dbHelper是SQLiteOpenHelper子類的一個實例。要關閉資料庫連接,調用以下方法。
 public void close() {
        dbHelper.close();
    }
在 Android SQLite 資料庫表中插入新記錄
以下代碼片段顯示了如何在 Android SQLite 資料庫中插入新記錄。
public void insert(String name, String desc) {
        ContentValues contentValue = new ContentValues();
        contentValue.put(DatabaseHelper.SUBJECT, name);
        contentValue.put(DatabaseHelper.DESC, desc);
        database.insert(DatabaseHelper.TABLE_NAME, null, contentValue);
    }
Content Values使用給定的初始大小創建一個空的值集。我們將在編碼部分進行討論其他實例值。
在 Android SQLite 資料庫表中更新記錄
下面的程式碼片段顯示了如何更新單個記錄。
public int update(long _id, String name, String desc) {
        ContentValues contentValues = new ContentValues();
        contentValues.put(DatabaseHelper.SUBJECT, name);
        contentValues.put(DatabaseHelper.DESC, desc);
        int i = database.update(DatabaseHelper.TABLE_NAME, contentValues, DatabaseHelper._ID + " = " + _id, null);
        return i;
    }
Android SQLite – 刪除記錄
我們只需要像下面所示地傳遞要刪除的記錄的 id。
public void delete(long _id) {
        database.delete(DatabaseHelper.TABLE_NAME, DatabaseHelper._ID + "=" + _id, null);
    }
Android SQLite Cursor
A Cursor represents the entire result set of the query. Once the query is fetched a call to cursor.moveToFirst() is made. Calling moveToFirst() does two things:
- 它允許我們測試查詢是否返回了空集(通過測試返回值)
- 它將游標移到第一個結果(當集不為空時)
以下代碼用於提取所有記錄:
 public Cursor fetch() {
        String[] columns = new String[] { DatabaseHelper._ID, DatabaseHelper.SUBJECT, DatabaseHelper.DESC };
        Cursor cursor = database.query(DatabaseHelper.TABLE_NAME, columns, null, null, null, null, null);
        if (cursor != null) {
            cursor.moveToFirst();
        }
        return cursor;
    }
使用 Cursor 的另一種方式是將其封裝在 CursorAdapter 中。就像 ArrayAdapter 適應數組一樣,CursorAdapter 適應 Cursor 對象,使它們的數據可用於像 ListView 這樣的 AdapterView。讓我們跳轉到使用 SQLite 存儲一些有意義數據的項目。
Android SQLite 範例項目結構
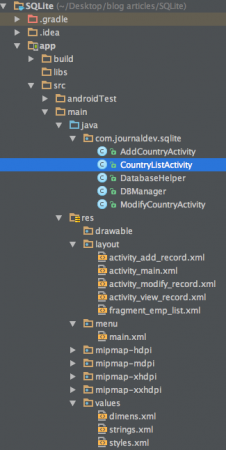 在這個應用程式中,我們希望創建一個記錄,以ListView的形式存儲國家名稱及其相應的貨幣。我們涵蓋了上面討論的所有功能。
Android SQLite 項目代碼
該應用程式由5個類組成。我們首先定義了DatabaseHelper,它是SQLiteOpenHelper的子類,如下所示:DatabaseHelper.java
package com.journaldev.sqlite;

import android.content.Context;
import android.database.sqlite.SQLiteDatabase;
import android.database.sqlite.SQLiteOpenHelper;

public class DatabaseHelper extends SQLiteOpenHelper {

    // 表名稱
    public static final String TABLE_NAME = "COUNTRIES";

    // 表列
    public static final String _ID = "_id";
    public static final String SUBJECT = "subject";
    public static final String DESC = "description";

    // 數據庫信息
    static final String DB_NAME = "JOURNALDEV_COUNTRIES.DB";

    // 數據庫版本
    static final int DB_VERSION = 1;

    // 創建表查詢
    private static final String CREATE_TABLE = "create table " + TABLE_NAME + "(" + _ID
            + " INTEGER PRIMARY KEY AUTOINCREMENT, " + SUBJECT + " TEXT NOT NULL, " + DESC + " TEXT);";

    public DatabaseHelper(Context context) {
        super(context, DB_NAME, null, DB_VERSION);
    }

    @Override
    public void onCreate(SQLiteDatabase db) {
        db.execSQL(CREATE_TABLE);
    }

    @Override
    public void onUpgrade(SQLiteDatabase db, int oldVersion, int newVersion) {
        db.execSQL("DROP TABLE IF EXISTS " + TABLE_NAME);
        onCreate(db);
    }
}
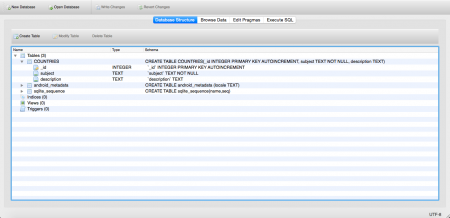
如上所述,我們除了構造函數之外,還覆蓋了onCreate()和onUpgrade()方法。我們將數據庫和表的名稱分別設置為JOURNALDEV_COUNTRIES.DB和COUNTRIES。索引列在插入新行時自動增加。國家和貨幣的列名分別為“subject”和“description”。DBManager類是初始化DatabaseHelper並定義CRUD操作的地方。以下是此類的代碼:DBManager.java
package com.journaldev.sqlite;


import android.content.ContentValues;
import android.content.Context;
import android.database.Cursor;
import android.database.SQLException;
import android.database.sqlite.SQLiteDatabase;

public class DBManager {

    private DatabaseHelper dbHelper;

    private Context context;

    private SQLiteDatabase database;

    public DBManager(Context c) {
        context = c;
    }

    public DBManager open() throws SQLException {
        dbHelper = new DatabaseHelper(context);
        database = dbHelper.getWritableDatabase();
        return this;
    }

    public void close() {
        dbHelper.close();
    }

    public void insert(String name, String desc) {
        ContentValues contentValue = new ContentValues();
        contentValue.put(DatabaseHelper.SUBJECT, name);
        contentValue.put(DatabaseHelper.DESC, desc);
        database.insert(DatabaseHelper.TABLE_NAME, null, contentValue);
    }

    public Cursor fetch() {
        String[] columns = new String[] { DatabaseHelper._ID, DatabaseHelper.SUBJECT, DatabaseHelper.DESC };
        Cursor cursor = database.query(DatabaseHelper.TABLE_NAME, columns, null, null, null, null, null);
        if (cursor != null) {
            cursor.moveToFirst();
        }
        return cursor;
    }

    public int update(long _id, String name, String desc) {
        ContentValues contentValues = new ContentValues();
        contentValues.put(DatabaseHelper.SUBJECT, name);
        contentValues.put(DatabaseHelper.DESC, desc);
        int i = database.update(DatabaseHelper.TABLE_NAME, contentValues, DatabaseHelper._ID + " = " + _id, null);
        return i;
    }

    public void delete(long _id) {
        database.delete(DatabaseHelper.TABLE_NAME, DatabaseHelper._ID + "=" + _id, null);
    }

}
CountryListActivity.java類別是應用程式啟動時啟動的活動。以下是為其定義的佈局:fragment_emp_list.xml
<?xml version="1.0" encoding="utf-8"?>
<RelativeLayout xmlns:android="https://schemas.android.com/apk/res/android"
    android:layout_width="fill_parent"
    android:layout_height="fill_parent" >

    <ListView
        android:id="@+id/list_view"
        android:layout_width="match_parent"
        android:layout_height="wrap_content"
        android:dividerHeight="1dp"
        android:padding="10dp" >
    </ListView>

    <TextView
        android:id="@+id/empty"
        android:layout_width="wrap_content"
        android:layout_height="wrap_content"
        android:layout_centerInParent="true"
        android:text="@string/empty_list_text" />

</RelativeLayout>
這裡定義了一個ListView元件,用於包含存儲在數據庫中的記錄。最初,ListView將是空的,因此使用TextView來顯示相同的內容。CountryListActivity.java
package com.journaldev.sqlite;

import android.content.Intent;
import android.database.Cursor;
import android.os.Bundle;
import android.support.v4.widget.SimpleCursorAdapter;
import android.support.v7.app.ActionBarActivity;
import android.view.Menu;
import android.view.MenuItem;
import android.view.View;
import android.widget.AdapterView;
import android.widget.ListView;
import android.widget.TextView;

public class CountryListActivity extends ActionBarActivity {

    private DBManager dbManager;

    private ListView listView;

    private SimpleCursorAdapter adapter;

    final String[] from = new String[] { DatabaseHelper._ID,
            DatabaseHelper.SUBJECT, DatabaseHelper.DESC };

    final int[] to = new int[] { R.id.id, R.id.title, R.id.desc };

    @Override
    protected void onCreate(Bundle savedInstanceState) {
        super.onCreate(savedInstanceState);

        setContentView(R.layout.fragment_emp_list);

        dbManager = new DBManager(this);
        dbManager.open();
        Cursor cursor = dbManager.fetch();

        listView = (ListView) findViewById(R.id.list_view);
        listView.setEmptyView(findViewById(R.id.empty));

        adapter = new SimpleCursorAdapter(this, R.layout.activity_view_record, cursor, from, to, 0);
        adapter.notifyDataSetChanged();

        listView.setAdapter(adapter);

        // 為列表項目添加的 OnCLickListiner
        listView.setOnItemClickListener(new AdapterView.OnItemClickListener() {
            @Override
            public void onItemClick(AdapterView parent, View view, int position, long viewId) {
                TextView idTextView = (TextView) view.findViewById(R.id.id);
                TextView titleTextView = (TextView) view.findViewById(R.id.title);
                TextView descTextView = (TextView) view.findViewById(R.id.desc);

                String id = idTextView.getText().toString();
                String title = titleTextView.getText().toString();
                String desc = descTextView.getText().toString();

                Intent modify_intent = new Intent(getApplicationContext(), ModifyCountryActivity.class);
                modify_intent.putExtra("title", title);
                modify_intent.putExtra("desc", desc);
                modify_intent.putExtra("id", id);

                startActivity(modify_intent);
            }
        });
    }

    @Override
    public boolean onCreateOptionsMenu(Menu menu) {
        getMenuInflater().inflate(R.menu.main, menu);
        return true;
    }

    @Override
    public boolean onOptionsItemSelected(MenuItem item) {

        int id = item.getItemId();
        if (id == R.id.add_record) {

            Intent add_mem = new Intent(this, AddCountryActivity.class);
            startActivity(add_mem);

        }
        return super.onOptionsItemSelected(item);
    }

}
在此活動中,調用了DBManager對象來執行CRUD操作。定義了SimpleCursorAdapter來從查詢結果中返回的Cursor對象中添加元素到列表中。點擊列表項目時,執行一個意圖來打開ModifyCountryActivity類。菜單中包含一個從操作欄添加新記錄的項目。再次執行一個意圖來打開AddCountryActivity類。以下是menu.xml代碼。menu.xml
<menu xmlns:android="https://schemas.android.com/apk/res/android"
    xmlns:app="https://schemas.android.com/apk/res-auto"
    xmlns:tools="https://schemas.android.com/tools"
    tools:context="com.example.sqlitesample.MainActivity" >

    <item
        android:id="@+id/add_record"
        android:icon="@android:drawable/ic_menu_add"
        android:orderInCategory="100"
        android:title="@string/add_record"
        app:showAsAction="always"/>

</menu>
下面是AddCountryActivity.java文件的xml佈局和代碼:activity_add_record.xml
<?xml version="1.0" encoding="utf-8"?>
<LinearLayout xmlns:android="https://schemas.android.com/apk/res/android"
    android:layout_width="match_parent"
    android:layout_height="match_parent"
    android:orientation="vertical"
    android:padding="20dp" >

    <EditText
        android:id="@+id/subject_edittext"
        android:layout_width="match_parent"
        android:layout_height="wrap_content"
        android:ems="10"
        android:hint="@string/enter_title" >

        <requestFocus />
    </EditText>

    <EditText
        android:id="@+id/description_edittext"
        android:layout_width="match_parent"
        android:layout_height="wrap_content"
        android:ems="10"
        android:hint="@string/enter_desc"
        android:inputType="textMultiLine"
        android:minLines="5" >
    </EditText>

    <Button
        android:id="@+id/add_record"
        android:layout_width="wrap_content"
        android:layout_height="wrap_content"
        android:layout_gravity="center"
        android:text="@string/add_record" />

</LinearLayout>
定義了兩個EditText元件,用於接收國家和貨幣的輸入,以及一個按鈕,將值添加到數據庫並在ListView中顯示。 AddCountryActivity.java
package com.journaldev.sqlite;

import android.app.Activity;
import android.content.Intent;
import android.os.Bundle;
import android.view.View;
import android.view.View.OnClickListener;
import android.widget.Button;
import android.widget.EditText;

public class AddCountryActivity extends Activity implements OnClickListener {

    private Button addTodoBtn;
    private EditText subjectEditText;
    private EditText descEditText;

    private DBManager dbManager;

    @Override
    protected void onCreate(Bundle savedInstanceState) {
        super.onCreate(savedInstanceState);

        setTitle("Add Record");

        setContentView(R.layout.activity_add_record);

        subjectEditText = (EditText) findViewById(R.id.subject_edittext);
        descEditText = (EditText) findViewById(R.id.description_edittext);

        addTodoBtn = (Button) findViewById(R.id.add_record);

        dbManager = new DBManager(this);
        dbManager.open();
        addTodoBtn.setOnClickListener(this);
    }

    @Override
    public void onClick(View v) {
        switch (v.getId()) {
            case R.id.add_record:

                final String name = subjectEditText.getText().toString();
                final String desc = descEditText.getText().toString();

                dbManager.insert(name, desc);

                Intent main = new Intent(AddCountryActivity.this, CountryListActivity.class)
                        .setFlags(Intent.FLAG_ACTIVITY_CLEAR_TOP);

                startActivity(main);
                break;
        }
    }

}
在這裡執行的CRUD操作是向數據庫添加新記錄。ModifyCountryActivity.java文件的xml佈局和代碼如下:activity_modify_record.xml
<?xml version="1.0" encoding="utf-8"?>
<LinearLayout xmlns:android="https://schemas.android.com/apk/res/android"
    android:layout_width="match_parent"
    android:layout_height="match_parent"
    android:orientation="vertical"
    android:padding="10dp" >

    <EditText
        android:id="@+id/subject_edittext"
        android:layout_width="match_parent"
        android:layout_height="wrap_content"
        android:layout_marginBottom="10dp"
        android:ems="10"
        android:hint="@string/enter_title" />

    <EditText
        android:id="@+id/description_edittext"
        android:layout_width="match_parent"
        android:layout_height="wrap_content"
        android:ems="10"
        android:hint="@string/enter_desc"
        android:inputType="textMultiLine"
        android:minLines="5" >
    </EditText>


    <LinearLayout
        android:layout_width="fill_parent"
        android:layout_height="wrap_content"
        android:weightSum="2"
        android:gravity="center_horizontal"
        android:orientation="horizontal" >

        <Button
            android:id="@+id/btn_update"
            android:layout_width="wrap_content"
            android:layout_height="wrap_content"
            android:layout_weight="1"
            android:text="@string/btn_update" />

        <Button
            android:id="@+id/btn_delete"
            android:layout_width="wrap_content"
            android:layout_height="wrap_content"
            android:layout_weight="1"
            android:text="@string/btn_delete" />
    </LinearLayout>

</LinearLayout>
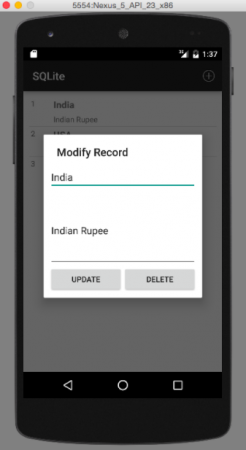
與前一個佈局相似,只是添加了修改和刪除按鈕。ModifyCountryActivity.java
package com.journaldev.sqlite;

import android.app.Activity;
import android.content.Intent;
import android.os.Bundle;
import android.view.View;
import android.view.View.OnClickListener;
import android.widget.Button;
import android.widget.EditText;

public class ModifyCountryActivity extends Activity implements OnClickListener {

    private EditText titleText;
    private Button updateBtn, deleteBtn;
    private EditText descText;

    private long _id;

    private DBManager dbManager;

    @Override
    protected void onCreate(Bundle savedInstanceState) {
        super.onCreate(savedInstanceState);

        setTitle("Modify Record");

        setContentView(R.layout.activity_modify_record);

        dbManager = new DBManager(this);
        dbManager.open();

        titleText = (EditText) findViewById(R.id.subject_edittext);
        descText = (EditText) findViewById(R.id.description_edittext);

        updateBtn = (Button) findViewById(R.id.btn_update);
        deleteBtn = (Button) findViewById(R.id.btn_delete);

        Intent intent = getIntent();
        String id = intent.getStringExtra("id");
        String name = intent.getStringExtra("title");
        String desc = intent.getStringExtra("desc");

        _id = Long.parseLong(id);

        titleText.setText(name);
        descText.setText(desc);

        updateBtn.setOnClickListener(this);
        deleteBtn.setOnClickListener(this);
    }

    @Override
    public void onClick(View v) {
        switch (v.getId()) {
            case R.id.btn_update:
                String title = titleText.getText().toString();
                String desc = descText.getText().toString();

                dbManager.update(_id, title, desc);
                this.returnHome();
                break;

            case R.id.btn_delete:
                dbManager.delete(_id);
                this.returnHome();
                break;
        }
    }

    public void returnHome() {
        Intent home_intent = new Intent(getApplicationContext(), CountryListActivity.class)
                .setFlags(Intent.FLAG_ACTIVITY_CLEAR_TOP);
        startActivity(home_intent);
    }
}
以下是在此執行的 CRUD 操作中更新和刪除記錄。以下圖像是我們專案的最終輸出的截圖。第一張圖片是在應用程式首次啟動時看到的輸出。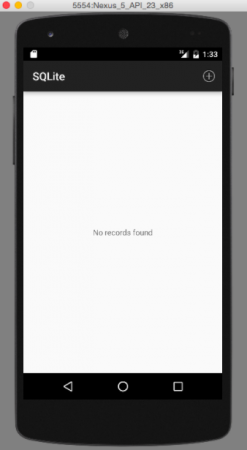 第二張圖片是從 ActionBar 點擊選單選項以新增記錄的結果,如下所示。
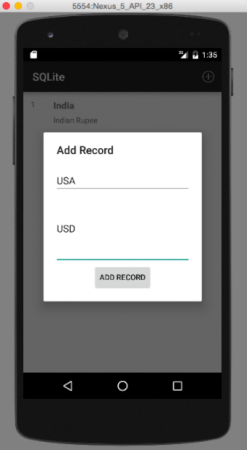 第三張圖片顯示在添加 3 條記錄時的輸出:
 第四張圖片顯示了點擊任何列表項以修改或刪除記錄時的輸出:
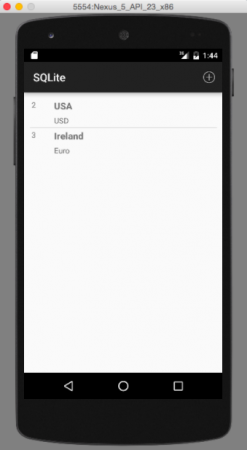
 最後一張圖片是在刪除記錄時的輸出。在這個例子中,我們刪除了第一條記錄:
打開 Android SQLite 數據庫文件
根據我們先前在本教程中討論的,數據庫文件存儲在內部存儲器中,可以通過Android Device Monitor訪問,如下圖所示。  為了查看此數據庫,我們需要將此文件從設備上拉到我們的桌面。這可以通過單擊右上角的菜單選項來完成,如下圖所示:
 為了打開此文件,請從this鏈接下載SQLiteBrowser。下面的片段展示了瀏覽器中的模式和表。
  要查看表,轉到頂部的“瀏覽數據”選項卡。下面的圖片顯示了這一點:
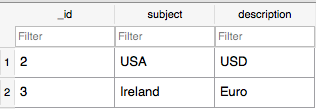 這結束了Android SQLite教程。最終的Android SQLite項目可以從以下鏈接下載。
Source:
https://www.digitalocean.com/community/tutorials/android-sqlite-database-example-tutorial


