


在本教程中,我們將討論 Android Intents 並在我們的應用程序中使用 Kotlin 實現它們。
您將學到什麼?
- 什麼是 Intents?
- Intents 的類型?
- 在活動之間使用 Intents
- 使用 Android Intents 發送數據
- 使用 Parcelable 和 Serializable 傳遞對象
- 創建簡短的 Intents
Android Intents
正如名稱所示,Intent 是用於執行某些與 Android 應用程序流程相關的操作。Intents 可以用於:
- 啟動新活動並傳遞一些數據。
- 啟動 Fragments/在 Fragments 之間通信。
- 啟動/結束服務。
- 從廣播接收器啟動活動
在本教程中,我們主要將討論處理活動的意圖。意圖定義主要包括當前活動的一個實例。我們設置組件名稱,可以是:要調用的活動的完全限定類名。這種類型的 Intent 是一個 明確的意圖。一個動作,例如 URL、電話號碼、位置。它將顯示所有這些類型的可用應用程序。這屬於 隱式意圖 類別。在 Kotlin 中,創建活動的方法如下。
val intent = Intent(this, OtherActivity::class.java)
startActivity(intent)
startActivity 會將 OtherActivity 加入到活動堆疊中並啟動它。 我們的應用程式如何知道要首先調用哪個活動? 在 AndroidManifest.xml 中,我們在要在應用程式打開時啟動的第一個活動上設置了 intent filter,其中包含動作 android.intent.action.MAIN 和類別 android.intent.category.LAUNCHER。 finish() 用於銷毀活動並從堆疊中移除它。
Intent 標誌
標誌就像是可以在 intent 上設置的選項,用於自定義啟動過程。如果每次都啟動相同的活動,會創建一個新的實例並將其添加到活動堆疊中。為了防止這種情況發生,可以使用以下標誌:FLAG_ACTIVITY_SINGLE_TOP – 如果設置了該標誌,則當該活動已經位於活動堆疊的頂部時,將不會啟動它。
intent.flags = Intent.FLAG_ACTIVITY_SINGLE_TOP
同樣地,使用標誌 FLAT_ACTIVITY_CLEAR_TOP 將不會啟動另一個活動實例,如果該活動已經存在。此標誌將清除該活動上方的所有活動並將其設置為堆疊的頂部。
通過 Intent 傳遞數據
為了將數據傳遞到新的活動中,我們在putExtra、putStringArrayListExtra等函數中使用鍵值對。putExtra通常傳遞基本類型,如Int、Float、Char、Double、Boolean、String,還有 IntArray等等。
val intent = Intent(this, OtherActivity::class.java)
intent.putExtra("keyString", "Androidly String data")
這些額外的字段在內部被包裝成Bundle對象,最終保存所有要傳遞的數據。要在其他活動中檢索數據,我們需要使用bundles上的extras屬性。在新活動中檢索數據
val bundle: Bundle? = intent.extras
val string: String? = intent.getString("keyString")
val myArray: ArrayList<String>? = intent.getStringArrayList("myArray")
intent、extras相當於Java中的getIntent()、getExtras()。我們使用可為空的Bundle?類型來防止當數據不存在時出現NullPointerExceptions。同樣,對於使用鍵檢索的數據,我們使用可為空的類型來防止鍵不正確時可能發生的NPE。
使用Parcelable和Serializable數據
有時我們需要從一個活動傳遞完整的對象到另一個活動。除非我們實現Parcelable或Serializable接口,否則無法這樣做。Parcelable和Serializable的區別
- Parcelable接口是Android SDK的一部分。Serializable是Java的標准接口。
- 在Parcelable中,您需要將所有要傳遞的數據設置為Parcel對象,並覆蓋writeToParcel()方法等。在Serializable中,實現接口就足以傳遞數據。
- Parcelable比Serializable更快。
發送Parcelable數據
Kotlin提供了一些方便的注釋,可以避免我們覆蓋writeToParcel()方法來設置Parcelable上的數據。相反,我們可以使用@Parcelize注釋,如下所示:
@Parcelize
data class Student(
        val name: String = "Anupam",
        val age: Int = 24
) : Parcelable
注意:目前在您的build.gradle中,您必須添加以下代碼才能使@Parcelize注釋正常工作:
android {
    androidExtensions {
        experimental = true
    }
//..
....
}
在您的Activity中,您可以執行以下操作:
val student = Student()
val intent = Intent(this, OtherActivity::class.java)
intent.putExtra("studentData", student)
startActivity(intent)
發送Serializable數據
data class Blog(val name: String = "Androidly", val year: Int = 2018) : Serializable

val blog = Blog("a", 1)
val intent = Intent(this, OtherActivity::class.java)
intent.putExtra("blogData", blog as Serializable)
startActivity(intent)
讓我們在我們的Android Studio項目中應用上述知識。
項目結構

佈局程式碼
給出了activity_main.xml佈局的程式碼:
<?xml version="1.0" encoding="utf-8"?>
<LinearLayout xmlns:android="http://schemas.android.com/apk/res/android"
    xmlns:tools="http://schemas.android.com/tools"
    android:layout_width="match_parent"
    android:layout_height="match_parent"
    android:gravity="center"
    android:orientation="vertical"
    tools:context=".MainActivity">

    <Button
        android:id="@+id/btnSimpleIntent"
        android:layout_width="wrap_content"
        android:layout_height="wrap_content"
        android:text="SIMPLE INTENT" />


    <Button
        android:id="@+id/btnSimpleIntentAndData"
        android:layout_width="wrap_content"
        android:layout_height="wrap_content"
        android:text="SIMPLE INTENT WITH DATA" />


    <Button
        android:id="@+id/btnParcelableIntent"
        android:layout_width="wrap_content"
        android:layout_height="wrap_content"
        android:text="Parcelable Intent" />


    <Button
        android:id="@+id/btnSerializableIntent"
        android:layout_width="wrap_content"
        android:layout_height="wrap_content"
        android:text="Serializable Intent" />

    <Button
        android:id="@+id/btnBrowserIntent"
        android:layout_width="wrap_content"
        android:layout_height="wrap_content"
        android:text="Browser Intent" />


    <Button
        android:id="@+id/btnMapsIntent"
        android:layout_width="wrap_content"
        android:layout_height="wrap_content"
        android:text="Maps Intent" />


    <Button
        android:id="@+id/btnGenericIntent"
        android:layout_width="wrap_content"
        android:layout_height="wrap_content"
        android:text="Generic Intent" />

</LinearLayout>
給出了activity_other.xml佈局的程式碼:
<?xml version="1.0" encoding="utf-8"?>
<LinearLayout xmlns:android="http://schemas.android.com/apk/res/android"
    xmlns:tools="http://schemas.android.com/tools"
    android:layout_width="match_parent"
    android:layout_height="match_parent"
    android:gravity="center"
    android:orientation="vertical"
    tools:context=".MainActivity">

    <TextView
        android:id="@+id/textView"
        android:layout_width="wrap_content"
        android:layout_height="wrap_content"
        android:text="Intent Data goes here" />


</LinearLayout>
活動程式碼
給出了MainActivity.kt類的程式碼:
package net.androidly.androidlyintents

import android.app.Activity
import android.content.ComponentName
import android.content.Context
import android.content.Intent
import android.net.Uri
import android.support.v7.app.AppCompatActivity
import android.os.Bundle
import android.os.Parcelable
import android.view.View
import android.widget.Toast
import android.widget.Toast.LENGTH_LONG
import kotlinx.android.parcel.Parcelize
import kotlinx.android.synthetic.main.activity_main.*
import java.io.Serializable


@Parcelize
data class Student(
        val name: String = "Anupam",
        val age: Int = 24
) : Parcelable

data class Blog(val name: String = "Androidly", val year: Int = 2018) : Serializable


class MainActivity : AppCompatActivity(), View.OnClickListener {


    fun Context.gotoClass(targetType: Class<*>) =
            ComponentName(this, targetType)

    fun Context.startActivity(f: Intent.() -> Unit): Unit =
            Intent().apply(f).run(this::startActivity)

    inline fun <reified T : Activity> Context.start(
            noinline createIntent: Intent.() -> Unit = {}
    ) = startActivity {
        component = gotoClass(T::class.java)
        createIntent(this)
    }


    var arrayList = ArrayList<String>()

    override fun onCreate(savedInstanceState: Bundle?) {
        super.onCreate(savedInstanceState)
        setContentView(R.layout.activity_main)
        btnSimpleIntent.setOnClickListener(this)
        btnSimpleIntentAndData.setOnClickListener(this)
        btnParcelableIntent.setOnClickListener(this)
        btnSerializableIntent.setOnClickListener(this)
        btnBrowserIntent.setOnClickListener(this)
        btnMapsIntent.setOnClickListener(this)
        btnGenericIntent.setOnClickListener(this)

        arrayList.add("Androidly")
        arrayList.add("Android")
        arrayList.add("Intents")
    }

    override fun onClick(v: View?) {
        when (v?.id) {
            R.id.btnSimpleIntent -> {
                val intent = Intent(this, OtherActivity::class.java)
                startActivity(intent)
            }
            R.id.btnSimpleIntentAndData -> {
                val intent = Intent(this, OtherActivity::class.java)
                with(intent)
                {
                    putExtra("keyString", "Androidly String data")
                    putStringArrayListExtra("arrayList", arrayList)
                    putExtra("keyBoolean", true)
                    putExtra("keyFloat", 1.2f)
                }
                startActivity(intent)
            }
            R.id.btnParcelableIntent -> {

                val student = Student()
                val intent = Intent(this, OtherActivity::class.java)
                intent.putExtra("studentData", student)
                startActivity(intent)
            }
            R.id.btnSerializableIntent -> {
                val blog = Blog("a", 1)
                val intent = Intent(this, OtherActivity::class.java)
                intent.putExtra("blogData", blog as Serializable)
                startActivity(intent)
            }
            R.id.btnBrowserIntent -> {
                val url = "https://www.androidly.net"
                val uri = Uri.parse(url)
                val intent = Intent(Intent.ACTION_VIEW, uri)

                if (intent.resolveActivity(packageManager) != null) {
                    startActivity(intent)
                } else {
                    Toast.makeText(applicationContext, "No application found", LENGTH_LONG).show()
                }
            }
            R.id.btnMapsIntent -> {
                val loc = "12.9538477,77.3507442"

                val addressUri = Uri.parse("geo:0,0?q=" + loc)
                val intent = Intent(Intent.ACTION_VIEW, addressUri)


                if (intent.resolveActivity(packageManager) != null) {
                    startActivity(intent)
                } else {
                    Toast.makeText(applicationContext, "No application found", LENGTH_LONG).show()
                }
            }
            else -> start<OtherActivity> {
                putExtra("keyString", "Androidly Generic Intent")
            }
        }
    }

}
在上面的程式碼中,我們使用了按鈕來處理每種類型的Intent。我們使用Kotlin的with表達式來避免每次都對intent對象進行數據設置。此外,我們還創建了三個不同的Intent,除了上面已討論過的Intent。瀏覽器Intent用於在瀏覽器應用程序中打開意圖中的URL。它使用Intent(Intent.ACTION_VIEW, uri)。位置Intent用於在地圖應用程序中打開lat,lng位置。這兩個都是隱式Intent。最後,我們使用通用Intent,其中我們使用Kotlin的擴展函數和lambda表達式創建簡寫函數來啟動Intent。為此,我們使用以下函數:
fun Context.gotoClass(targetType: Class<*>) =
            ComponentName(this, targetType)

    fun Context.startActivity(createIntent: Intent.() -> Unit): Unit =
            Intent().apply(createIntent).run(this::startActivity)

    inline fun <reified T : Activity> Context.start(
            noinline createIntent: Intent.() -> Unit = {}
    ) = startActivity {
        component = gotoClass(T::class.java)
        createIntent(this)
    }
startActivity 是一個擴展函數,它尋找一個高階函數作為其參數。由於這個特性,我們現在可以在幾行代碼中啟動意圖:`start
package net.androidly.androidlyintents

import android.content.Context
import android.support.v7.app.AppCompatActivity
import android.os.Bundle
import android.widget.Toast
import kotlinx.android.synthetic.main.activity_other.*

class OtherActivity : AppCompatActivity() {


    override fun onCreate(savedInstanceState: Bundle?) {
        super.onCreate(savedInstanceState)
        setContentView(R.layout.activity_other)

        val bundle: Bundle? = intent.extras

        bundle?.let {

            bundle.apply {
                //Intent with data
                val string: String? = getString("keyString")
                textView.text = string

                val myArray: ArrayList? = getStringArrayList("myArray")
                showToast(message = "MyArrayList size:${myArray?.size}")

                val arrayList: ArrayList? = getStringArrayList("arrayList")
                showToast(message = "ArrayList size:${arrayList?.size}")

                val float: Float? = bundle.get("keyFloat") as Float?
                var boolean = bundle.get("boolean") as? Boolean

                showToast(message = "Float data is:$float")
                showToast(message = "Boolean data is:$boolean")
                boolean = bundle.get("keyBoolean") as? Boolean
                showToast(message = "Boolean correct key data is:$boolean")

            }


            bundle.apply {
                //Serializable Data
                val blog = getSerializable("blogData") as Blog?
                if (blog != null) {
                    textView.text = "Blog name is ${blog?.name}. Year started: ${blog?.year}"

                }
            }

            bundle.apply {
                //Parcelable Data
                val student: Student? = getParcelable("studentData")
                if (student != null) {
                    textView.text = "Name is ${student?.name}. Age: ${student?.age}"
                }
            }
        }
    }

    private fun showToast(context: Context = applicationContext, message: String, duration: Int = Toast.LENGTH_SHORT) {
        if (!message.contains("null"))
            Toast.makeText(context, message, duration).show()
    }
}
我們使用了 `let` 和 `apply` 來處理可為空類型,並防止在每一行中執行 bundle.field。上述應用程序的輸出如下所示: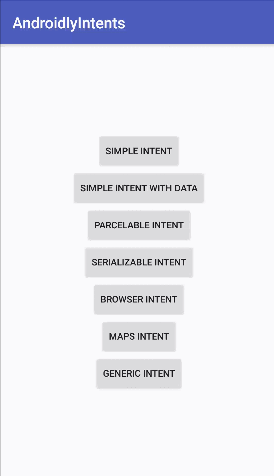 這結束了這篇有關 Kotlin 中 Android 意圖的教程。您可以從下面的鏈接下載該項目。