


Spring WebFlux 是 Spring 5 中引入的新模块。Spring WebFlux 是 Spring 框架中响应式编程模型的第一步。
Spring 响应式编程
如果你对响应式编程模型还不熟悉,我强烈建议你阅读以下文章来了解响应式编程。
如果你对 Spring 5 还不熟悉,请阅读Spring 5 特性。
Spring WebFlux
Spring WebFlux是Spring MVC模块的替代品。Spring WebFlux用于创建完全异步和非阻塞的基于事件循环执行模型构建的应用程序。下面的图表来自Spring官方文档,对比了Spring WebFlux和Spring Web MVC,提供了很好的洞察力。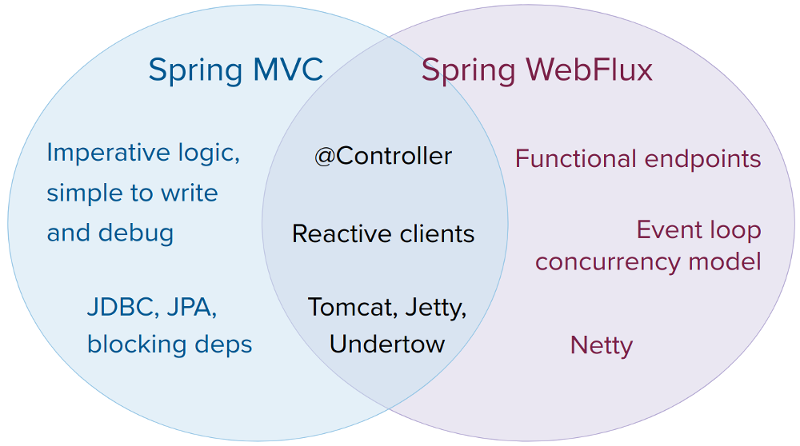 如果您想要开发一个基于非阻塞响应式模型的Web应用程序或Rest Web服务,那么您可以考虑使用Spring WebFlux。Spring WebFlux支持在Tomcat、Jetty、Servlet 3.1+容器上运行,以及在非Servlet运行时,如Netty和Undertow上运行。Spring WebFlux是基于Project Reactor构建的。Project Reactor是Reactive Streams规范的实现。Reactor提供了两种类型:
- Mono:实现Publisher并返回0或1个元素
- Flux:实现Publisher并返回N个元素。
Spring WebFlux Hello World示例
让我们构建一个简单的Spring WebFlux Hello World应用程序。我们将创建一个简单的REST Web服务,并使用Spring Boot在默认的Netty服务器上运行它。我们的最终项目结构如下图所示。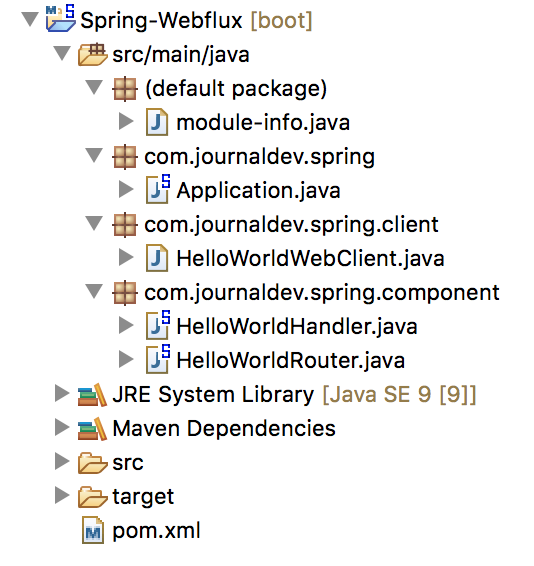 让我们逐个查看应用程序的每个组件。
Spring WebFlux Maven依赖项
<project xmlns="https://maven.apache.org/POM/4.0.0" xmlns:xsi="https://www.w3.org/2001/XMLSchema-instance" xsi:schemaLocation="https://maven.apache.org/POM/4.0.0 https://maven.apache.org/xsd/maven-4.0.0.xsd">
  <modelVersion>4.0.0</modelVersion>
  <groupId>com.journaldev.spring</groupId>
  <artifactId>SpringWebflux</artifactId>
  <version>0.0.1-SNAPSHOT</version>
  <name>Spring WebFlux</name>
  <description>Spring WebFlux Example</description>

      <properties>
        <project.build.sourceEncoding>UTF-8</project.build.sourceEncoding>
        <project.reporting.outputEncoding>UTF-8</project.reporting.outputEncoding>
        <jdk.version>1.9</jdk.version>
    </properties>

  <parent>
		<groupId>org.springframework.boot</groupId>
		<artifactId>spring-boot-starter-parent</artifactId>
		<version>2.0.1.RELEASE</version>
		<relativePath/> <!-- lookup parent from repository -->
	</parent>

	<dependencies>
		<dependency>
			<groupId>org.springframework.boot</groupId>
			<artifactId>spring-boot-starter-webflux</artifactId>
		</dependency>
		<dependency>
			<groupId>org.springframework.boot</groupId>
			<artifactId>spring-boot-starter-test</artifactId>
			<scope>test</scope>
		</dependency>

		<dependency>
			<groupId>io.projectreactor</groupId>
			<artifactId>reactor-test</artifactId>
			<scope>test</scope>
		</dependency>
    </dependencies>
	<repositories>
		<repository>
			<id>spring-snapshots</id>
			<name>Spring Snapshots</name>
			<url>https://repo.spring.io/snapshot</url>
			<snapshots>
				<enabled>true</enabled>
			</snapshots>
		</repository>
		<repository>
			<id>spring-milestones</id>
			<name>Spring Milestones</name>
			<url>https://repo.spring.io/milestone</url>
			<snapshots>
				<enabled>false</enabled>
			</snapshots>
		</repository>
	</repositories>
	<pluginRepositories>
		<pluginRepository>
			<id>spring-snapshots</id>
			<name>Spring Snapshots</name>
			<url>https://repo.spring.io/snapshot</url>
			<snapshots>
				<enabled>true</enabled>
			</snapshots>
		</pluginRepository>
		<pluginRepository>
			<id>spring-milestones</id>
			<name>Spring Milestones</name>
			<url>https://repo.spring.io/milestone</url>
			<snapshots>
				<enabled>false</enabled>
			</snapshots>
		</pluginRepository>
	</pluginRepositories>
    <build>
        <plugins>
            <plugin>
                <groupId>org.springframework.boot</groupId>
                <artifactId>spring-boot-maven-plugin</artifactId>
            </plugin>
        </plugins>
        <pluginManagement>
            <plugins>
                <plugin>
                    <groupId>org.apache.maven.plugins</groupId>
                    <artifactId>maven-compiler-plugin</artifactId>
                    <version>3.7.0</version>
                    <configuration>
                        <source>${jdk.version}</source>
                        <target>${jdk.version}</target>
                    </configuration>
                </plugin>
            </plugins>
    </pluginManagement>
    </build>

</project>
最重要的依赖项是spring-boot-starter-webflux和spring-boot-starter-parent。其他一些依赖项用于创建JUnit测试用例。
Spring WebFlux处理器
Spring WebFlux处理器方法处理请求并返回Mono或Flux作为响应。
package com.journaldev.spring.component;

import org.springframework.http.MediaType;
import org.springframework.stereotype.Component;
import org.springframework.web.reactive.function.BodyInserters;
import org.springframework.web.reactive.function.server.ServerRequest;
import org.springframework.web.reactive.function.server.ServerResponse;

import reactor.core.publisher.Mono;

@Component
public class HelloWorldHandler {

	public Mono<ServerResponse> helloWorld(ServerRequest request) {
		return ServerResponse.ok().contentType(MediaType.TEXT_PLAIN)
			.body(BodyInserters.fromObject("Hello World!"));
	}
}
请注意,响应式组件Mono保存ServerResponse的主体。还要查看函数链以设置返回内容类型、响应代码和主体。
Spring WebFlux路由器
路由器方法用于定义应用程序的路由。这些方法返回RouterFunction对象,该对象还包含ServerResponse主体。
package com.journaldev.spring.component;

import org.springframework.context.annotation.Bean;
import org.springframework.context.annotation.Configuration;
import org.springframework.http.MediaType;
import org.springframework.web.reactive.function.server.RequestPredicates;
import org.springframework.web.reactive.function.server.RouterFunction;
import org.springframework.web.reactive.function.server.RouterFunctions;
import org.springframework.web.reactive.function.server.ServerResponse;

@Configuration
public class HelloWorldRouter {

	@Bean
	public RouterFunction<ServerResponse> routeHelloWorld(HelloWorldHandler helloWorldHandler) {

		return RouterFunctions.route(RequestPredicates.GET("/helloWorld")
                .and(RequestPredicates.accept(MediaType.TEXT_PLAIN)), helloWorldHandler::helloWorld);
	}
}
因此,我们为/helloWorld公开了一个GET方法,客户端调用应该接受纯文本响应。
Spring Boot应用程序
让我们使用Spring Boot配置我们的简单WebFlux应用程序。
package com.journaldev.spring;

import org.springframework.boot.SpringApplication;
import org.springframework.boot.autoconfigure.SpringBootApplication;

@SpringBootApplication
public class Application {

	public static void main(String[] args) {
		SpringApplication.run(Application.class, args);
	}
}
如果您查看上面的代码,与Spring WebFlux无关。但是,由于我们添加了spring-boot-starter-webflux模块的依赖项,Spring Boot将配置我们的应用程序为Spring WebFlux。
Java 9模块支持
我们的应用程序已准备在Java 8上执行,但如果您使用Java 9,则还需要添加module-info.java类。
module com.journaldev.spring {
    requires reactor.core;
    requires spring.web;
    requires spring.beans;
    requires spring.context;
    requires spring.webflux;
    requires spring.boot;
    requires spring.boot.autoconfigure;
    exports com.journaldev.spring;
}
运行Spring WebFlux Spring Boot应用程序
如果您在Eclipse中有Spring支持,则可以将上述类作为Spring Boot应用程序运行。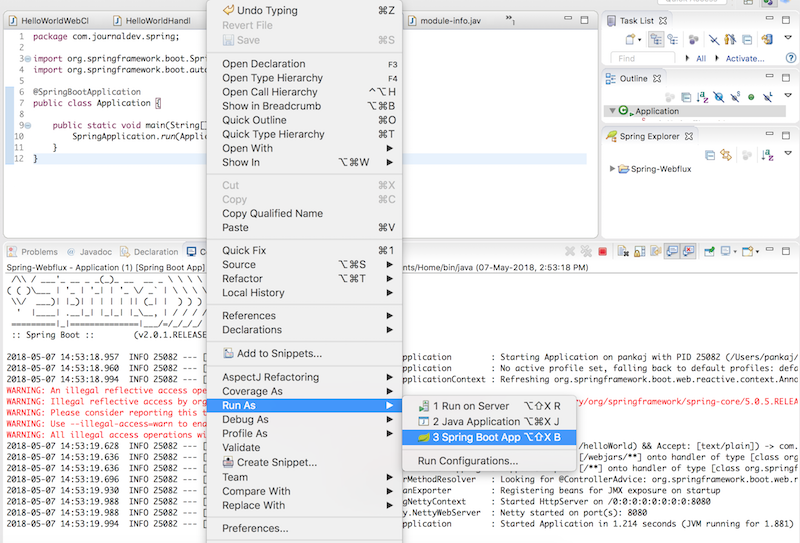 如果您喜欢使用命令行,则打开终端并从项目源目录中运行以下命令:
mvn spring-boot:run。一旦应用程序正在运行,注意以下日志消息以确保我们的应用程序一切正常。当您通过添加更多路由和功能来扩展这个简单的应用程序时,这也会很有帮助。
2018-05-07 15:01:47.893  INFO 25158 --- [           main] o.s.w.r.f.s.s.RouterFunctionMapping      : Mapped ((GET && /helloWorld) && Accept: [text/plain]) -> com.journaldev.spring.component.HelloWorldRouter$$Lambda$501/704766954@6eeb5d56
2018-05-07 15:01:48.495  INFO 25158 --- [ctor-http-nio-1] r.ipc.netty.tcp.BlockingNettyContext     : Started HttpServer on /0:0:0:0:0:0:0:0:8080
2018-05-07 15:01:48.495  INFO 25158 --- [           main] o.s.b.web.embedded.netty.NettyWebServer  : Netty started on port(s): 8080
2018-05-07 15:01:48.501  INFO 25158 --- [           main] com.journaldev.spring.Application        : Started Application in 1.86 seconds (JVM running for 5.542)
从日志中可以清楚地看到我们的应用程序正在8080端口上的Netty服务器上运行。让我们继续测试我们的应用程序。
Spring WebFlux应用程序测试
我们可以使用各种方法测试我们的应用程序。
-
使用CURL命令
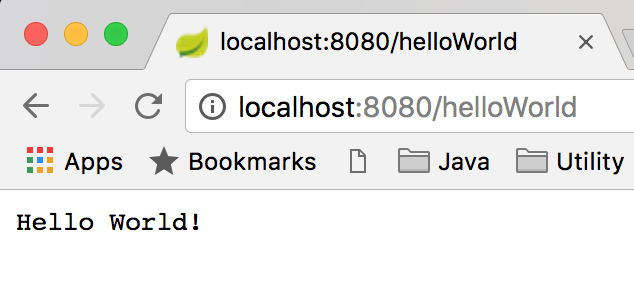
$ curl https://localhost:8080/helloWorld Hello World! $ -
在浏览器中启动URL
-
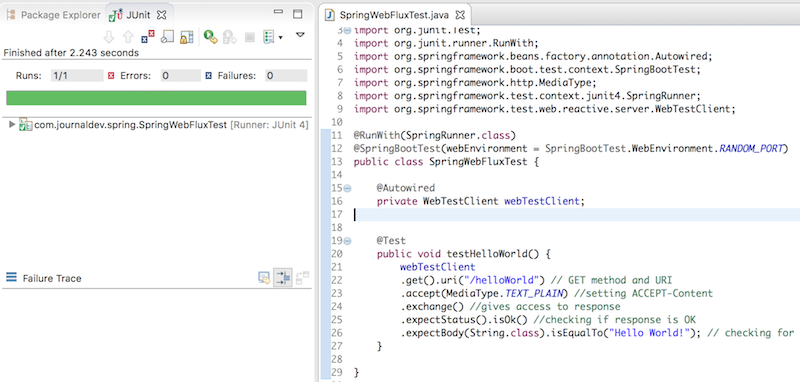
使用Spring 5的WebTestClient这是一个使用Spring 5响应式Web的
WebTestClient测试我们的Rest Web服务的JUnit测试程序。package com.journaldev.spring; import org.junit.Test; import org.junit.runner.RunWith; import org.springframework.beans.factory.annotation.Autowired; import org.springframework.boot.test.context.SpringBootTest; import org.springframework.http.MediaType; import org.springframework.test.context.junit4.SpringRunner; import org.springframework.test.web.reactive.server.WebTestClient; @RunWith(SpringRunner.class) @SpringBootTest(webEnvironment = SpringBootTest.WebEnvironment.RANDOM_PORT) public class SpringWebFluxTest { @Autowired private WebTestClient webTestClient; @Test public void testHelloWorld() { webTestClient .get().uri("/helloWorld") // GET方法和URI .accept(MediaType.TEXT_PLAIN) //设置ACCEPT-Content .exchange() //访问响应 .expectStatus().isOk() //检查响应是否OK .expectBody(String.class).isEqualTo("Hello World!"); //检查响应类型和消息 } }运行它作为JUnit测试用例,它应该能够顺利通过。
-
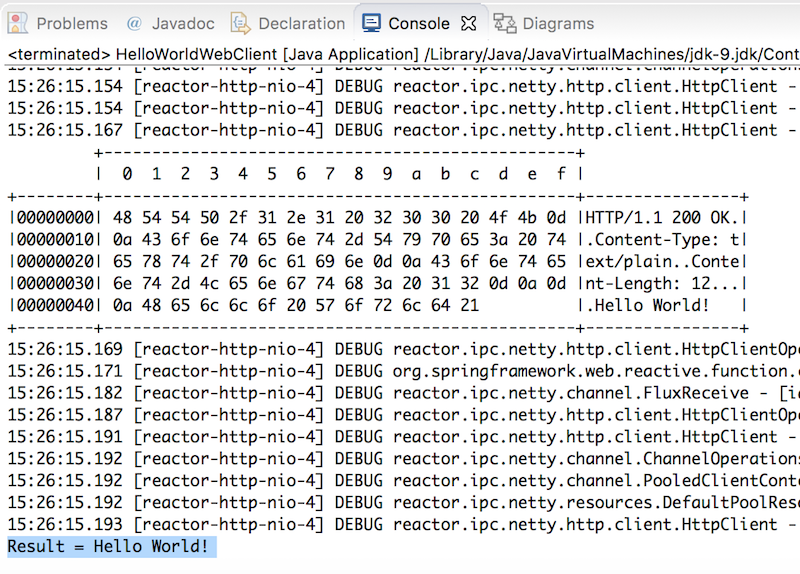
使用Spring Web Reactive中的WebClient 我们也可以使用
WebClient来调用REST Web服务。package com.journaldev.spring.client; import org.springframework.http.MediaType; import org.springframework.web.reactive.function.client.ClientResponse; import org.springframework.web.reactive.function.client.WebClient; import reactor.core.publisher.Mono; public class HelloWorldWebClient { public static void main(String args[]) { WebClient client = WebClient.create("https://localhost:8080"); Mono<ClientResponse> result = client.get() .uri("/helloWorld") .accept(MediaType.TEXT_PLAIN) .exchange(); System.out.println("结果 = " + result.flatMap(res -> res.bodyToMono(String.class)).block()); } }只需将其作为简单的Java应用程序运行,您应该会看到带有大量调试消息的正确输出。
摘要
在这篇文章中,我们学习了关于Spring WebFlux以及如何构建一个响应式的Hello World Restful Web服务的内容。很高兴看到像Spring这样的流行框架支持响应式编程模型。但我们有很多内容要涵盖,因为如果你的所有依赖都不是响应式且非阻塞的,那么你的应用程序也不是真正的响应式。例如,关系型数据库供应商没有响应式驱动,因为它们依赖于JDBC,这是非响应式的。因此,Hibernate API也是非响应式的。因此,如果你正在使用关系型数据库,那么你目前还不能构建一个真正的响应式应用程序。我希望这种情况会在不久的将来改变。
你可以从我的GitHub存储库下载项目代码。
参考:官方文档
Source:
https://www.digitalocean.com/community/tutorials/spring-webflux-reactive-programming