欢迎来到Spring MVC示例。在之前的Spring MVC教程中,我解释了如何使用Spring Tool Suite创建Spring MVC应用程序。但是今天,我将使用maven和Eclipse创建一个基本的hello world spring MVC应用程序。
Spring MVC示例
Spring MVC基于模型-视图-控制器架构。下面的图片展示了Spring MVC架构的高层次。 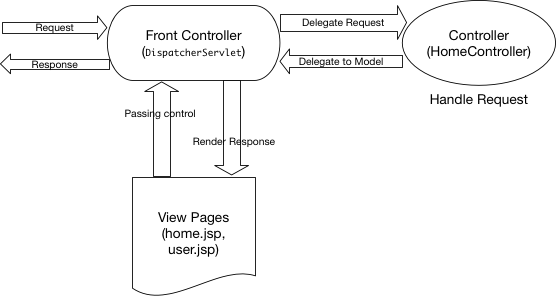
DispatcherServlet是前端控制器类,负责接收所有请求并开始处理它们。我们必须在web.xml文件中对其进行配置。它的工作是将请求传递给适当的控制器类,并在视图页面渲染响应页面后将响应发送回来。 HomeController.java将是我们的spring mvc示例应用程序中唯一的控制器类。 home.jsp,user.jsp是我们spring mvc hello world示例应用程序中的视图页面。 User.java将是我们spring mvc示例Web应用程序中唯一的模型类。
Spring MVC 示例 Hello World Eclipse 项目
下图显示了我们在 Eclipse 中的 Spring MVC 示例项目。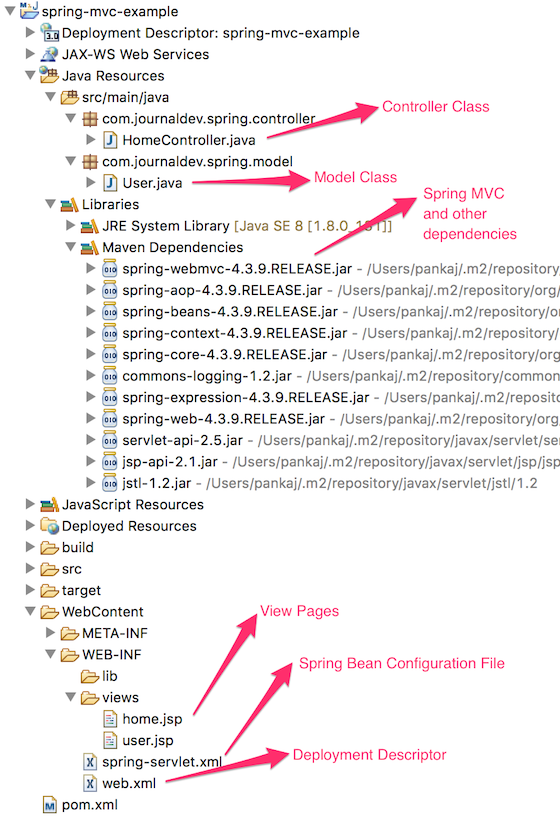 让我们开始并从头开始创建我们的项目。
Spring MVC 示例 Eclipse 项目设置
由于这是一个网络应用程序,我们想要使用maven进行依赖管理,首先我们必须创建一个动态网络应用程序,然后将其转换为maven项目。以下图片展示了如何执行此操作,并准备好我们的项目骨架结构。在项目资源管理器窗口上右键单击,然后单击“新建 -> 动态Web项目”,如下图所示。 在下一个弹出页面中,提供名称为“spring-mvc-example”,其余内容应该不需要更改。
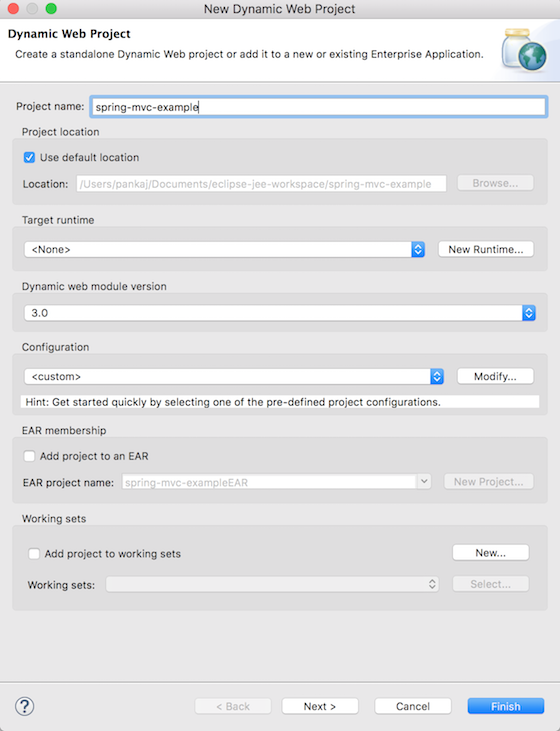 在下一个页面中,将源文件夹设置为“src/main/java”。在添加之前,您可能需要从列表中移除“src”文件夹。
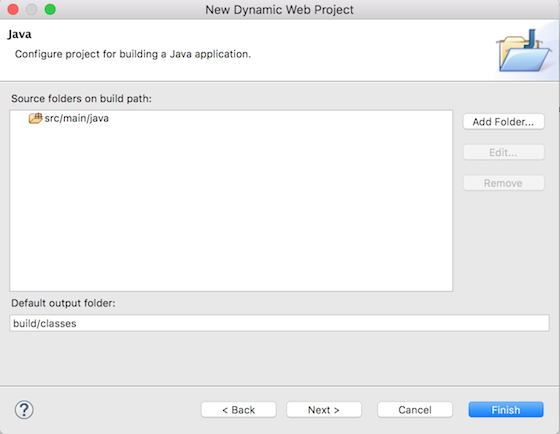 接下来是网络模块页面,将应用程序的上下文根设置为“spring-mvc-example”,并确保勾选“生成web.xml部署描述符”选项。
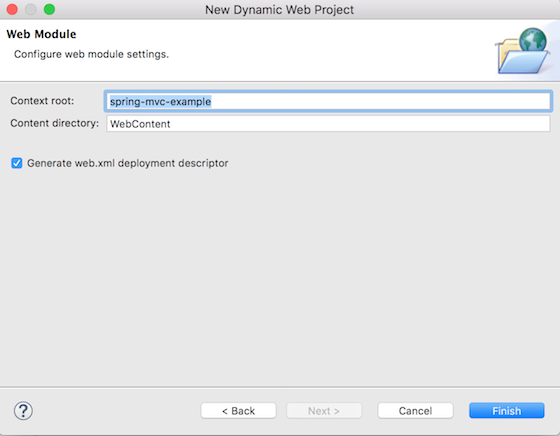 单击“完成”,您将在eclipse项目资源管理器中拥有一个新的动态Web项目。
将动态Web项目转换为Maven项目
我们希望使用Maven来轻松管理我们的Spring MVC依赖项。因此,让我们将我们的Web项目转换为Maven。右键单击项目,选择“配置 -> 转换为Maven项目”。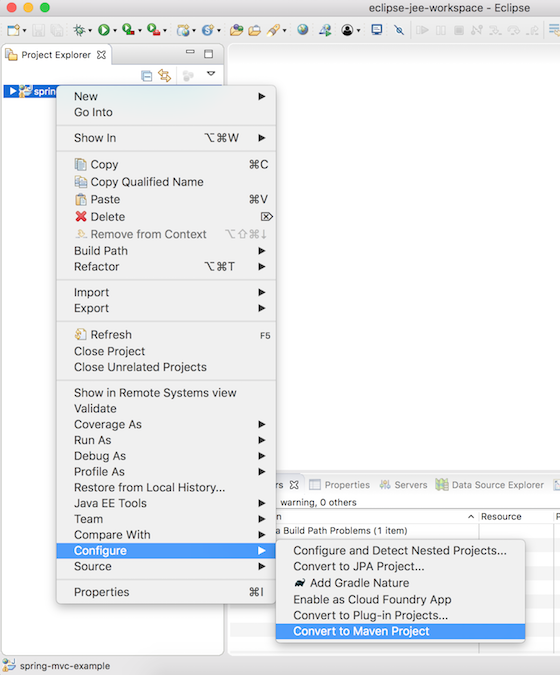 接下来按照下面所示提供pom.xml配置。
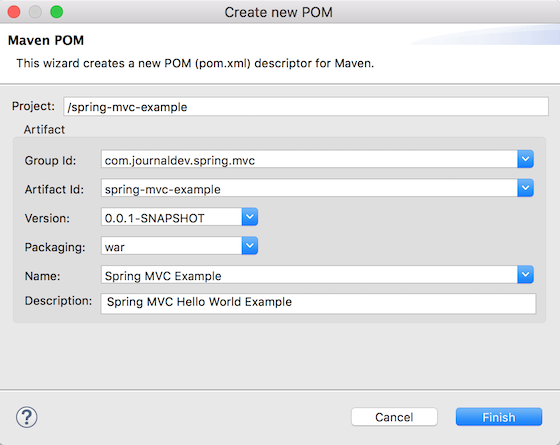 我们的Maven Web应用程序项目骨架代码已准备就绪。现在我们可以开始对其进行更改并创建我们的Spring MVC Hello World示例应用程序。
向pom.xml添加Spring MVC依赖项
我们需要在pom.xml中添加spring-web和spring-webmvc依赖项,还需要添加servlet-api、jsp-api和jstl依赖项。我们最终的pom.xml文件将如下所示。
<project xmlns="https://maven.apache.org/POM/4.0.0" xmlns:xsi="https://www.w3.org/2001/XMLSchema-instance"
	xsi:schemaLocation="https://maven.apache.org/POM/4.0.0 https://maven.apache.org/xsd/maven-4.0.0.xsd">
	<modelVersion>4.0.0</modelVersion>
	<groupId>com.journaldev.spring.mvc</groupId>
	<artifactId>spring-mvc-example</artifactId>
	<version>0.0.1-SNAPSHOT</version>
	<packaging>war</packaging>
	<name>Spring MVC Example</name>
	<description>Spring MVC Hello World Example</description>

	<!-- Add Spring Web and MVC dependencies -->
	<dependencies>
		<dependency>
			<groupId>org.springframework</groupId>
			<artifactId>spring-webmvc</artifactId>
			<version>4.3.9.RELEASE</version>
		</dependency>
		<dependency>
			<groupId>org.springframework</groupId>
			<artifactId>spring-web</artifactId>
			<version>4.3.9.RELEASE</version>
		</dependency>
		<!-- Servlet -->
		<dependency>
			<groupId>javax.servlet</groupId>
			<artifactId>servlet-api</artifactId>
			<version>2.5</version>
			<scope>provided</scope>
		</dependency>
		<dependency>
			<groupId>javax.servlet.jsp</groupId>
			<artifactId>jsp-api</artifactId>
			<version>2.1</version>
			<scope>provided</scope>
		</dependency>
		<dependency>
			<groupId>javax.servlet</groupId>
			<artifactId>jstl</artifactId>
			<version>1.2</version>
		</dependency>
	</dependencies>

	<build>
		<plugins>
			<plugin>
				<artifactId>maven-compiler-plugin</artifactId>
				<version>3.6.1</version>
				<configuration>
					<source>1.8</source>
					<target>1.8</target>
				</configuration>
			</plugin>
			<plugin>
				<artifactId>maven-war-plugin</artifactId>
				<version>3.0.0</version>
				<configuration>
					<warSourceDirectory>WebContent</warSourceDirectory>
				</configuration>
			</plugin>
		</plugins>
		<finalName>${project.artifactId}</finalName> <!-- added to remove Version from WAR file -->
	</build>
</project>
请注意构建中的finalName配置,以便我们的WAR文件名称不包含版本详情。当项目由Eclipse构建时,您会注意到所有的JAR文件都显示在maven依赖项部分。
Spring MVC DispatcherServlet作为前端控制器
我们必须将Spring MVC框架添加到我们的Web应用程序中,为此,我们需要在web.xml中配置DispatcherServlet,如下所示。
<?xml version="1.0" encoding="UTF-8"?>
<web-app xmlns:xsi="https://www.w3.org/2001/XMLSchema-instance" xmlns="https://java.sun.com/xml/ns/javaee" xsi:schemaLocation="https://java.sun.com/xml/ns/javaee https://java.sun.com/xml/ns/javaee/web-app_3_0.xsd" id="WebApp_ID" version="3.0">
  <display-name>spring-mvc-example</display-name>

	<!-- Add Spring MVC DispatcherServlet as front controller -->
	<servlet>
        <servlet-name>spring</servlet-name>
        <servlet-class>
                org.springframework.web.servlet.DispatcherServlet
        </servlet-class>
        <init-param>
       		<param-name>contextConfigLocation</param-name>
       		<param-value>/WEB-INF/spring-servlet.xml</param-value>
    		</init-param>
        <load-on-startup>1</load-on-startup>
    </servlet>

    <servlet-mapping>
        <servlet-name>spring</servlet-name>
        <url-pattern>/</url-pattern>
    </servlet-mapping>

 </web-app>
contextConfigLocation init-param用于提供spring bean配置文件的位置。
Spring MVC示例Bean配置文件
下一步是创建Spring Bean配置文件spring-servlet.xml,如下所示。
<?xml version="1.0" encoding="UTF-8"?>
<beans:beans xmlns="https://www.springframework.org/schema/mvc"
	xmlns:xsi="https://www.w3.org/2001/XMLSchema-instance" xmlns:beans="https://www.springframework.org/schema/beans"
	xmlns:context="https://www.springframework.org/schema/context"
	xsi:schemaLocation="https://www.springframework.org/schema/mvc https://www.springframework.org/schema/mvc/spring-mvc.xsd
		https://www.springframework.org/schema/beans https://www.springframework.org/schema/beans/spring-beans.xsd
		https://www.springframework.org/schema/context https://www.springframework.org/schema/context/spring-context.xsd">

	<!-- DispatcherServlet Context: defines this servlet's request-processing
		infrastructure -->

	<!-- Enables the Spring MVC @Controller programming model -->
	<annotation-driven />
	<context:component-scan base-package="com.journaldev.spring" />

	<!-- Resolves views selected for rendering by @Controllers to .jsp resources
		in the /WEB-INF/views directory -->
	<beans:bean
		class="org.springframework.web.servlet.view.InternalResourceViewResolver">
		<beans:property name="prefix" value="/WEB-INF/views/" />
		<beans:property name="suffix" value=".jsp" />
	</beans:bean>

</beans:beans>
有三个重要的配置。
annotation-driven告诉DispatcherServlet使用@Controller注释查找控制器类。context:component-scan告诉DispatcherServlet在哪里查找控制器类。InternalResourceViewResolverbean 配置用于指定视图页面的位置和使用的后缀。控制器类方法返回视图页面的名称,然后添加后缀以确定要用于呈现响应的视图页面。
Spring MVC 控制器类
我们有一个单一的控制器类来响应两个 URI – “/” 用于主页,“/user” 用于用户页面。
package com.journaldev.spring.controller;

import java.text.DateFormat;
import java.util.Date;
import java.util.Locale;

import org.springframework.stereotype.Controller;
import org.springframework.ui.Model;
import org.springframework.validation.annotation.Validated;
import org.springframework.web.bind.annotation.RequestMapping;
import org.springframework.web.bind.annotation.RequestMethod;

import com.journaldev.spring.model.User;

@Controller
public class HomeController {

	/**
	 * Simply selects the home view to render by returning its name.
	 */
	@RequestMapping(value = "/", method = RequestMethod.GET)
	public String home(Locale locale, Model model) {
		System.out.println("Home Page Requested, locale = " + locale);
		Date date = new Date();
		DateFormat dateFormat = DateFormat.getDateTimeInstance(DateFormat.LONG, DateFormat.LONG, locale);

		String formattedDate = dateFormat.format(date);

		model.addAttribute("serverTime", formattedDate);

		return "home";
	}

	@RequestMapping(value = "/user", method = RequestMethod.POST)
	public String user(@Validated User user, Model model) {
		System.out.println("User Page Requested");
		model.addAttribute("userName", user.getUserName());
		return "user";
	}
}
请注意,为简单起见,我没有使用任何日志记录框架,如 log4j。
Spring MVC 模型类
我们有一个简单的模型类,其中包含一个变量及其 getter-setter 方法。它是一个简单的 POJO 类。
package com.journaldev.spring.model;

public class User {
	private String userName;

	public String getUserName() {
		return userName;
	}

	public void setUserName(String userName) {
		this.userName = userName;
	}
}
Spring MVC 视图页面
我们有以下两个定义的视图页面。home.jsp
<%@ page language="java" contentType="text/html; charset=UTF-8"
	pageEncoding="UTF-8"%>
<%@ taglib uri="https://java.sun.com/jsp/jstl/core" prefix="c"%>
<%@ page session="false"%>
<html>
<head>
<title>Home</title>
</head>
<body>
	<h1>Hello world!</h1>

	<P>The time on the server is ${serverTime}.</p>

	<form action="user" method="post">
		<input type="text" name="userName"><br> <input
			type="submit" value="Login">
	</form>
</body>
</html>
user.jsp
<%@ page language="java" contentType="text/html; charset=UTF-8"
    pageEncoding="UTF-8"%>
<!DOCTYPE html PUBLIC "-//W3C//DTD HTML 4.01 Transitional//EN" "https://www.w3.org/TR/html4/loose.dtd">
<html>
<head>
<meta http-equiv="Content-Type" content="text/html; charset=UTF-8">
<title>User Home Page</title>
</head>
<body>
<h3>Hi ${userName}</h3>
</body>
</html>
注意,Spring MVC 负责将表单变量映射到模型类变量,这就是为什么两个地方都有相同的变量名。就是这样,我们的 Spring MVC 示例项目已经准备好部署和测试了。
Spring MVC Eclipse 项目部署
我们可以使用 Eclipse 导出为 WAR 文件选项直接部署到任何正在运行的 Tomcat 服务器的 webapps 目录中。但是,您也可以使用命令行构建项目,然后将其复制到您喜欢的 Servlet 容器部署目录中。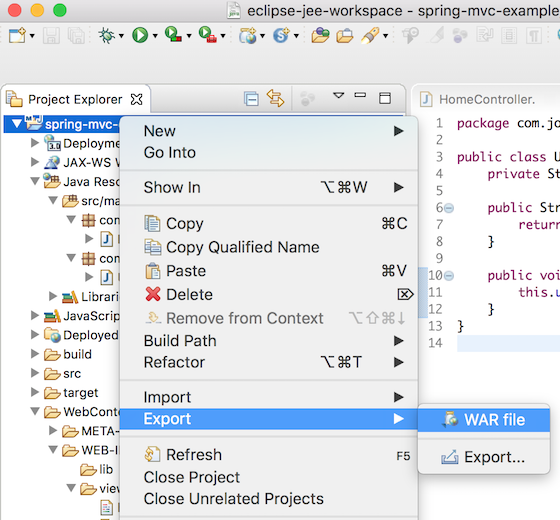
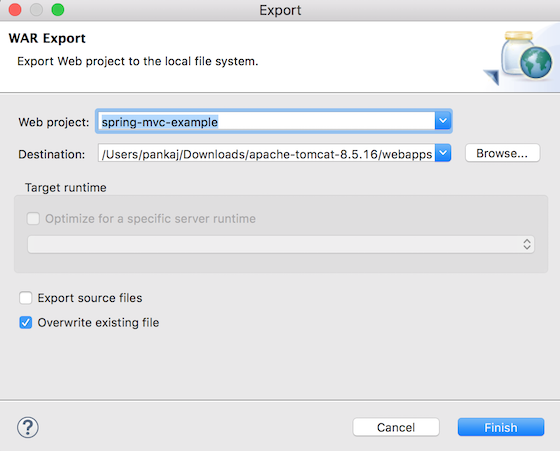
Spring MVC 示例测试
一旦部署了Spring MVC项目,我们可以在https://localhost:8080/spring-mvc-example/访问主页。根据需要更改Tomcat端口和上下文根。这就是Spring MVC示例的全部内容,我已尽量保持简单。但如果您仍然遇到任何问题,请通过评论告诉我,我会尽力帮助您解决。您可以从下面的链接下载最终的Spring MVC示例项目。
参考:官方页面
Source:
https://www.digitalocean.com/community/tutorials/spring-mvc-example


