今天我们将深入了解Spring依赖注入。Spring框架的核心概念是“依赖注入”和“面向切面编程”。我之前已经写过关于Java依赖注入以及我们如何可以使用Google Guice框架来自动化我们应用程序中的这个过程。
Spring依赖注入
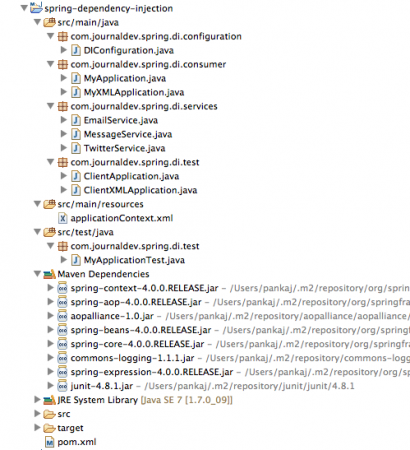
 本教程旨在提供有关Spring依赖注入示例的详细信息,包括基于注解的配置和基于XML文件的配置。我还将为应用程序提供JUnit测试用例示例,因为易于测试是依赖注入的主要好处之一。我创建了一个名为spring-dependency-injection的Maven项目,其结构如下图所示。
  让我们逐个看看每个组件。
Spring依赖注入 – Maven依赖项
I have added Spring and JUnit maven dependencies in pom.xml file, final pom.xml code is below.
<project xmlns="https://maven.apache.org/POM/4.0.0" xmlns:xsi="https://www.w3.org/2001/XMLSchema-instance"
	xsi:schemaLocation="https://maven.apache.org/POM/4.0.0 https://maven.apache.org/xsd/maven-4.0.0.xsd">
	<modelVersion>4.0.0</modelVersion>
	<groupId>com.journaldev.spring</groupId>
	<artifactId>spring-dependency-injection</artifactId>
	<version>0.0.1-SNAPSHOT</version>

	<dependencies>
		<dependency>
			<groupId>org.springframework</groupId>
			<artifactId>spring-context</artifactId>
			<version>4.0.0.RELEASE</version>
		</dependency>
		<dependency>
			<groupId>junit</groupId>
			<artifactId>junit</artifactId>
			<version>4.8.1</version>
			<scope>test</scope>
		</dependency>
	</dependencies>

</project>
当前稳定版本的Spring框架是4.0.0.RELEASE,JUnit当前版本是4.8.1,如果您使用其他版本,则项目可能需要进行一些更改。如果您构建该项目,您会注意到由于传递依赖关系,还会添加一些其他的jar文件到Maven依赖项中,就像上面的图像一样。
Spring 依赖注入 – 服务类
假设我们想要向用户发送电子邮件和 Twitter 消息。对于依赖注入,我们需要为服务定义一个基类。因此,我有一个带有单个方法声明的 MessageService 接口,用于发送消息。
package com.journaldev.spring.di.services;

public interface MessageService {

	boolean sendMessage(String msg, String rec);
}
现在我们将有实际的实现类来发送电子邮件和 Twitter 消息。
package com.journaldev.spring.di.services;

public class EmailService implements MessageService {

	public boolean sendMessage(String msg, String rec) {
		System.out.println("Email Sent to "+rec+ " with Message="+msg);
		return true;
	}

}
package com.journaldev.spring.di.services;

public class TwitterService implements MessageService {

	public boolean sendMessage(String msg, String rec) {
		System.out.println("Twitter message Sent to "+rec+ " with Message="+msg);
		return true;
	}

}
现在我们的服务已经准备好了,我们可以继续编写将使用该服务的组件类。
Spring 依赖注入 – 组件类
让我们编写一个消费者类来使用上述服务。我们将有两个消费者类 – 一个带有 Spring 注解用于自动装配,另一个没有注解,装配配置将在 XML 配置文件中提供。
package com.journaldev.spring.di.consumer;

import org.springframework.beans.factory.annotation.Autowired;
import org.springframework.context.annotation.ComponentScan;
import org.springframework.stereotype.Component;

import com.journaldev.spring.di.services.MessageService;

@Component
public class MyApplication {

	//基于字段的依赖注入
	//@Autowired
	private MessageService service;

//基于构造函数的依赖注入
 //@Autowired
 //public MyApplication(MessageService svc){
//		this.service=svc;
//	}

	@Autowired
	public void setService(MessageService svc){
		this.service=svc;
	}

	public boolean processMessage(String msg, String rec){
		//一些像验证、日志记录等的魔法
		return this.service.sendMessage(msg, rec);
	}
}
MyApplication 类的一些重要点:
@Component注解被添加到类中,以便在Spring框架扫描组件时,该类将被视为组件。@Component注解仅可应用于类,其保留策略为Runtime。如果您对注解的保留策略不熟悉,我建议您阅读Java注解教程。@Autowired注解用于通知Spring自动装配是必需的。这可以应用于字段、构造函数和方法。此注解允许我们在组件中实现基于构造函数、基于字段或基于方法的依赖注入。- 在我们的示例中,我正在使用基于方法的依赖注入。您可以取消注释构造方法以切换到基于构造函数的依赖注入。
现在让我们编写一个类,不使用注解。
package com.journaldev.spring.di.consumer;

import com.journaldev.spring.di.services.MessageService;

public class MyXMLApplication {

	private MessageService service;

	//基于构造函数的依赖注入
//	public MyXMLApplication(MessageService svc) {
//		this.service = svc;
//	}

	//基于setter的依赖注入
	public void setService(MessageService svc){
		this.service=svc;
	}

	public boolean processMessage(String msg, String rec) {
		// 一些像验证、日志记录等的魔法
		return this.service.sendMessage(msg, rec);
	}
}
A simple application class consuming the service. For XML based configuration, we can use implement either constructor-based spring dependency injection or method-based spring dependency injection. Note that method-based and setter-based injection approaches are same, it’s just that some prefer calling it setter-based and some call it method-based.
使用注解进行Spring依赖注入配置
对于基于注解的配置,我们需要编写一个配置器类,该类将用于将实际实现的Bean注入到组件属性中。
package com.journaldev.spring.di.configuration;

import org.springframework.context.annotation.Bean;
import org.springframework.context.annotation.ComponentScan;
import org.springframework.context.annotation.Configuration;

import com.journaldev.spring.di.services.EmailService;
import com.journaldev.spring.di.services.MessageService;

@Configuration
@ComponentScan(value={"com.journaldev.spring.di.consumer"})
public class DIConfiguration {

	@Bean
	public MessageService getMessageService(){
		return new EmailService();
	}
}
与上述类相关的一些重要点是:
- 使用
@Configuration注解让Spring知道这是一个配置类。 - 使用
@ComponentScan注解与@Configuration注解一起,指定要查找组件类的包。 - 使用
@Bean注解告诉Spring框架,该方法应该用于获取Bean的实现,以便注入到组件类中。
让我们编写一个简单的程序来测试我们基于注解的Spring依赖注入示例。
package com.journaldev.spring.di.test;

import org.springframework.context.annotation.AnnotationConfigApplicationContext;

import com.journaldev.spring.di.configuration.DIConfiguration;
import com.journaldev.spring.di.consumer.MyApplication;

public class ClientApplication {

	public static void main(String[] args) {
		AnnotationConfigApplicationContext context = new AnnotationConfigApplicationContext(DIConfiguration.class);
		MyApplication app = context.getBean(MyApplication.class);

		app.processMessage("Hi Pankaj", "[email protected]");

		//关闭上下文
		context.close();
	}

}
AnnotationConfigApplicationContext 是 AbstractApplicationContext 抽象类的实现,当使用注解时,它用于为组件自动装配服务。 AnnotationConfigApplicationContext 构造函数以类作为参数,该类将用于获取要注入到组件类中的 bean 实现。 getBean(Class) 方法返回组件对象,并使用配置来自动装配对象。 上下文对象资源密集,所以在完成后应关闭它们。 当我们运行上面的程序时,我们会得到以下输出。
Dec 16, 2013 11:49:20 PM org.springframework.context.support.AbstractApplicationContext prepareRefresh
INFO: Refreshing org.springframework.context.annotation.AnnotationConfigApplicationContext@3067ed13: startup date [Mon Dec 16 23:49:20 PST 2013]; root of context hierarchy
Email Sent to [email protected] with Message=Hi Pankaj
Dec 16, 2013 11:49:20 PM org.springframework.context.support.AbstractApplicationContext doClose
INFO: Closing org.springframework.context.annotation.AnnotationConfigApplicationContext@3067ed13: startup date [Mon Dec 16 23:49:20 PST 2013]; root of context hierarchy
基于 XML 的 Spring 依赖注入配置
我们将创建带有以下数据的 Spring 配置文件,文件名可以是任意的。 applicationContext.xml 代码:
<?xml version="1.0" encoding="UTF-8"?>
<beans xmlns="https://www.springframework.org/schema/beans"
	xmlns:xsi="https://www.w3.org/2001/XMLSchema-instance"
	xsi:schemaLocation="
https://www.springframework.org/schema/beans https://www.springframework.org/schema/beans/spring-beans-4.0.xsd">

<!--
	<bean id="MyXMLApp" class="com.journaldev.spring.di.consumer.MyXMLApplication">
		<constructor-arg>
			<bean class="com.journaldev.spring.di.services.TwitterService" />
		</constructor-arg>
	</bean>
-->
	<bean id="twitter" class="com.journaldev.spring.di.services.TwitterService"></bean>
	<bean id="MyXMLApp" class="com.journaldev.spring.di.consumer.MyXMLApplication">
		<property name="service" ref="twitter"></property>
	</bean>
</beans>
请注意,上述 XML 包含基于构造函数和基于 setter 的 Spring 依赖注入的配置。 由于 MyXMLApplication 使用 setter 方法进行注入,bean 配置包含 property 元素用于注入。 对于基于构造函数的注入,我们必须使用 constructor-arg 元素。 配置 XML 文件位于源目录中,因此在构建后它将位于 classes 目录中。 让我们看看如何在简单程序中使用基于 XML 的配置。
package com.journaldev.spring.di.test;

import org.springframework.context.support.ClassPathXmlApplicationContext;

import com.journaldev.spring.di.consumer.MyXMLApplication;

public class ClientXMLApplication {

	public static void main(String[] args) {
		ClassPathXmlApplicationContext context = new ClassPathXmlApplicationContext(
				"applicationContext.xml");
		MyXMLApplication app = context.getBean(MyXMLApplication.class);

		app.processMessage("Hi Pankaj", "[email protected]");

		// 关闭上下文
		context.close();
	}

}
ClassPathXmlApplicationContext 用于通过提供配置文件的位置获取 ApplicationContext 对象。它有多个重载的构造函数,我们还可以提供多个配置文件。其余的代码与基于注解的配置测试程序相似,唯一的区别是根据我们的配置选择获取 ApplicationContext 对象的方式。当我们运行上述程序时,我们会得到以下输出。
Dec 17, 2013 12:01:23 AM org.springframework.context.support.AbstractApplicationContext prepareRefresh
INFO: Refreshing org.springframework.context.support.ClassPathXmlApplicationContext@4eeaabad: startup date [Tue Dec 17 00:01:23 PST 2013]; root of context hierarchy
Dec 17, 2013 12:01:23 AM org.springframework.beans.factory.xml.XmlBeanDefinitionReader loadBeanDefinitions
INFO: Loading XML bean definitions from class path resource [applicationContext.xml]
Twitter message Sent to [email protected] with Message=Hi Pankaj
Dec 17, 2013 12:01:23 AM org.springframework.context.support.AbstractApplicationContext doClose
INFO: Closing org.springframework.context.support.ClassPathXmlApplicationContext@4eeaabad: startup date [Tue Dec 17 00:01:23 PST 2013]; root of context hierarchy
请注意,Spring Framework 的一些输出是由其编写的。由于 Spring Framework 使用 log4j 进行日志记录,而我没有配置它,因此输出被写入到控制台。
Spring 依赖注入 JUnit 测试用例
在 Spring 中依赖注入的一个主要优势是更容易拥有模拟服务类,而不是使用实际的服务。因此,我将以上所有的学习内容结合起来,编写了一个单一的 JUnit 4 测试类,用于在 Spring 中进行依赖注入。
package com.journaldev.spring.di.test;

import org.junit.Assert;
import org.junit.After;
import org.junit.Before;
import org.junit.Test;
import org.springframework.context.annotation.AnnotationConfigApplicationContext;
import org.springframework.context.annotation.Bean;
import org.springframework.context.annotation.ComponentScan;
import org.springframework.context.annotation.Configuration;

import com.journaldev.spring.di.consumer.MyApplication;
import com.journaldev.spring.di.services.MessageService;

@Configuration
@ComponentScan(value="com.journaldev.spring.di.consumer")
public class MyApplicationTest {

	private AnnotationConfigApplicationContext context = null;

	@Bean
	public MessageService getMessageService() {
		return new MessageService(){

			public boolean sendMessage(String msg, String rec) {
				System.out.println("Mock Service");
				return true;
			}

		};
	}

	@Before
	public void setUp() throws Exception {
		context = new AnnotationConfigApplicationContext(MyApplicationTest.class);
	}

	@After
	public void tearDown() throws Exception {
		context.close();
	}

	@Test
	public void test() {
		MyApplication app = context.getBean(MyApplication.class);
		Assert.assertTrue(app.processMessage("Hi Pankaj", "[email protected]"));
	}

}
这个类使用@Configuration和@ComponentScan注解,因为getMessageService()方法返回MessageService的模拟实现。这就是为什么getMessageService()被@Bean注解标注的原因。由于我正在测试配置了注解的MyApplication类,我在setUp()方法中使用AnnotationConfigApplicationContext并创建其对象。上下文在tearDown()方法中关闭。test()方法的代码只是从上下文中获取组件对象并进行测试。你是否想知道Spring框架是如何进行自动装配并调用Spring框架不知道的方法的呢?这是通过大量使用Java反射来实现的,我们可以在运行时使用它来分析和修改类的行为。
从上述URL下载示例Spring依赖注入(DI)项目,并尽情体验以了解更多。
Source:
https://www.digitalocean.com/community/tutorials/spring-dependency-injection


