今天我们将介绍使用@MultipartConfig注解和javax.servlet.http.Part的Servlet 3文件上传示例。之前我写过一篇关于Servlet文件上传的文章,并且我使用了Apache FileUpload API,但在这里我们将使用Servlet 3文件上传功能。
Servlet 3文件上传
由于文件上传是Web应用程序中常见的任务,Servlet规范3.0提供了额外的支持,用于将文件上传到服务器,我们不需要依赖于任何第三方API。在本教程中,我们将看到如何使用Servlet 3.0 API将文件上传到服务器。
MultipartConfig
我们需要使用MultipartConfig注解来注释文件上传处理器servlet,以处理用于上传文件到服务器的multipart/form-data请求。MultipartConfig注解具有以下属性:
- fileSizeThreshold:我们可以指定文件写入磁盘之后的大小阈值。大小值以字节为单位,所以1024*1024*10表示10 MB。
- 位置:文件将默认存储的目录,其默认值为“”。
- maxFileSize:允许上传文件的最大大小,以字节为单位提供。默认值为-1L,表示无限制。
- maxRequestSize:multipart/form-data请求允许的最大大小。默认值为-1L,表示无限制。
了解有关注释的更多信息,请参阅Java注释教程。
Part接口
Part接口表示在multipart/form-data POST请求中接收到的部分或表单项。一些重要的方法包括getInputStream(),write(String fileName),我们可以用它来读写文件。
HttpServletRequest更改
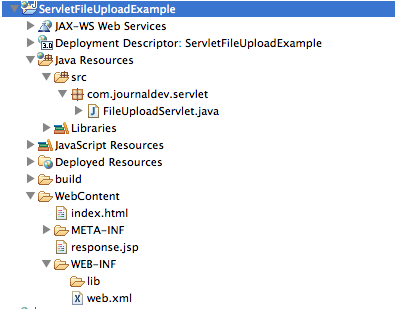
新方法已添加到HttpServletRequest中,以通过getParts()方法获取multipart/form-data请求中的所有部分。我们可以使用getPart(String partName)方法获取特定部分。让我们看一个简单的项目,我们将在其中使用上述API方法来使用servlet上传文件。我们的项目结构将如下图所示。
HTML表单
我们有一个简单的HTML页面,我们可以在其中选择要上传的文件,并提交请求到服务器以上传它。index.html
<html>
<head></head>
<body>
<form action="FileUploadServlet" method="post" enctype="multipart/form-data">
Select File to Upload:<input type="file" name="fileName">
<br>
<input type="submit" value="Upload">
</form>
</body>
</html>
文件上传Servlet
这是我们的文件上传Servlet实现。FileUploadServlet.java
package com.journaldev.servlet;

import java.io.File;
import java.io.IOException;

import javax.servlet.ServletException;
import javax.servlet.annotation.MultipartConfig;
import javax.servlet.annotation.WebServlet;
import javax.servlet.http.HttpServlet;
import javax.servlet.http.HttpServletRequest;
import javax.servlet.http.HttpServletResponse;
import javax.servlet.http.Part;

@WebServlet("/FileUploadServlet")
@MultipartConfig(fileSizeThreshold=1024*1024*10, 	// 10 MB
                 maxFileSize=1024*1024*50,      	// 50 MB
                 maxRequestSize=1024*1024*100)   	// 100 MB
public class FileUploadServlet extends HttpServlet {

    private static final long serialVersionUID = 205242440643911308L;

    /**
     * Directory where uploaded files will be saved, its relative to
     * the web application directory.
     */
    private static final String UPLOAD_DIR = "uploads";

    protected void doPost(HttpServletRequest request,
            HttpServletResponse response) throws ServletException, IOException {
        // 获取web应用程序的绝对路径
        String applicationPath = request.getServletContext().getRealPath("");
        // 构造保存上传文件的目录路径
        String uploadFilePath = applicationPath + File.separator + UPLOAD_DIR;

        // 如果目录不存在,则创建保存目录
        File fileSaveDir = new File(uploadFilePath);
        if (!fileSaveDir.exists()) {
            fileSaveDir.mkdirs();
        }
        System.out.println("Upload File Directory="+fileSaveDir.getAbsolutePath());

        String fileName = null;
        //从请求中获取所有部分并将其写入服务器上的文件
        for (Part part : request.getParts()) {
            fileName = getFileName(part);
            part.write(uploadFilePath + File.separator + fileName);
        }

        request.setAttribute("message", fileName + " File uploaded successfully!");
        getServletContext().getRequestDispatcher("/response.jsp").forward(
                request, response);
    }

    /**
     * Utility method to get file name from HTTP header content-disposition
     */
    private String getFileName(Part part) {
        String contentDisp = part.getHeader("content-disposition");
        System.out.println("content-disposition header= "+contentDisp);
        String[] tokens = contentDisp.split(";");
        for (String token : tokens) {
            if (token.trim().startsWith("filename")) {
                return token.substring(token.indexOf("=") + 2, token.length()-1);
            }
        }
        return "";
    }
}
注意使用@MultipartConfig注解为上传文件指定不同的大小参数。我们需要使用请求头“content-disposition”属性来获取客户端发送的文件名,然后将文件保存为相同的名称。文件保存的目录位置相对于我保存文件的Web应用程序,您可以将其配置到其他位置,例如在Apache Commons FileUpload示例中。
响应JSP
A simple JSP page that will be sent as response to client once the file is uploaded successfully to server. response.jsp
<%@ page language="java" contentType="text/html; charset=ISO-8859-1"
    pageEncoding="ISO-8859-1"%>
<!DOCTYPE html PUBLIC "-//W3C//DTD HTML 4.01 Transitional//EN"
    "https://www.w3.org/TR/html4/loose.dtd">
<html>
<head>
<title>Upload File Response</title>
</head>
<body>
	<%-- Using JSP EL to get message attribute value from request scope --%>
    <h2>${requestScope.message}</h2>
</body>
</html>
部署描述符
对于Servlet文件上传,web.xml文件中没有新的内容,它仅用于将index.html设置为欢迎文件。web.xml
<?xml version="1.0" encoding="UTF-8"?>
<web-app xmlns:xsi="https://www.w3.org/2001/XMLSchema-instance" xmlns="https://java.sun.com/xml/ns/javaee" xsi:schemaLocation="https://java.sun.com/xml/ns/javaee https://java.sun.com/xml/ns/javaee/web-app_3_0.xsd" version="3.0">
  <display-name>ServletFileUploadExample</display-name>
  <welcome-file-list>
    <welcome-file>index.html</welcome-file>
  </welcome-file-list>
</web-app>
现在当我们运行应用程序时,我们会得到以下页面作为响应。
 日志将显示文件保存的目录位置和content-disposition头信息。
Upload File Directory=/Users/pankaj/Documents/workspace/j2ee/.metadata/.plugins/org.eclipse.wst.server.core/tmp0/wtpwebapps/ServletFileUploadExample/uploads
content-disposition header= form-data; name="fileName"; filename="IMG_2046.jpg"
I am running Tomcat through Eclipse, that’s why file location is like this. If you run tomcat through command line and deploy application by exporting as WAR file into webapps directory, you will get different structure but a clear one.
Source:
https://www.digitalocean.com/community/tutorials/servlet-3-file-upload-multipartconfig-part


