


在本系列中,我们详细探讨了至少两种访问控制方法:标准ugo/rwx权限(管理用户和组 – 第3部分)和访问控制列表(在文件系统上配置ACL – 第7部分)。
虽然作为第一级权限和访问控制机制是必要的,但它们存在一些限制,这些限制通过Security Enhanced Linux(简称SELinux)得到解决。
其中之一是,用户可以通过粗糙的chmod命令暴露文件或目录给安全漏洞,从而导致访问权限的意外传播。结果,该用户启动的任何进程都可以随心所欲地处理用户拥有的文件,最终,一个恶意或受到 compromise 的软件可以获得对整个系统的 root 级访问权限。
考虑到这些限制,美国国家安全局(NSA)首先设计了SELinux,这是一种灵活的强制访问控制方法,用于限制进程访问或执行系统对象(如文件、目录、网络端口等)的能力至最低权限模型,后续可以根据需要进行修改。简而言之,系统的每个元素仅被赋予执行所需功能的访问权限。
在 RHEL 7 中,SELinux 被整合到内核中,并默认以 Enforcing 模式启用。在本文中,我们将简要解释与 SELinux 相关的基本概念及其运作。
SELinux 模式
SELinux 可以以三种不同方式运行:
- Enforcing:基于 SELinux 策略规则拒绝访问,这些规则是控制安全引擎的一套准则。
- Permissive:SELinux 不会拒绝访问,但会记录在执行强制模式下将会被拒绝的操作。
- Disabled(不用多说)。
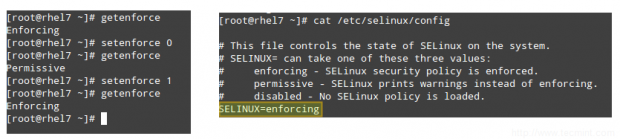
命令 getenforce 显示 SELinux 的当前模式,而 setenforce(后跟 1 或 0)用于在当前会话中将模式更改为 Enforcing 或 Permissive。
为了实现在注销和重新启动后的持久性,您需要编辑 /etc/selinux/config 文件,并将 SELINUX 变量设置为 enforcing、permissive 或 disabled:
# getenforce
# setenforce 0
# getenforce
# setenforce 1
# getenforce
# cat /etc/selinux/config
通常,您会使用 setenforce 在 SELinux 模式之间切换(从强制切换到宽松模式,然后切回)。如果 SELinux 当前设置为 enforcing 而您遇到某个问题时,当您将其设置为 permissive 时问题消失了,您可以确定您正在查看一个 SELinux 权限问题。
SELinux上下文
A SELinux context consists of an access control environment where decisions are made based on SELinux user, role, and type (and optionally a level):
- A SELinux user complements a regular Linux user account by mapping it to a SELinux user account, which in turn is used in the SELinux context for processes in that session, in order to explicitly define their allowed roles and levels.
- 角色的概念充当领域和SELinux用户之间的中介,它定义了哪些进程领域和文件类型可以被访问。这将保护您的系统免受特权升级攻击的漏洞。
- A type defines an SELinux file type or an SELinux process domain. Under normal circumstances, processes are prevented from accessing files that other processes use, and and from accessing other processes, thus access is only allowed if a specific SELinux policy rule exists that allows it.
让我们通过以下示例看看所有这些是如何工作的。
示例1:更改sshd守护程序的默认端口
在Securing SSH – Part 8中,我们解释了将sshd监听的默认端口更改为服务器防御外部攻击的第一安全措施之一。让我们编辑/etc/ssh/sshd_config文件,并将端口设置为9999:
Port 9999
保存更改,并重新启动sshd:
# systemctl restart sshd
# systemctl status sshd
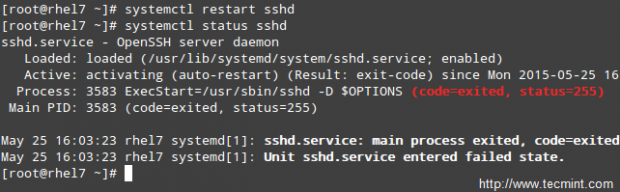
如您所见,sshd启动失败了。但发生了什么?
A quick inspection of /var/log/audit/audit.log indicates that sshd has been denied permissions to start on port 9999 (SELinux log messages include the word “AVC” so that they might be easily identified from other messages) because that is a reserved port for the JBoss Management service:
# cat /var/log/audit/audit.log | grep AVC | tail -1

此时,您可以禁用SELinux(但不要这样做!),如前所述尝试重新启动sshd,它应该可以正常工作。然而,semanage实用程序可以告诉我们需要更改什么,以便我们能够在任何端口上启动sshd而不会出现问题。
运行
# semanage port -l | grep ssh
以获取SELinux允许sshd监听的端口列表。
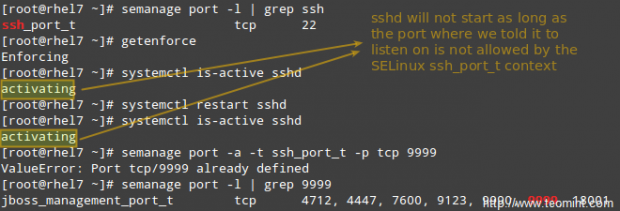
因此,让我们将/etc/ssh/sshd_config中的端口更改为端口9998,将端口添加到ssh_port_t上下文,然后重新启动服务:
# semanage port -a -t ssh_port_t -p tcp 9998
# systemctl restart sshd
# systemctl is-active sshd

正如您所见,此次服务成功启动。这个例子说明了SELinux控制TCP端口号与其自己的端口类型内部定义之间的关系。
示例2:允许httpd发送访问sendmail
这是一个SELinux管理一个进程访问另一个进程的例子。如果您在RHEL 7服务器上实施了mod_security和mod_evasive以及Apache,您需要允许httpd访问sendmail以便在(D)DoS攻击发生后发送邮件通知。在下面的命令中,如果您不希望更改在重启后持久化,请省略-P标志。
# semanage boolean -1 | grep httpd_can_sendmail
# setsebool -P httpd_can_sendmail 1
# semanage boolean -1 | grep httpd_can_sendmail

从上面的例子中可以看出,SELinux布尔设置(或布尔值)是嵌入到SELinux策略中的真/假规则。您可以使用semanage boolean -l列出所有布尔值,也可以将其通过管道传递给grep以筛选输出。
示例3:从非默认目录提供静态网站
假设您正在使用不同于默认目录(/var/www/html)的目录(例如/websites)提供静态网站(如果您将Web文件存储在共享网络驱动器中,并需要将其挂载在/websites上,就可能出现这种情况)。
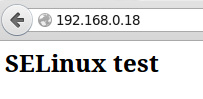
a). Create an index.html file inside /websites with the following contents:
<html>
<h2>SELinux test</h2>
</html>
如果是这样的话,
# ls -lZ /websites/index.html
你会看到 index.html 文件已被标记为 default_t SELinux 类型,Apache 无法访问:

b). Change the DocumentRoot directive in /etc/httpd/conf/httpd.conf to /websites and don’t forget to update the corresponding Directory block. Then, restart Apache.
c). Browse to http://<web server IP address>, and you should get a 503 Forbidden HTTP response.
d). Next, change the label of /websites, recursively, to the httpd_sys_content_t type in order to grant Apache read-only access to that directory and its contents:
# semanage fcontext -a -t httpd_sys_content_t "/websites(/.*)?"
e). Finally, apply the SELinux policy created in d):
# restorecon -R -v /websites
现在重新启动 Apache 并浏览到 http://<web 服务器 IP 地址>,你会看到 html 文件正确显示:
摘要
在本文中,我们已经介绍了 SELinux 的基础知识。请注意,由于该主题的广泛性,单篇文章无法提供详尽的解释,但我们相信本指南中概述的原则将帮助您深入了解更高级的主题,如果您有兴趣的话。
如果我可以的话,让我推荐两个开始学习的基本资源: NSA SELinux 页面 和 RHEL 7 SELinux 用户和管理员 指南。
如果您有任何问题或意见,请随时告诉我们。
Source:
https://www.tecmint.com/selinux-essentials-and-control-filesystem-access/