


作者选择了电子前沿基金会作为Write for Donations计划的捐赠对象。
介绍
Ruby on Rails是一种流行的服务器端Web应用程序框架。它驱动了许多今天在Web上存在的热门应用程序,如GitHub、Basecamp、SoundCloud、Airbnb和Twitch。凭借其对程序员体验的重视和围绕其建立的充满激情的社区,Ruby on Rails将为您提供构建和维护现代Web应用程序所需的工具。
React是一个用于创建前端用户界面的JavaScript库。由Facebook支持,它是当今Web上使用最广泛的前端库之一。React提供了虚拟文档对象模型(DOM)、组件架构和状态管理等功能,使前端开发过程更有组织、更高效。
随着网络前端向与服务器端代码分离的框架发展,将Rails的优雅与React的高效结合起来,可以让您构建强大而现代的应用程序,这些应用程序受到当前趋势的启发。通过使用React在Rails视图中渲染组件(而不是Rails模板引擎),您的应用程序将受益于JavaScript和前端开发的最新进展,同时利用Ruby on Rails的表现力。
在本教程中,您将创建一个Ruby on Rails应用程序,用于存储您喜爱的食谱,然后使用React前端显示它们。完成后,您将能够使用一个由Bootstrap样式化的React界面来创建、查看和删除食谱:
先决条件
要按照本教程操作,您需要:
-
Node.js和npm已安装在您的开发机器上。本教程使用Node.js版本16.14.0和npm版本8.3.1。Node.js是一个JavaScript运行时环境,允许您在浏览器之外运行代码。它带有一个预安装的包管理器称为npm,它允许您安装和更新包。要在Ubuntu 20.04或macOS上安装这些,请按照在Ubuntu 20.04上安装Node.js的方法中的“使用PPA安装”部分,或按照如何在macOS上安装Node.js并创建本地开发环境中的步骤。
-
在您的开发机器上安装了 Yarn 包管理器,这将允许您下载 React 框架。本教程在版本 1.22.10 上进行了测试;要安装此依赖项,请按照 官方 Yarn 安装指南 进行操作。
-
已安装Ruby on Rails。要获得此内容,请按照我们在Ubuntu 20.04上使用rbenv安装Ruby on Rails的指南How to Install Ruby on Rails with rbenv on Ubuntu 20.04进行操作。如果您想在macOS上开发此应用程序,可以使用How To Install Ruby on Rails with rbenv on macOS。本教程已在Ruby版本3.1.2和Rails版本7.0.4上进行了测试,因此在安装过程中请确保指定这些版本。
注意: Rails版本7不向后兼容。如果您使用Rails版本5,请访问有关如何在Ubuntu 18.04上设置具有React前端的Ruby on Rails v5项目的教程。
- 安装了PostgreSQL,如步骤1和2中描述的那样如何在Ubuntu 20.04上使用PostgreSQL与您的Ruby on Rails应用程序或如何在macOS上使用PostgreSQL与您的Ruby on Rails应用程序。要按照本教程操作,您可以使用PostgreSQL版本12或更高版本。如果您想在Linux的其他发行版或其他操作系统上开发此应用程序,请参阅官方的PostgreSQL下载页面。有关如何使用PostgreSQL的更多信息,请参阅如何安装和使用PostgreSQL。
步骤1 — 创建新的Rails应用程序
您将在此步骤中在Rails应用程序框架上构建您的菜谱应用程序。首先,您将创建一个新的Rails应用程序,该应用程序将设置为与React一起使用。
Rails提供了几个称为生成器的脚本,这些脚本会创建构建现代Web应用程序所需的一切。要查看完整的命令列表以及它们的作用,请在终端中运行以下命令:
- rails -h
这个命令将产生一个全面的选项列表,允许您设置应用程序的参数。 列出的命令之一是 new 命令,它创建一个新的 Rails 应用程序。
现在,您将使用 new 生成器创建一个新的 Rails 应用程序。 在您的终端中运行以下命令:
- rails new rails_react_recipe -d postgresql -j esbuild -c bootstrap -T
前面的命令将在名为 rails_react_recipe 的目录中创建一个新的 Rails 应用程序,安装所需的 Ruby 和 JavaScript 依赖项,并配置 Webpack。 与此 new 生成器命令相关联的标志包括以下内容:
-
-d标志指定首选数据库引擎,本例中为 PostgreSQL。 -
-j标志指定应用程序的 JavaScript 方法。 Rails 提供了几种不同的处理 Rails 应用程序中 JavaScript 代码的方法。 传递给-j标志的esbuild选项指示 Rails 预配置 esbuild 作为首选的 JavaScript 打包程序。 -
-c标志指定应用程序的 CSS 处理器。 在这种情况下,Bootstrap 是首选选项。 -
-T标志指示 Rails 跳过测试文件的生成,因为您不会为本教程编写测试。 如果您想使用与 Rails 提供的不同的 Ruby 测试工具,则还建议使用此命令。
一旦命令完成,转到应用程序的根目录 rails_react_recipe:
- cd rails_react_recipe
接下来,列出目录的内容:
- ls
OutputGemfile       README.md  bin        db   node_modules  storage  yarn.lock
Gemfile.lock  Rakefile   config     lib  package.json  tmp
Procfile.dev  app        config.ru  log  public        vendor
此根目录包含几个自动生成的文件和文件夹,构成了Rails应用程序的结构,其中包括一个package.json文件,其中包含React应用程序的依赖项。
现在您已成功创建了一个新的Rails应用程序,下一步是将其连接到数据库。
第2步 – 设置数据库
在运行新的Rails应用程序之前,您必须首先将其连接到数据库。在此步骤中,您将连接新创建的Rails应用程序到一个PostgreSQL数据库,以便根据需要存储和检索配方数据。
在config/database.yml中找到的database.yml文件包含数据库详细信息,如不同开发环境的数据库名称。Rails通过在环境名称后附加下划线(_)来为各种开发环境指定数据库名称。在本教程中,您将使用默认的数据库配置值,但如果需要,您可以更改配置值。
注意:此时,您可以更改 config/database.yml 来设置 Rails 将使用哪个 PostgreSQL 角色来创建您的数据库。在先决条件中,您创建了一个由 如何在 Ruby on Rails 应用程序中使用 PostgreSQL 教程中的密码保护的角色。如果您还没有设置用户,则可以按照同一先决条件教程中的 第 4 步 —— 配置和创建您的数据库 的说明进行操作。
Rails 提供了许多命令,使得开发 Web 应用程序变得容易,其中包括用于处理数据库的命令,如 create、drop 和 reset。要为您的应用程序创建数据库,请在终端中运行以下命令:
- rails db:create
此命令将创建一个 development 和 test 数据库,生成以下输出:
OutputCreated database 'rails_react_recipe_development'
Created database 'rails_react_recipe_test'
现在,应用程序已连接到数据库,请通过运行以下命令启动应用程序:
- bin/dev
Rails 提供了一个替代 bin/dev 脚本,它通过使用 app 根目录中的 Procfile.dev 文件中的命令来启动 Rails 应用程序,使用 Foreman gem。
一旦运行此命令,您的命令提示符将消失,并显示以下输出:
Outputstarted with pid 70099
started with pid 70100
started with pid 70101
yarn run v1.22.10
yarn run v1.22.10
$ esbuild app/javascript/*.* --bundle --sourcemap --outdir=app/assets/builds --public-path=assets --watch
$ sass ./app/assets/stylesheets/application.bootstrap.scss:./app/assets/builds/application.css --no-source-map --load-path=node_modules --watch
=> Booting Puma
=> Rails 7.0.4 application starting in development
=> Run `bin/rails server --help` for more startup options
[watch] build finished, watching for changes...
Puma starting in single mode...
* Puma version: 5.6.5 (ruby 3.1.2-p20) ("Birdie's Version")
*  Min threads: 5
*  Max threads: 5
*  Environment: development
*          PID: 70099
* Listening on http://127.0.0.1:3000
* Listening on http://[::1]:3000
Use Ctrl-C to stop
Sass is watching for changes. Press Ctrl-C to stop.
为了访问您的应用程序,请打开浏览器窗口并导航至http://localhost:3000。Rails默认的欢迎页面将加载,这意味着您已经正确设置了Rails应用程序:
要停止Web服务器,请在运行服务器的终端中按下CTRL+C。您将收到来自Puma的告别消息:
Output^C SIGINT received, starting shutdown
- Gracefully stopping, waiting for requests to finish
=== puma shutdown: 2019-07-31 14:21:24 -0400 ===
- Goodbye!
Exiting
sending SIGTERM to all processes
terminated by SIGINT
terminated by SIGINT
exited with code 0
然后,您的终端提示将重新出现。
您已成功为您的食谱应用程序设置了数据库。在下一步中,您将安装所需的JavaScript依赖项,以组装React前端。
步骤3 — 安装前端依赖项
在此步骤中,您将安装在您的食谱应用程序前端需要的JavaScript依赖项。它们包括:
- React用于构建用户界面。
- React DOM以使React与浏览器DOM交互。
- React Router用于处理React应用程序中的导航。
运行以下命令使用Yarn软件包管理器安装这些软件包:
- yarn add react react-dom react-router-dom
这个命令使用Yarn来安装指定的包,并将它们添加到package.json文件中。要验证这一点,请打开项目根目录下的package.json文件:
- nano package.json
安装的包将列在dependencies键下:
{
  "name": "app",
  "private": "true",
  "dependencies": {
    "@hotwired/stimulus": "^3.1.0",
    "@hotwired/turbo-rails": "^7.1.3",
    "@popperjs/core": "^2.11.6",
    "bootstrap": "^5.2.1",
    "bootstrap-icons": "^1.9.1",
    "esbuild": "^0.15.7",
    "react": "^18.2.0",
    "react-dom": "^18.2.0",
    "react-router-dom": "^6.3.0",
    "sass": "^1.54.9"
  },
  "scripts": {
    "build": "esbuild app/javascript/*.* --bundle --sourcemap --outdir=app/assets/builds --public-path=assets",
    "build:css": "sass ./app/assets/stylesheets/application.bootstrap.scss:./app/assets/builds/application.css --no-source-map --load-path=node_modules"
  }
}
按下CTRL+X关闭文件。
您已经为您的应用程序安装了一些前端依赖项。接下来,您将为您的食谱应用程序设置一个主页。
第4步 — 设置主页
安装了所需的依赖项后,您现在将为应用程序创建一个主页,作为用户首次访问应用程序时的登陆页面。
Rails遵循模型-视图-控制器架构模式。在MVC模式中,控制器的目的是接收特定的请求并将它们传递给适当的模型或视图。当前,当在浏览器中加载根URL时,应用程序会显示Rails欢迎页面。要更改这一点,您将创建一个控制器和视图用于主页,然后将其与一个路由匹配。
Rails提供了一个controller生成器,用于创建控制器。 controller生成器接收一个控制器名称和相应的操作(action)。有关详细信息,请查阅Rails文档。
本教程将称此控制器为Homepage。运行以下命令以创建一个带有index操作的Homepage控制器:
- rails g controller Homepage index
注意:
在Linux上,错误FATAL: Listen error: unable to monitor directories for changes.可能是由于系统对您的机器能够监视更改的文件数量的限制引起的。运行以下命令来解决此问题:
- echo fs.inotify.max_user_watches=524288 | sudo tee -a /etc/sysctl.conf && sudo sysctl -p
此命令将永久增加您可以使用Listen监视的目录数至524288。您可以通过运行相同的命令并将524288替换为所需的数字来再次更改此设置。
运行controller命令会生成以下文件:
- A
homepage_controller.rbfile for receiving all homepage-related requests. This file contains theindexaction you specified in the command. - A
homepage_helper.rbfile for adding helper methods related to theHomepagecontroller. - 一个
index.html.erb文件,用作与主页相关的任何内容的视图页面。
除了通过运行Rails命令创建的这些新页面外,Rails还会更新位于config/routes.rb的路由文件,添加一个用于主页的get路由,您将将其修改为根路由。
A root route in Rails specifies what will show up when users visit the root URL of your application. In this case, you want your users to see your homepage. Open the routes file located at config/routes.rb in your favorite editor:
- nano config/routes.rb
在此文件中,将get 'homepage/index'替换为root 'homepage#index',使文件匹配以下内容:
Rails.application.routes.draw do
  root 'homepage#index'
  # 有关此文件中可用 DSL 的详细信息,请参阅 http://guides.rubyonrails.org/routing.html
end
此修改指示Rails将对应用程序根的请求映射到Homepage控制器的index操作,该操作进而在浏览器中呈现app/views/homepage/index.html.erb文件中的内容。
保存并关闭文件。
为了验证是否起作用,请启动应用程序:
- bin/dev
当您在浏览器中打开或刷新应用程序时,将加载应用程序的新着陆页:

一旦您验证应用程序正在运行,按CTRL+C停止服务器。
接下来,打开〜/rails_react_recipe/app/views/homepage/index.html.erb文件:
- nano ~/rails_react_recipe/app/views/homepage/index.html.erb
删除文件内的代码,然后将文件保存为空。通过这样做,您确保index.html.erb的内容不会干扰React渲染您前端的内容。
现在,您已经为应用程序设置了主页,可以转到下一部分,在那里您将配置应用程序的前端以使用React。
第 5 步 — 配置 React 作为您的 Rails 前端
在这一步中,您将配置Rails以在应用程序的前端使用React,而不是其模板引擎。这个新的配置将允许您使用React创建一个在视觉上更具吸引力的主页。
在生成Rails应用程序时,通过指定esbuild选项,大部分设置已经完成,使JavaScript能够与Rails无缝工作。现在只需将React应用程序的入口点加载到esbuild JavaScript文件的入口点中。要做到这一点,首先在app/javascript目录中创建一个components目录:
- mkdir ~/rails_react_recipe/app/javascript/components
components目录将存放主页的组件,以及应用程序中的其他React组件,包括React应用程序的入口文件。
接下来,打开位于app/javascript/application.js的application.js文件:
- nano ~/rails_react_recipe/app/javascript/application.js
将下面的代码添加到文件中:
// 构建脚本的入口点在你的package.json中
import "@hotwired/turbo-rails"
import "./controllers"
import * as bootstrap from "bootstrap"
import "./components"
添加到application.js文件的这行代码将导入index.jsx文件中的代码,使其对esbuild可用于捆绑。通过将/components目录导入Rails应用程序的JavaScript入口点,您可以为主页创建一个React组件。主页将包含一些文本和一个用于查看所有食谱的行动按钮。
保存并关闭文件。
然后,在components目录中创建一个Home.jsx文件:
- nano ~/rails_react_recipe/app/javascript/components/Home.jsx
将以下代码添加到文件中:
import React from "react";
import { Link } from "react-router-dom";

export default () => (
  <div className="vw-100 vh-100 primary-color d-flex align-items-center justify-content-center">
    <div className="jumbotron jumbotron-fluid bg-transparent">
      <div className="container secondary-color">
        <h1 className="display-4">Food Recipes</h1>
        <p className="lead">
          A curated list of recipes for the best homemade meal and delicacies.
        </p>
        <hr className="my-4" />
        <Link
          to="/recipes"
          className="btn btn-lg custom-button"
          role="button"
        >
          View Recipes
        </Link>
      </div>
    </div>
  </div>
);
在这段代码中,你导入了 React 和来自 React Router 的 `Link` 组件。`Link` 组件创建了一个超链接,用于从一个页面导航到另一个页面。然后,你创建并导出了一个包含一些标记语言的功能性组件,用 Bootstrap 类进行样式设计。
保存并关闭文件。
有了你的 `Home` 组件,现在你将使用 React Router 进行路由设置。在 `app/javascript` 目录下创建一个 `routes` 目录:
- mkdir ~/rails_react_recipe/app/javascript/routes
`routes` 目录将包含一些带有相应组件的路由。每当加载任何指定路由时,它将在浏览器中呈现相应的组件。
在 `routes` 目录中,创建一个 `index.jsx` 文件:
- nano ~/rails_react_recipe/app/javascript/routes/index.jsx
添加以下代码:
import React from "react";
import { BrowserRouter as Router, Routes, Route } from "react-router-dom";
import Home from "../components/Home";

export default (
  <Router>
    <Routes>
      <Route path="/" element={<Home />} />
    </Routes>
  </Router>
);
在这个 `index.jsx` 路由文件中,你导入了以下模块:允许你使用 React 的 `React` 模块,以及来自 React Router 的 `BrowserRouter`、`Routes` 和 `Route` 模块,它们一起帮助你从一个路由导航到另一个路由。最后,你导入了你的 `Home` 组件,当请求匹配根路由(`/`)时将呈现该组件。当你想要向应用程序添加更多页面时,可以在此文件中声明一个路由,并将其匹配到你想为该页面呈现的组件。
保存并退出文件。
你现在已经使用 React Router 设置了路由。为了让 React 知道可用的路由并使用它们,这些路由必须在应用程序的入口点可用。为了实现这一点,你需要在一个组件中渲染你的路由,React 将在你的入口文件中渲染这个组件。
在 app/javascript/components 目录中创建一个 App.jsx 文件:
- nano ~/rails_react_recipe/app/javascript/components/App.jsx
将以下代码添加到 App.jsx 文件中:
import React from "react";
import Routes from "../routes";

export default props => <>{Routes}</>;
在 App.jsx 文件中,你需要导入 React 和你刚刚创建的路由文件。然后导出一个组件来渲染这些路由,在应用程序加载时,该组件将在应用程序的入口点渲染,从而使得路由在应用程序加载时可用。fragments
保存并关闭文件。
现在你已经设置了 App.jsx,你可以在你的入口文件中渲染它。在 components 目录中创建一个 index.jsx 文件:
- nano ~/rails_react_recipe/app/javascript/components/index.jsx
将以下代码添加到 index.js 文件中:
import React from "react";
import { createRoot } from "react-dom/client";
import App from "./App";

document.addEventListener("turbo:load", () => {
  const root = createRoot(
    document.body.appendChild(document.createElement("div"))
  );
  root.render(<App />);
});
在 import 行中,你导入了 React 库、ReactDOM 的 createRoot 函数以及你的 App 组件。使用 ReactDOM 的 createRoot 函数,你创建了一个根元素作为页面上附加的 div 元素,并在其中渲染了你的 App 组件。当应用程序加载时,React 将会在页面上的 div 元素内渲染 App 组件的内容。
保存并退出文件。
最后,你将为你的首页添加一些 CSS 样式。
打开`application.bootstrap.scss`文件在你的`~/rails_react_recipe/app/assets/stylesheets/application.bootstrap.scss`目录中:
- nano ~/rails_react_recipe/app/assets/stylesheets/application.bootstrap.scss
接下来,用以下代码替换`application.bootstrap.scss`文件的内容:
@import 'bootstrap/scss/bootstrap';
@import 'bootstrap-icons/font/bootstrap-icons';

.bg_primary-color {
  background-color: #FFFFFF;
}
.primary-color {
  background-color: #FFFFFF;
}
.bg_secondary-color {
  background-color: #293241;
}
.secondary-color {
  color: #293241;
}
.custom-button.btn {
  background-color: #293241;
  color: #FFF;
  border: none;
}
.hero {
  width: 100vw;
  height: 50vh;
}
.hero img {
  object-fit: cover;
  object-position: top;
  height: 100%;
  width: 100%;
}
.overlay {
  height: 100%;
  width: 100%;
  opacity: 0.4;
}
你设置了一些页面的自定义颜色。`hero`部分将为你的网站首页创建一个`hero image`框架,或者一个大的网络横幅,稍后你将添加。此外,`custom-button.btn`样式了用户将用于进入应用程序的按钮。
在你的CSS样式就绪后,保存并退出文件。
接下来,重新启动应用程序的web服务器:
- bin/dev
然后重新加载浏览器中的应用程序。一个全新的首页将加载:

使用CTRL+C停止web服务器。
在这一步中,你配置了应用程序使用React作为其前端。在下一步中,你将创建模型和控制器,使你能够创建、读取、更新和删除菜谱。
第6步 — 创建菜谱控制器和模型
现在您已经为应用程序设置了React前端,您将创建一个Recipe模型和控制器。recipe模型将表示包含用户菜谱信息的数据库表,而控制器将接收和处理创建、读取、更新或删除菜谱的请求。当用户请求菜谱时,菜谱控制器接收此请求并将其传递给菜谱模型,后者从数据库中检索所请求的数据。然后,模型将菜谱数据作为响应返回给控制器。最后,这些信息在浏览器中显示。
首先,使用Rails提供的generate model子命令创建一个Recipe模型,并指定模型的名称以及其列和数据类型。运行以下命令:
- rails generate model Recipe name:string ingredients:text instruction:text image:string
上述命令指示Rails创建一个包含name列(类型为string)、ingredients和instruction列(类型为text)以及image列(类型为string)的Recipe模型。本教程将模型命名为Recipe,因为Rails中的模型使用单数名称,而它们对应的数据库表使用复数名称。
运行generate model命令会创建两个文件,并打印以下输出:
Output      invoke  active_record
      create    db/migrate/20221017220817_create_recipes.rb
      create    app/models/recipe.rb
创建的两个文件是:
- A
recipe.rbfile that holds all the model-related logic. - A
20221017220817_create_recipes.rbfile (the number at the beginning of the file may differ depending on the date when you run the command). This migration file contains the instruction for creating the database structure.
接下来,您将编辑菜谱模型文件,以确保只有有效的数据保存到数据库中。您可以通过向模型添加一些数据库验证来实现这一点。
打开位于app/models/recipe.rb的菜谱模型:
- nano ~/rails_react_recipe/app/models/recipe.rb
在文件中添加以下突出显示的代码行:
class Recipe < ApplicationRecord
  validates :name, presence: true
  validates :ingredients, presence: true
  validates :instruction, presence: true
end
在此代码中,您添加了模型验证,检查了name、ingredients和instruction字段的存在。如果缺少这三个字段,食谱将无效,并且不会保存到数据库中。
保存并关闭文件。
为了让Rails在数据库中创建recipes表,您必须运行迁移,这是一种以编程方式对数据库进行更改的方法。为了确保迁移与您设置的数据库配合工作,您必须对20221017220817_create_recipes.rb文件进行更改。
在您的编辑器中打开此文件:
- nano ~/rails_react_recipe/db/migrate/20221017220817_create_recipes.rb
添加突出显示的材料,使您的文件与以下内容匹配:
class CreateRecipes < ActiveRecord::Migration[5.2]
  def change
    create_table :recipes do |t|
      t.string :name, null: false
      t.text :ingredients, null: false
      t.text :instruction, null: false
      t.string :image, default: 'https://raw.githubusercontent.com/do-community/react_rails_recipe/master/app/assets/images/Sammy_Meal.jpg'

      t.timestamps
    end
  end
end
此迁移文件包含一个带有change方法的Ruby类,并包含一个命令,用于创建名为recipes的表以及列和其数据类型。您还通过添加null: false在name、ingredients和instruction列上添加了NOT NULL约束,确保在更改数据库之前这些列具有值。最后,您为图像列添加了默认图像URL;如果您想使用不同的图像,则可以是另一个URL。
完成这些更改后,保存并退出文件。您现在已经准备好运行迁移并创建表了。在您的终端中运行以下命令:
- rails db:migrate
你可以使用数据库迁移命令来运行迁移文件中的指令。一旦命令成功运行,你将会收到类似以下的输出:
Output== 20190407161357 CreateRecipes: migrating ====================================
-- create_table(:recipes)
   -> 0.0140s
== 20190407161357 CreateRecipes: migrated (0.0141s) ===========================
有了你的食谱模型,接下来你将创建你的食谱控制器,以添加创建、读取和删除食谱的逻辑。运行以下命令:
- rails generate controller api/v1/Recipes index create show destroy --skip-template-engine --no-helper
在这个命令中,你将在 api/v1 目录中创建一个 Recipes 控制器,包括 index、create、show 和 destroy 动作。index 动作将处理获取所有食谱的请求;create 动作将负责创建新的食谱;show 动作将获取单个食谱;destroy 动作将处理删除食谱的逻辑。
你还传递了一些标志,使控制器更轻量化,包括:
--skip-template-engine,这个标志指示 Rails 跳过生成 Rails 视图文件,因为 React 处理你的前端需求。--no-helper,这个标志指示 Rails 跳过为你的控制器生成帮助器文件。
运行该命令还会更新你的路由文件,为 Recipes 控制器的每个动作添加一个路由。
当命令运行时,它会打印类似以下的输出:
Output      create  app/controllers/api/v1/recipes_controller.rb
       route  namespace :api do
                namespace :v1 do
                  get 'recipes/index'
                  get 'recipes/create'
                  get 'recipes/show'
                  get 'recipes/destroy'
                end
              end
要使用这些路由,你需要对你的 config/routes.rb 文件进行更改。在你的文本编辑器中打开 routes.rb 文件:
- nano ~/rails_react_recipe/config/routes.rb
更新此文件以使其看起来像以下代码,修改或添加突出显示的行:
Rails.application.routes.draw do
  namespace :api do
    namespace :v1 do
      get 'recipes/index'
      post 'recipes/create'
      get '/show/:id', to: 'recipes#show'
      delete '/destroy/:id', to: 'recipes#destroy'
    end
  end
  root 'homepage#index'
  get '/*path' => 'homepage#index'
  # 根据 https://guides.rubyonrails.org/routing.html 中的 DSL 定义应用程序路由


# 定义根路径路由 ("/")


# root "articles#index"

end
在这个路由文件中,您需要修改 create 和 destroy 路由的 HTTP 动词,以便能够 post 和 delete 数据。您还需要修改 show 和 destroy 操作的路由,通过在路由中添加一个 :id 参数来完成。 :id 将保存您想要读取或删除的食谱的标识号。
您可以添加一个捕获所有路由,使用 get '/*path' 来将任何不匹配现有路由的请求重定向到 homepage 控制器的 index 操作。前端路由将处理与创建、读取或删除食谱无关的请求。
保存并退出文件。
要评估应用程序中可用的路由列表,请运行以下命令:
- rails routes
运行此命令将显示一个包含 URI 模式、动词以及与您的项目匹配的控制器或操作的详细列表。
接下来,您将添加获取所有食谱的逻辑。Rails 使用 ActiveRecord 库来处理此类与数据库相关的任务。ActiveRecord 将类连接到关系数据库表,并为与之交互提供了丰富的 API。
要获取所有食谱,您将使用 ActiveRecord 查询食谱表,并从数据库中获取所有食谱。
打开recipes_controller.rb文件,使用以下命令:
- nano ~/rails_react_recipe/app/controllers/api/v1/recipes_controller.rb
将以下突出显示的行添加到recipes控制器中:
class Api::V1::RecipesController < ApplicationController
  def index
    recipe = Recipe.all.order(created_at: :desc)
    render json: recipe
  end

  def create
  end

  def show
  end

  def destroy
  end
end
在你的index动作中,你使用ActiveRecord的all方法来获取数据库中的所有食谱。使用order方法,按创建日期降序排列它们,这将把最新的食谱放在首位。最后,你将你的食谱列表作为JSON响应发送,使用render。
接下来,你将添加创建新食谱的逻辑。与获取所有食谱一样,你将依赖于ActiveRecord来验证和保存提供的食谱详情。使用以下突出显示的代码更新你的食谱控制器:
class Api::V1::RecipesController < ApplicationController
  def index
    recipe = Recipe.all.order(created_at: :desc)
    render json: recipe
  end

  def create
    recipe = Recipe.create!(recipe_params)
    if recipe
      render json: recipe
    else
      render json: recipe.errors
    end
  end

  def show
  end

  def destroy
  end

  private

  def recipe_params
    params.permit(:name, :image, :ingredients, :instruction)
  end
end
在create操作中,您使用ActiveRecord的create方法来创建新食谱。create方法可以一次性将所有控制器参数分配到模型中。这种方法使得创建记录变得容易,但也打开了恶意使用的可能性。可以通过使用Rails提供的强参数功能来防止恶意使用。这样,除非已经被允许,否则无法分配参数。您在代码中向create方法传递了一个recipe_params参数。recipe_params是一个private方法,您在其中允许您的控制器参数,以防止错误或恶意内容进入数据库。在这种情况下,您允许name、image、ingredients和instruction参数以正确使用create方法。
现在,您的食谱控制器可以读取并创建食谱了。剩下的就是阅读和删除单个食谱的逻辑。使用以下突出显示的代码更新您的食谱控制器:
class Api::V1::RecipesController < ApplicationController
  before_action :set_recipe, only: %i[show destroy]

  def index
    recipe = Recipe.all.order(created_at: :desc)
    render json: recipe
  end

  def create
    recipe = Recipe.create!(recipe_params)
    if recipe
      render json: recipe
    else
      render json: recipe.errors
    end
  end

  def show
    render json: @recipe
  end

  def destroy
    @recipe&.destroy
    render json: { message: 'Recipe deleted!' }
  end

  private

  def recipe_params
    params.permit(:name, :image, :ingredients, :instruction)
  end

  def set_recipe
    @recipe = Recipe.find(params[:id])
  end
end
在新的代码行中,您创建了一个名为set_recipe的私有方法,并通过before_action调用,只有当show和delete操作匹配请求时才调用。 set_recipe方法使用ActiveRecord的find方法来查找id与params中提供的id匹配的配方,并将其分配给实例变量@recipe。在show操作中,您返回由set_recipe方法设置的@recipe对象作为JSON响应。
在destroy操作中,您使用Ruby的安全导航运算符&.做了类似的操作,这样在调用方法时避免了nil错误。这个新增功能让您只有在食谱存在时才能删除它,然后作为响应发送一条消息。
在修改了recipes_controller.rb后,保存并关闭文件。
在此步骤中,您创建了一个模型和控制器来管理您的食谱。您已经编写了处理后端食谱所需的所有逻辑。在接下来的部分中,您将创建用于查看食谱的组件。
步骤7 — 查看食谱
在本节中,您将创建用于查看食谱的组件。您将创建两个页面:一个用于查看所有现有食谱,另一个用于查看单个食谱。
你将从创建一个页面来查看所有的食谱开始。在创建页面之前,你需要一些食谱来操作,因为你的数据库目前是空的。Rails 提供了一种为你的应用创建种子数据的方法。
打开名为 seeds.rb 的种子文件进行编辑:
- nano ~/rails_react_recipe/db/seeds.rb
将种子文件的初始内容替换为以下代码:
9.times do |i|
  Recipe.create(
    name: "Recipe #{i + 1}",
    ingredients: '227g tub clotted cream, 25g butter, 1 tsp cornflour,100g parmesan, grated nutmeg, 250g fresh fettuccine or tagliatelle, snipped chives or chopped parsley to serve (optional)',
    instruction: 'In a medium saucepan, stir the clotted cream, butter, and cornflour over a low-ish heat and bring to a low simmer. Turn off the heat and keep warm.'
  )
end
在这段代码中,你使用一个循环指令 Rails 创建九个具有 name、ingredients 和 instruction 部分的食谱。保存并退出文件。
为了用这些数据填充数据库,运行以下命令在你的终端中:
- rails db:seed
运行此命令会向你的数据库中添加九个食谱。现在你可以获取它们并在前端渲染它们了。
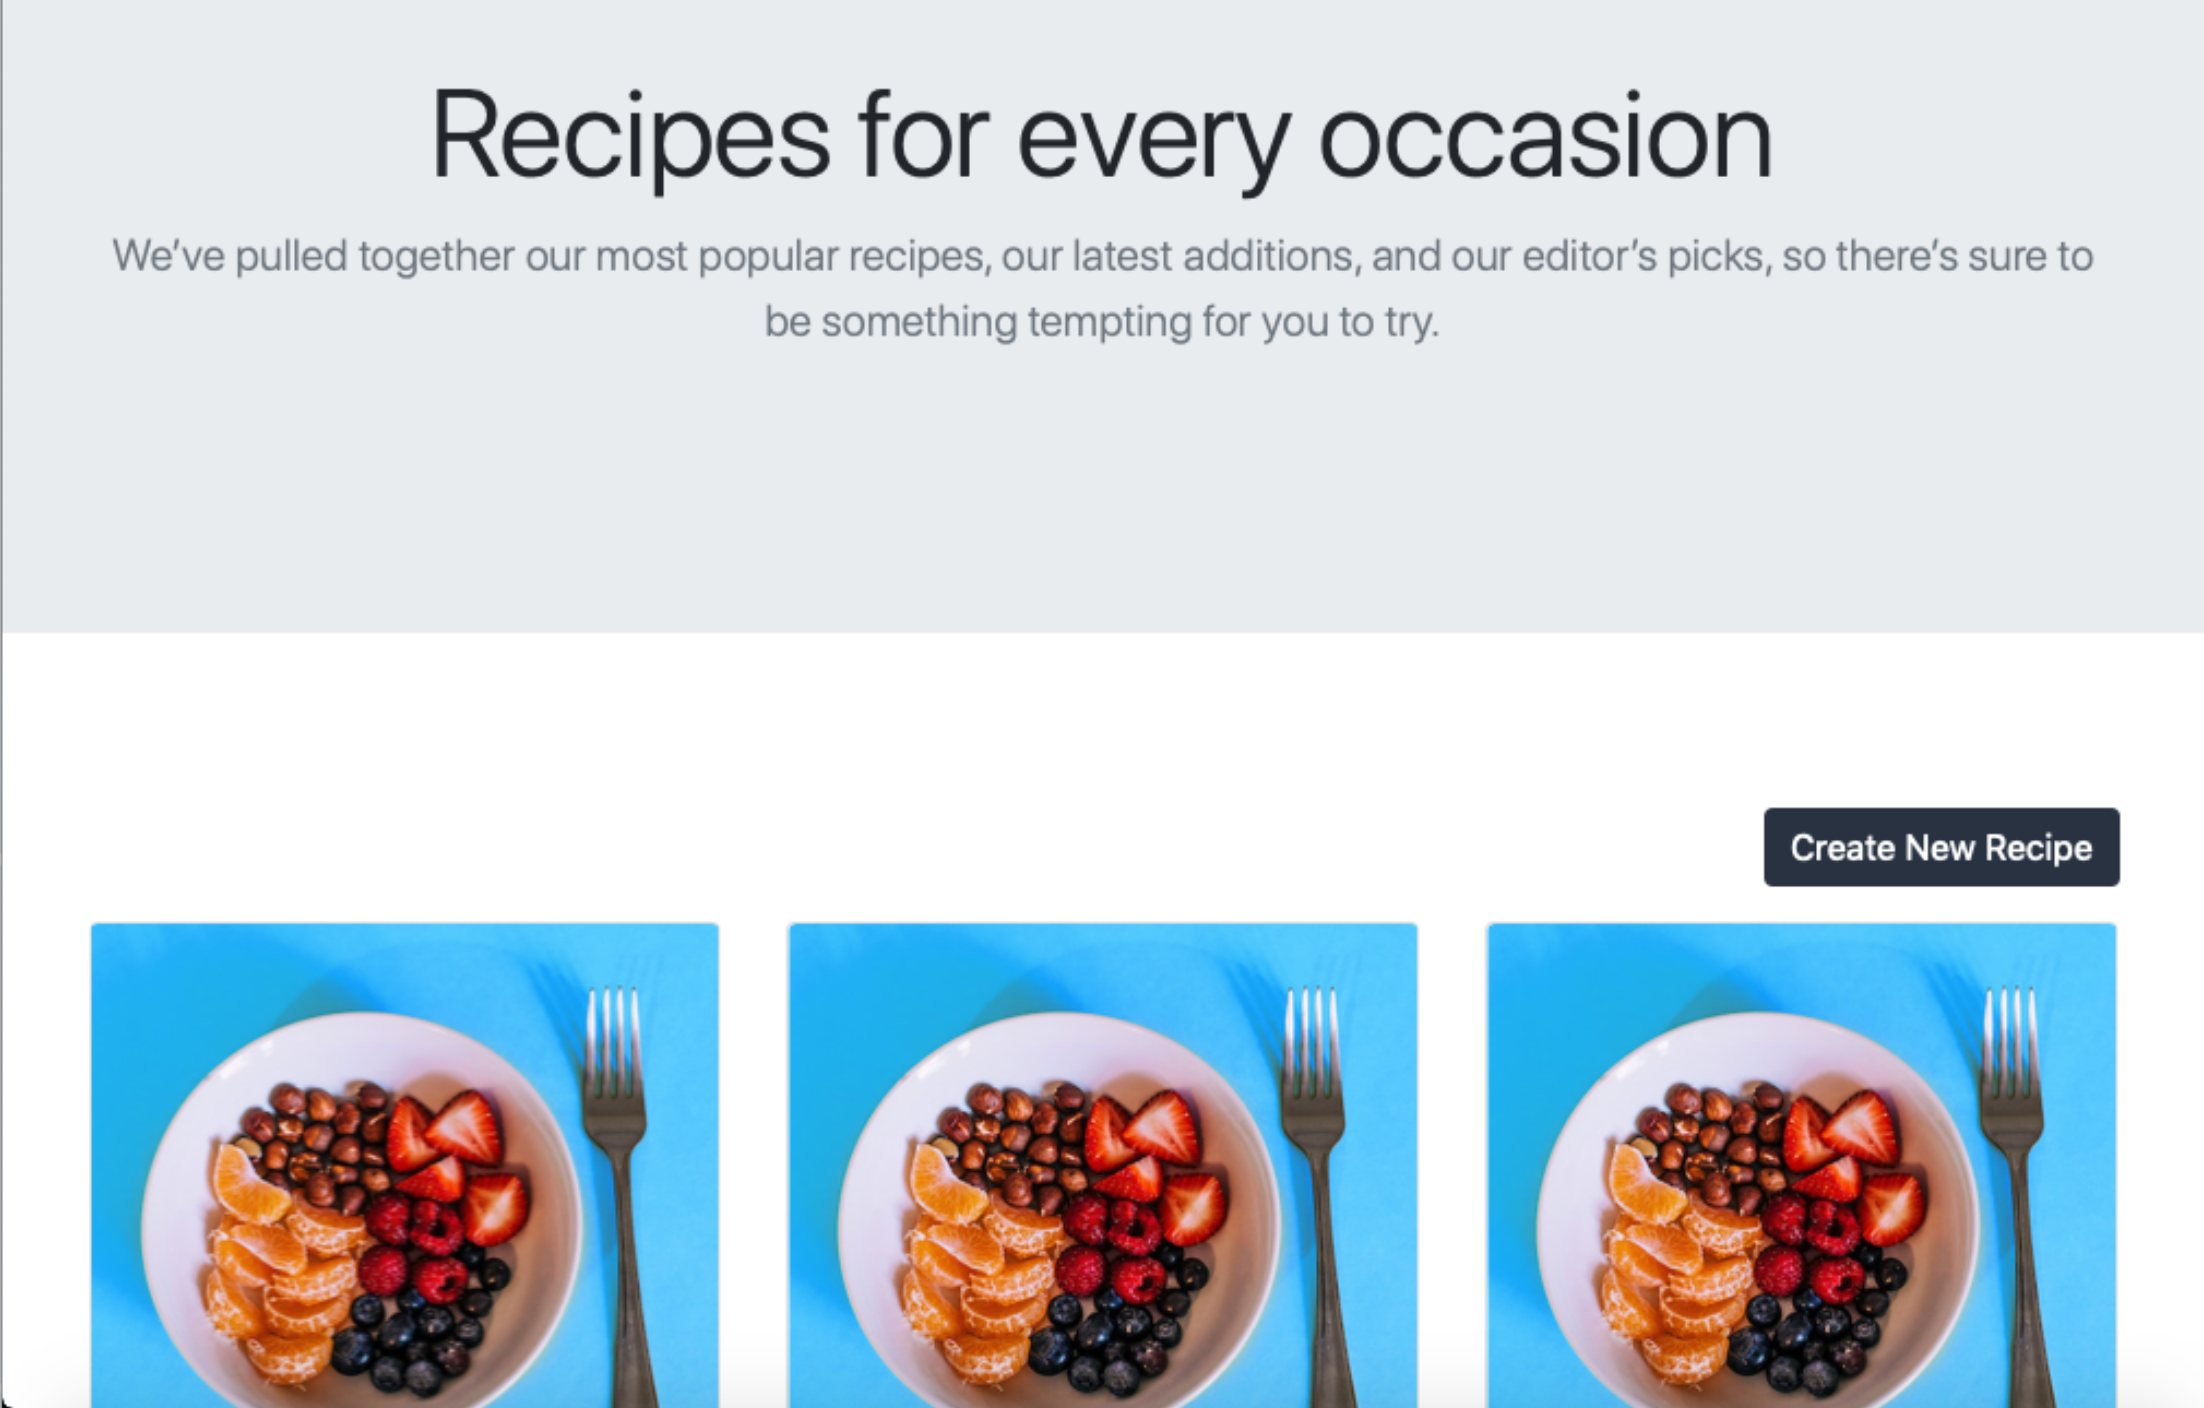
用于查看所有食谱的组件将向 RecipesController 中的 index 动作发送 HTTP 请求,以获取所有食谱的列表。然后这些食谱将在页面上以卡片的形式显示。
在 app/javascript/components 目录中创建一个 Recipes.jsx 文件:
- nano ~/rails_react_recipe/app/javascript/components/Recipes.jsx
一旦文件打开,通过添加以下行导入 React、useState、useEffect、Link 和 useNavigate 模块:
import React, { useState, useEffect } from "react";
import { Link, useNavigate } from "react-router-dom";
接下来,添加高亮显示的行以创建并导出一个名为 Recipes 的功能性 React 组件:
import React, { useState, useEffect } from "react";
import { Link, useNavigate } from "react-router-dom";

const Recipes = () => {
  const navigate = useNavigate();
  const [recipes, setRecipes] = useState([]);
};

export default Recipes;
在Recipe组件内,React Router的导航API将调用useNavigate钩子。React的useState钩子将初始化recipes状态,这是一个空数组([]),以及一个用于更新recipes状态的setRecipes函数。
接下来,在useEffect钩子中,您将发起HTTP请求以获取所有的食谱。为此,请添加以下突出显示的行:
import React, { useState, useEffect } from "react";
import { Link, useNavigate } from "react-router-dom";

const Recipes = () => {
  const navigate = useNavigate();
  const [recipes, setRecipes] = useState([]);

  useEffect(() => {
    const url = "/api/v1/recipes/index";
    fetch(url)
      .then((res) => {
        if (res.ok) {
          return res.json();
        }
        throw new Error("Network response was not ok.");
      })
      .then((res) => setRecipes(res))
      .catch(() => navigate("/"));
  }, []);
};

export default Recipes;
在您的useEffect钩子中,使用Fetch API进行HTTP调用以获取所有食谱。如果响应成功,应用程序将将食谱数组保存到recipes状态。如果发生错误,将重定向用户到主页。
最后,在组件呈现时返回将在浏览器页面上评估和显示的元素的标记。在这种情况下,组件将呈现来自recipes状态的一张食谱卡。将以下突出显示的行添加到Recipes.jsx:
import React, { useState, useEffect } from "react";
import { Link, useNavigate } from "react-router-dom";

const Recipes = () => {
  const navigate = useNavigate();
  const [recipes, setRecipes] = useState([]);

  useEffect(() => {
    const url = "/api/v1/recipes/index";
    fetch(url)
      .then((res) => {
        if (res.ok) {
          return res.json();
        }
        throw new Error("Network response was not ok.");
      })
      .then((res) => setRecipes(res))
      .catch(() => navigate("/"));
  }, []);

  const allRecipes = recipes.map((recipe, index) => (
    <div key={index} className="col-md-6 col-lg-4">
      <div className="card mb-4">
        <img
          src={recipe.image}
          className="card-img-top"
          alt={`${recipe.name} image`}
        />
        <div className="card-body">
          <h5 className="card-title">{recipe.name}</h5>
          <Link to={`/recipe/${recipe.id}`} className="btn custom-button">
            View Recipe
          </Link>
        </div>
      </div>
    </div>
  ));
  const noRecipe = (
    <div className="vw-100 vh-50 d-flex align-items-center justify-content-center">
      <h4>
        No recipes yet. Why not <Link to="/new_recipe">create one</Link>
      </h4>
    </div>
  );

  return (
    <>
      <section className="jumbotron jumbotron-fluid text-center">
        <div className="container py-5">
          <h1 className="display-4">Recipes for every occasion</h1>
          <p className="lead text-muted">
            We’ve pulled together our most popular recipes, our latest
            additions, and our editor’s picks, so there’s sure to be something
            tempting for you to try.
          </p>
        </div>
      </section>
      <div className="py-5">
        <main className="container">
          <div className="text-end mb-3">
            <Link to="/recipe" className="btn custom-button">
              Create New Recipe
            </Link>
          </div>
          <div className="row">
            {recipes.length > 0 ? allRecipes : noRecipe}
          </div>
          <Link to="/" className="btn btn-link">
            Home
          </Link>
        </main>
      </div>
    </>
  );
};

export default Recipes;
保存并退出Recipes.jsx。
现在您已经创建了一个用于显示所有食谱的组件,您将为其创建一个路由。打开前端路由文件app/javascript/routes/index.jsx:
- nano app/javascript/routes/index.jsx
将以下突出显示的行添加到文件中:
import React from "react";
import { BrowserRouter as Router, Routes, Route } from "react-router-dom";
import Home from "../components/Home";
import Recipes from "../components/Recipes";

export default (
  <Router>
    <Routes>
      <Route path="/" exact component={Home} />
      <Route path="/recipes" element={<Recipes />} />
    </Routes>
  </Router>
);
保存并退出文件。
此时,验证代码是否按预期工作是个好主意。像之前一样,使用以下命令启动服务器:
- bin/dev
然后在浏览器中打开应用程序。在主页上点击查看菜谱按钮,以访问包含您种子菜谱的显示页面:

在终端中使用CTRL+C停止服务器,并返回到提示符。
现在,您可以查看应用程序中的所有菜谱了,是时候创建第二个组件以查看单个菜谱了。在app/javascript/components目录中创建一个Recipe.jsx文件:
- nano app/javascript/components/Recipe.jsx
与Recipes组件一样,通过添加以下行导入React、useState、useEffect、Link、useNavigate和useParam模块:
import React, { useState, useEffect } from "react";
import { Link, useNavigate, useParams } from "react-router-dom";
接下来,添加突出显示的行来创建并导出一个名为Recipe的功能性React组件:
import React, { useState, useEffect } from "react";
import { Link, useNavigate, useParams } from "react-router-dom";

const Recipe = () => {
  const params = useParams();
  const navigate = useNavigate();
  const [recipe, setRecipe] = useState({ ingredients: "" });
};

export default Recipe;
像Recipes组件一样,您使用useNavigate钩子初始化React Router导航。一个recipe状态和一个setRecipe函数将使用useState钩子更新状态。此外,您调用useParams钩子,它返回一个对象,其键/值对是URL参数。
为了找到特定的菜谱,您的应用程序需要知道菜谱的id,这意味着您的Recipe组件期望URL中有一个id param。您可以通过params对象访问这个对象,该对象保存useParams钩子的返回值。
接下来,请声明一个 useEffect 钩子,在这里您将访问 params 对象中的 id param。一旦获取到食谱的 id 参数,您将发起一个 HTTP 请求以获取该食谱。在您的文件中添加以下突出显示的行:
import React, { useState, useEffect } from "react";
import { Link, useNavigate, useParams } from "react-router-dom";

const Recipe = () => {
  const params = useParams();
  const navigate = useNavigate();
  const [recipe, setRecipe] = useState({ ingredients: "" });

  useEffect(() => {
    const url = `/api/v1/show/${params.id}`;
    fetch(url)
      .then((response) => {
        if (response.ok) {
          return response.json();
        }
        throw new Error("Network response was not ok.");
      })
      .then((response) => setRecipe(response))
      .catch(() => navigate("/recipes"));
  }, [params.id]);
};

export default Recipe;
在 useEffect 钩子中,您使用 params.id 的值发起 GET HTTP 请求,以获取拥有该 id 的食谱,然后使用 setRecipe 函数将其保存到组件状态中。如果食谱不存在,应用程序将重定向用户到食谱页面。
接下来,添加一个 addHtmlEntities 函数,该函数将用于用 HTML 实体 替换组件中的字符实体。addHtmlEntities 函数将接受一个字符串,并替换所有转义的开放和关闭括号为其 HTML 实体。这个函数将帮助您转换在食谱说明中保存的任何转义字符。添加以下突出显示的行:
import React, { useState, useEffect } from "react";
import { Link, useNavigate, useParams } from "react-router-dom";
const Recipe = () => {
const params = useParams();
const navigate = useNavigate();
const [recipe, setRecipe] = useState({ ingredients: "" });
useEffect(() => {
const url = `/api/v1/show/${params.id}`;
fetch(url)
.then((response) => {
if (response.ok) {
return response.json();
}
throw new Error("Network response was not ok.");
})
.then((response) => setRecipe(response))
.catch(() => navigate("/recipes"));
}, [params.id]);
const addHtmlEntities = (str) => {
return String(str).replace(/</g, "<").replace(/>/g, ">");
};
};
export default Recipe;
最后,通过添加以下突出显示的行,返回标记以在页面上呈现组件状态中的食谱:
import React, { useState, useEffect } from "react";
import { Link, useNavigate, useParams } from "react-router-dom";
const Recipe = () => {
const params = useParams();
const navigate = useNavigate();
const [recipe, setRecipe] = useState({ ingredients: "" });
useEffect(() => {
const url = `/api/v1/show/${params.id}`;
fetch(url)
.then((response) => {
if (response.ok) {
return response.json();
}
throw new Error("Network response was not ok.");
})
.then((response) => setRecipe(response))
.catch(() => navigate("/recipes"));
}, [params.id]);
const addHtmlEntities = (str) => {
return String(str).replace(/</g, "<").replace(/>/g, ">");
};
const ingredientList = () => {
let ingredientList = "No ingredients available";
if (recipe.ingredients.length > 0) {
ingredientList = recipe.ingredients
.split(",")
.map((ingredient, index) => (
<li key={index} className="list-group-item">
{ingredient}
</li>
));
}
return ingredientList;
};
const recipeInstruction = addHtmlEntities(recipe.instruction);
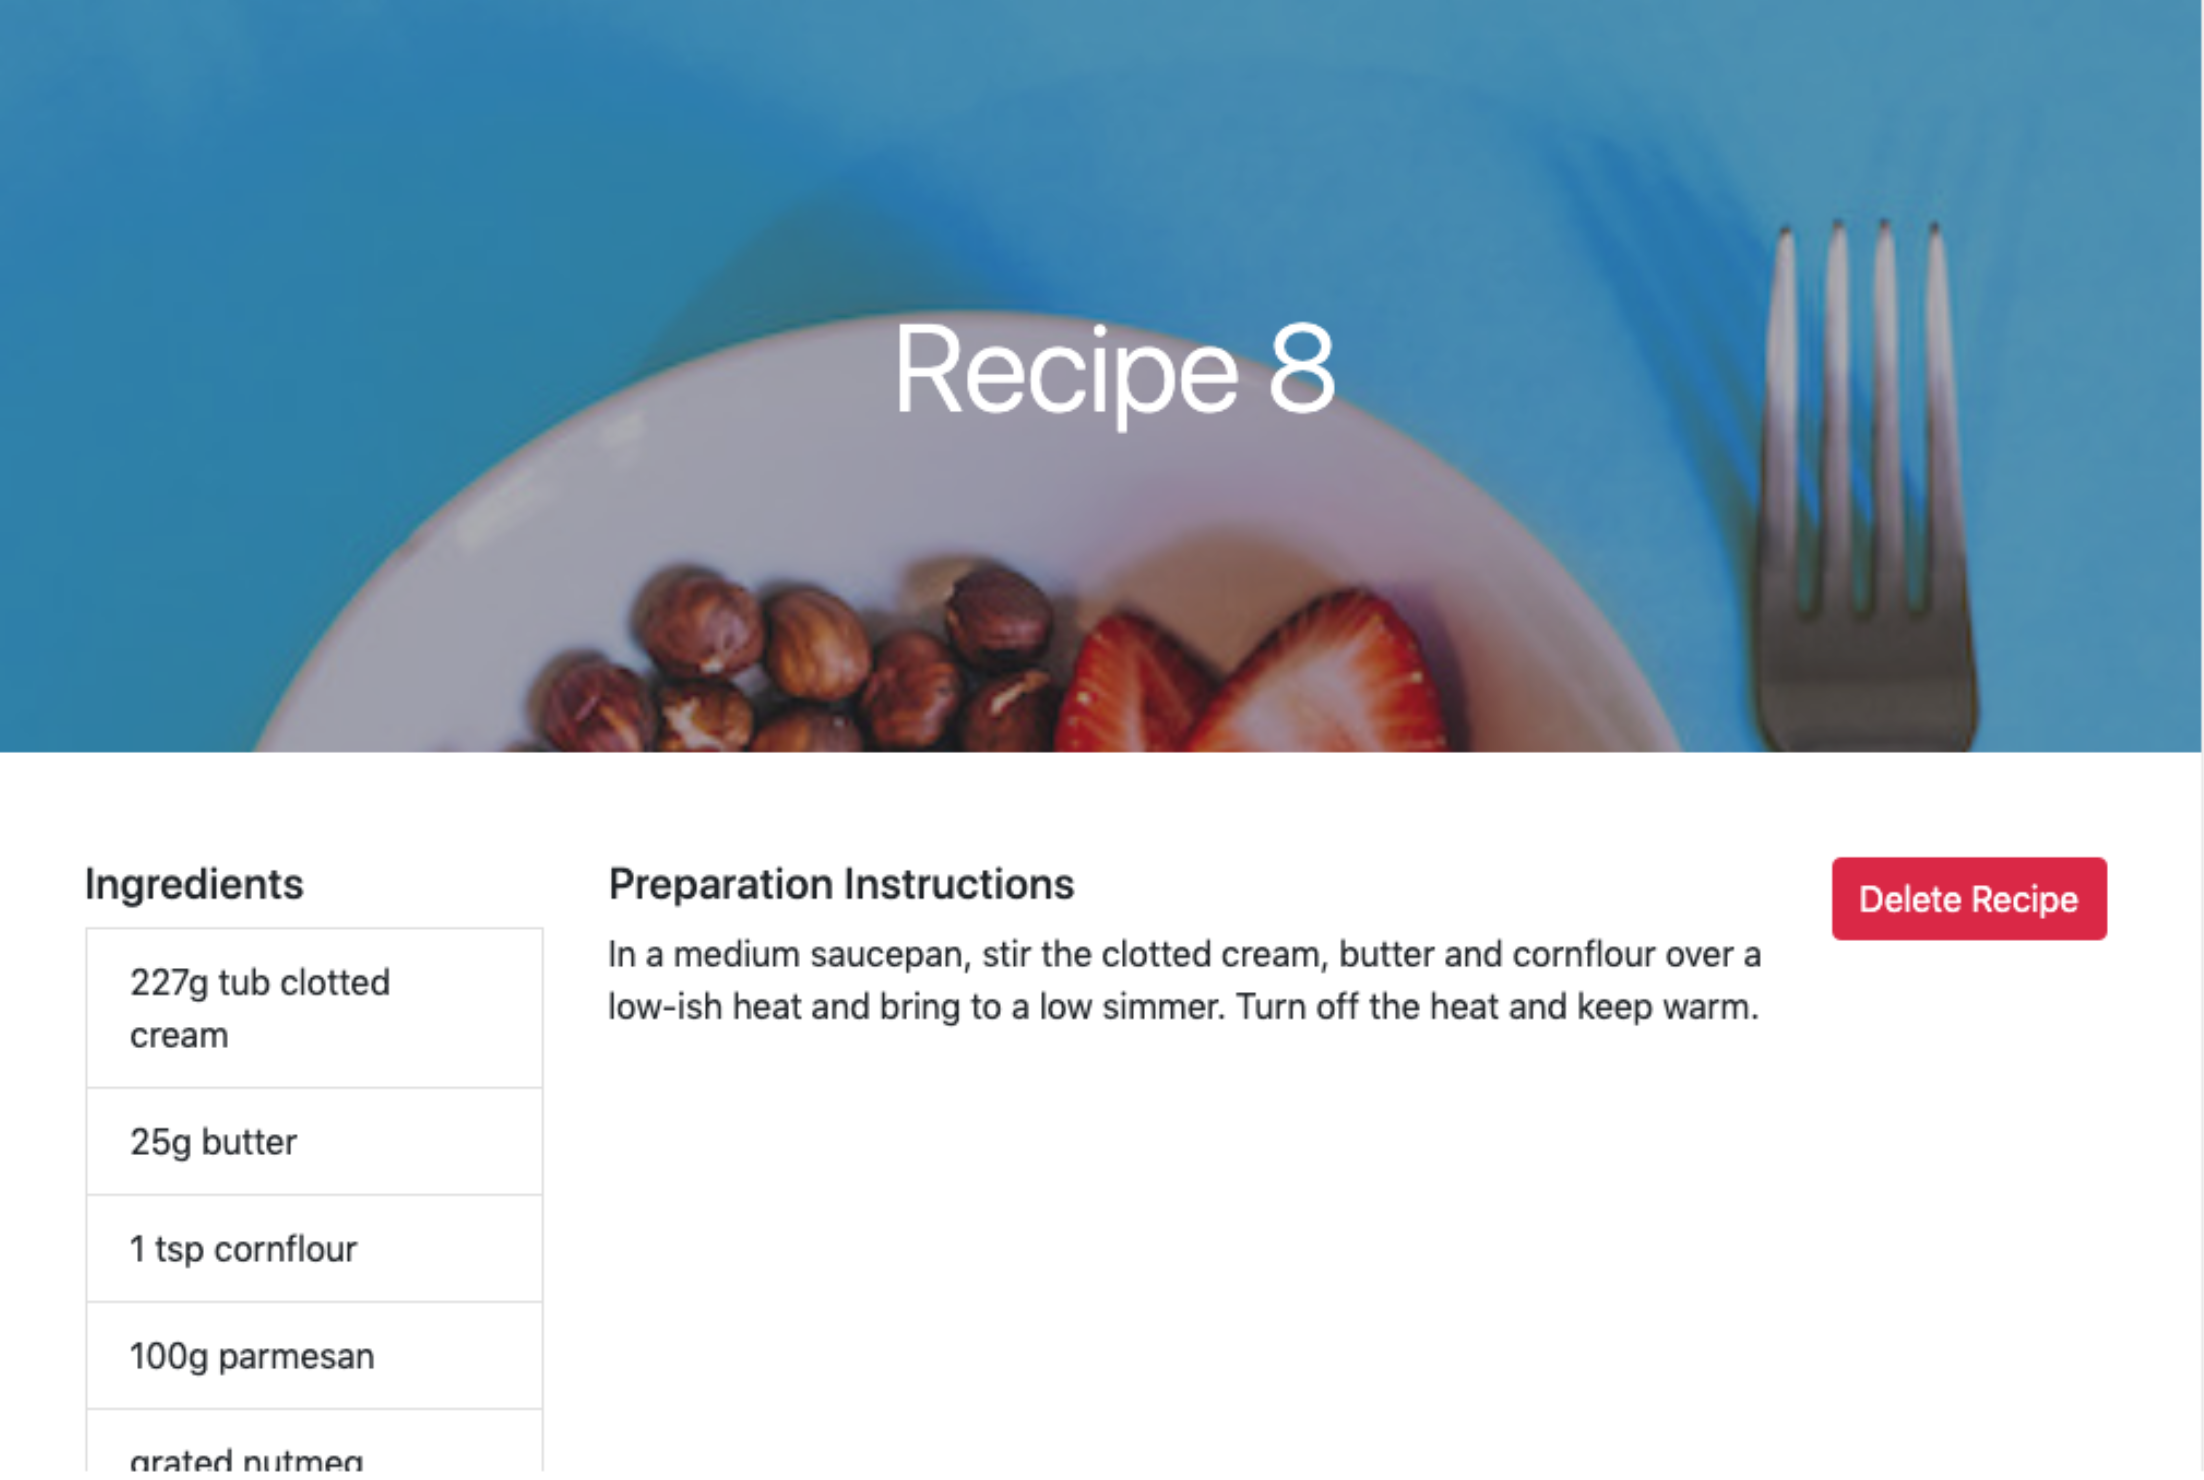
return (
<div className="">
<div className="hero position-relative d-flex align-items-center justify-content-center">
<img
src={recipe.image}
alt={`${recipe.name} image`}
className="img-fluid position-absolute"
/>
<div className="overlay bg-dark position-absolute" />
<h1 className="display-4 position-relative text-white">
{recipe.name}
</h1>
</div>
<div className="container py-5">
<div className="row">
<div className="col-sm-12 col-lg-3">
<ul className="list-group">
<h5 className="mb-2">Ingredients</h5>
{ingredientList()}
</ul>
</div>
<div className="col-sm-12 col-lg-7">
<h5 className="mb-2">Preparation Instructions</h5>
<div
dangerouslySetInnerHTML={{
__html: `${recipeInstruction}`,
}}
/>
</div>
<div className="col-sm-12 col-lg-2">
<button
type="button"
className="btn btn-danger"
>
Delete Recipe
</button>
</div>
</div>
<Link to="/recipes" className="btn btn-link">
Back to recipes
</Link>
</div>
</div>
);
};
export default Recipe;
通过一个ingredientList函数,你可以将逗号分隔的食谱配料拆分为一个数组,并对其进行映射以创建配料列表。如果没有配料,应用程序将显示一条消息,提示“无可用配料”。你还可以通过将食谱说明传递给addHtmlEntities函数来替换食谱说明中的所有开放和闭合括号。最后,代码将食谱图片显示为主图,添加一个删除食谱按钮到食谱说明旁边,并添加一个返回食谱页面的按钮。
注意:使用React的dangerouslySetInnerHTML属性存在风险,因为它会将你的应用程序暴露给跨站脚本攻击。通过确保在创建食谱时输入的特殊字符被NewRecipe组件中声明的stripHtmlEntities函数替换,可以降低这种风险。
保存并退出文件。
要在页面上查看Recipe组件,您需要将其添加到您的路由文件中。打开您的路由文件进行编辑:
- nano app/javascript/routes/index.jsx
将以下突出显示的行添加到文件中:
import React from "react";
import { BrowserRouter as Router, Routes, Route } from "react-router-dom";
import Home from "../components/Home";
import Recipes from "../components/Recipes";
import Recipe from "../components/Recipe";

export default (
  <Router>
    <Routes>
      <Route path="/" exact component={Home} />
      <Route path="/recipes" exact component={Recipes} />
      <Route path="/recipe/:id" element={<Recipe />} />
    </Routes>
  </Router>
);
您在此路由文件中导入您的Recipe组件并添加一个路由。其路由具有一个:id参数,该参数将被您要查看的食谱的id替换。
保存并关闭文件。
使用bin/dev脚本重新启动您的服务器,然后在浏览器中访问http://localhost:3000。点击查看食谱按钮导航到食谱页面。在食谱页面,通过点击其查看食谱按钮访问任何食谱。您将看到一个页面,其中包含来自您的数据库的数据:
您可以使用CTRL+C停止服务器。
在这一步中,您向您的数据库添加了九个食谱,并创建了用于查看这些食谱的组件,既可以单独查看,也可以作为集合查看。在下一步中,您将添加一个组件以创建食谱。
第8步 — 创建食谱
拥有可用的食谱应用程序的下一步是能够创建新食谱。在此步骤中,您将为此功能创建一个组件。该组件将包含一个表单,以从用户收集所需的食谱详细信息,然后向Recipe控制器中的create操作发出请求以保存食谱数据。
在app/javascript/components目录中创建一个NewRecipe.jsx文件:
- nano app/javascript/components/NewRecipe.jsx
在新文件中,导入您在其他组件中使用的React,useState,Link和useNavigate模块:
import React, { useState } from "react";
import { Link, useNavigate } from "react-router-dom";
接下来,通过添加突出显示的行创建并导出一个功能性的NewRecipe组件:
import React, { useState } from "react";
import { Link, useNavigate } from "react-router-dom";

const NewRecipe = () => {
  const navigate = useNavigate();
  const [name, setName] = useState("");
  const [ingredients, setIngredients] = useState("");
  const [instruction, setInstruction] = useState("");
};

export default NewRecipe;
与之前的组件一样,您可以使用useNavigate钩子初始化React路由导航,然后使用useState钩子初始化name、ingredients和instruction状态,分别使用它们的更新函数。这些是您需要创建有效食谱所需的字段。
接下来,创建一个stripHtmlEntities函数,它将把特殊字符(如<)转换为它们的转义/编码值(如<)。为此,请向NewRecipe组件添加以下突出显示的行:
import React, { useState } from "react";
import { Link, useNavigate } from "react-router-dom";
const NewRecipe = () => {
const navigate = useNavigate();
const [name, setName] = useState("");
const [ingredients, setIngredients] = useState("");
const [instruction, setInstruction] = useState("");
const stripHtmlEntities = (str) => {
return String(str)
.replace(/\n/g, "<br> <br>")
.replace(/</g, "<")
.replace(/>/g, ">");
};
};
export default NewRecipe;
在stripHtmlEntities函数中,用它们的转义值替换<和>字符。这样,您就不会将原始HTML存储在数据库中。
接下来,添加以下突出显示的行以添加onChange和onSubmit函数到NewRecipe组件,以处理表单的编辑和提交:
import React, { useState } from "react";
import { Link, useNavigate } from "react-router-dom";
const NewRecipe = () => {
const navigate = useNavigate();
const [name, setName] = useState("");
const [ingredients, setIngredients] = useState("");
const [instruction, setInstruction] = useState("");
const stripHtmlEntities = (str) => {
return String(str)
.replace(/\n/g, "<br> <br>")
.replace(/</g, "<")
.replace(/>/g, ">");
};
const onChange = (event, setFunction) => {
setFunction(event.target.value);
};
const onSubmit = (event) => {
event.preventDefault();
const url = "/api/v1/recipes/create";
if (name.length == 0 || ingredients.length == 0 || instruction.length == 0)
return;
const body = {
name,
ingredients,
instruction: stripHtmlEntities(instruction),
};
const token = document.querySelector('meta[name="csrf-token"]').content;
fetch(url, {
method: "POST",
headers: {
"X-CSRF-Token": token,
"Content-Type": "application/json",
},
body: JSON.stringify(body),
})
.then((response) => {
if (response.ok) {
return response.json();
}
throw new Error("Network response was not ok.");
})
.then((response) => navigate(`/recipe/${response.id}`))
.catch((error) => console.log(error.message));
};
};
export default NewRecipe;
onChange 函数接受用户输入的 event 和状态设置函数,然后使用用户输入的值更新状态。在 onSubmit 函数中,您检查所有必填输入是否为空。然后,您构建一个包含创建新食谱所需参数的对象。使用 stripHtmlEntities 函数,您替换食谱说明中的 < 和 > 字符为它们的转义值,并用换行符替换每个新行字符为换行标签,从而保留用户输入的文本格式。最后,您进行 POST HTTP 请求以创建新食谱,并在成功响应时重定向到其页面。
为防范 Cross-Site Request Forgery (CSRF) 攻击,Rails 在 HTML 文档中附加一个 CSRF 安全令牌。每当进行非 GET 请求时,都需要此令牌。在前述代码中使用的 token 常量中,您的应用程序在服务器上验证令牌,如果安全令牌不匹配预期值,则引发异常。在 onSubmit 函数中,应用程序检索由 Rails 嵌入在 HTML 文档中的 CSRF 令牌,然后使用 JSON 字符串进行 HTTP 请求。如果成功创建食谱,则应用程序将用户重定向到食谱页面,用户可以在那里查看他们新创建的食谱。
最后,返回呈现用户输入新食谱详细信息的表单的标记。添加以下突出显示的行:
import React, { useState } from "react";
import { Link, useNavigate } from "react-router-dom";
const NewRecipe = () => {
const navigate = useNavigate();
const [name, setName] = useState("");
const [ingredients, setIngredients] = useState("");
const [instruction, setInstruction] = useState("");
const stripHtmlEntities = (str) => {
return String(str)
.replace(/\n/g, "<br> <br>")
.replace(/</g, "<")
.replace(/>/g, ">");
};
const onChange = (event, setFunction) => {
setFunction(event.target.value);
};
const onSubmit = (event) => {
event.preventDefault();
const url = "/api/v1/recipes/create";
if (name.length == 0 || ingredients.length == 0 || instruction.length == 0)
return;
const body = {
name,
ingredients,
instruction: stripHtmlEntities(instruction),
};
const token = document.querySelector('meta[name="csrf-token"]').content;
fetch(url, {
method: "POST",
headers: {
"X-CSRF-Token": token,
"Content-Type": "application/json",
},
body: JSON.stringify(body),
})
.then((response) => {
if (response.ok) {
return response.json();
}
throw new Error("Network response was not ok.");
})
.then((response) => navigate(`/recipe/${response.id}`))
.catch((error) => console.log(error.message));
};
return (
<div className="container mt-5">
<div className="row">
<div className="col-sm-12 col-lg-6 offset-lg-3">
<h1 className="font-weight-normal mb-5">
Add a new recipe to our awesome recipe collection.
</h1>
<form onSubmit={onSubmit}>
<div className="form-group">
<label htmlFor="recipeName">Recipe name</label>
<input
type="text"
name="name"
id="recipeName"
className="form-control"
required
onChange={(event) => onChange(event, setName)}
/>
</div>
<div className="form-group">
<label htmlFor="recipeIngredients">Ingredients</label>
<input
type="text"
name="ingredients"
id="recipeIngredients"
className="form-control"
required
onChange={(event) => onChange(event, setIngredients)}
/>
<small id="ingredientsHelp" className="form-text text-muted">
Separate each ingredient with a comma.
</small>
</div>
<label htmlFor="instruction">Preparation Instructions</label>
<textarea
className="form-control"
id="instruction"
name="instruction"
rows="5"
required
onChange={(event) => onChange(event, setInstruction)}
/>
<button type="submit" className="btn custom-button mt-3">
Create Recipe
</button>
<Link to="/recipes" className="btn btn-link mt-3">
Back to recipes
</Link>
</form>
</div>
</div>
</div>
);
};
export default NewRecipe;
返回的标记包含一个表单,其中包含三个输入字段;分别为recipeName,recipeIngredients和instruction。 每个输入字段都有一个onChange事件处理程序,它调用onChange函数。 还将onSubmit事件处理程序附加到提交按钮,并调用onSubmit函数以提交表单数据。
保存并退出文件。
要在浏览器中访问此组件,请更新路由文件以包含其路由:
- nano app/javascript/routes/index.jsx
更新您的路由文件以包含这些突出显示的行:
import React from "react";
import { BrowserRouter as Router, Routes, Route } from "react-router-dom";
import Home from "../components/Home";
import Recipes from "../components/Recipes";
import Recipe from "../components/Recipe";
import NewRecipe from "../components/NewRecipe";

export default (
  <Router>
    <Routes>
      <Route path="/" exact component={Home} />
      <Route path="/recipes" exact component={Recipes} />
      <Route path="/recipe/:id" exact component={Recipe} />
      <Route path="/recipe" element={<NewRecipe />} />
    </Routes>
  </Router>
);
有了路由后,保存并退出文件。
重新启动您的开发服务器并在浏览器中访问http://localhost:3000。 转到食谱页面并单击创建新食谱按钮。 您将找到一个带有表单的页面,以将食谱添加到您的数据库中:
输入所需的食谱详细信息,然后单击创建食谱按钮。 然后,新创建的食谱将显示在页面上。 准备好后,关闭服务器。
在此步骤中,您添加了将食谱添加到您的食谱应用程序中的功能。 在下一步中,您将添加删除食谱的功能。
步骤9 —— 删除食谱
在这一部分,您将修改您的Recipe组件以包括删除菜谱的选项。当您在菜谱页面点击删除按钮时,应用程序将发送一个请求以从数据库中删除菜谱。
首先,打开您的Recipe.jsx文件进行编辑:
- nano app/javascript/components/Recipe.jsx
在Recipe组件中,添加一个带有突出显示行的deleteRecipe函数:
import React, { useState, useEffect } from "react";
import { Link, useNavigate, useParams } from "react-router-dom";
const Recipe = () => {
const params = useParams();
const navigate = useNavigate();
const [recipe, setRecipe] = useState({ ingredients: "" });
useEffect(() => {
const url = `/api/v1/show/${params.id}`;
fetch(url)
.then((response) => {
if (response.ok) {
return response.json();
}
throw new Error("Network response was not ok.");
})
.then((response) => setRecipe(response))
.catch(() => navigate("/recipes"));
}, [params.id]);
const addHtmlEntities = (str) => {
return String(str).replace(/</g, "<").replace(/>/g, ">");
};
const deleteRecipe = () => {
const url = `/api/v1/destroy/${params.id}`;
const token = document.querySelector('meta[name="csrf-token"]').content;
fetch(url, {
method: "DELETE",
headers: {
"X-CSRF-Token": token,
"Content-Type": "application/json",
},
})
.then((response) => {
if (response.ok) {
return response.json();
}
throw new Error("Network response was not ok.");
})
.then(() => navigate("/recipes"))
.catch((error) => console.log(error.message));
};
const ingredientList = () => {
let ingredientList = "No ingredients available";
if (recipe.ingredients.length > 0) {
ingredientList = recipe.ingredients
.split(",")
.map((ingredient, index) => (
<li key={index} className="list-group-item">
{ingredient}
</li>
));
}
return ingredientList;
};
const recipeInstruction = addHtmlEntities(recipe.instruction);
return (
<div className="">
...
在deleteRecipe函数中,您获取要删除的菜谱的id,然后构建您的URL并获取CSRF令牌。接下来,您会向Recipes控制器发出DELETE请求以删除菜谱。如果成功删除菜谱,则应用程序将用户重定向到菜谱页面。
每当单击删除按钮时,都将在组件中的删除按钮元素上添加一个onClick事件,以将其作为单击事件处理程序传递给deleteRecipe函数,从而运行deleteRecipe函数中的代码:
...
return (
    <div className="">
      <div className="hero position-relative d-flex align-items-center justify-content-center">
        <img
          src={recipe.image}
          alt={`${recipe.name} image`}
          className="img-fluid position-absolute"
        />
        <div className="overlay bg-dark position-absolute" />
        <h1 className="display-4 position-relative text-white">
          {recipe.name}
        </h1>
      </div>
      <div className="container py-5">
        <div className="row">
          <div className="col-sm-12 col-lg-3">
            <ul className="list-group">
              <h5 className="mb-2">Ingredients</h5>
              {ingredientList()}
            </ul>
          </div>
          <div className="col-sm-12 col-lg-7">
            <h5 className="mb-2">Preparation Instructions</h5>
            <div
              dangerouslySetInnerHTML={{
                __html: `${recipeInstruction}`,
              }}
            />
          </div>
          <div className="col-sm-12 col-lg-2">
            <button
              type="button"
              className="btn btn-danger"
              onClick={deleteRecipe}
            >
              Delete Recipe
            </button>
          </div>
        </div>
        <Link to="/recipes" className="btn btn-link">
          Back to recipes
        </Link>
      </div>
    </div>
  );
...
到达本教程的这一点时,您完整的Recipe.jsx文件应与此文件匹配:
import React, { useState, useEffect } from "react";
import { Link, useNavigate, useParams } from "react-router-dom";
const Recipe = () => {
const params = useParams();
const navigate = useNavigate();
const [recipe, setRecipe] = useState({ ingredients: "" });
useEffect(() => {
const url = `/api/v1/show/${params.id}`;
fetch(url)
.then((response) => {
if (response.ok) {
return response.json();
}
throw new Error("Network response was not ok.");
})
.then((response) => setRecipe(response))
.catch(() => navigate("/recipes"));
}, [params.id]);
const addHtmlEntities = (str) => {
return String(str).replace(/</g, "<").replace(/>/g, ">");
};
const deleteRecipe = () => {
const url = `/api/v1/destroy/${params.id}`;
const token = document.querySelector('meta[name="csrf-token"]').content;
fetch(url, {
method: "DELETE",
headers: {
"X-CSRF-Token": token,
"Content-Type": "application/json",
},
})
.then((response) => {
if (response.ok) {
return response.json();
}
throw new Error("Network response was not ok.");
})
.then(() => navigate("/recipes"))
.catch((error) => console.log(error.message));
};
const ingredientList = () => {
let ingredientList = "No ingredients available";
if (recipe.ingredients.length > 0) {
ingredientList = recipe.ingredients
.split(",")
.map((ingredient, index) => (
<li key={index} className="list-group-item">
{ingredient}
</li>
));
}
return ingredientList;
};
const recipeInstruction = addHtmlEntities(recipe.instruction);
return (
<div className="">
<div className="hero position-relative d-flex align-items-center justify-content-center">
<img
src={recipe.image}
alt={`${recipe.name} image`}
className="img-fluid position-absolute"
/>
<div className="overlay bg-dark position-absolute" />
<h1 className="display-4 position-relative text-white">
{recipe.name}
</h1>
</div>
<div className="container py-5">
<div className="row">
<div className="col-sm-12 col-lg-3">
<ul className="list-group">
<h5 className="mb-2">Ingredients</h5>
{ingredientList()}
</ul>
</div>
<div className="col-sm-12 col-lg-7">
<h5 className="mb-2">Preparation Instructions</h5>
<div
dangerouslySetInnerHTML={{
__html: `${recipeInstruction}`,
}}
/>
</div>
<div className="col-sm-12 col-lg-2">
<button
type="button"
className="btn btn-danger"
onClick={deleteRecipe}
>
Delete Recipe
</button>
</div>
</div>
<Link to="/recipes" className="btn btn-link">
Back to recipes
</Link>
</div>
</div>
);
};
export default Recipe;
保存并退出文件。
重新启动应用程序服务器并导航到主页。点击查看菜谱按钮以访问所有现有菜谱,然后打开任何特定的菜谱并点击页面上的删除菜谱按钮以删除该文章。您将被重定向到菜谱页面,并且已删除的菜谱将不再存在。
通过使删除按钮起作用,您现在拥有一个完全功能的菜谱应用程序!
结论
在这个教程中,您使用Ruby on Rails和React前端创建了一个食谱应用程序,使用PostgreSQL作为数据库,使用Bootstrap进行样式设计。如果您想继续使用Ruby on Rails进行构建,请考虑查看我们的使用SSH隧道在三层Rails应用程序中保护通信教程,或访问我们的如何在Ruby中编码系列以刷新您的Ruby技能。要深入了解React,请尝试如何使用React显示来自DigitalOcean API的数据。