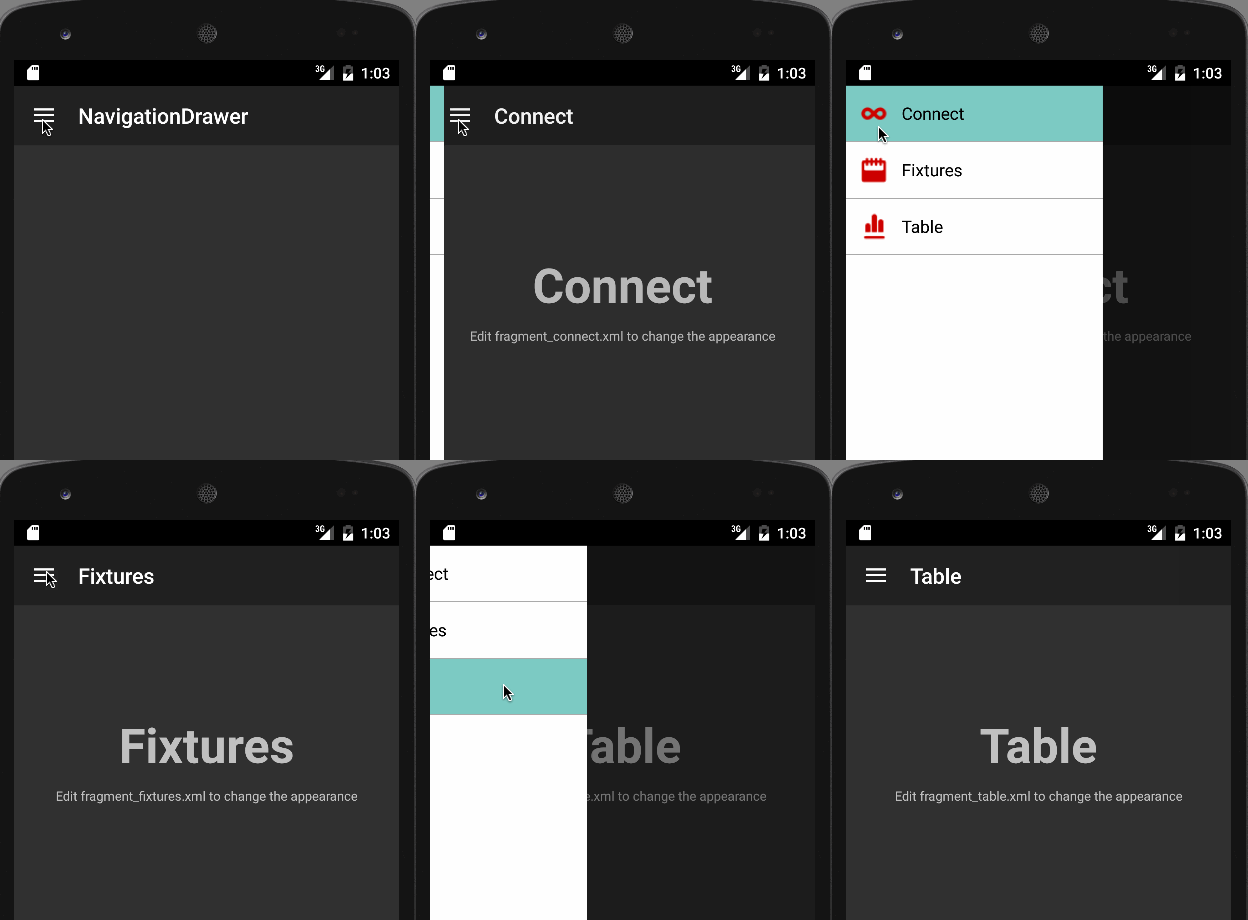
在本教程中,我们将在我们的安卓应用程序中实现一个导航抽屉。安卓导航抽屉是一个滑动菜单,是一个重要的UI组件。你会在大多数安卓应用程序中看到导航抽屉,它类似于网站上的导航菜单栏。
安卓导航抽屉
安卓导航抽屉是一个滑动的左侧菜单,用于显示应用程序中的重要链接。导航抽屉使得在这些链接之间轻松导航变得容易。它默认情况下是不可见的,需要通过从左侧滑动或点击其在ActionBar中的图标来打开。更广义地说,导航抽屉是一个覆盖面板,它替代了一个专门用于显示应用程序中所有选项和链接的活动屏幕。在这个安卓导航抽屉教程中,我们将使用安卓支持库中提供的Drawer Layout API来实现导航抽屉。我们将展示可以从抽屉项中打开的3个片段视图。
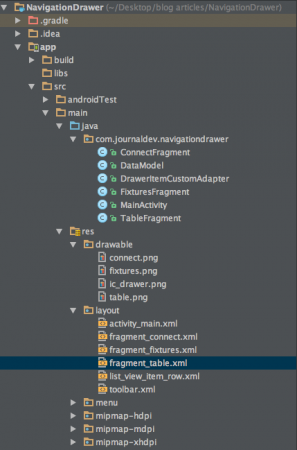
安卓导航抽屉项目结构
Android导航抽屉示例
要实现导航抽屉,我们首先需要将android.support.v4.widget.DrawerLayout添加为活动布局的根元素,如下所示。activity_main.xml
<android.support.v4.widget.DrawerLayout
    xmlns:android="https://schemas.android.com/apk/res/android"
    android:id="@+id/drawer_layout"
    android:layout_width="match_parent"
    android:layout_height="match_parent" >


    <LinearLayout
        android:layout_width="match_parent"
        android:layout_height="match_parent"
        android:orientation="vertical">

    <LinearLayout
        android:id="@+id/container_toolbar"
        android:layout_width="match_parent"
        android:layout_height="wrap_content"
        android:orientation="vertical">

        <include
            android:id="@+id/toolbar"
            layout="@layout/toolbar" />
    </LinearLayout>


    <FrameLayout
        android:id="@+id/content_frame"
        android:layout_width="match_parent"
        android:layout_height="match_parent" />

    </LinearLayout>

    <ListView
        android:id="@+id/left_drawer"
        android:layout_width="240dp"
        android:layout_height="match_parent"
        android:layout_gravity="start"
        android:background="#FFFFFF"
        android:choiceMode="singleChoice"
        android:divider="@android:color/darker_gray"
        android:dividerHeight="1dp" />

</android.support.v4.widget.DrawerLayout>
导航抽屉中的菜单选项以ListView的形式存储。每个选项在FrameLayout中打开。我们在这里使用了一个工具栏来替代操作栏。ToolBar自Android 5.0起作为ActionBar的泛化引入。它为我们提供了更多控制和灵活性来修改,并且更容易与层次结构中的其他视图交错。下面的xml布局中定义了ToolBar的布局。toolbar.xml
<android.support.v7.widget.Toolbar xmlns:android="https://schemas.android.com/apk/res/android"
    xmlns:local="https://schemas.android.com/apk/res-auto"
    android:id="@+id/toolbar"
    android:layout_width="match_parent"
    android:layout_height="wrap_content"
    android:minHeight="?attr/actionBarSize"
    android:background="?attr/colorPrimary"
    local:theme="@style/ThemeOverlay.AppCompat.Dark.ActionBar"
    local:popupTheme="@style/ThemeOverlay.AppCompat.Light" />
当使用工具栏时,我们需要在styles.xml中使用主题Theme.AppCompat.NoActionBar。导航抽屉中的ListView行的布局如下所示。list_view_item_row.xml
<RelativeLayout xmlns:android="https://schemas.android.com/apk/res/android"
    android:layout_width="match_parent"
    android:layout_height="wrap_content"
    android:background="?android:attr/activatedBackgroundIndicator"
    android:minHeight="?android:attr/listPreferredItemHeightSmall"
    android:padding="10dp" >

    <ImageView
        android:id="@+id/imageViewIcon"
        android:layout_width="wrap_content"
        android:layout_height="wrap_content"
        android:layout_alignParentLeft="true"
        android:layout_alignParentTop="true"
        android:paddingRight="10dp" />

    <TextView
        android:id="@+id/textViewName"
        android:layout_width="wrap_content"
        android:layout_height="wrap_content"
        android:layout_centerVertical="true"
        android:layout_toRightOf="@+id/imageViewIcon"
        android:paddingRight="10dp"
        android:text="Item Name"
        android:textColor="@android:color/black"
        android:textAppearance="?android:attr/textAppearanceListItemSmall"
        />

</RelativeLayout>
导航抽屉项目以字符串数组的形式放置在strings.xml文件中,如下所示。strings.xml
<string-array name="navigation_drawer_items_array">
        <item>Connect</item>
        <item>Fixtures</item>
        <item>Table</item>
    </string-array>
DataModel.java类用于定义抽屉列表项的对象。DataModel.java
package com.journaldev.navigationdrawer;

public class DataModel {

    public int icon;
    public String name;

    // Constructor.
    public DataModel(int icon, String name) {

        this.icon = icon;
        this.name = name;
    }
}
抽屉项目以ListView的形式存储。因此,我们需要使用适配器类将数据提供给活动类。DrawerItemCustomAdapter.java
package com.journaldev.navigationdrawer;

import android.app.Activity;
import android.content.Context;
import android.view.LayoutInflater;
import android.view.View;
import android.view.ViewGroup;
import android.widget.ArrayAdapter;
import android.widget.ImageView;
import android.widget.TextView;

public class DrawerItemCustomAdapter extends ArrayAdapter<DataModel> {

    Context mContext;
    int layoutResourceId;
    DataModel data[] = null;

    public DrawerItemCustomAdapter(Context mContext, int layoutResourceId, DataModel[] data) {

        super(mContext, layoutResourceId, data);
        this.layoutResourceId = layoutResourceId;
        this.mContext = mContext;
        this.data = data;
    }

    @Override
    public View getView(int position, View convertView, ViewGroup parent) {

        View listItem = convertView;

        LayoutInflater inflater = ((Activity) mContext).getLayoutInflater();
        listItem = inflater.inflate(layoutResourceId, parent, false);

        ImageView imageViewIcon = (ImageView) listItem.findViewById(R.id.imageViewIcon);
        TextView textViewName = (TextView) listItem.findViewById(R.id.textViewName);

        DataModel folder = data[position];


        imageViewIcon.setImageResource(folder.icon);
        textViewName.setText(folder.name);

        return listItem;
    }
}
MainActivity.java源代码如下。 MainActivity.java
package com.journaldev.navigationdrawer;

import android.support.v4.app.Fragment;
import android.support.v4.app.FragmentManager;
import android.support.v4.widget.DrawerLayout;
import android.support.v7.app.AppCompatActivity;
import android.os.Bundle;
import android.support.v7.widget.Toolbar;
import android.util.Log;
import android.view.MenuItem;
import android.view.View;
import android.widget.AdapterView;
import android.widget.ListView;

public class MainActivity extends AppCompatActivity {

    private String[] mNavigationDrawerItemTitles;
    private DrawerLayout mDrawerLayout;
    private ListView mDrawerList;
    Toolbar toolbar;
    private CharSequence mDrawerTitle;
    private CharSequence mTitle;
    android.support.v7.app.ActionBarDrawerToggle mDrawerToggle;

    @Override
    protected void onCreate(Bundle savedInstanceState) {
        super.onCreate(savedInstanceState);
        setContentView(R.layout.activity_main);
        mTitle = mDrawerTitle = getTitle();
        mNavigationDrawerItemTitles= getResources().getStringArray(R.array.navigation_drawer_items_array);
        mDrawerLayout = (DrawerLayout) findViewById(R.id.drawer_layout);
        mDrawerList = (ListView) findViewById(R.id.left_drawer);

        setupToolbar();

        DataModel[] drawerItem = new DataModel[3];

        drawerItem[0] = new DataModel(R.drawable.connect, "Connect");
        drawerItem[1] = new DataModel(R.drawable.fixtures, "Fixtures");
        drawerItem[2] = new DataModel(R.drawable.table, "Table");
        getSupportActionBar().setDisplayHomeAsUpEnabled(false);
        getSupportActionBar().setHomeButtonEnabled(true);

        DrawerItemCustomAdapter adapter = new DrawerItemCustomAdapter(this, R.layout.list_view_item_row, drawerItem);
        mDrawerList.setAdapter(adapter);
        mDrawerList.setOnItemClickListener(new DrawerItemClickListener());
        mDrawerLayout = (DrawerLayout) findViewById(R.id.drawer_layout);
        mDrawerLayout.setDrawerListener(mDrawerToggle);
        setupDrawerToggle();

    }

    private class DrawerItemClickListener implements ListView.OnItemClickListener {

        @Override
        public void onItemClick(AdapterView parent, View view, int position, long id) {
            selectItem(position);
        }

    }

    private void selectItem(int position) {

        Fragment fragment = null;

        switch (position) {
            case 0:
                fragment = new ConnectFragment();
                break;
            case 1:
                fragment = new FixturesFragment();
                break;
            case 2:
                fragment = new TableFragment();
                break;

            default:
                break;
        }

        if (fragment != null) {
            FragmentManager fragmentManager = getSupportFragmentManager();
            fragmentManager.beginTransaction().replace(R.id.content_frame, fragment).commit();

            mDrawerList.setItemChecked(position, true);
            mDrawerList.setSelection(position);
            setTitle(mNavigationDrawerItemTitles[position]);
            mDrawerLayout.closeDrawer(mDrawerList);

        } else {
            Log.e("MainActivity", "Error in creating fragment");
        }
    }

    @Override
    public boolean onOptionsItemSelected(MenuItem item) {

        if (mDrawerToggle.onOptionsItemSelected(item)) {
            return true;
        }

        return super.onOptionsItemSelected(item);
    }

    @Override
    public void setTitle(CharSequence title) {
        mTitle = title;
        getSupportActionBar().setTitle(mTitle);
    }

    @Override
    protected void onPostCreate(Bundle savedInstanceState) {
        super.onPostCreate(savedInstanceState);
        mDrawerToggle.syncState();
    }

    void setupToolbar(){
        toolbar = (Toolbar) findViewById(R.id.toolbar);
        setSupportActionBar(toolbar);
        getSupportActionBar().setDisplayShowHomeEnabled(true);
    }

    void setupDrawerToggle(){
        mDrawerToggle = new android.support.v7.app.ActionBarDrawerToggle(this,mDrawerLayout,toolbar,R.string.app_name, R.string.app_name);
        //这是在状态改变时更改抽屉切换图标的必要操作。
        mDrawerToggle.syncState();
    }
}
在上述代码中,getSupportActionBar().setDisplayHomeAsUpEnabled(false);用于隐藏默认返回按钮。在这段代码中,我们使用了一个DrawerItemClickListener类,它使用FragmentManager加载点击的列表项的相应片段。还使用setTitle(mNavigationDrawerItemTitles[position]);将ToolBar的标题更改为点击的列表项。下面给出了片段类及其相应的布局。 ConnectFragment.java
package com.journaldev.navigationdrawer;

import android.os.Bundle;
import android.support.v4.app.Fragment;
import android.view.LayoutInflater;
import android.view.View;
import android.view.ViewGroup;

public class ConnectFragment extends Fragment {

    public ConnectFragment() {
    }

    @Override
    public View onCreateView(LayoutInflater inflater, ViewGroup container, Bundle savedInstanceState) {

        View rootView = inflater.inflate(R.layout.fragment_connect, container, false);

        return rootView;
    }

}
上述片段的布局定义如下。 fragment_connect.xml
<RelativeLayout xmlns:android="https://schemas.android.com/apk/res/android"
    xmlns:tools="https://schemas.android.com/tools"
    android:layout_width="match_parent"
    android:layout_height="match_parent"
    android:orientation="vertical">


    <TextView
        android:id="@+id/label"
        android:layout_alignParentTop="true"
        android:layout_marginTop="100dp"
        android:layout_width="fill_parent"
        android:layout_height="wrap_content"
        android:gravity="center_horizontal"
        android:textSize="45dp"
        android:text="Connect"
        android:textStyle="bold"/>

    <TextView
        android:layout_below="@id/label"
        android:layout_centerInParent="true"
        android:layout_width="fill_parent"
        android:layout_height="wrap_content"
        android:textSize="12dp"
        android:layout_marginTop="10dp"
        android:gravity="center_horizontal"
        android:text="Edit fragment_connect.xml to change the appearance"
        android:id="@+id/textView2" />

</RelativeLayout>
另外两个项目的定义方式与上述完全相同,因此我们在这里跳过。
导航抽屉Android示例输出
以下是我们的导航抽屉Android示例应用程序生成的输出。  这就结束了Android导航抽屉示例教程。 您可以从以下链接下载最终的Android导航抽屉项目。
Source:
https://www.digitalocean.com/community/tutorials/android-navigation-drawer-example-tutorial


