


Spring RestTemplate обеспечивает удобный способ тестирования RESTful веб-сервисов.
Spring RestTemplate
- Класс Spring RestTemplate является частью
spring-web, введенной в Spring 3. - Мы можем использовать RestTemplate для тестирования веб-сервисов, основанных на HTTP, но он не поддерживает протокол HTTPS.
- Класс RestTemplate предоставляет перегруженные методы для разных HTTP-методов, таких как GET, POST, PUT, DELETE и т. д.
Пример Spring RestTemplate
Давайте рассмотрим пример использования Spring RestTemplate, где мы будем тестировать REST веб-сервисы, созданные в статье Spring Data JPA. В таблице ниже представлены URI, поддерживаемые этим веб-сервисом. .tg {border-collapse:collapse;border-spacing:0;border-color:#999;} .tg td{font-family:Arial, sans-serif;font-size:14px;padding:10px 5px;border-style:solid;border-width:1px;overflow:hidden;word-break:normal;border-color:#999;color:#444;background-color:#F7FDFA;} .tg th{font-family:Arial, sans-serif;font-size:14px;font-weight:normal;padding:10px 5px;border-style:solid;border-width:1px;overflow:hidden;word-break:normal;border-color:#999;color:#fff;background-color:#26ADE4;} .tg .tg-baqh{text-align:center;vertical-align:top} .tg .tg-yw4l{vertical-align:top}
| URI | HTTP Method | Description |
|---|---|---|
| /springData/person | GET | Get all persons from database |
| /springData/person/{id} | GET | Get person by id |
| /springData/person | POST | Add person to database |
| /springData/person | PUT | Update person |
| /springData/person/{id} | DELETE | Delete person by id |
Давайте начнем создание нашего проекта клиента REST для тестирования этих веб-сервисов. На изображении ниже показан наш конечный проект примера Spring RestTemplate. 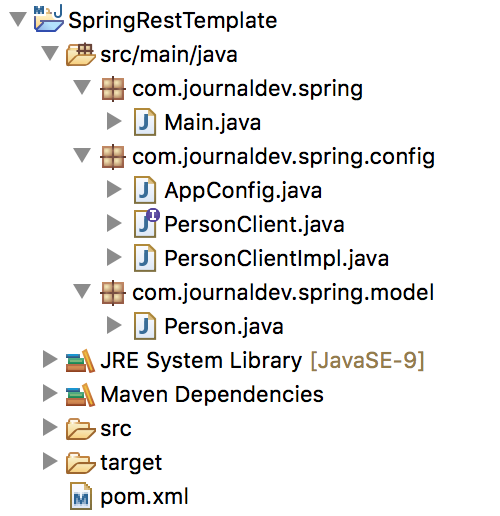
Зависимости Maven для Spring RestTemplate
Нам нужны зависимости spring-core, spring-context для Spring-фреймворка. Затем нам нужен артефакт spring-web, который содержит класс RestTemplate. Мы также нуждаемся в jackson-mapper-asl для поддержки JSON в Spring через API Jackson.
<?xml version="1.0" encoding="UTF-8"?>
<project xmlns="https://maven.apache.org/POM/4.0.0" xmlns:xsi="https://www.w3.org/2001/XMLSchema-instance"
	xsi:schemaLocation="https://maven.apache.org/POM/4.0.0 https://maven.apache.org/xsd/maven-4.0.0.xsd">
	<modelVersion>4.0.0</modelVersion>

	<groupId>com.journaldev.spring</groupId>
	<artifactId>SpringRestTemplate</artifactId>
	<version>1.0-SNAPSHOT</version>
	<properties>
		<spring.framework>4.3.0.RELEASE</spring.framework>
		<spring.web>3.0.2.RELEASE</spring.web>
		<serializer.version>2.8.1</serializer.version>
	</properties>
	<dependencies>
		<dependency>
			<groupId>org.springframework</groupId>
			<artifactId>spring-core</artifactId>
			<version>${spring.framework}</version>
		</dependency>
		<dependency>
			<groupId>org.springframework</groupId>
			<artifactId>spring-context</artifactId>
			<version>${spring.framework}</version>
		</dependency>
		<dependency>
			<groupId>org.codehaus.jackson</groupId>
			<artifactId>jackson-mapper-asl</artifactId>
			<version>1.9.4</version>
		</dependency>
		<dependency>
			<groupId>org.springframework</groupId>
			<artifactId>spring-web</artifactId>
			<version>${spring.web}</version>
		</dependency>
	</dependencies>
</project>
Класс конфигурации Spring
Мы должны определить бин Spring для класса RestTemplate, это делается в классе AppConfig.
package com.journaldev.spring.config;

import org.codehaus.jackson.map.ObjectMapper;
import org.springframework.context.annotation.Bean;
import org.springframework.context.annotation.ComponentScan;
import org.springframework.context.annotation.Configuration;
import org.springframework.http.converter.json.MappingJacksonHttpMessageConverter;
import org.springframework.web.client.RestTemplate;

@Configuration
@ComponentScan("com.journaldev.spring")
public class AppConfig {

	@Bean
	RestTemplate restTemplate() {
		RestTemplate restTemplate = new RestTemplate();
		MappingJacksonHttpMessageConverter converter = new MappingJacksonHttpMessageConverter();
		converter.setObjectMapper(new ObjectMapper());
		restTemplate.getMessageConverters().add(converter);
		return restTemplate;
	}
}
Обратите внимание, что RestTamplate использует MessageConverter, и нам нужно установить это свойство в бин RestTemplate. В нашем примере мы используем MappingJacksonHttpMessageConverter для извлечения данных из формата JSON.
Класс модели
Поскольку мы пытаемся преобразовать JSON, возвращаемый нашим веб-сервисом, в объект java с использованием маппера jackson, нам нужно создать модельный класс для этого. Обратите внимание, что этот модельный класс будет очень похож на модельный класс, используемый в веб-сервисе, за исключением того, что здесь нам не нужны аннотации JPA.
package com.journaldev.spring.model;

public class Person {

	private Long id;

	private Integer age;

	private String firstName;

	private String lastName;

	public Person() {
	}

	public Long getId() {
		return id;
	}

	public void setId(Long id) {
		this.id = id;
	}

	public Integer getAge() {
		return age;
	}

	public void setAge(Integer age) {
		this.age = age;
	}

	public String getFirstName() {
		return firstName;
	}

	public void setFirstName(String firstName) {
		this.firstName = firstName;
	}

	public String getLastName() {
		return lastName;
	}

	public void setLastName(String lastName) {
		this.lastName = lastName;
	}

	@Override
	public String toString() {
		return "Person{" + "id=" + id + ", age=" + age + ", firstName='" + firstName + '\'' + ", lastName='" + lastName
				+ '\'' + '}';
	}
}
Класс клиента Spring RestTemplate
Последний шаг – создать классы клиентов, которые будут использовать определенный выше бин RestTemplate.
package com.journaldev.spring.config;

import java.util.List;

import org.springframework.http.HttpStatus;

import com.journaldev.spring.model.Person;

public interface PersonClient {
	List<Person> getAllPerson();

	Person getById(Long id);

	HttpStatus addPerson(Person person);

	void updatePerson(Person person);

	void deletePerson(Long id);
}
package com.journaldev.spring.config;

import java.util.Arrays;
import java.util.List;

import org.springframework.beans.factory.annotation.Autowired;
import org.springframework.http.HttpStatus;
import org.springframework.http.ResponseEntity;
import org.springframework.stereotype.Service;
import org.springframework.web.client.RestTemplate;

import com.journaldev.spring.model.Person;

@Service
public class PersonClientImpl implements PersonClient {

	@Autowired
	RestTemplate restTemplate;

	final String ROOT_URI = "https://localhost:8080/springData/person";

	public List<Person> getAllPerson() {
		ResponseEntity<Person[]> response = restTemplate.getForEntity(ROOT_URI, Person[].class);
		return Arrays.asList(response.getBody());

	}

	public Person getById(Long id) {
		ResponseEntity<Person> response = restTemplate.getForEntity(ROOT_URI + "/"+id, Person.class);
		return response.getBody();
	}

	public HttpStatus addPerson(Person person) {
		ResponseEntity<HttpStatus> response = restTemplate.postForEntity(ROOT_URI, person, HttpStatus.class);
		return response.getBody();
	}

	public void updatePerson(Person person) {
		restTemplate.put(ROOT_URI, person);
	}

	public void deletePerson(Long id) {
		restTemplate.delete(ROOT_URI + id);

	}
}
Код понятен сам по себе, мы вызываем методы RestTemplate в зависимости от URI и метода HTTP, и передаем соответствующий объект запроса, если это необходимо.
Класс тестирования Spring RestTemplate
Пришло время протестировать наш пример проекта Spring RestTemplate, ниже показано, как использовать методы RestTemplate в стиле Spring.
package com.journaldev.spring;

import org.springframework.context.annotation.AnnotationConfigApplicationContext;
import org.springframework.http.HttpStatus;

import com.journaldev.spring.config.AppConfig;
import com.journaldev.spring.config.PersonClient;
import com.journaldev.spring.model.Person;

public class Main {

	public static void main(String[] args) {
		AnnotationConfigApplicationContext applicationContext = new AnnotationConfigApplicationContext(AppConfig.class);

		PersonClient client = applicationContext.getBean(PersonClient.class);

		System.out.println("Getting list of all people:");

		for (Person p : client.getAllPerson()) {
			System.out.println(p);
		}

		System.out.println("\nGetting person with ID 2");

		Person personById = client.getById(2L);

		System.out.println(personById);

		System.out.println("Adding a Person");
		Person p = new Person();
		p.setAge(50);
		p.setFirstName("David");
		p.setLastName("Blain");
		HttpStatus status = client.addPerson(p);
		System.out.println("Add Person Response = " + status);

		applicationContext.close();
	}
}
Когда я запускаю указанную выше программу на моей локальной установке, я получаю следующий вывод.
Getting list of all people:
Person{id=2, age=30, firstName='Oksi', lastName=' Bahatskaya'}
Person{id=1, age=30, firstName='Vlad', lastName='Mateo'}

Getting person with ID 2
Person{id=2, age=30, firstName='Oksi', lastName=' Bahatskaya'}
Adding a Person
Add Person Response = 201
На следующем изображении показаны данные таблицы базы данных веб-сервиса до и после выполнения вышеуказанной программы. 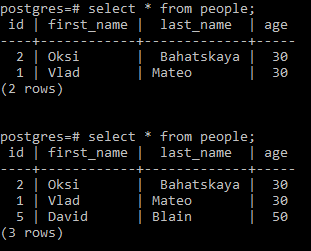 Как видите, вывод программы соответствует образцовым данным таблицы. Вот и все для примера Spring RestTemplate, вы можете скачать проект по ссылке ниже.
Скачать Пример Проекта Spring RestTemplate
Ссылка: Документация по API
Source:
https://www.digitalocean.com/community/tutorials/spring-resttemplate-example