Добро пожаловать в пример Spring Restful Web Services XML и JSON. Недавно я написал статью о Spring REST JSON, и получил много комментариев с вопросами о том, как изменить программу, чтобы она поддерживала XML. Я также получил несколько электронных писем с вопросами о том, как сделать приложение поддерживать как XML, так и JSON.
Spring REST XML и JSON
I thought to write an article about Spring REST XML and JSON application where I will show you how easily we can extend the existing application to support XML. Since I will be making changes to the existing project, make sure you first download it from below link.
Скачайте проект Spring Restful Webservice
Теперь внесите следующие изменения в файл конфигурации бина Spring.
-
Определите бин типа
Jaxb2RootElementHttpMessageConverter.<beans:bean id="xmlMessageConverter" class="org.springframework.http.converter.xml.Jaxb2RootElementHttpMessageConverter"> </beans:bean> -
Добавьте выше настроенный бин в свойство
messageConvertersобъектаRequestMappingHandlerAdapter.<beans:bean class="org.springframework.web.servlet.mvc.method.annotation.RequestMappingHandlerAdapter"> <beans:property name="messageConverters"> <beans:list> <beans:ref bean="jsonMessageConverter"/> <beans:ref bean="xmlMessageConverter"/> </beans:list> </beans:property> </beans:bean>
После этих изменений наш конечный файл конфигурации бина Spring будет выглядеть следующим образом. servlet-context.xml
<?xml version="1.0" encoding="UTF-8"?>
<beans:beans xmlns="https://www.springframework.org/schema/mvc"
xmlns:xsi="https://www.w3.org/2001/XMLSchema-instance"
xmlns:beans="https://www.springframework.org/schema/beans"
xmlns:context="https://www.springframework.org/schema/context"
xsi:schemaLocation="https://www.springframework.org/schema/mvc https://www.springframework.org/schema/mvc/spring-mvc.xsd
https://www.springframework.org/schema/beans https://www.springframework.org/schema/beans/spring-beans.xsd
https://www.springframework.org/schema/context https://www.springframework.org/schema/context/spring-context.xsd">
<!-- DispatcherServlet Context: defines this servlet's request-processing infrastructure -->
<!-- Enables the Spring MVC @Controller programming model -->
<annotation-driven />
<!-- Handles HTTP GET requests for /resources/** by efficiently serving up static resources in the ${webappRoot}/resources directory -->
<resources mapping="/resources/**" location="/resources/" />
<!-- Resolves views selected for rendering by @Controllers to .jsp resources in the /WEB-INF/views directory -->
<beans:bean class="org.springframework.web.servlet.view.InternalResourceViewResolver">
<beans:property name="prefix" value="/WEB-INF/views/" />
<beans:property name="suffix" value=".jsp" />
</beans:bean>
<!-- Configure to plugin JSON as request and response in method handler -->
<beans:bean class="org.springframework.web.servlet.mvc.method.annotation.RequestMappingHandlerAdapter">
<beans:property name="messageConverters">
<beans:list>
<beans:ref bean="jsonMessageConverter"/>
<beans:ref bean="xmlMessageConverter"/>
</beans:list>
</beans:property>
</beans:bean>
<!-- Configure bean to convert JSON to POJO and vice versa -->
<beans:bean id="jsonMessageConverter" class="org.springframework.http.converter.json.MappingJackson2HttpMessageConverter">
</beans:bean>
<beans:bean id="xmlMessageConverter" class="org.springframework.http.converter.xml.Jaxb2RootElementHttpMessageConverter">
</beans:bean>
<context:component-scan base-package="com.journaldev.spring.controller" />
</beans:beans>
Мы знаем, что для работы с маршалингом JAXB для класса необходимо аннотировать его аннотацией @XmlRootElement. Поэтому добавьте это к нашему модельному классу Employee. Employee.java
@XmlRootElement
public class Employee implements Serializable{

//нет изменений в коде
}
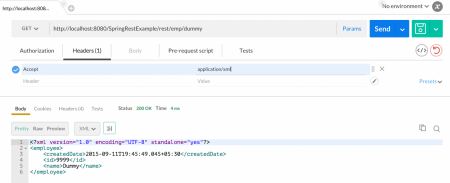
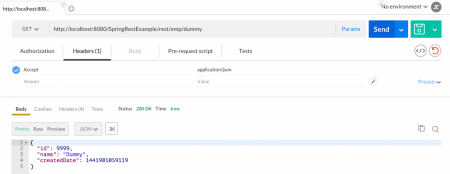
Вот и все, мы закончили. Наше веб-приложение Spring будет поддерживать как JSON, так и XML. Оно даже будет поддерживать запросы XML с ответом JSON и наоборот. Ниже приведены некоторые скриншоты, демонстрирующие это в действии. ПРИМЕЧАНИЕ: Я использую приложение Postman для Chrome для этого, вы можете использовать любой REST-клиент для тестирования. 1. Ответ в формате XML: Убедитесь, что вы передаете заголовок Accept как “application/xml”.  2. Ответ в формате JSON: Убедитесь, что вы передаете заголовок Accept как “application/json”.
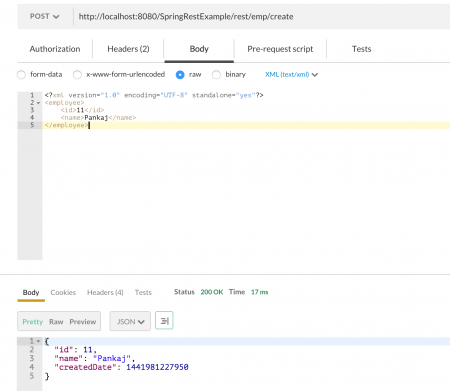
  3. Запрос в формате XML с ответом в формате JSON: Убедитесь, что заголовок Accept установлен как “application/json”, а заголовок Content-Type как “text/xml”, как показано на изображениях ниже.
 Это все, что касается примера Spring Restful веб-сервисов для поддержки как XML, так и JSON. Вы видите, насколько легко расширить фреймворк Spring, это одна из основных причин его популярности.
Source:
https://www.digitalocean.com/community/tutorials/spring-rest-xml-and-json-example


