


Безопасность вашего приложения extends beyond simply granting or denying access at the surface level. As a developer, you need to implement fine-grained authorization (FGA) to manage permissions at a more detailed, granular level.
FGA allows you to set up detailed access controls that specify who can do what and under which conditions.
In this tutorial, you will learn how to implement fine-grained authorization in Java and Spring Boot using Permit.io.
Here is the source code (remember to give it a star ⭐).
I hope you enjoyed my previous blog about building a custom video conferencing app with Stream and Next.js. These blogs reflect my journey in creating DevTools Academy, a platform designed to help developers discover amazing developer tools.
This tutorial is another effort to introduce you to a super helpful developer tool that I recently explored.
Table of Contents:
Что такое разрешение?
Permit.io — это полнофункциональное решение для уровня приложений, работающее как вставка, которое позволяет внедрить
безопасный,гибкий,уровень авторизацииза считаные минуты, так что вы сможете сосредоточиться на самом важном.

Предварительные требования
Чтобы полностью понять учебник, вам нужно иметь базовое понимание Java и Spring Boot. Вам также потребуется следующее:
-
Permit.io: инструмент для разработчиков, упрощающий внедрение FGA.
-
Spring Boot Starter Web: предоставляет необходимые компоненты для создания веб-приложений, включая RESTful API.
-
Gradle: средство управления зависимостями.
-
JDK 11 или更新: версия Java Development Kit, необходимая для компиляции и выполнения вашего приложения Spring Boot.
-
Postman или cURL: инструменты для тестирования
APIконечных точек.
Что такое тонкая настройка прав доступа?
Тонкая настройка прав доступа позволяет контролировать доступ к ресурсам, определяя, кто может получить к ним доступ, насколько и под какими условиями.
В отличие от грубой модели авторизации (которая осуществляет управление доступом на основе категорий, таких как роли пользователей (например, “админ” или “пользователь“), тонкая модель авторизации gives you the flexibility to define access at a granular level, for specific resources or actions and even attributes.
In Fine Grained Authorization there exist 3 types of policy models for managing authorization; Role Based Access Control (RBAC), Attribute Based Access Control (ABAC), and Relationship-Based Access Control (ReBAC).
Let’s take a look, at each of these approaches and see how you can implement them in your application.
Role-Based Access Control (RBAC)
RBAC is a security approach that controls resource access based on the roles of users within an organization. This model streamlines permissions by organizing users into roles and managing access control according to these defined roles.
Key Concepts in RBAC:
Users: People who use the system such as employees or customers.
Roles: A set of permissions or access privileges assigned to a group of users based on their responsibilities or tasks such as admin, manager, or customer.
Permissions: The rights granted to users for interacting with resources, such as read, write, or delete.
Attribute-Based Access Control (ABAC)
ABAC – это гибкая и адаптивная модель контроля доступа, которая определяет, кто может или не может получить доступ к ресурсам, основываясь на атрибутах, таких как данные пользователя. Модель ABAC позволяет определить тонкий уровень авторизации на основе атрибутов пользователя.
Ключевые понятия в ABAC:
Атрибуты:Characteristics or properties used to make access control decisions. Attributes are typically categorized into:
-
User Attributes: Information about the user (for example, role, department, job title, age, and so on).
-
Resource Attributes: Characteristics of the resource (for example, file type, data classification level, creation date, owner).
-
Action Attributes: The action the user is trying to perform (for example, read, write, delete, approve).
-
Environmental Attributes: Contextual information about the access request (for example, time of day, location, device type, IP address).
Реляционный метод контроля доступа (ReBAC)
ReBAC – это система контроля доступа, которая предоставляет разрешения для доступа к ресурсам на основе взаимоотношений между субъектами в системе. Этот подход особенно акцентирует определение и управление контролем доступа, отображая, какие отношения пользователи имеют с ресурсами и другими субъектами, такими как организации или группы.
Ключевые понятия ReBAC:
Субъекты: Пользователи, ресурсы (такие как файлы и документы) и другие субъекты, например, группы или подразделения организации.
Отношения: Связи, определяющие взаимоотношения между двумя субъектами. Например, пользователь может быть “владельцем” документа или “членом” команды.
Политики: Правила, использующие отношения для определения прав доступа. Пользователь может получить доступ к ресурсу или выполнить действие над ним, если у него есть соответствующее отношение к нему.
Как реализовать тонкий контроль разрешений
Теперь, когда у вас есть базовая idea о RBAC, ABAC и ReBAC, посмотрим, как мы можем реализовать эти модели в e-commerce приложении.
Реализация контроля доступа на основе ролей
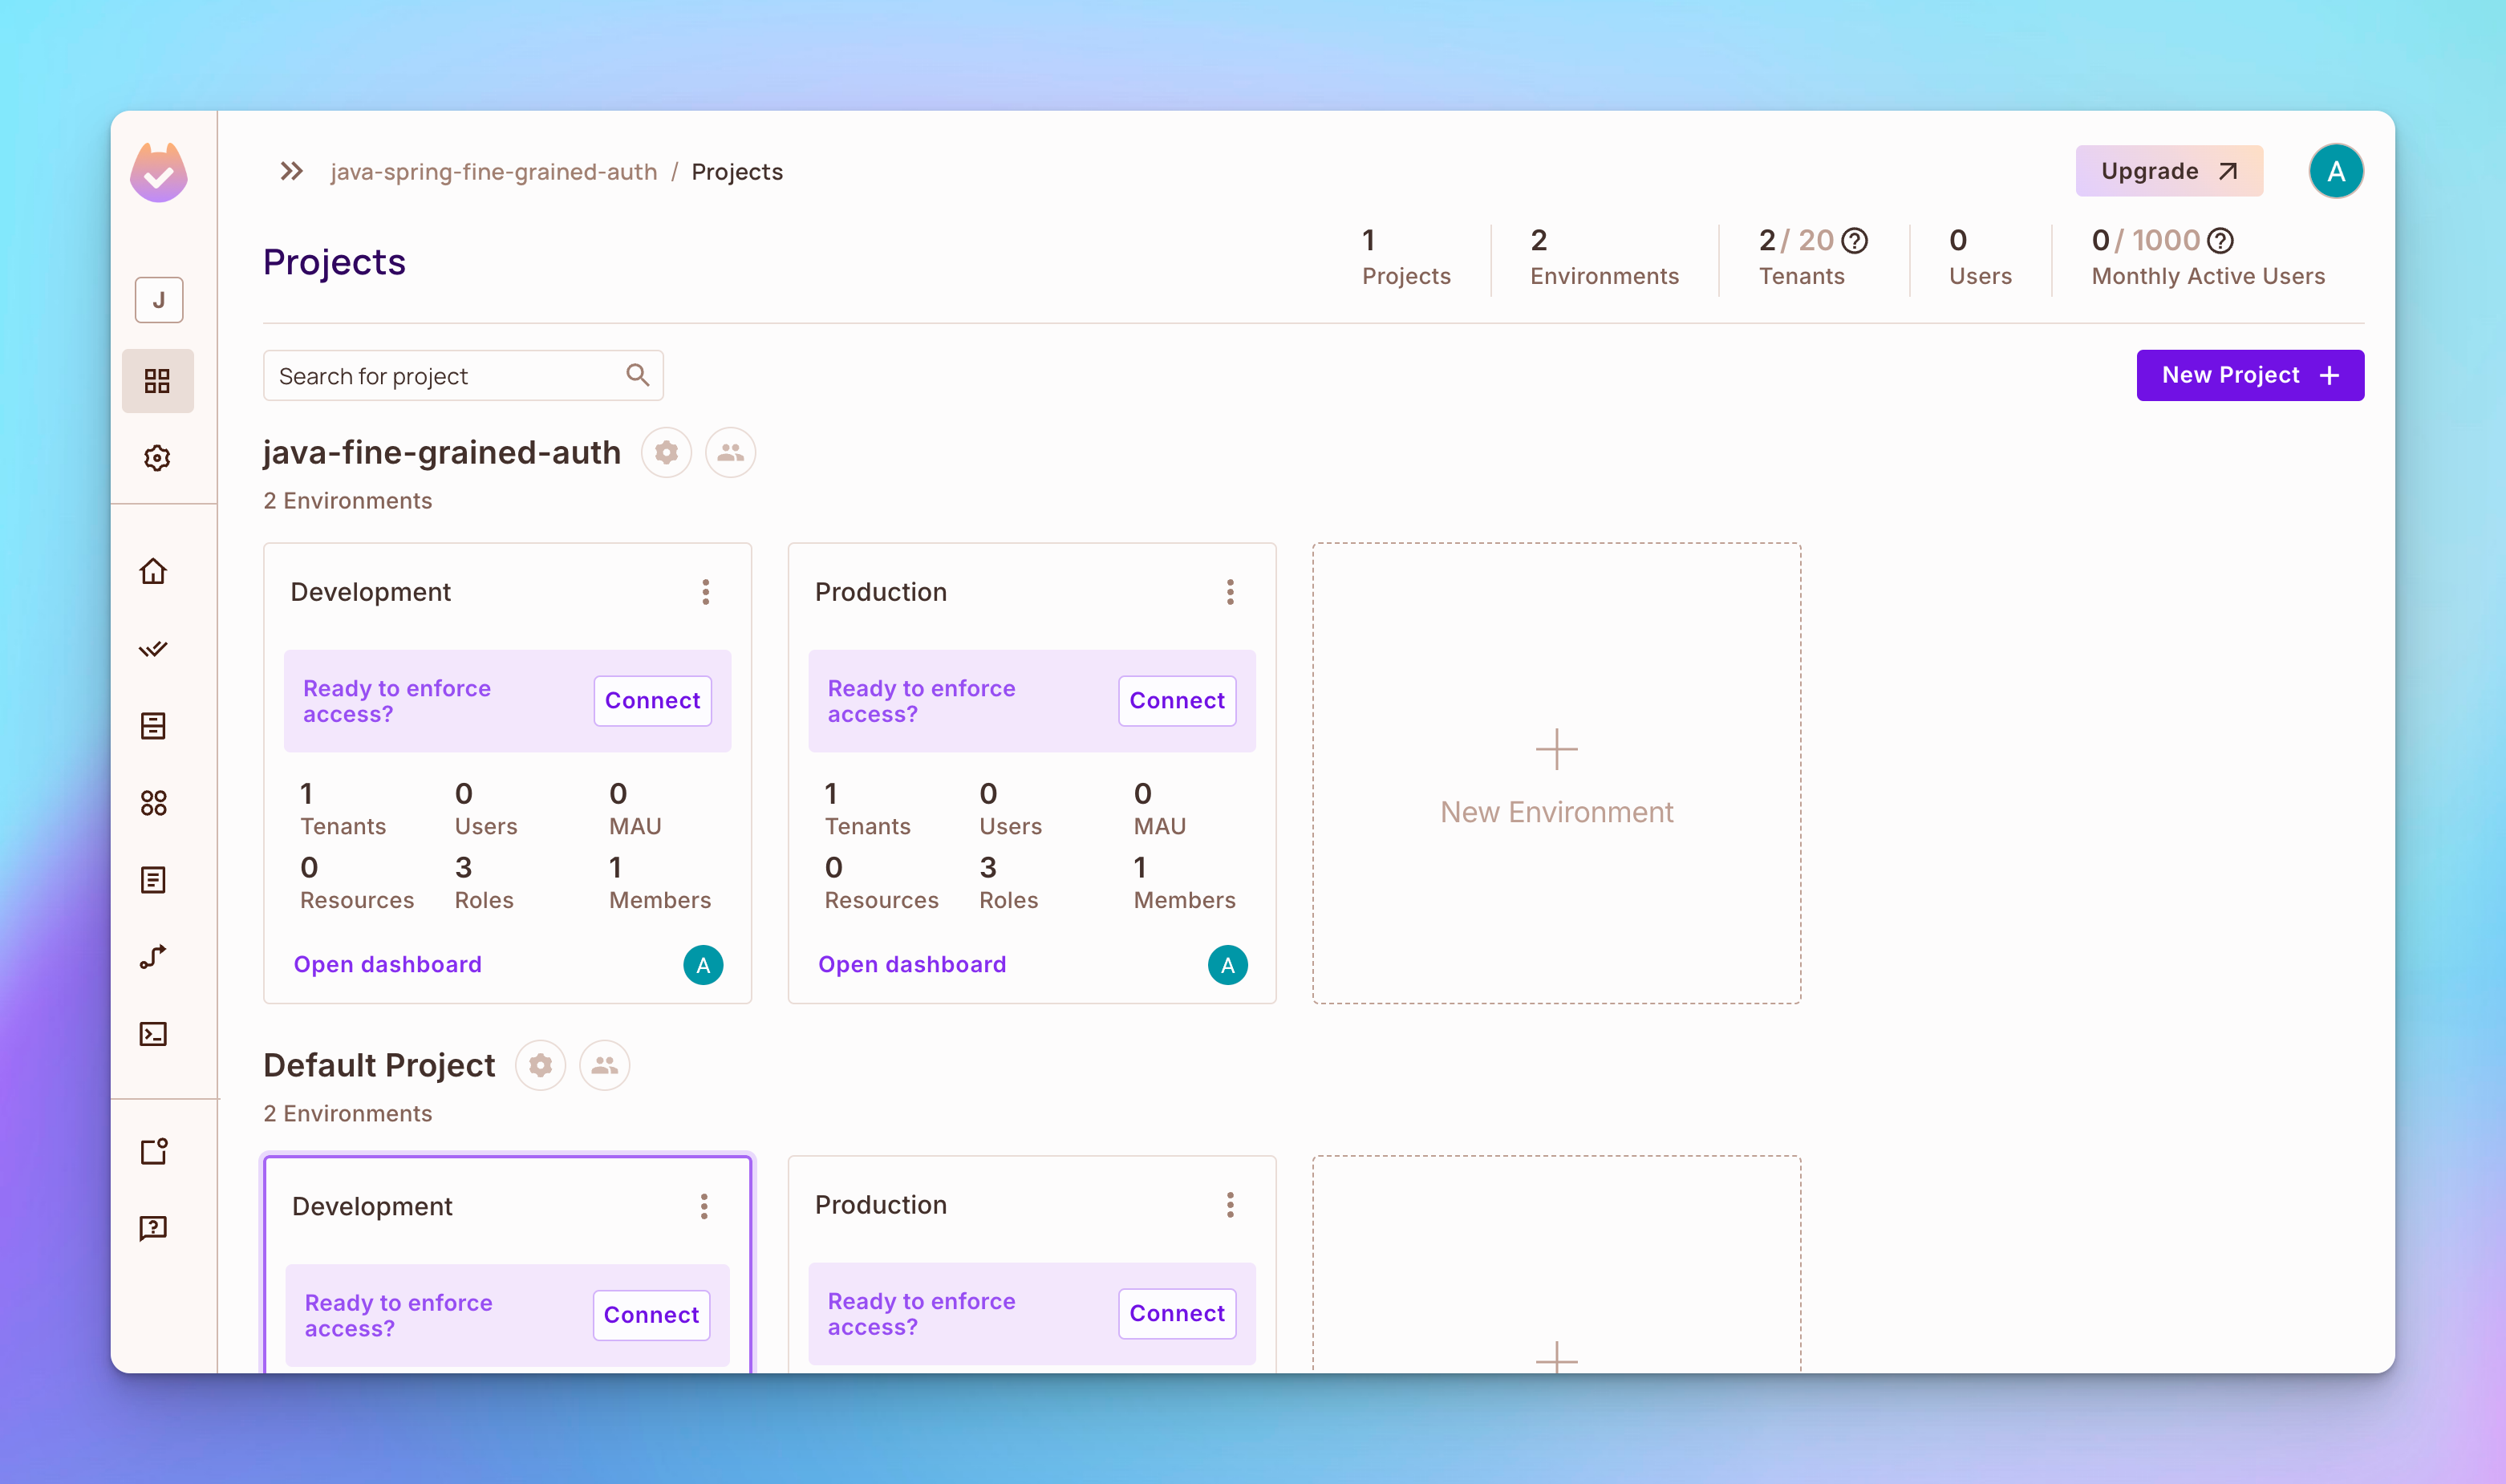
Шаг 1: Перейдите на Permit.io и создайте учетную запись и ваш рабочий пространство.

По умолчанию вы должны видеть проект, который включает два окружения: Разработка и Производство.
Шаг 2: Создайте ресурс с именем Products. Чтобы создать ресурс, откройте в левой sidebar Политику и затем откройте вверху Ресурсы. Затем нажмите кнопку Создать ресурс и создайте ресурс с именем Products с действиями read, create, update и delete.
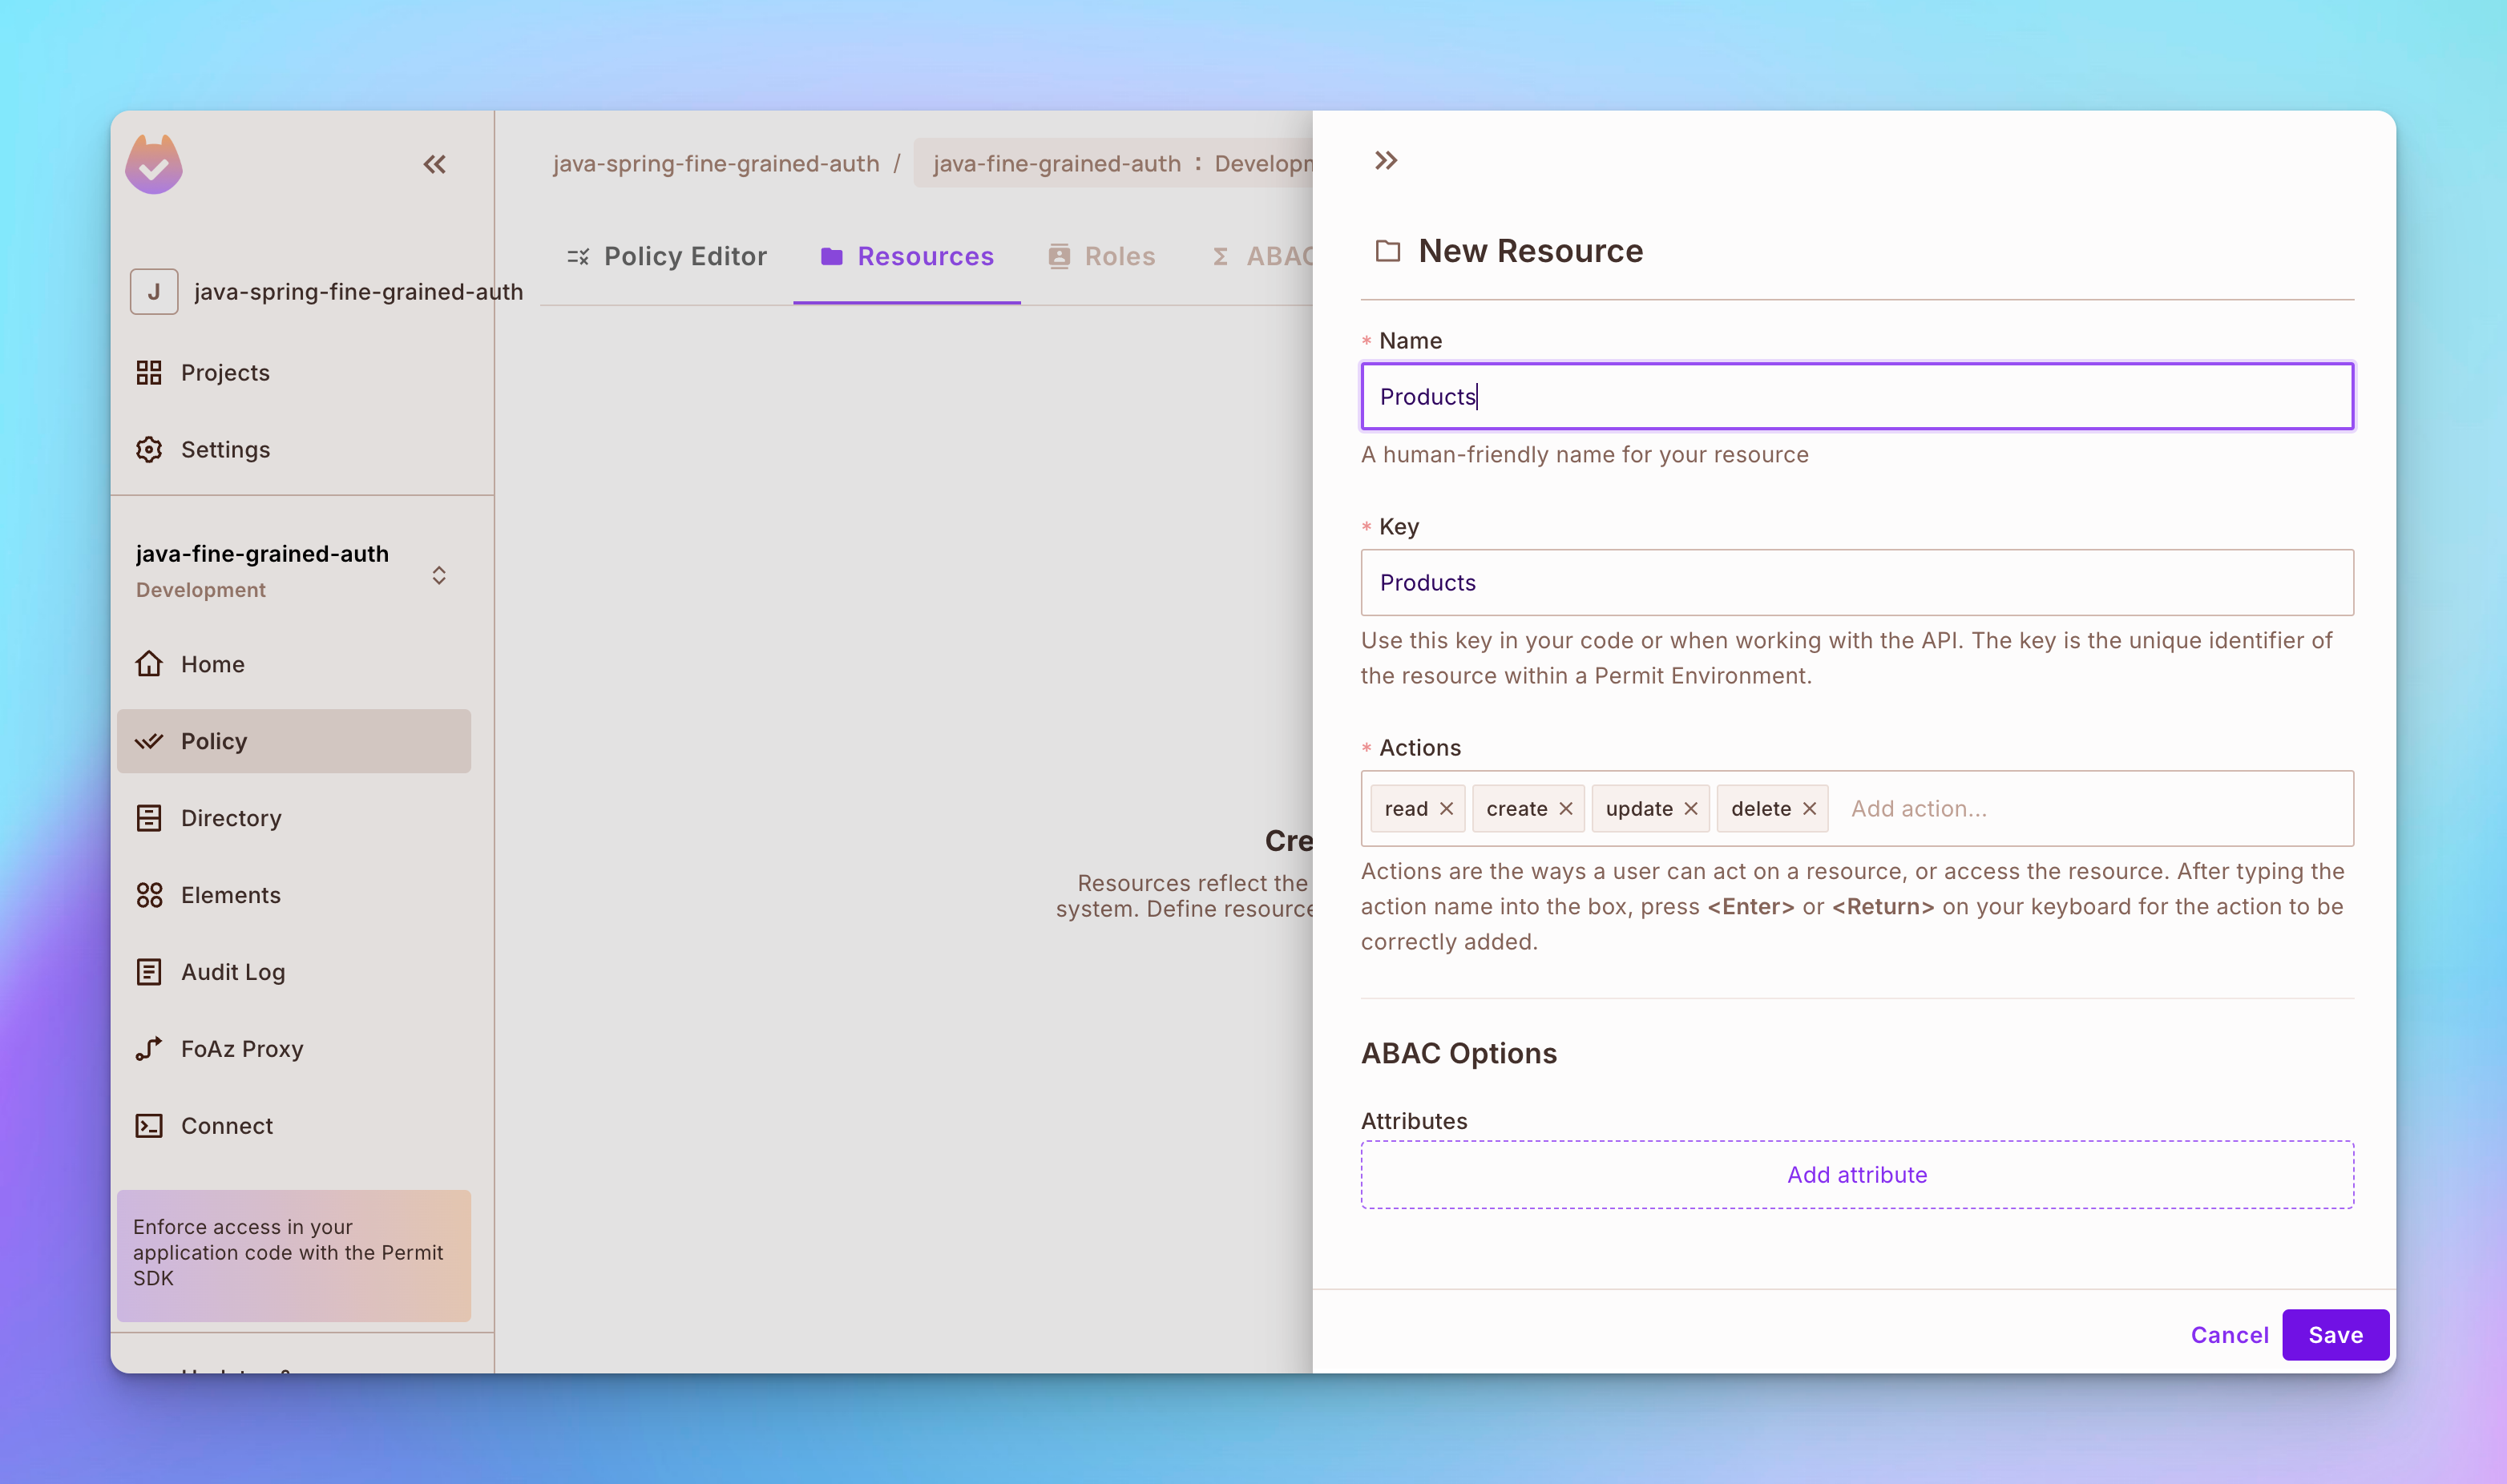
Шаг 3: Создайте еще один ресурс с именем Reviews с действиями read, create, update и delete.
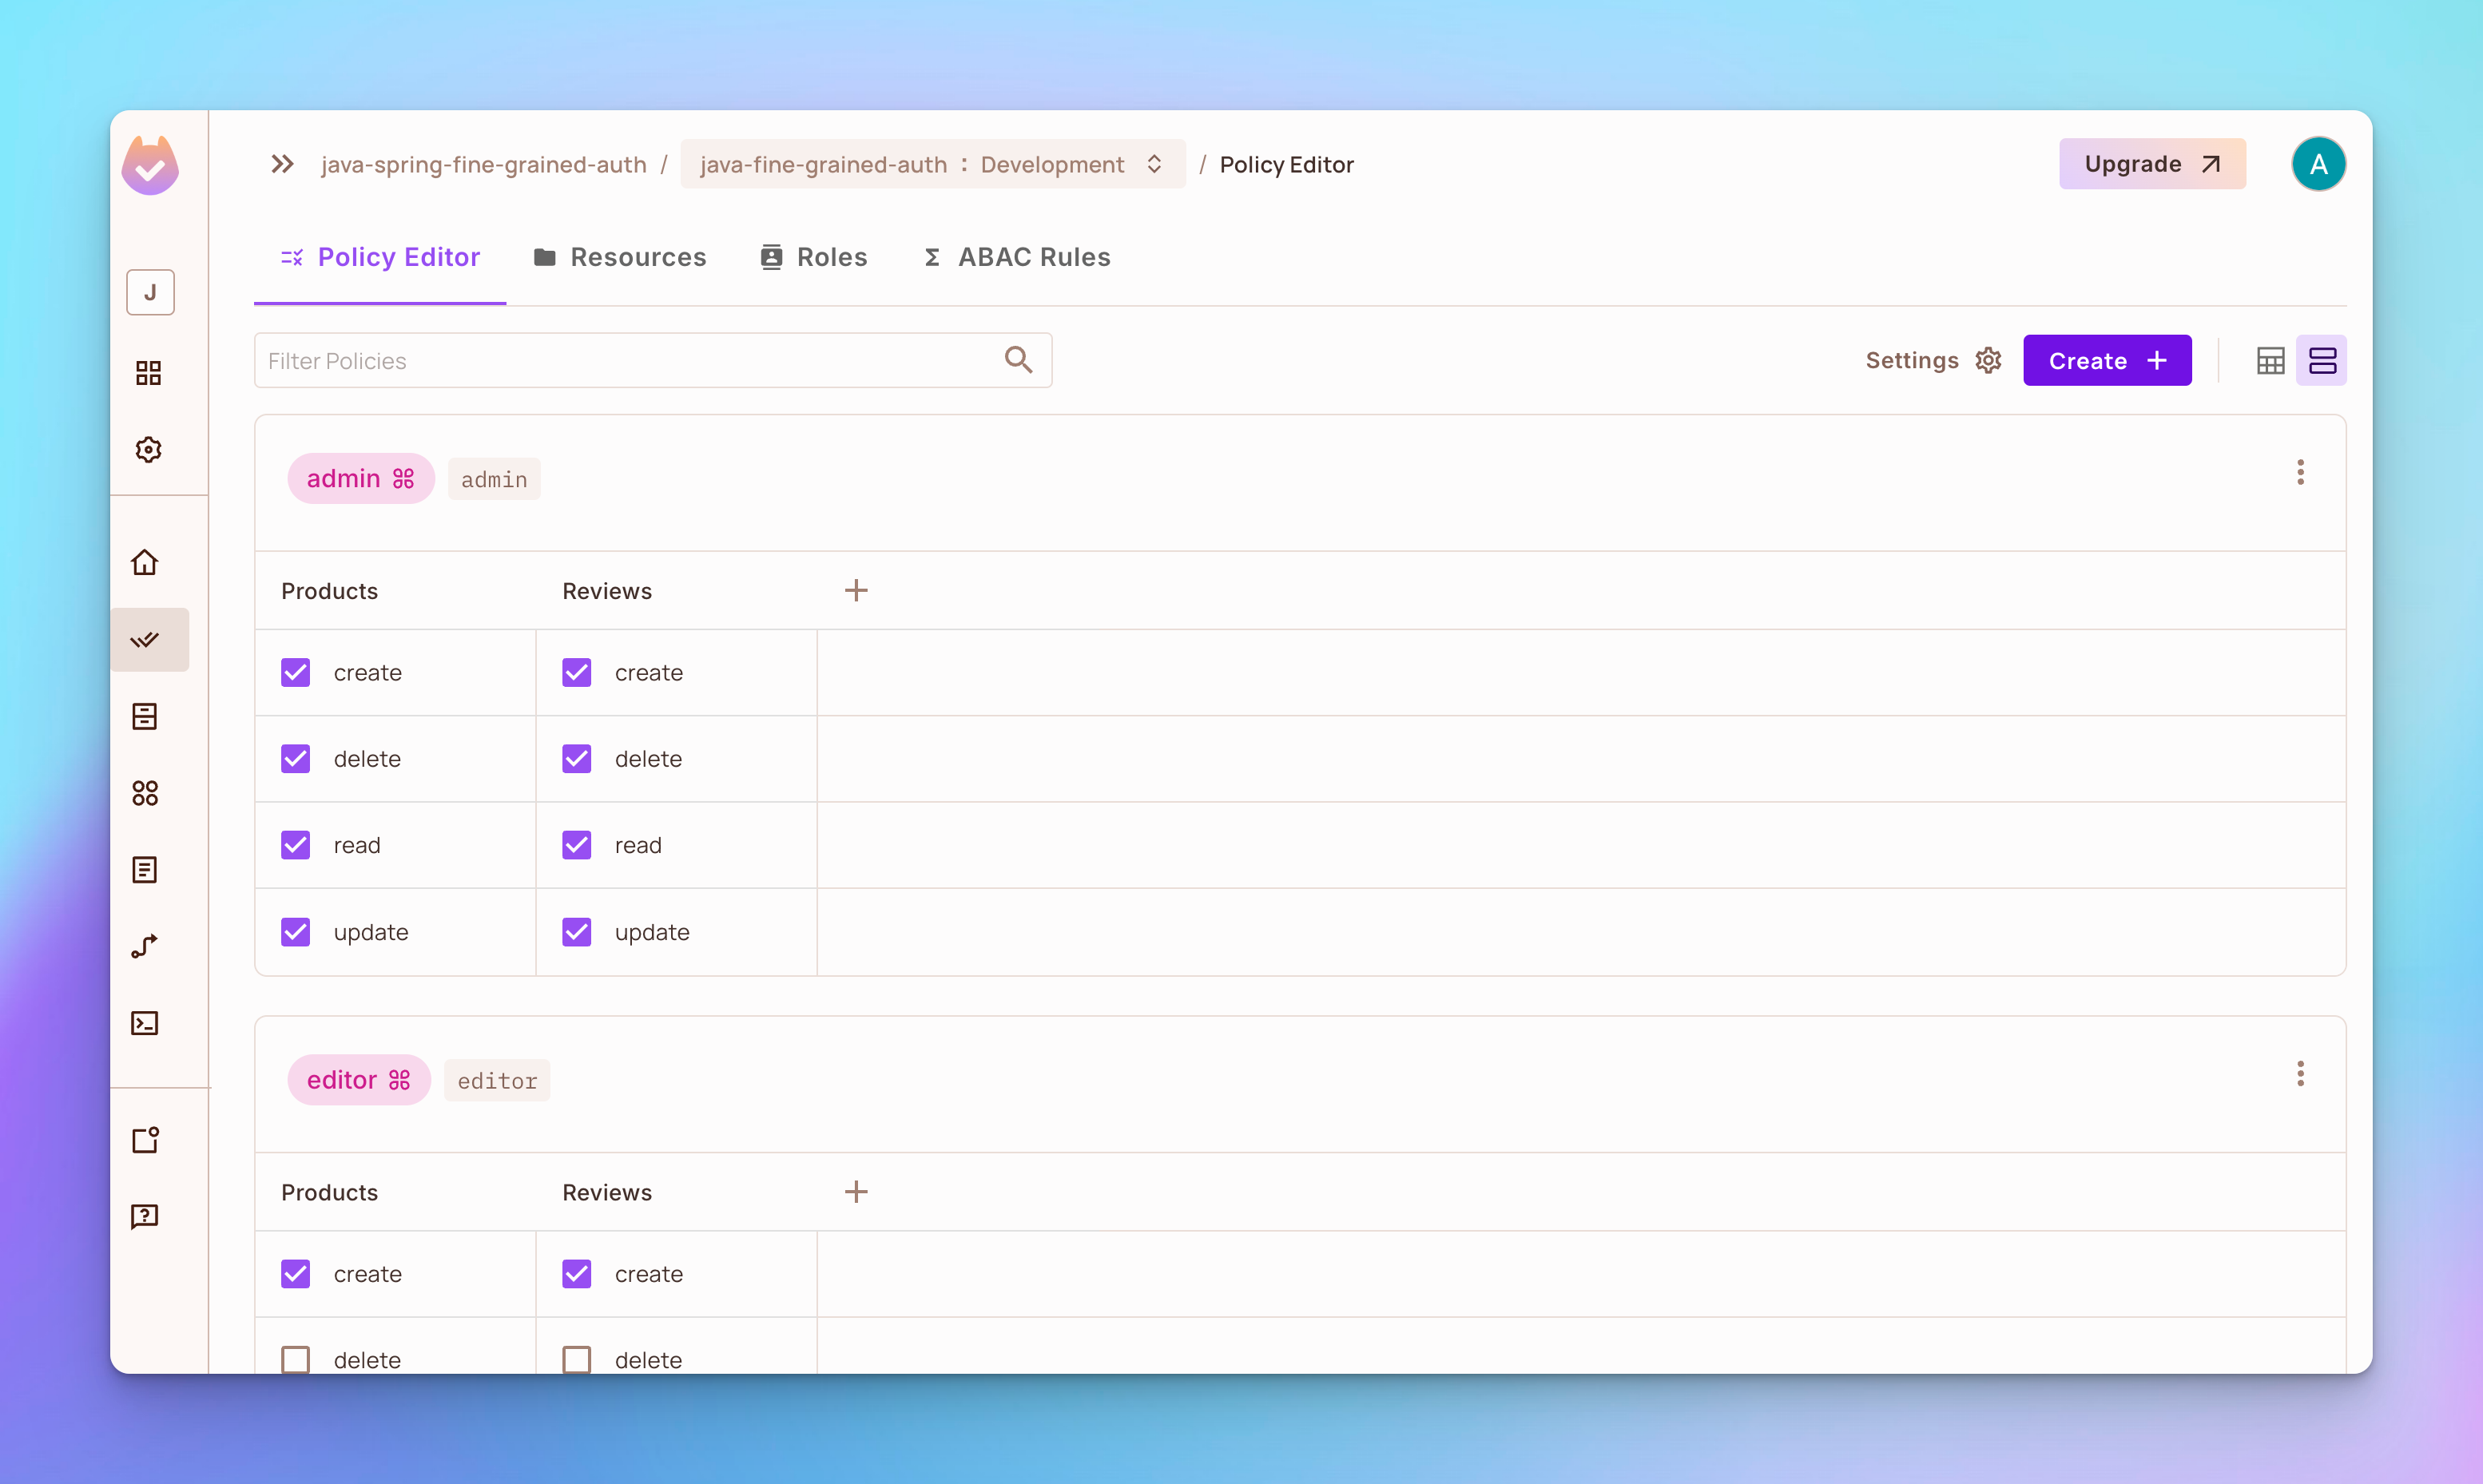
Шаг 4: Откройте вкладку Редактор политики. Вы увидите, что были созданы 3 роли: admin, editor и viewer.
-
Роль admin имеет разрешение создавать, удалять, читать или обновлять продукт или отзыв.
-
Роль
editorимеет разрешение создавать, читать или обновлять продукт или отзыв, но не удалять. -
Роль
viewerимеет разрешение создавать и читать продукт или отзыв, но не удалять или обновлять.
Реализация контроля доступа на основе атрибутов
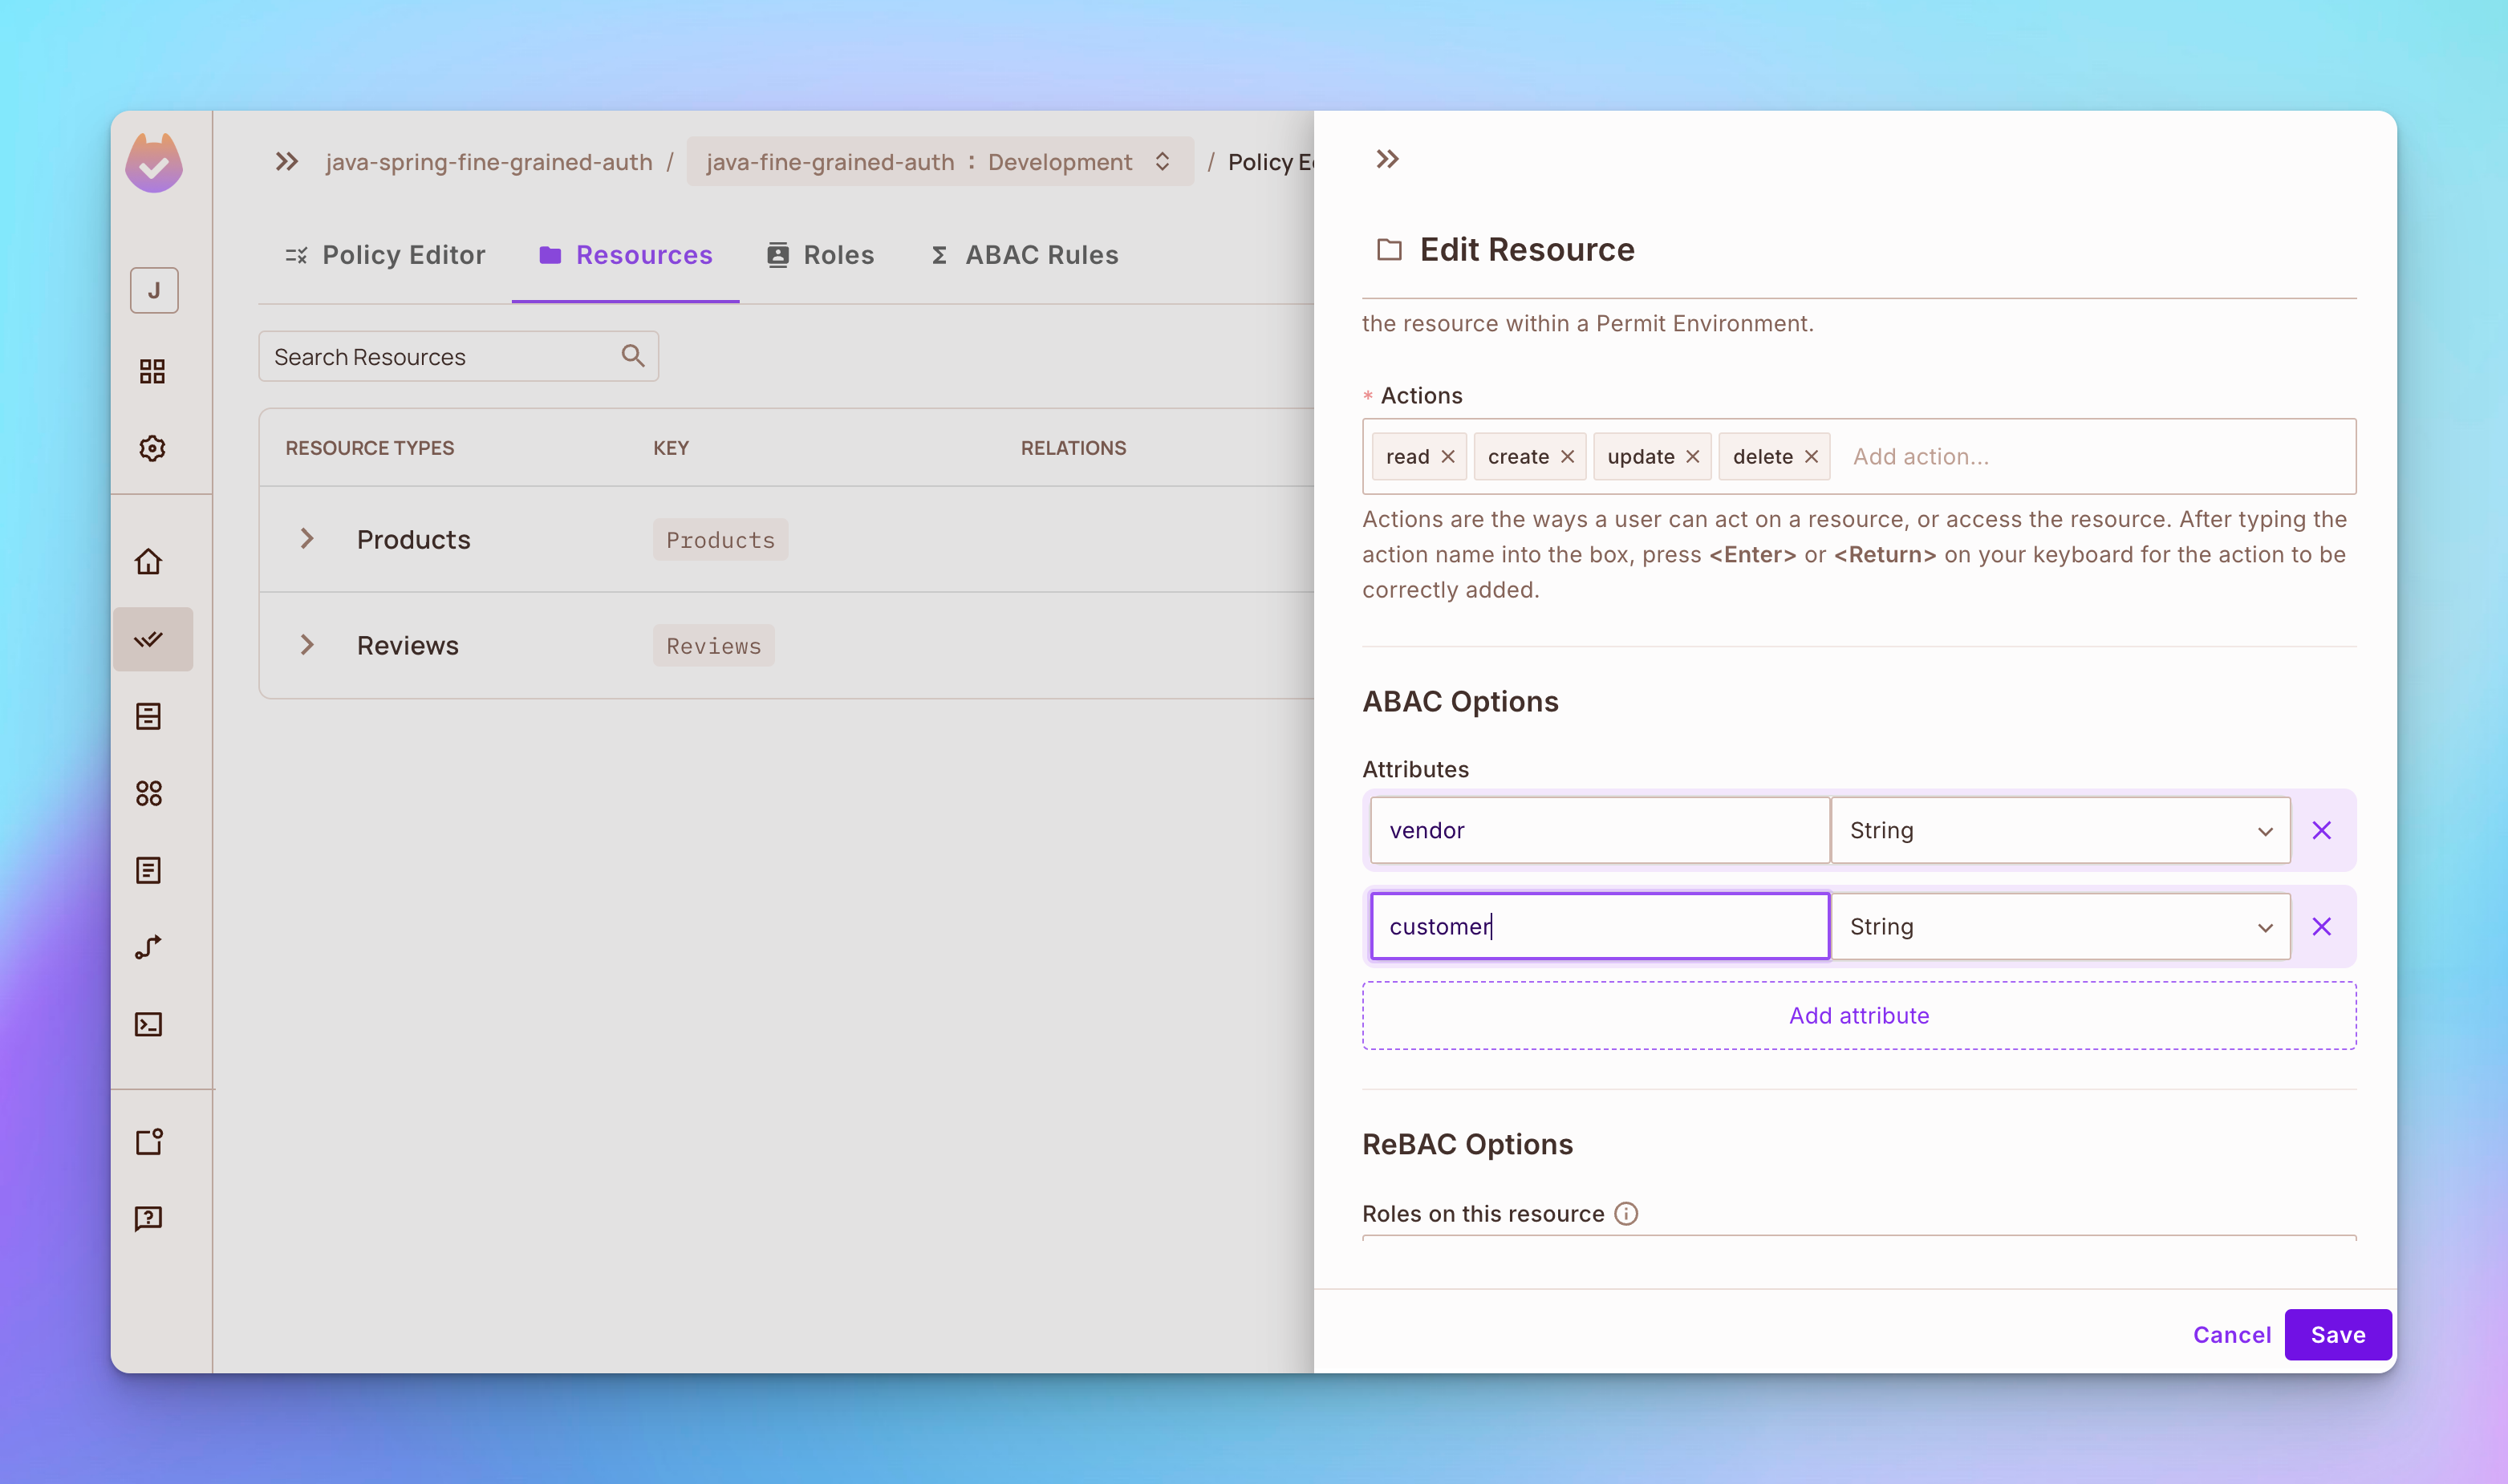
Шаг 1: Откройте вкладку Ресурсы, затем нажмите кнопку Добавить атрибуты.
-
Добавьте атрибут с именем производитель
-
Добавьте атрибут с именем клиент
Шаг 2: Откройте вкладку Правила ABAC, затем создайте новый набор ресурсов ABAC под названием Свои продукты, зависящий от ресурса Продукты. После этого, добавьте условие, которое gives permissions only to the user who created a product based on the vendor attribute.
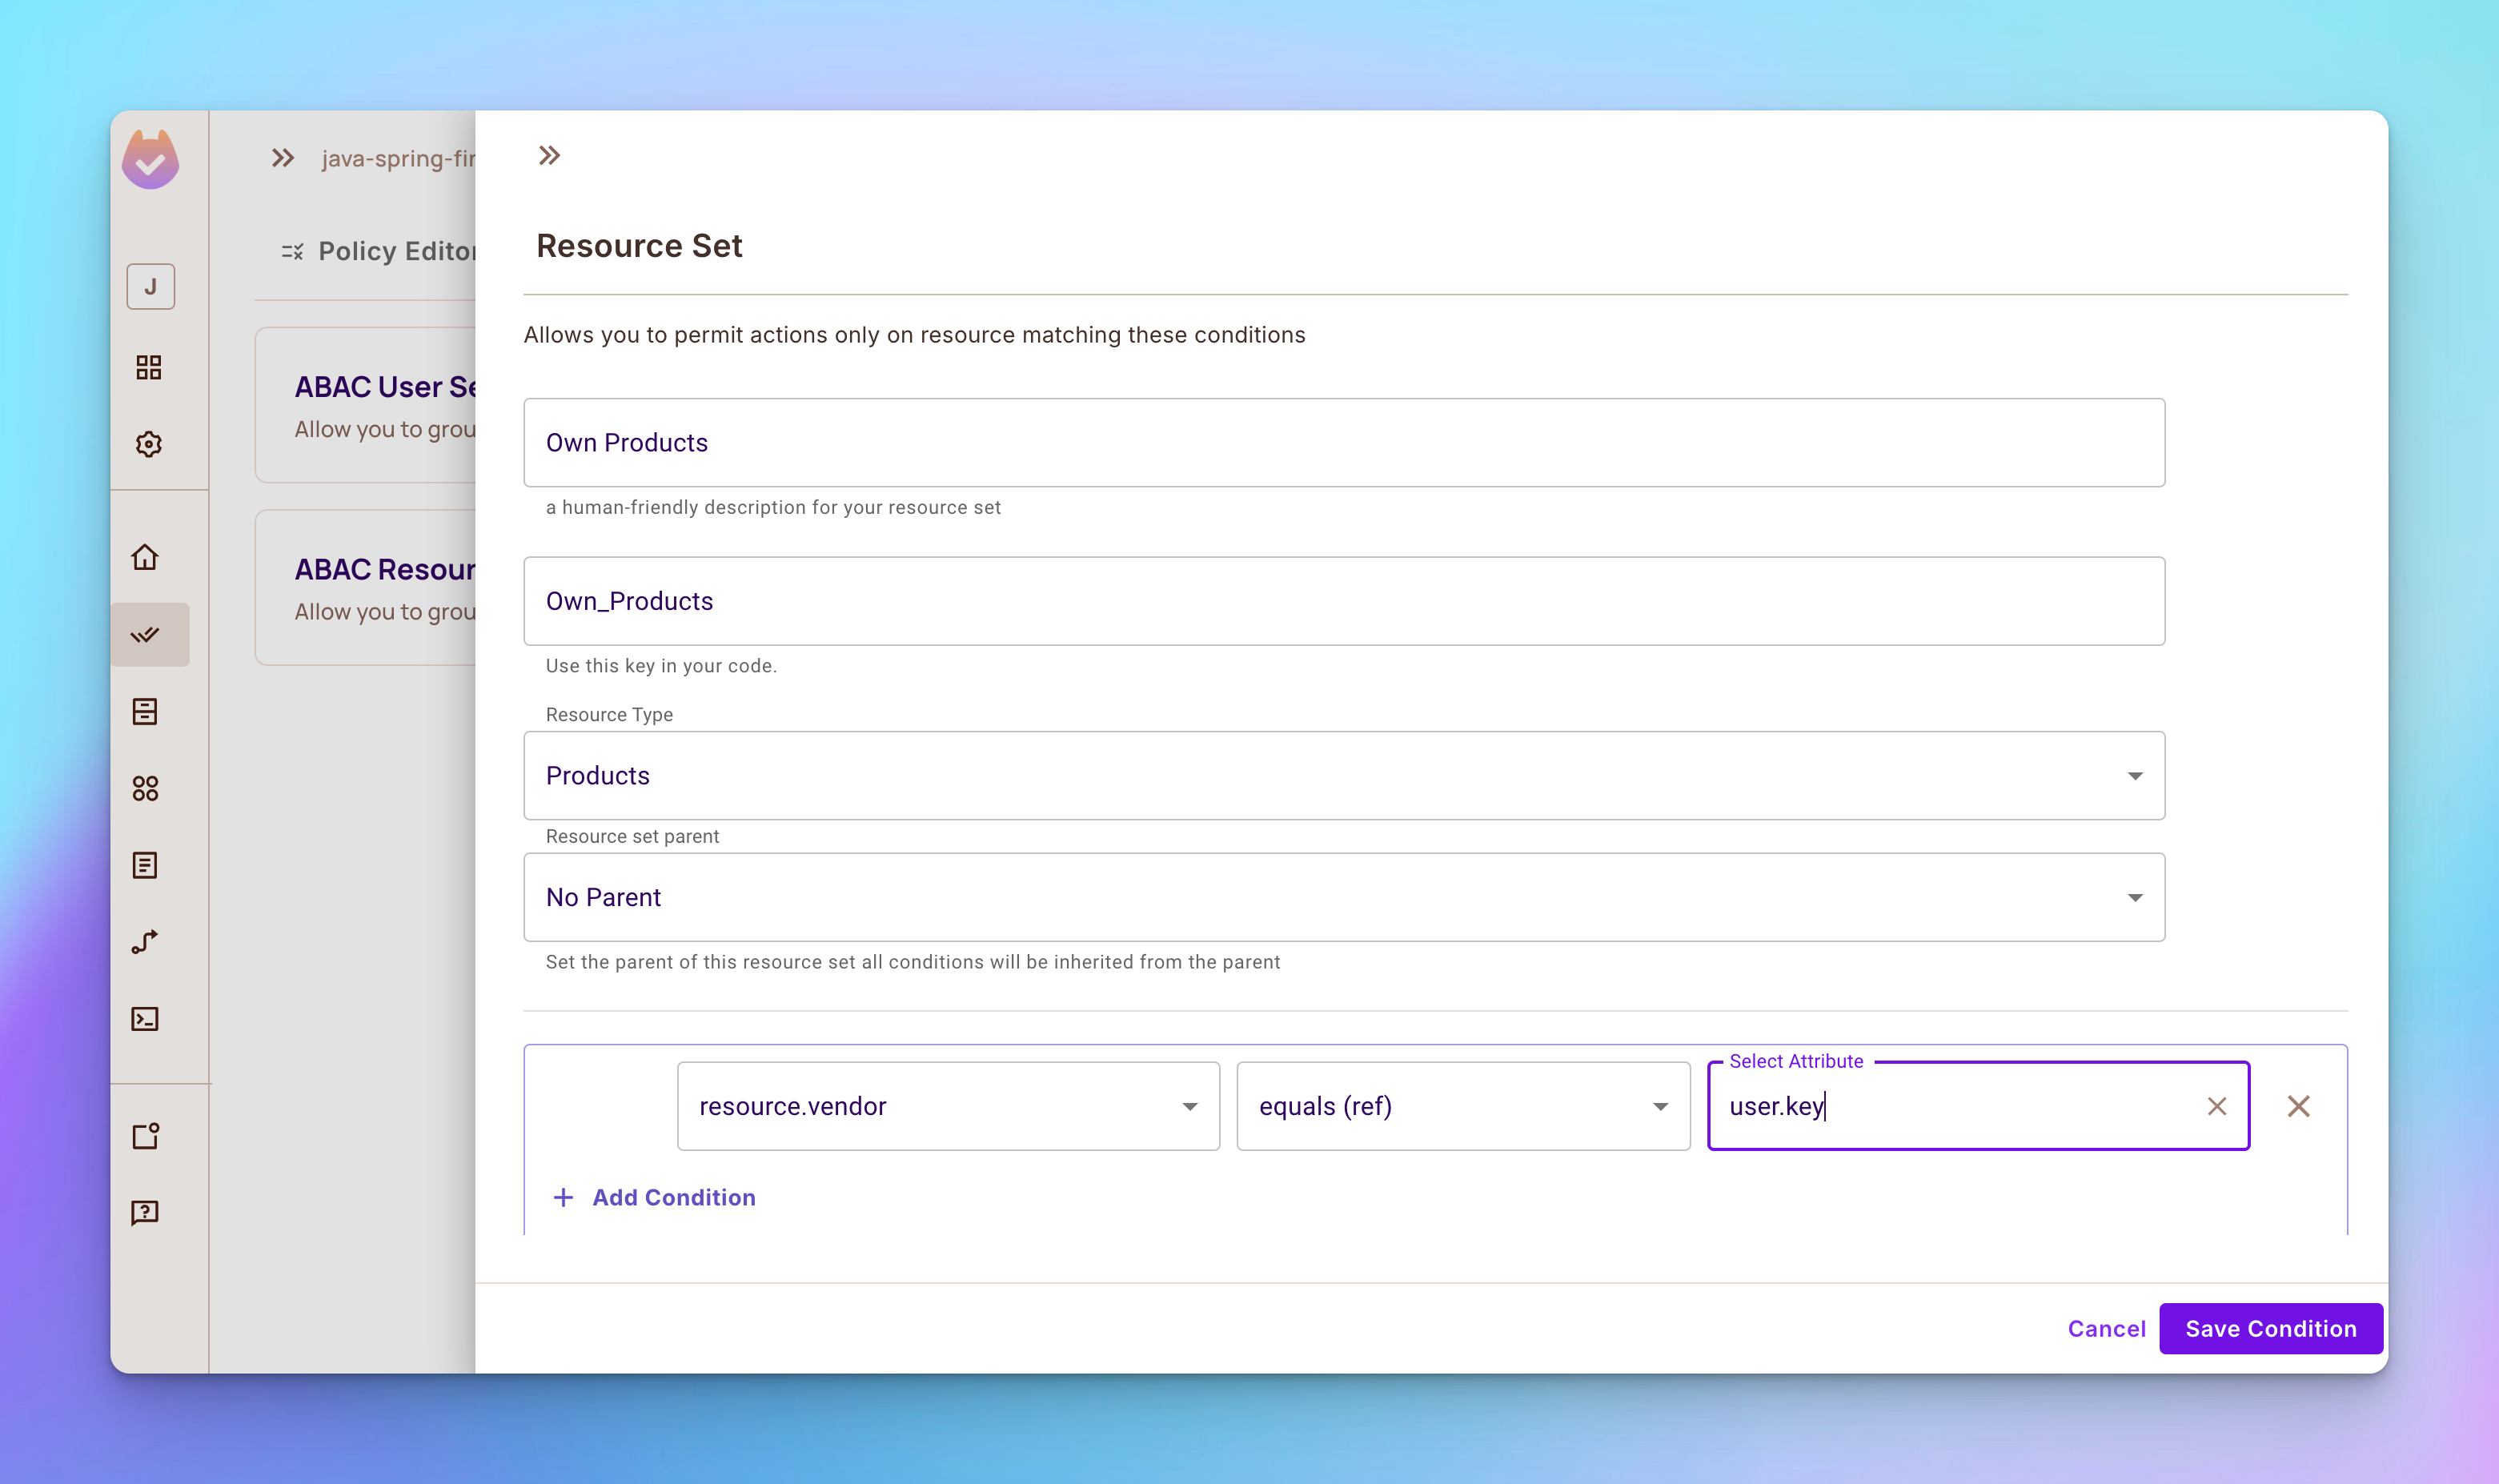
Шаг 3: Создайте еще один набор ресурсов ABAC под названием Свои отзывы, зависящий от ресурса Отзывы.
Реализация контроля доступа на основе отношений
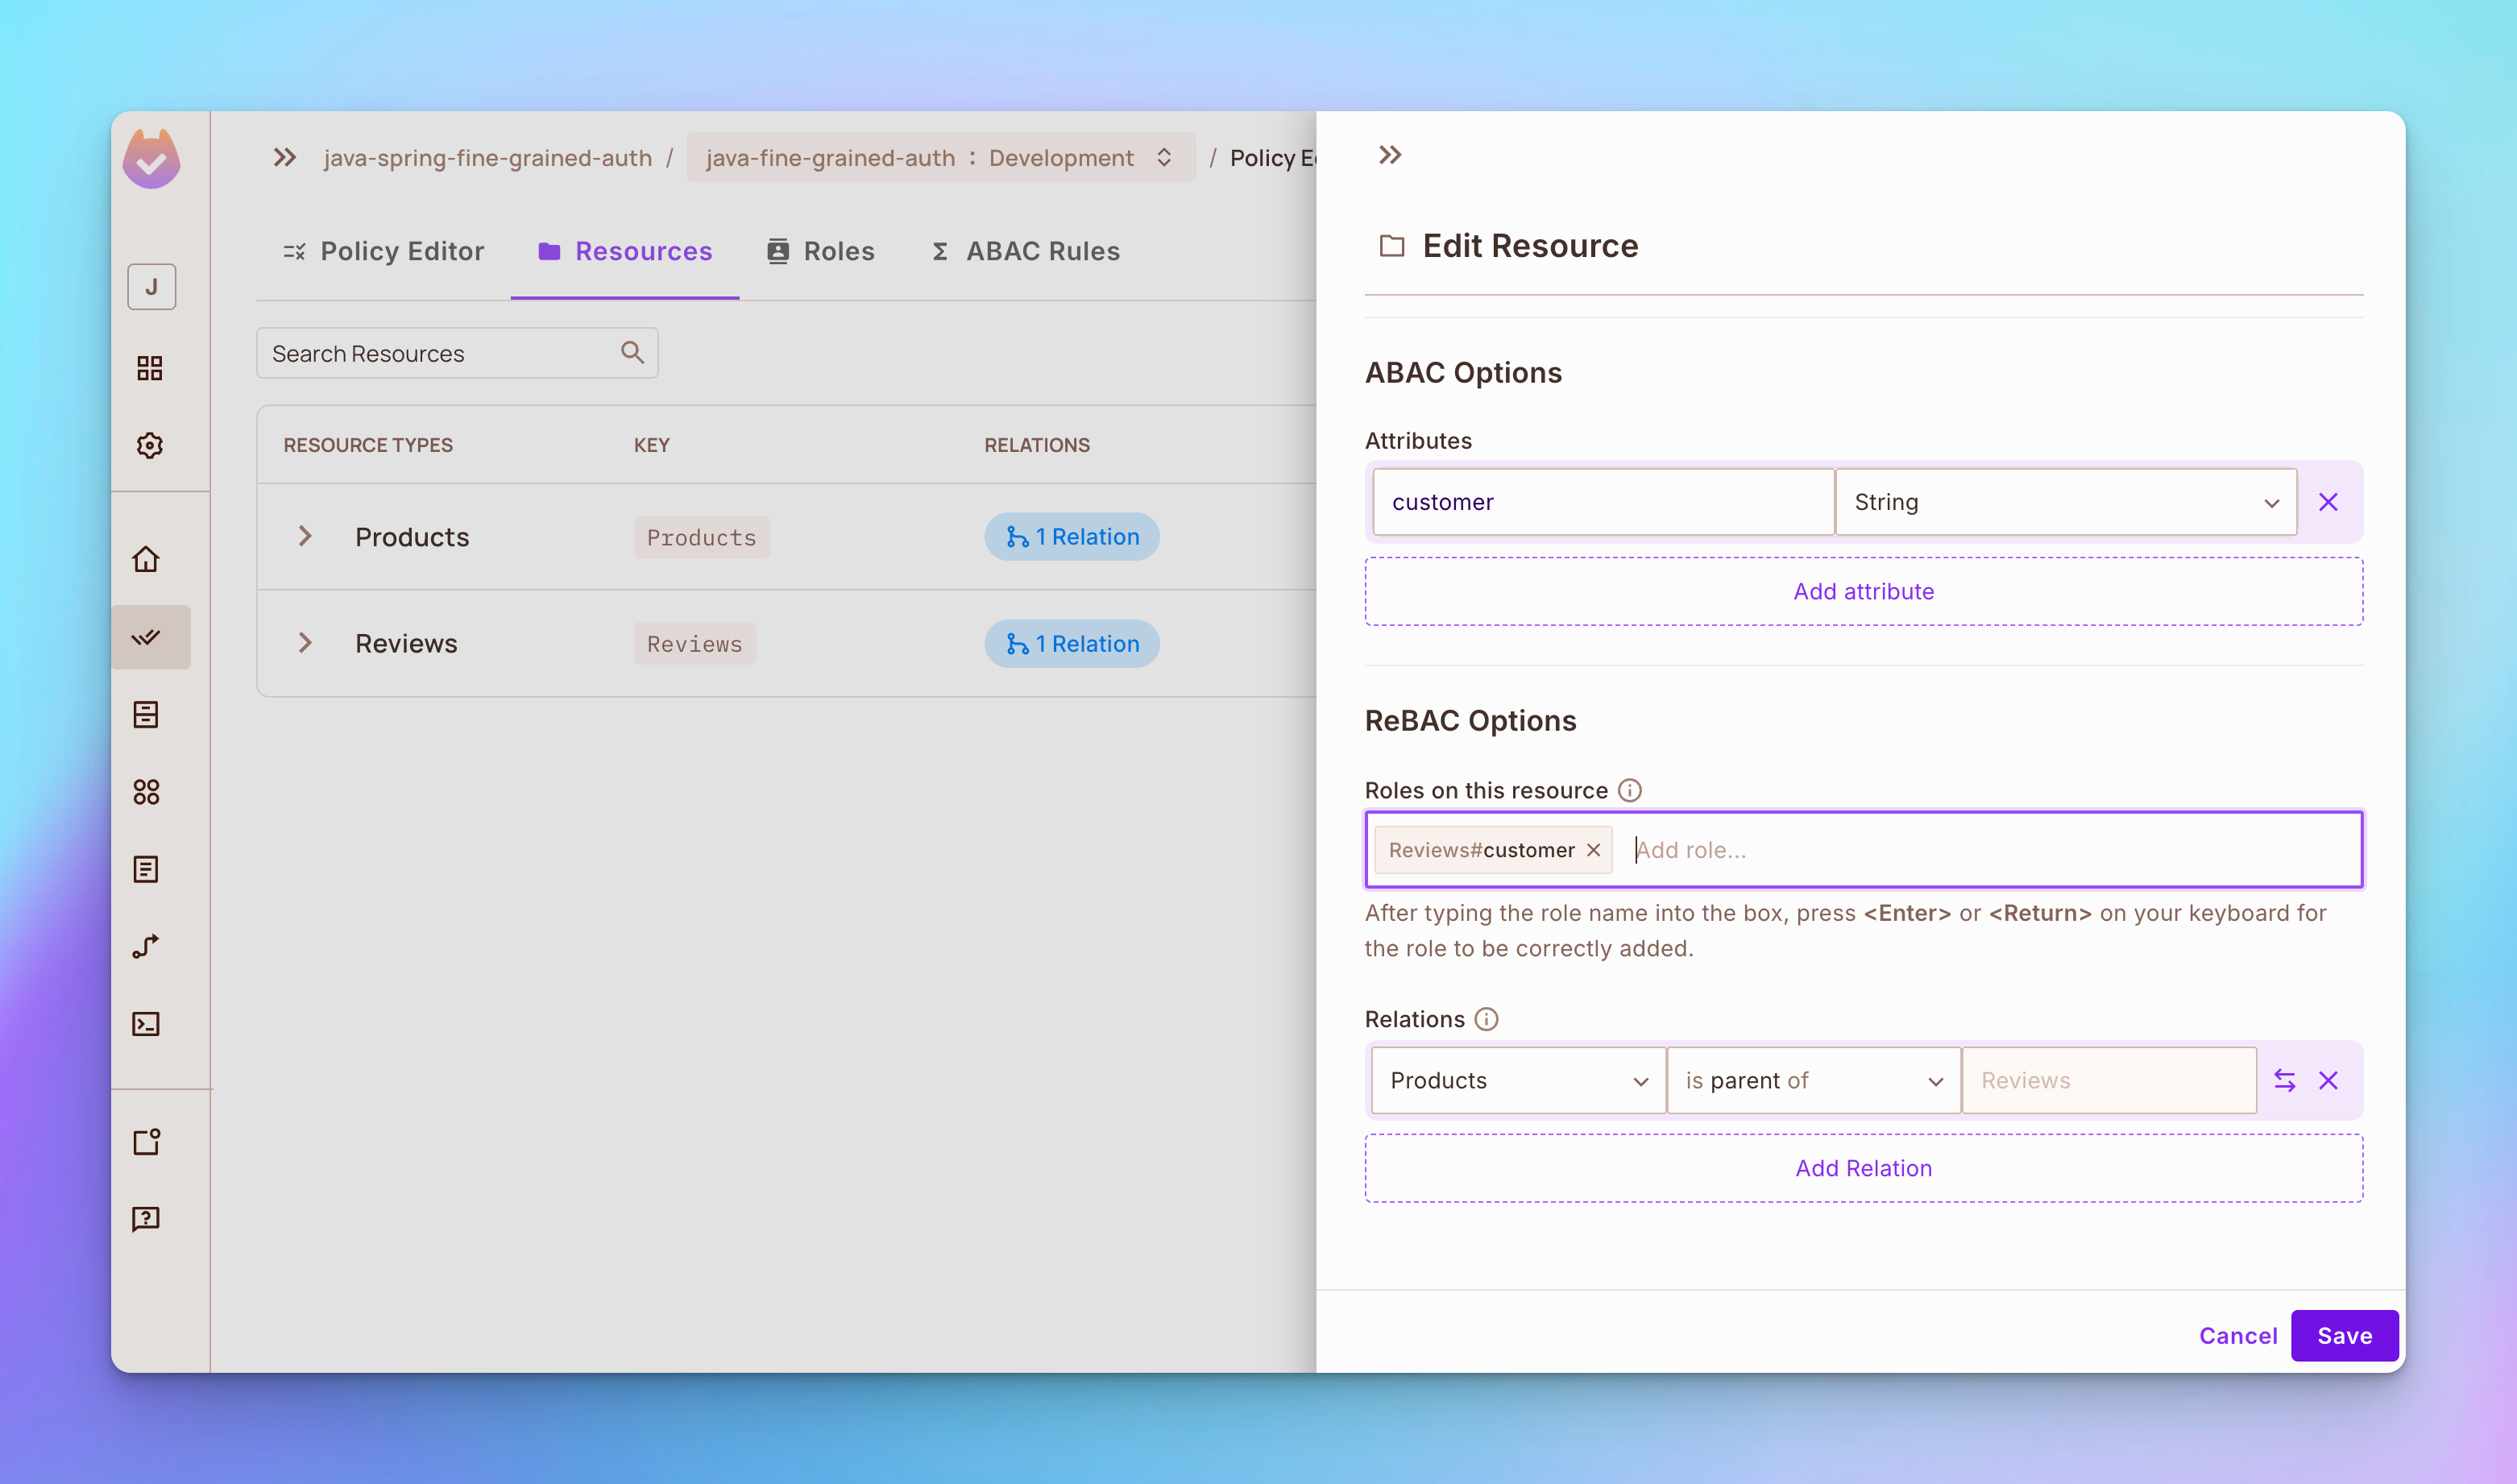
Шаг 1: Откройте вкладку Ресурсы и отредактируйте ресурс Продукты. Добавьте роль производитель в секцию ReBAC опций. Затем установите продукты в качестве родителя отзывов в секции отношений.
Шаг 2: 编辑 “评论” 资源,在 ReBAC 选项部分添加角色 “客户”,如下所示:
Шаг 3: 前往 策略 编辑器 标签页,并添加:
-
角色
供应商有权更新和删除自己的产品。 -
角色
客户有权更新和删除自己对产品的评价。

如何在Java和SpringBoot中实现FGA
既然我们已经在 Permit.io 网页界面中定义了 RBAC、ABAC 和 ReBAC 策略,现在让我们学习如何使用 Permit.io API 在一个电子商务管理系统应用程序中实施它们。
接下来的代码很多,所以请确保你阅读了我在每个代码块中留下的详细注释。这些注释将帮助你更全面地理解这段代码。
步1:设置电子商务应用程序
要设置电子商务应用程序,请克隆源代码。
git clone https://github.com/tyaga001/java-spring-fine-grained-auth.git
安装 Permit 包 SDK
要安装 Permit 包 SDK,你需要在 build.gradle 文件的依赖项部分添加 SDK。
## Dependencies

To set up the necessary dependencies for your Spring Boot project, include the following in your `build.gradle` file:

```groovy
dependencies {
    implementation 'org.springframework.boot:spring-boot-starter-web'
    implementation 'org.springdoc:springdoc-openapi-starter-webmvc-ui:2.3.0'
    developmentOnly 'org.springframework.boot:spring-boot-devtools'
    testImplementation 'org.springframework.boot:spring-boot-starter-test'
    testRuntimeOnly 'org.junit.platform:junit-platform-launcher'

    // 在你的项目中添加此行以安装 Permit.io Java SDK
    implementation 'io.permit:permit-sdk-java:2.0.0'
}
Инициализация SDK Permit
Вы можете инициализировать клиент SDK Permit с помощью следующего кода:
package com.boostmytool.store.config;

import io.permit.sdk.Permit;
import io.permit.sdk.PermitConfig;
import org.springframework.beans.factory.annotation.Value;
import org.springframework.context.annotation.Bean;
import org.springframework.context.annotation.Configuration;

@Configuration  // Mark this class as a configuration class for Spring IoC
public class PermitClientConfig {

    @Value("${permit.api-key}")  // Inject Permit API key from application properties
    private String apiKey;

    @Value("${permit.pdp-url}")  // Inject Permit PDP (Policy Decision Point) URL from application properties
    private String pdpUrl;

    /**
     * Creates a Permit client bean with custom configuration
     * @return Permit client instance
     */
    @Bean
    public Permit permit() {
        return new Permit(
                new PermitConfig.Builder(apiKey)  // Initialize PermitConfig with API key
                        .withPdpAddress(pdpUrl)   // Set the PDP address
                        .withDebugMode(true)      // Enable debug mode for detailed logging
                        .build()                  // Build the PermitConfig object
        );
    }
}
Синхронизация пользователей с SDK
Для начала применения прав доступа, сначала вы должны синхронизировать пользователя с Permit, а затем назначить ему роль.
В следующем коде класс UserService обеспечивает методы для входа и выхода пользователей, регистрации, назначения ролей и авторизации, с обработкой исключений для возможных ошибок при взаимодействии с API Permit.
package com.boostmytool.store.service;

import com.boostmytool.store.exception.ForbiddenAccessException;
import com.boostmytool.store.exception.UnauthorizedException;
import io.permit.sdk.Permit;
import io.permit.sdk.api.PermitApiError;
import io.permit.sdk.api.PermitContextError;
import io.permit.sdk.enforcement.Resource;
import io.permit.sdk.enforcement.User;
import org.springframework.stereotype.Service;

import java.io.IOException;

@Service  // Обозначение класса как Spring сервиса, делая его кандидатом для сканирования компонентов
public class UserService {
    private final Permit permit;

    // Инъекция конструктора для SDK Permit
    public UserService(Permit permit) {
        this.permit = permit;
    }

    /**
     * Монтирует пользователя Permit, создавая и возвращая объект Permit User.
     *
     * @param key Уникальный ключ пользователя
     * @return Объект User
     */
    public Object login(String key) {
        return new User.Builder(key).build();
    }

    /**
     * Обрабатывает регистрацию пользователя, создавая и синхронизируя новый пользователя Permit.
     *
     * @param key Уникальный ключ пользователя
     * @return Созданный и синхронизированный объект User
     */
    public User signup(String key) {
        var user = new User.Builder(key).build();
        try {
            permit.api.users.sync(user);  // Синхронизирует новых пользователей с сервисом Permit
        } catch (PermitContextError | PermitApiError | IOException e) {
            throw new RuntimeException("Failed to create user", e);  // Обрабатывает исключения при создании пользователя
        }
        return user;
    }

    /**
     * Назначает роль пользователю в "по умолчанию" среде.
     *
     * @param user Объект User, для назначения роли
     * @param role Роль, которая будет назначена
     */
    public void assignRole(User user, String role) {
        try {
            permit.api.users.assignRole(user.getKey(), role, "default");  // Назначение роли в "по умолчанию" среде
        } catch (PermitApiError | PermitContextError | IOException e) {
            throw new RuntimeException("Failed to assign role to user", e);  // Обрабатывает исключения при назначении роли
        }
    }

    /**
     * Проверяет, авторизован ли пользователь для выполнения конкретной деятельности с ресурсом.
     *
     * @param user Объект User, запрашивающий авторизацию
     * @param action Деятельность, которая будет авторизована
     * @param resource Ресурс, на котором будет выполнена деятельность
     * @throws UnauthorizedException, если пользователь не авторизован
     * @throws ForbiddenAccessException, если пользователь запрещен доступ
     */
    public void authorize(User user, String action, Resource resource) {
        if (user == null) {
            throw new UnauthorizedException("Not logged in");  // throw exception if user is not logged in
        }
        try {
            var permitted = permit.check(user, action, resource);  // Perform authorization check
            if (!permitted) {
                throw new ForbiddenAccessException("Access denied");  // throw exception if access is denied
            }
        } catch (PermitApiError | IOException e) {
            throw new RuntimeException("Failed to authorize user", e);  // Handle exceptions during authorization
        }
    }
}
В коде ниже класс UserController обеспечивает REST API endpoint для регистрации пользователей и назначения ролей. Он взаимодействует с классом UserService для обработки бизнес-логики, связанной с пользователями, и предоставляет соответствующие HTTP-ответы.
package com.boostmytool.store.controllers;

import com.boostmytool.store.exception.UnauthorizedException;
import com.boostmytool.store.service.UserService;
import io.permit.sdk.enforcement.User;
import jakarta.servlet.http.HttpServletRequest;
import org.springframework.web.bind.annotation.PostMapping;
import org.springframework.web.bind.annotation.RequestBody;
import org.springframework.web.bind.annotation.RequestMapping;
import org.springframework.web.bind.annotation.RestController;

@RestController  // Indicates that this class handles HTTP requests and returns JSON responses
@RequestMapping("/api/users")  // Base URL path for all user-related operations
public class UserController {
    private final UserService userService;

    // Constructor injection of UserService, containing business logic for user operations
    public UserController(UserService userService) {
        this.userService = userService;
    }

    /**
     * Handles user signup requests.
     * Endpoint: POST /api/users/signup
     *
     * @param key Unique key for the new user
     * @return Created User object
     */
    @PostMapping("/signup")
    public User signup(@RequestBody String key) {
        return userService.signup(key);  // Calls the signup method in UserService to create a new user
    }

    /**
     * Handles assigning a role to the logged-in user.
     * Endpoint: POST /api/users/assign-role
     *
     * @param request HTTP request, used to retrieve the current user
     * @param role Role to be assigned to the current user
     */
    @PostMapping("/assign-role")
    public void assignRole(HttpServletRequest request, @RequestBody String role) {
        // Retrieves the current user from the request attributes
        User currentUser = (User) request.getAttribute("user");

        // Throws an exception if the user is not logged in
        if (currentUser == null) {
            throw new UnauthorizedException("Not logged in");
        }

        // Assigns the specified role to the current user
        userService.assignRole(currentUser, role);
    }
}
Creating RBAC, ABAC, and ReBAC Policy Enforcement Point
В коде ниже класс ProductService управляет операциями CRUD для продуктов и отзывов, обрабатывая разрешения и роли через API разрешений.
Каждая операция включает проверку авторизации пользователя, с соответствующей обработкой исключений для ошибок API разрешений и сценариев ненайденности ресурса.
package com.boostmytool.store.service;

import com.boostmytool.store.exception.ResourceNotFoundException;
import com.boostmytool.store.model.Product;
import com.boostmytool.store.model.Review;
import io.permit.sdk.Permit;
import io.permit.sdk.api.PermitApiError;
import io.permit.sdk.api.PermitContextError;
import io.permit.sdk.enforcement.Resource;
import io.permit.sdk.enforcement.User;
import io.permit.sdk.openapi.models.RelationshipTupleCreate;
import io.permit.sdk.openapi.models.ResourceInstanceCreate;
import io.permit.sdk.openapi.models.RoleAssignmentCreate;
import org.springframework.stereotype.Service;

import java.io.IOException;
import java.util.ArrayList;
import java.util.HashMap;
import java.util.List;
import java.util.concurrent.atomic.AtomicInteger;

@Service  // Отмечает этот класс как сервис Spring
public class ProductService {

    private final List<Product> products = new ArrayList<>();  // Список в памяти для хранения продуктов
    private final AtomicInteger productIdCounter = new AtomicInteger();  // Счетчик для генерации уникальных идентификаторов продуктов
    private final AtomicInteger reviewIdCounter = new AtomicInteger();   // Счетчик для генерации уникальных идентификаторов отзывов

    // Строители для экземпляров ресурса Разрешения (продукт и отзыв)
    private final Resource.Builder productResourceBuilder = new Resource.Builder("product");
    private final Resource.Builder reviewResourceBuilder = new Resource.Builder("review");

    private final UserService userService;  // Сервис для обработки операций, связанных с пользователем
    private final Permit permit;  // Экземпляр SDK Разрешения для обработки авторизации и управления ресурсами

    // Конструктор для внедрения зависимостей
    public ProductService(UserService userService, Permit permit) {
        this.userService = userService;
        this.permit = permit;
    }

    // Метод для авторизации пользователя на выполнение действия с ресурсом
    private void authorize(User user, String action, Resource resource) {
        userService.authorize(user, action, resource);
    }

    // Авторизует пользователя для выполнения действия с конкретным продуктом
    private void authorize(User user, String action, Product product) {
        var attributes = new HashMap<String, Object>();
        attributes.put("vendor", product.getVendor());  // Добавить атрибут поставщика к продукту
        userService.authorize(user, action, productResourceBuilder.withKey(product.getId().toString()).withAttributes(attributes).build());
    }

    // Авторизует пользователя для выполнения действия с конкретным отзывом
    private void authorize(User user, String action, Review review) {
        var attributes = new HashMap<String, Object>();
        attributes.put("customer", review.getCustomer());  // Добавить атрибут клиента к отзыву
        userService.authorize(user, action, reviewResourceBuilder.withKey(review.getId().toString()).withAttributes(attributes).build());
    }

    // Извлекает продукт по его идентификатору, выбрасывает исключение, если не найден
    private Product getProductById(int id) {
        return products.stream().filter(product -> product.getId().equals(id))
                .findFirst().orElseThrow(() -> new ResourceNotFoundException("Product with id " + id + " not found"));
    }

    // Извлекает все продукты, проверяет, имеет ли пользователь право "читать" продукты
    public List<Product> getAllProducts(User user) {
        authorize(user, "read", productResourceBuilder.build());  // Пользователь должен иметь разрешение "читать"
        return new ArrayList<>(products);  // Возвращает копию списка продуктов
    }

    // Извлекает продукт по его идентификатору, проверяет, имеет ли пользователь право "читать" продукт
    public Product getProduct(User user, int id) {
        authorize(user, "read", productResourceBuilder.build());
        return getProductById(id);
    }

    // Добавляет новый продукт, авторизует пользователя и создает экземпляры ресурсов и назначения ролей в Разрешении
    public Product addProduct(User user, String content) {
        authorize(user, "create", productResourceBuilder.build());  // Проверяет, может ли пользователь создать продукт
        Product product = new Product(productIdCounter.incrementAndGet(), user.getKey(), content);  // Создает новый продукт

        try {
            // Создает экземпляр ресурса в Разрешении и назначает роль "поставщик" пользователю для этого продукта
            permit.api.resourceInstances.create(new ResourceInstanceCreate(product.getId().toString(), "product").withTenant("default"));
            permit.api.roleAssignments.assign(new RoleAssignmentCreate("vendor", user.getKey()).withResourceInstance("product:" + product.getId()).withTenant("default"));
        } catch (IOException | PermitApiError | PermitContextError e) {
            throw new RuntimeException("Failed to create resource instance or role assignment: " + e.getMessage());
        }

        products.add(product);  // Добавляет продукт в список в памяти
        return product;
    }

    // Обновляет содержимое продукта, проверяет, имеет ли пользователь право "обновить" продукт
    public Product updateProduct(User user, int id, String content) {
        Product product = getProductById(id);  // Получает продукт по его идентификатору
        authorize(user, "update", product);  // Проверяет, может ли пользователь обновить продукт
        product.setContent(content);  // Обновляет содержимое продукта
        return product;
    }

    // Удаляет продукт, проверяет, имеет ли пользователь право "удалить" продукт
    public void deleteProduct(User user, int id) {
        boolean isDeleted = products.removeIf(product -> {
            if (product.getId().equals(id)) {
                authorize(user, "delete", product);  // Проверяет, может ли пользователь удалить продукт
                return true;
            } else {
                return false;
            }
        });

        if (!isDeleted) {
            throw new ResourceNotFoundException("Product with id " + id + " not found");
        }

        try {
            permit.api.resourceInstances.delete("product:" + id);  // Удаляет экземпляр ресурса продукта из Разрешения
        } catch (IOException | PermitApiError | PermitContextError e) {
            throw new RuntimeException(e);
        }
    }

    // Добавляет отзыв к продукту, создает экземпляр ресурса и связь в Разрешении
    public Review addReview(User user, int productId, String content) {
        authorize(user, "create", reviewResourceBuilder.build());  // Проверяет, может ли пользователь создать отзыв
        Product product = getProductById(productId);  // Получает продукт по его идентификатору
        Review review = new Review(reviewIdCounter.incrementAndGet(), user.getKey(), content);  // Создает новый отзыв

        try {
            // Создает экземпляр ресурса для отзыва и устанавливает связь с продуктом
            permit.api.resourceInstances.create(new ResourceInstanceCreate(review.getId().toString(), "review").withTenant("default"));
            permit.api.relationshipTuples.create(new RelationshipTupleCreate("product:" + productId, "parent", "review:" + review.getId()));
        } catch (IOException | PermitApiError | PermitContextError e) {
            throw new RuntimeException(e);
        }

        product.addReview(review);  // Добавляет отзыв к продукту
        return review;
    }

    // Обновляет содержимое отзыва, проверяет, имеет ли пользователь право "обновить" отзыв
    public Review updateReview(User user, int productId, int reviewId, String content) {
        Product product = getProductById(productId);  // Получает продукт по его идентификатору
        Review review = product.getReviews().stream().filter(c -> c.getId().equals(reviewId))
                .findFirst().orElseThrow(() -> new ResourceNotFoundException("Review with id " + reviewId + " not found"));

        authorize(user, "update", review);  // Проверяет, может ли пользователь обновить отзыв
        review.setContent(content);  // Обновляет содержимое отзыва
        return review;
    }

    // Удаляет отзыв, проверяет, имеет ли пользователь право "удалить" отзыв
    public void deleteReview(User user, int productId, int reviewId) {
        Product product = getProductById(productId);  // Получает продукт по его идентификатору
        boolean isDeleted = product.getReviews().removeIf(review -> {
            if (review.getId().equals(reviewId)) {
                authorize(user, "delete", review);  // Проверяет, может ли пользователь удалить отзыв
                return true;
            } else {
                return false;
            }
        });

        if (!isDeleted) {
            throw new ResourceNotFoundException("Review with id " + reviewId + " not found");
        }

        try {
            permit.api.resourceInstances.delete("review:" + reviewId);  // Удаляет экземпляр ресурса отзыва из Разрешения
        } catch (IOException | PermitApiError | PermitContextError e) {
            throw new RuntimeException(e);
        }
    }
}
В коде ниже класс ProductController обслуживает HTTP-запросы, связанные с продуктами и их отзывами. Он предоставляет endpoint для управления продуктами (как creating, updating, deleting, и retrieving) и для управления отзывами о продуктах.
package com.boostmytool.store.controllers;

import com.boostmytool.store.model.Product;
import com.boostmytool.store.model.Review;
import com.boostmytool.store.service.ProductService;
import io.permit.sdk.enforcement.User;
import jakarta.servlet.http.HttpServletRequest;
import org.springframework.beans.factory.annotation.Autowired;
import org.springframework.http.HttpStatus;
import org.springframework.web.bind.annotation.*;

import java.util.List;

@RestController  // Indicates that this class is a Spring REST controller
@RequestMapping("/api/products")  // Base URL for all endpoints in this controller
public class ProductController {

    private final ProductService productService;  // ProductService instance to handle product-related operations

    @Autowired  // Autowires ProductService bean automatically
    public ProductController(ProductService productService) {
        this.productService = productService;
    }

    // GET request to retrieve all products
    @GetMapping
    public List<Product> getAllProducts(HttpServletRequest request) {
        User currentUser = (User) request.getAttribute("user");  // Gets the authenticated user from the request
        return productService.getAllProducts(currentUser);  // Calls ProductService to get all products for the user
    }

    // GET request to retrieve a product by its ID
    @GetMapping("/{id}")
    public Product getProductById(HttpServletRequest request, @PathVariable("id") int id) {
        User currentUser = (User) request.getAttribute("user");  // Gets the authenticated user from the request
        return productService.getProduct(currentUser, id);  // Calls ProductService to get the product by ID for the user
    }

    // POST request to add a new product
    @PostMapping
    @ResponseStatus(HttpStatus.CREATED)  // Sets the response status to 201 (Created)
    public Product addProduct(HttpServletRequest request, @RequestBody String content) {
        User currentUser = (User) request.getAttribute("user");  // Gets the authenticated user from the request
        return productService.addProduct(currentUser, content);  // Calls ProductService to add a new product
    }

    // PUT request to update an existing product by its ID
    @PutMapping("/{id}")
    public Product updateProduct(HttpServletRequest request, @PathVariable("id") int id, @RequestBody String content) {
        User currentUser = (User) request.getAttribute("user");  // Gets the authenticated user from the request
        return productService.updateProduct(currentUser, id, content);  // Calls ProductService to update the product by ID
    }

    // DELETE request to delete a product by its ID
    @DeleteMapping("/{id}")
    public String deleteProduct(HttpServletRequest request, @PathVariable("id") int id) {
        User currentUser = (User) request.getAttribute("user");  // Gets the authenticated user from the request
        productService.deleteProduct(currentUser, id);  // Calls ProductService to delete the product by ID
        return "Deleted product with id " + id;  // Returns a success message after deletion
    }

    // POST request to add a new review to a product by product ID
    @PostMapping("/{id}/review")
    public Review addReview(HttpServletRequest request, @PathVariable("id") int id, @RequestBody String content) {
        User currentUser = (User) request.getAttribute("user");  // Gets the authenticated user from the request
        return productService.addReview(currentUser, id, content);  // Calls ProductService to add a review to the product
    }

    // PUT request to update an existing review by product and review ID
    @PutMapping("/{id}/review/{reviewId}")
    public Review updateReview(HttpServletRequest request, @PathVariable("id") int id, @PathVariable("reviewId") int reviewId, @RequestBody String content) {
        User currentUser = (User) request.getAttribute("user");  // Gets the authenticated user from the request
        return productService.updateReview(currentUser, id, reviewId, content);  // Calls ProductService to update the review
    }

    // DELETE request to delete a review by product and review ID
    @DeleteMapping("/{id}/review/{reviewId}")
    public String deleteReview(HttpServletRequest request, @PathVariable("id") int id, @PathVariable("reviewId") int reviewId) {
        User currentUser = (User) request.getAttribute("user");  // Gets the authenticated user from the request
        productService.deleteReview(currentUser, id, reviewId);  // Calls ProductService to delete the review
        return "Deleted review with id " + reviewId + " from product " + id;  // Returns a success message after deletion
    }
}
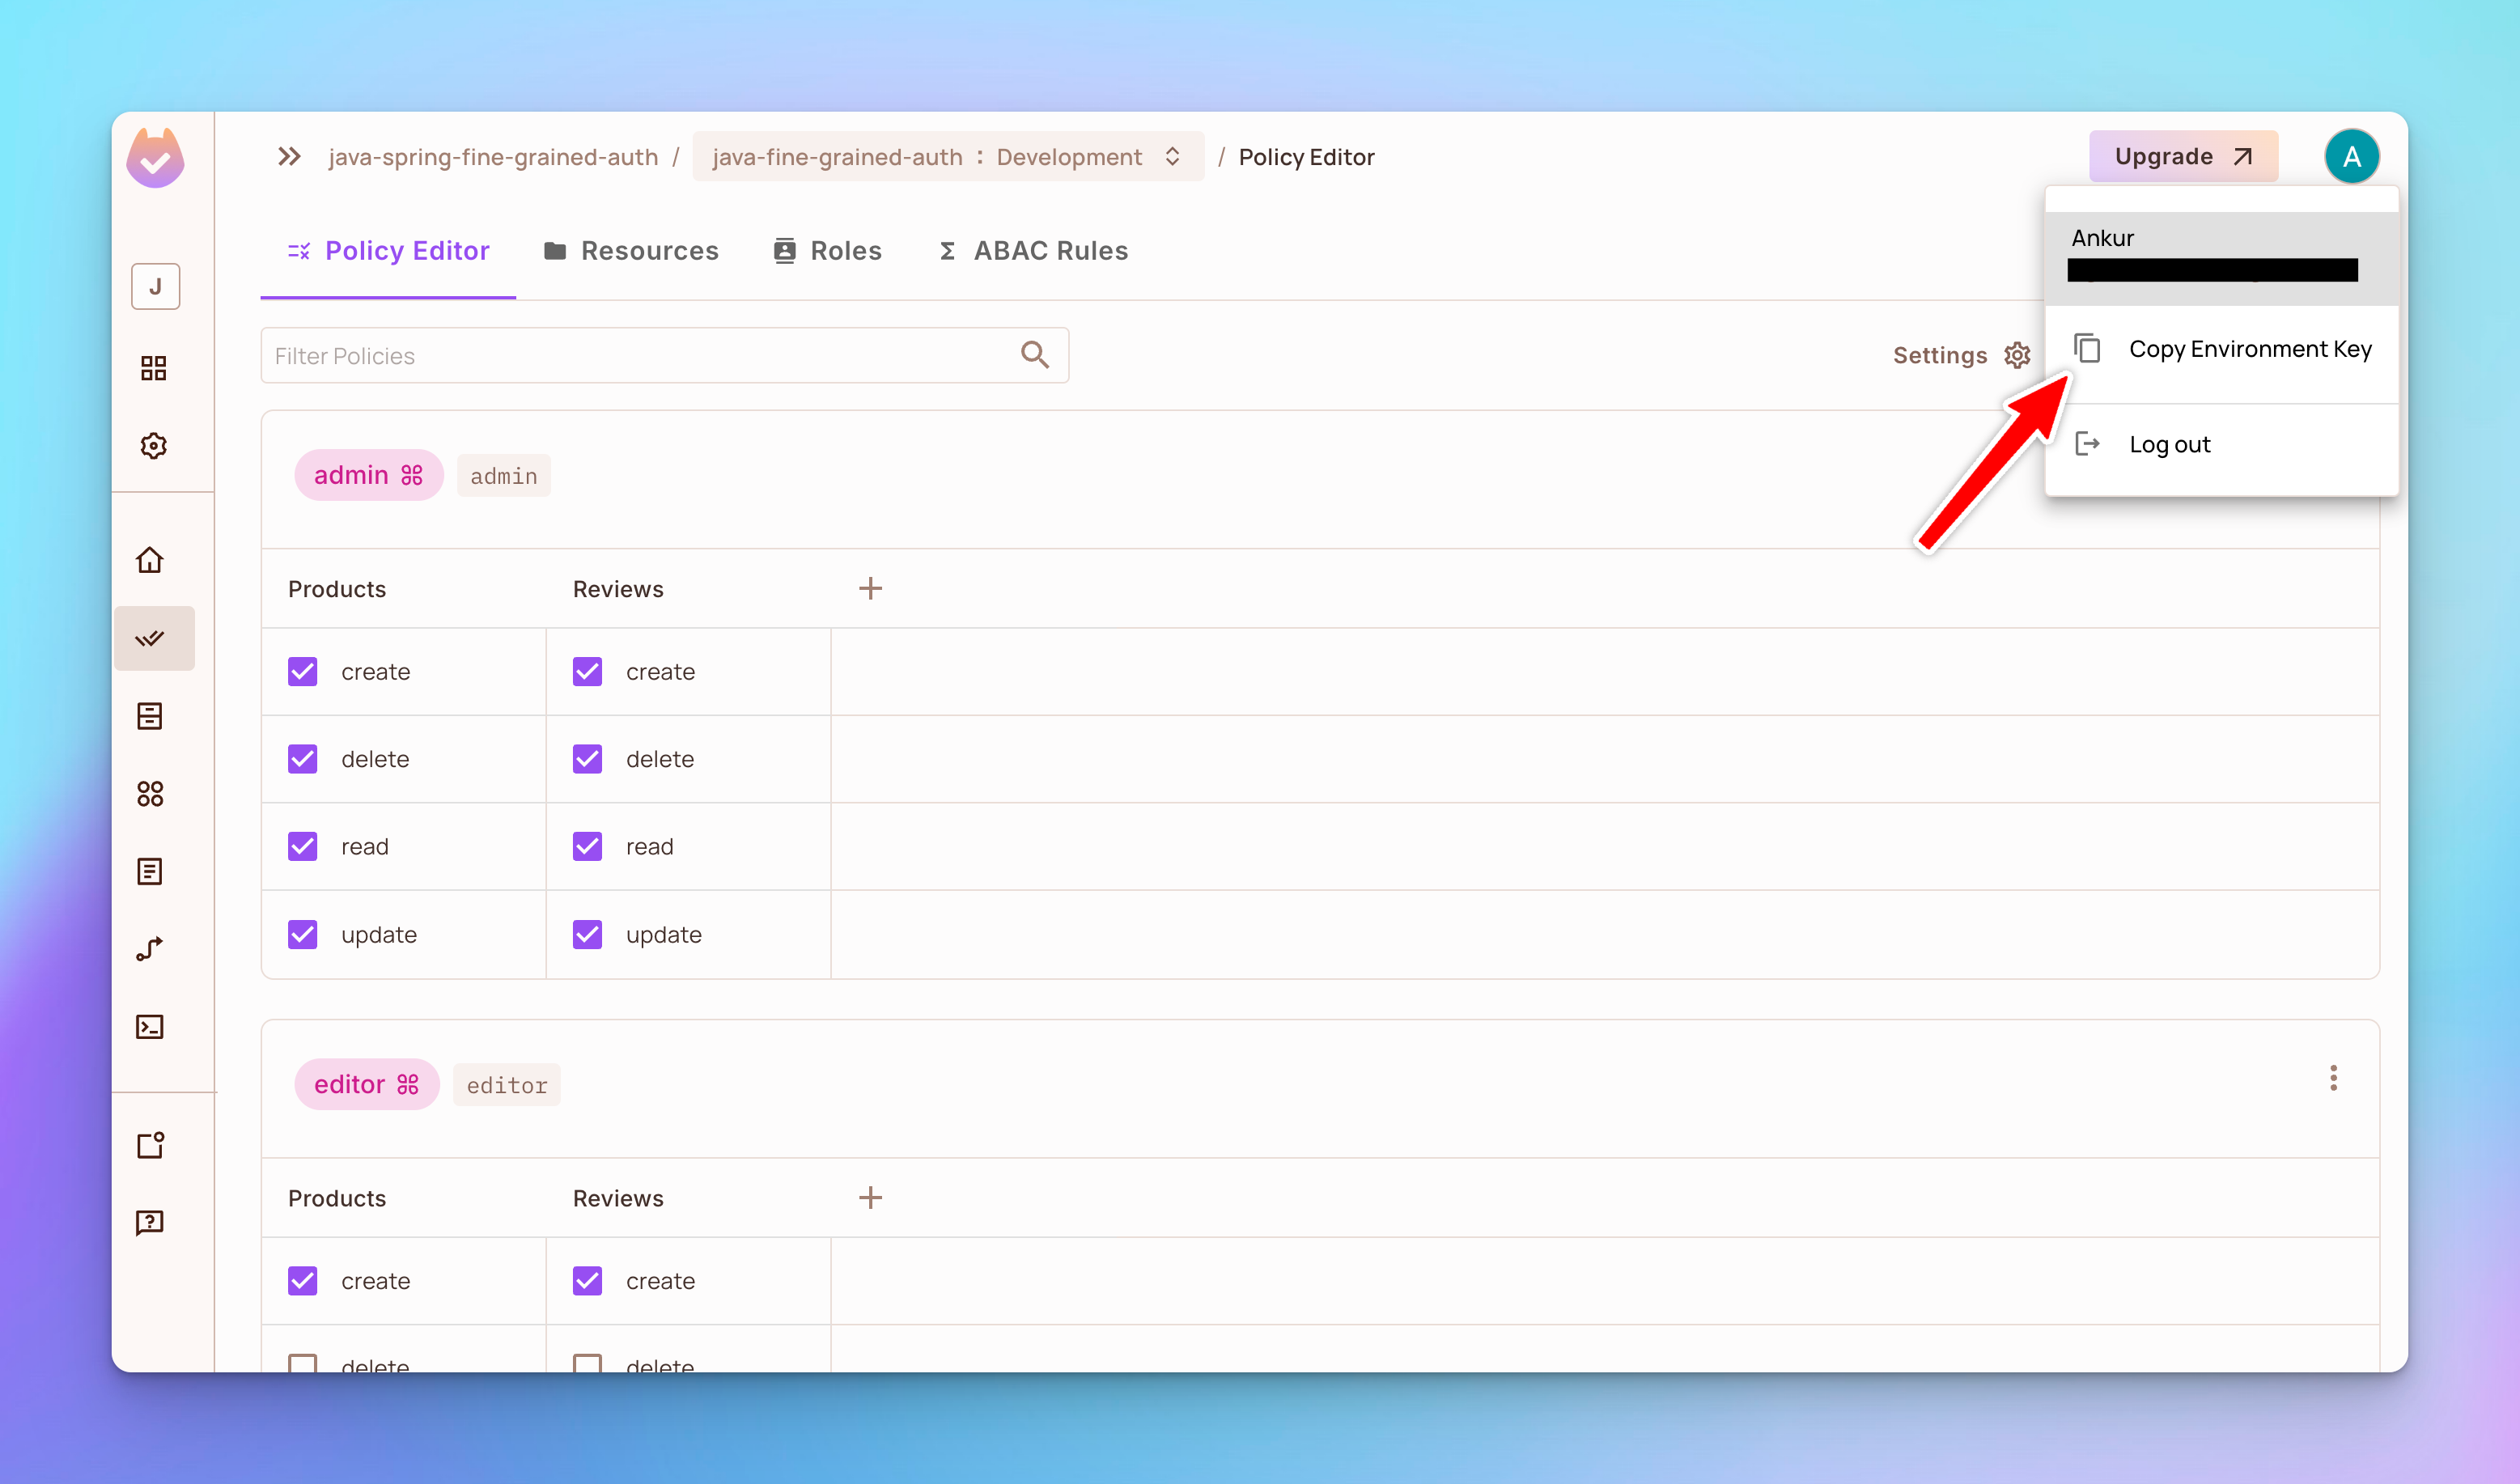
Шаг 2: получите API ключ среды
В интерфейсе панели управления скопируйте API ключ активной среды.
Потом добавьте ключ среды API и URL PDP в файл application.yaml.
permit:
  pdpUrl: 'http://localhost:7766'
  apiKey: "Your Permit environment API Key"
Шаг 3: разверните точку решения политики (PDP)
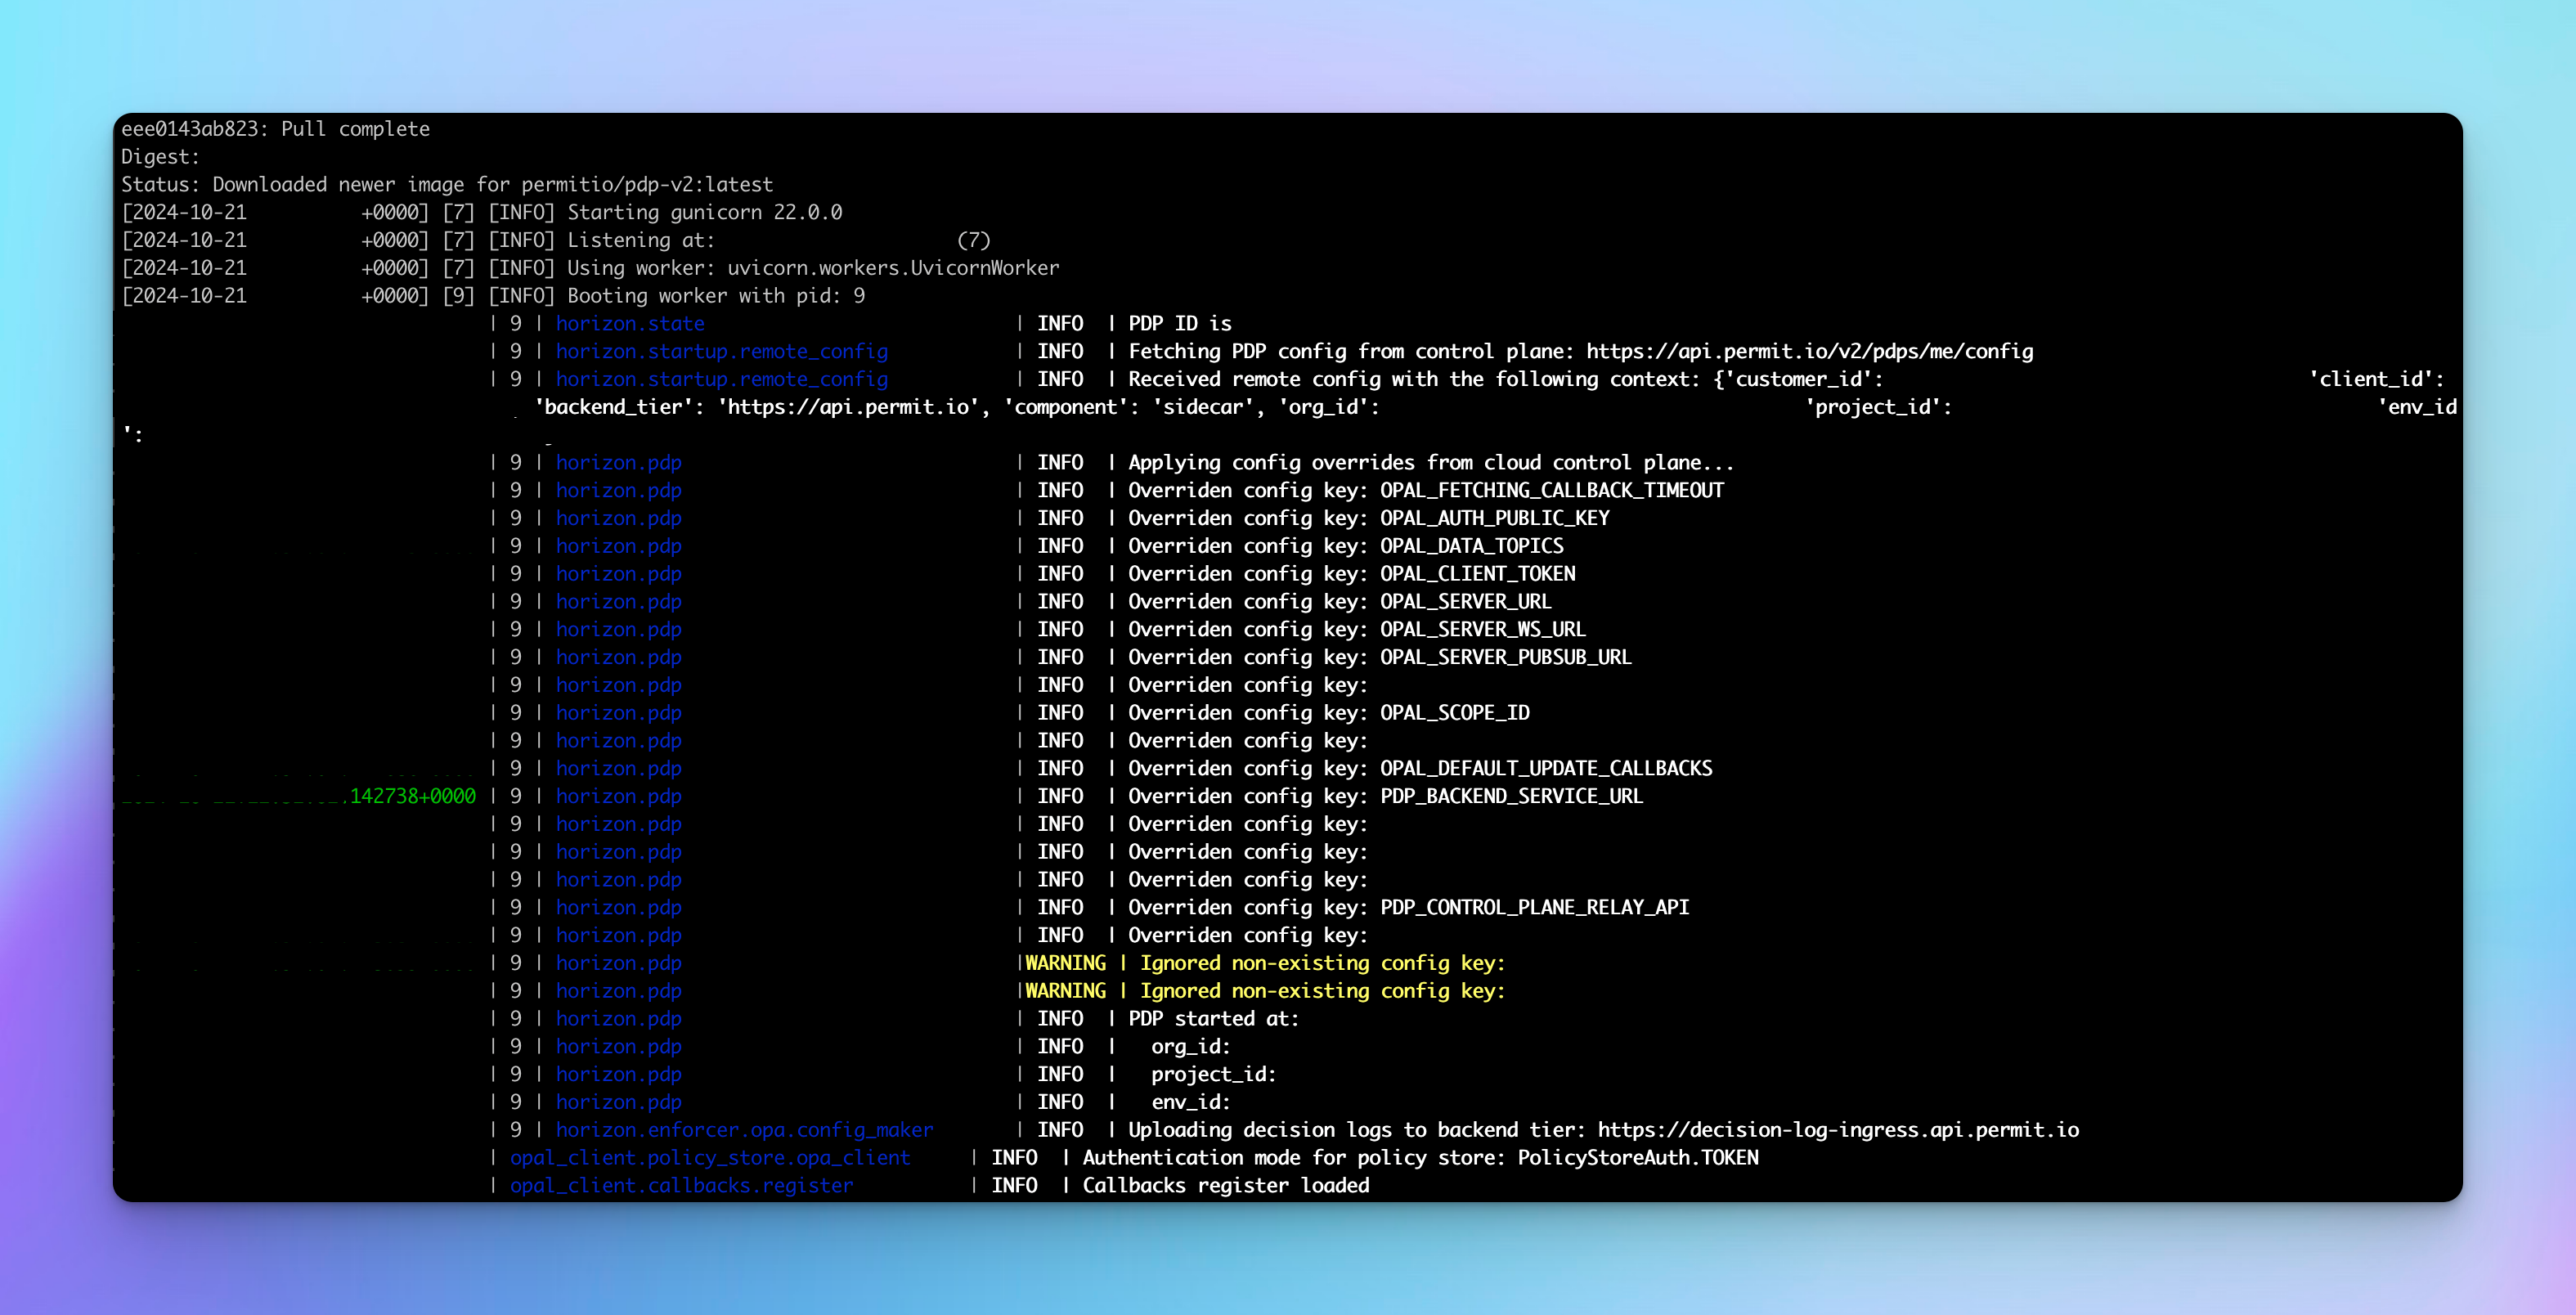
Точка решения политики (PDP) развернута в вашем VPC и отвечает за оценку ваших запросов авторизации. PDP обеспечит нулевую задержку, высокую производительность, высокую доступность и улучшенную безопасность.
Используйте нижеследующий коммандный запрос, чтобы удалить контейнер Permit.io PDP с Docker Hub.
docker pull permitio/pdp-v2:latest
Потом запустите контейнер.
docker run -it -p 7766:7000 --env PDP_DEBUG=True --env PDP_API_KEY=<YOUR_API_KEY> permitio/pdp-v2:latest
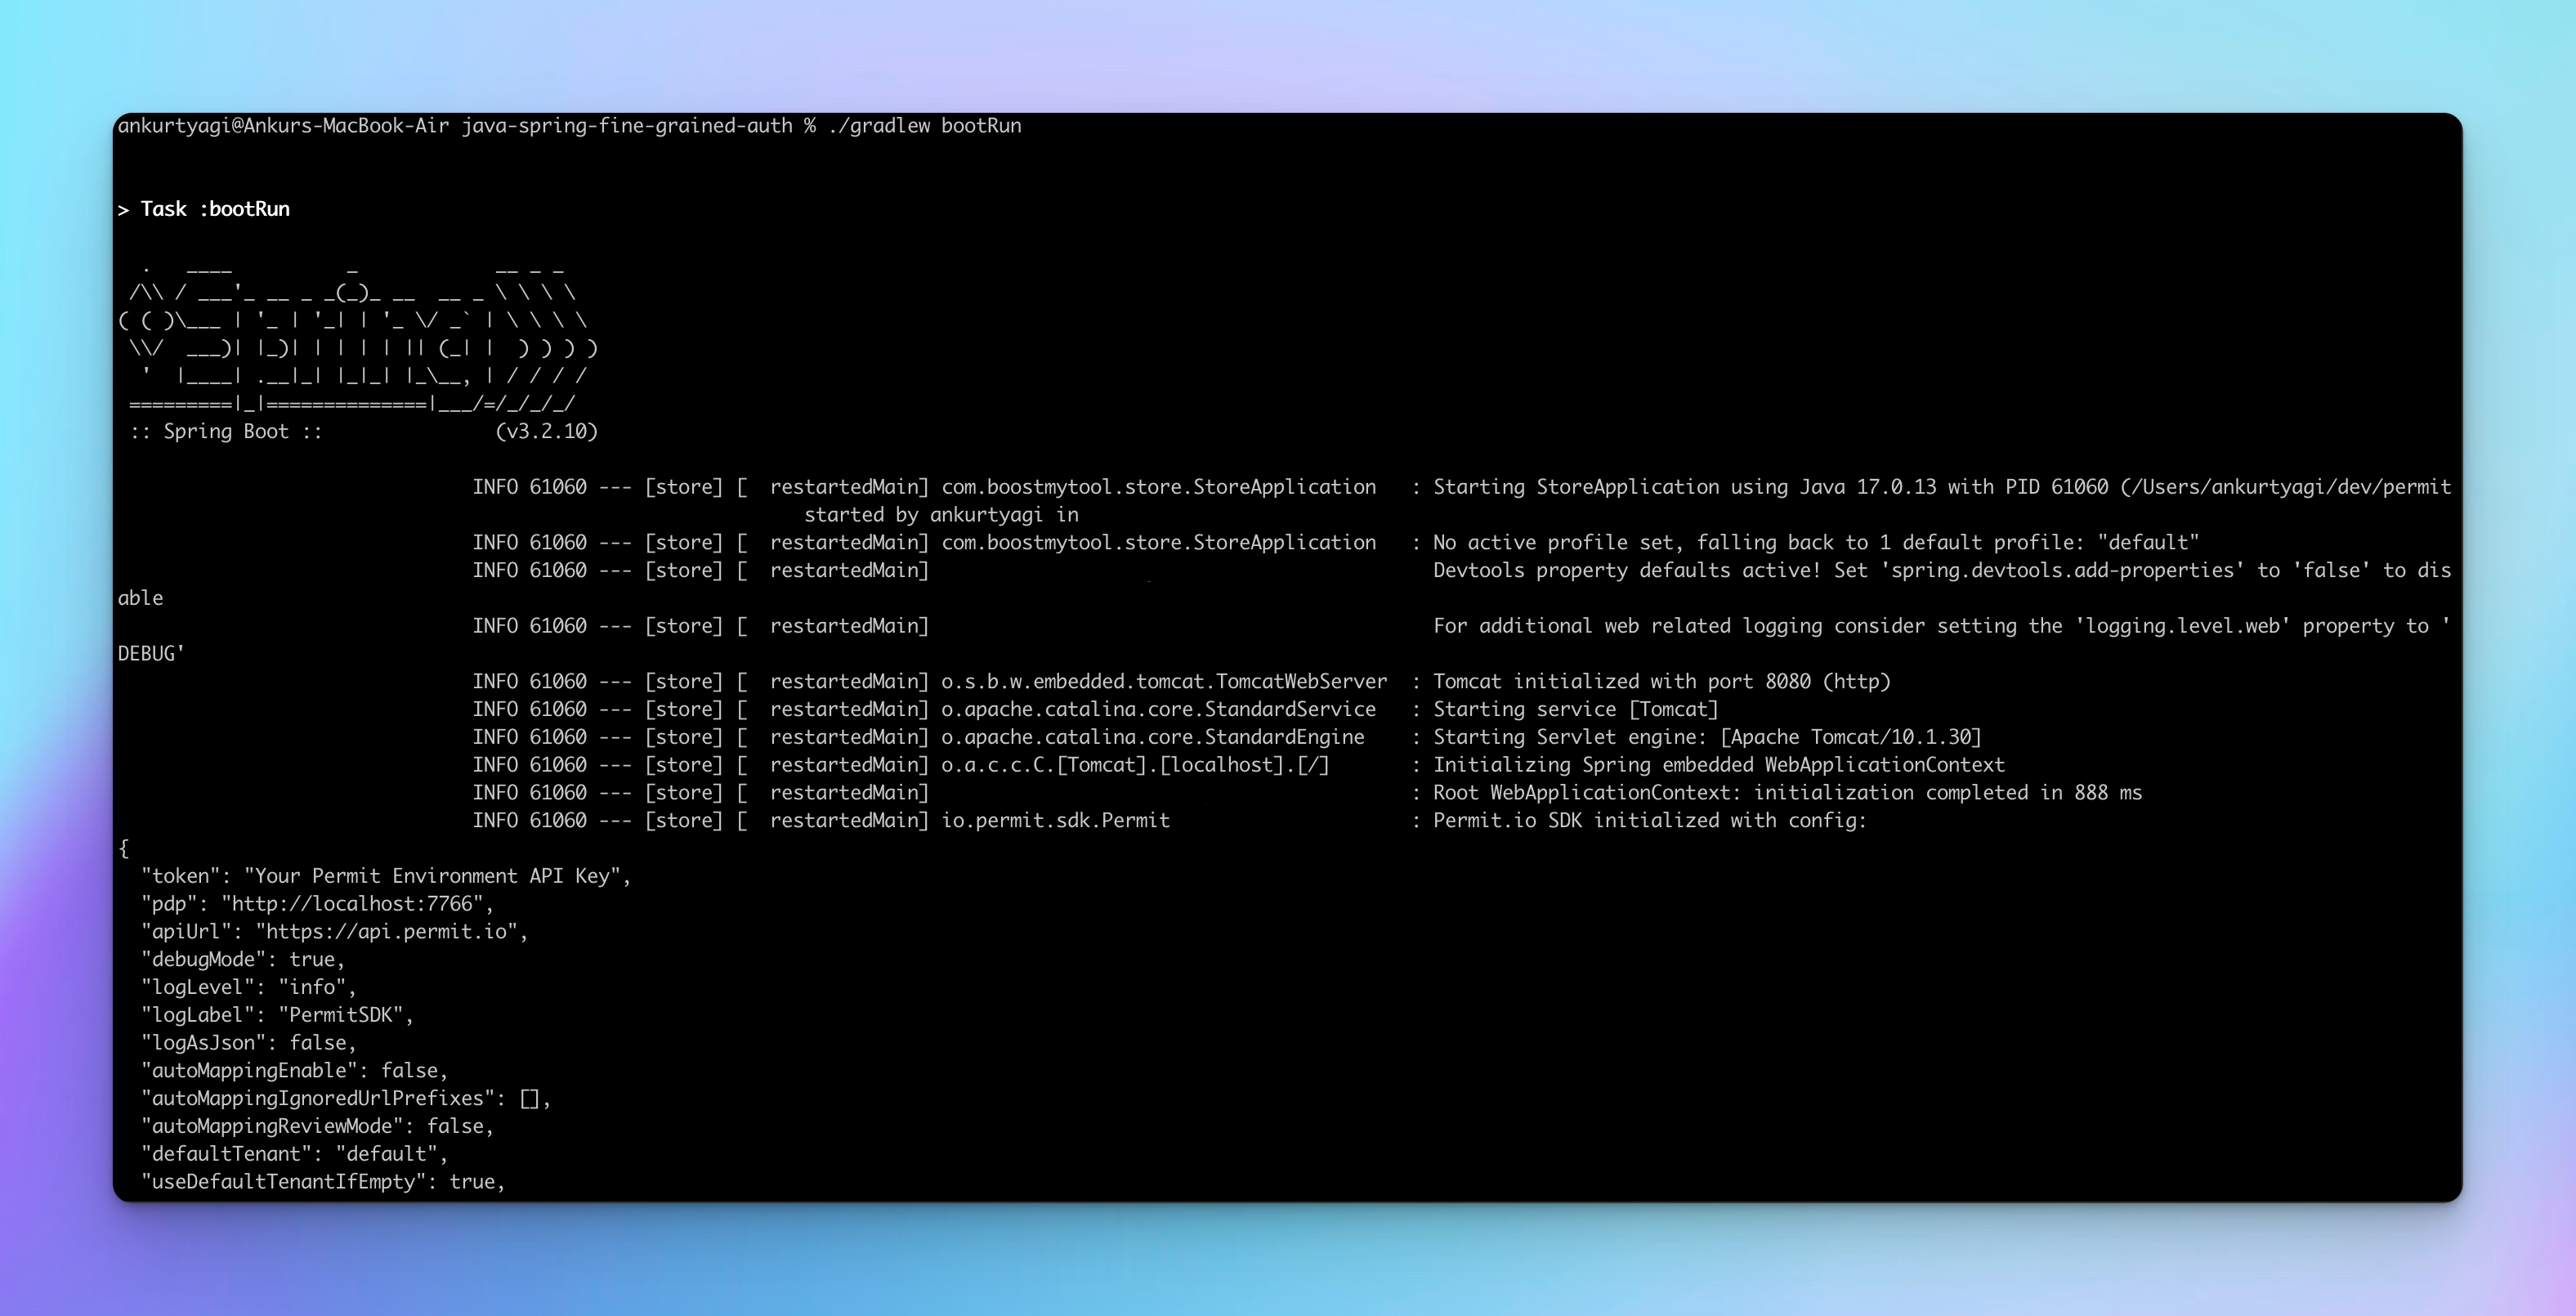
Шаг 4: запуск приложения
Вы можете запустить приложение с помощью следующего комманда Gradle:
./gradlew bootRun
Просмотр и создание продуктов
Теперь мы будем взаимодействовать с конечными точками приложения с помощью REQBIN.
Сначала создайте новый пользователя с помощью конечной точки /api/users/signup.
curl -X POST "http://localhost:8080/api/users/signup" -H "Content-Type: application/json" -d 'johndoe'
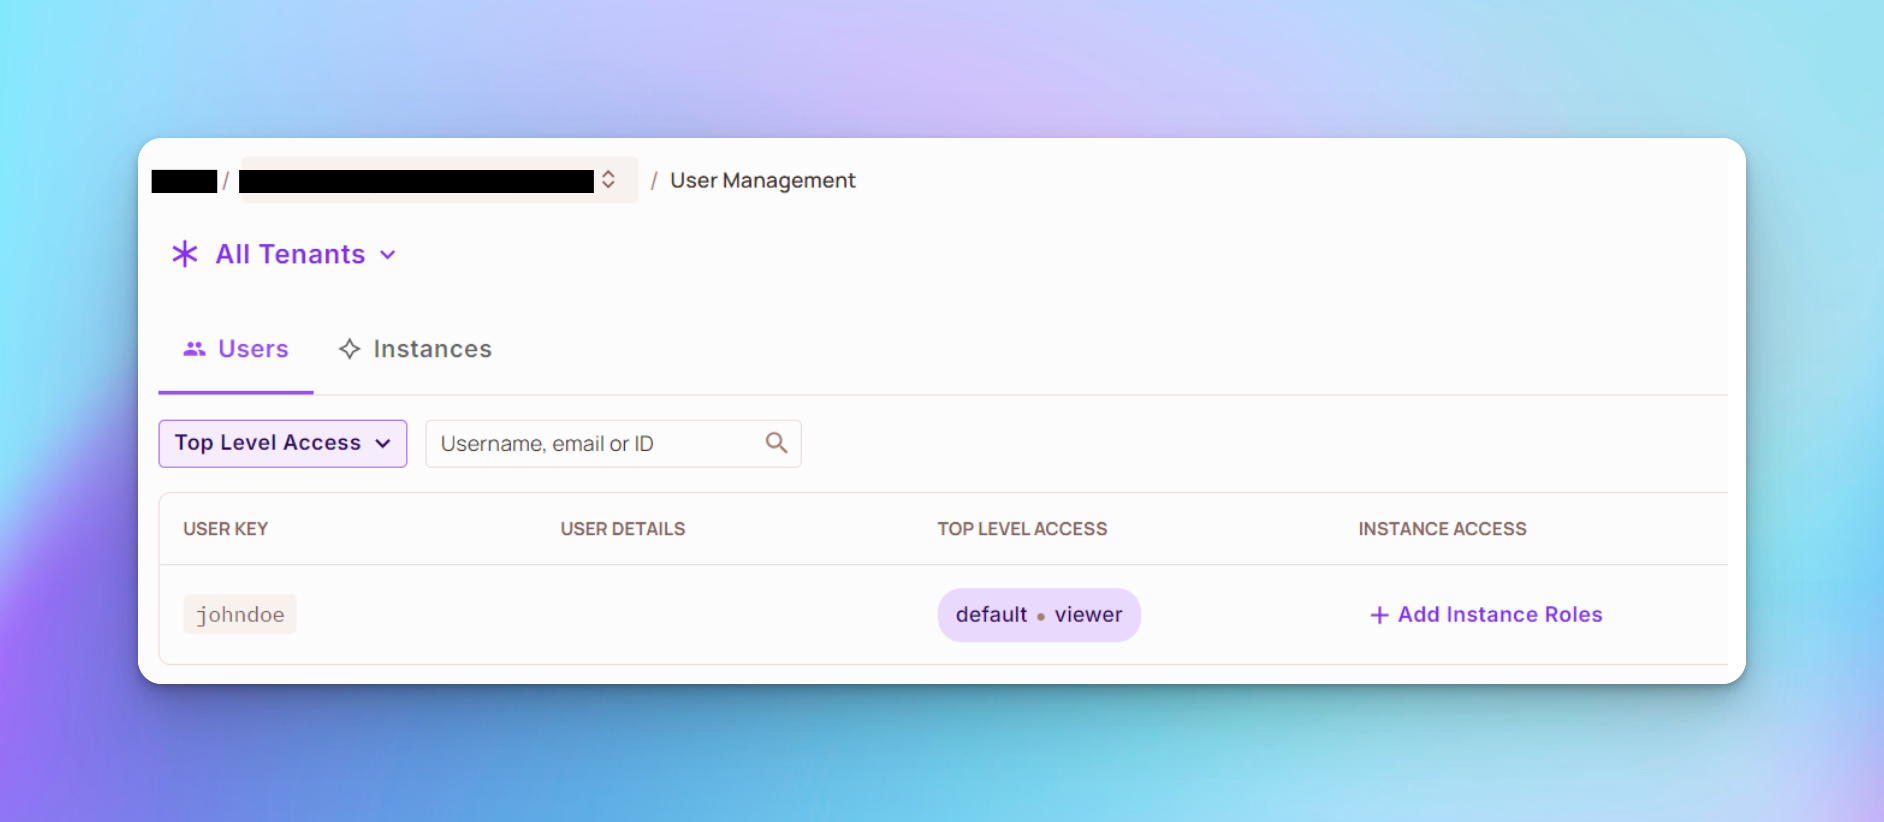
Вы должны смотреть пользователя в вашем проекте Permit, в разделе Directory > All Tenants.
initially, the user has no roles, so it cannot do much. for example, trying to list the products will result in a 403 forbidden response, as shown below. the 403 error code means the user doesn’t have permissions to access the requested resource, which is products in this case. you can learn more about the difference between 401 and 403 error codes here.

for the user to view a list of products, assign them a viewer role using the command below:
curl -X POST "http://localhost:8080/api/users/assign-role" \
-H "Authorization: Bearer johndoe" \
-H "Content-Type: application/json" \
-d 'viewer'
you should see that user johndoe was assigned role viewer, as shown below:
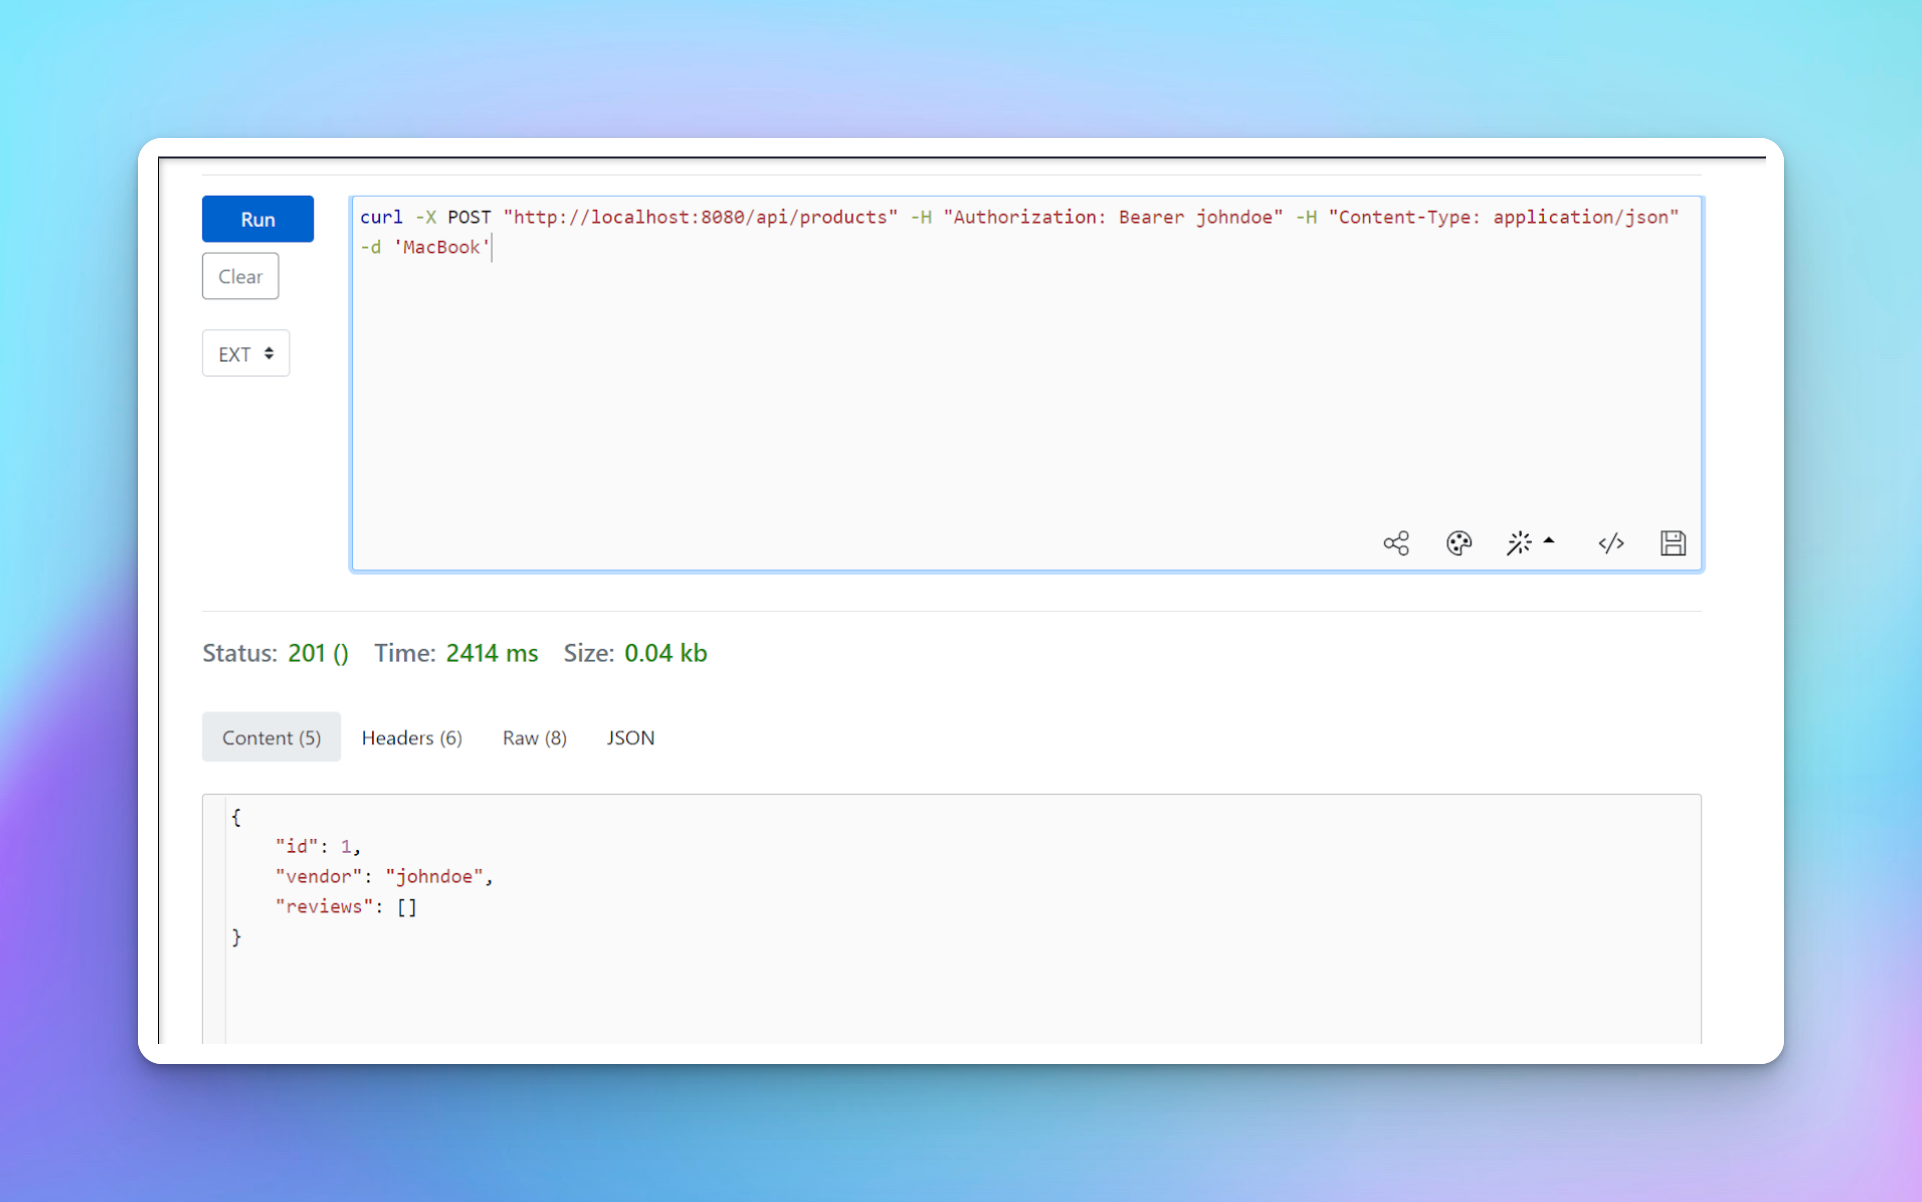
since a viewer can create a product, use the command below to create a product with user johndoe.
curl -X POST "http://localhost:8080/api/products" -H "Authorization: Bearer johndoe" -H "Content-Type: application/json" -d 'MacBook'
you should see that a new product is created with id 1 and that the user johndoe has been added as the vendor.
adding reviews to products
to add reviews to products, create another user called jane.
curl -X POST "http://localhost:8080/api/users/signup" -H "Content-Type: application/json" -d 'jane'
for the user to add a review to products, assign them a viewer role using the command below:
curl -X POST "http://localhost:8080/api/users/assign-role" \
-H "Authorization: Bearer jane" \
-H "Content-Type: application/json" \
-d 'viewer'
then you can add a review to the product added by johndoe using the command below:
curl -X POST "http://localhost:8080/api/products/1/review" -H "Authorization: Bearer jane" -H "Content-Type: application/json" -d 'The product was in good quality'
congratulations! you’ve completed the project for this tutorial.
next steps
now that you’ve learned how to implement fine-grained authorization in your java and spring boot applications using permit.io, you might want to explore further.
здесь представлены несколько ценных ресурсов:
Перед тем, как мы окончим
Я надеюсь, что этот учебник был для вас полезен.
Вот несколько моих других последних блог-постов, которые вы можете понадобиться:
Для более подробных руководств по амзаazing разработчикских инструментов, убедитесь проверить мой блог DTA.
Следуйте за мной на Twitter, чтобы получатьживые обновления о моих других проектах.
Удачи вам в кодировании.
Source:
https://www.freecodecamp.org/news/fine-grained-authorization-in-java-and-springboot/