In deze tutorial gaan we dieper in op de functies die Android TextInputLayout biedt. Android TextInputLayout is een ontwerpelement dat wordt geleverd met de Material Design Support Library.
Android TextInputLayout
Android TexInputLayout breidt LinearLayout uit. Het primaire gebruik van een TextInputLayout is om op te treden als een omhulsel voor EditText (of de afstammeling ervan) en het inschakelen van zwevende hint-animaties. Regel: TextInputLayout moet TextInputEditText omwikkelen in plaats van de normale EditText. Reden? TextInputEditText is een subklasse van EditText en is ontworpen voor gebruik als een kind van TextInputLayout. Bovendien zou het gebruik van een EditText in plaats daarvan een waarschuwing genereren: EditText toegevoegd is geen TextInputEditText. Schakel over naar het gebruik van die klasse. TextInputLayout heeft veel meer te bieden dan alleen zwevende hintlabels weergeven.
Kenmerken van Android TextInputLayout
Enkele van de functies die we in deze tutorial zullen behandelen, zijn:
- Inschakelen/Uitschakelen van zwevende hints
- Inschakelen/Uitschakelen van animatie voor zwevende hints
- Weergeven van foutmeldingen
- Weergeven van tekenteller
- Het waarschuwen van de gebruiker wanneer het tekentelling de limiet overschrijdt
- Aanpassen van de tekstweergave voor zwevende hint, foutlabel, tekenteller
- Wachtwoord zichtbaarheid wisselen
We zullen elk van deze functies bekijken en deze implementeren in een Android Studio-project.
Voorbeeldprojectstructuur van Android TextInputLayout
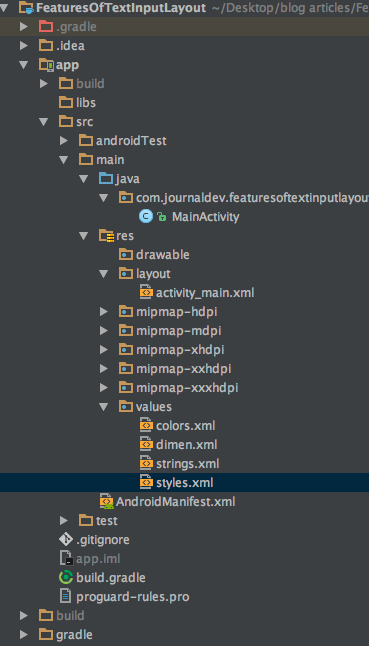 Dit is een applicatie met één activiteit. We zullen alles binnen de lay-out, activiteit en de bestanden
 styles.xml en colors.xml doen. Voeg eerst de afhankelijkheid van de designondersteuningsbibliotheek toe aan het bestand build.gradle zoals hieronder wordt getoond.
compile 'com.android.support:design:25.3.1'
Het inschakelen/uitschakelen van zwevende hints
Zwevende hints zijn standaard ingeschakeld in een TextInputLayout. Om het uit te schakelen moeten we het volgende attribuut binnen de tag toevoegen: app:hintEnabled="false". De onderstaande XML-code is afkomstig van de lay-out activity_main.xml en heeft drie EditText-velden.
<?xml version="1.0" encoding="utf-8"?>
<ScrollView xmlns:android="https://schemas.android.com/apk/res/android"
    xmlns:app="https://schemas.android.com/apk/res-auto"
    xmlns:tools="https://schemas.android.com/tools"
    android:layout_width="match_parent"
    android:layout_height="wrap_content"
    tools:context="com.journaldev.featuresoftextinputlayout.MainActivity">

    <LinearLayout
        android:layout_width="match_parent"
        android:layout_height="wrap_content"
        android:orientation="vertical">


        <android.support.design.widget.TextInputEditText
            android:layout_width="match_parent"
            android:layout_height="wrap_content"
            android:layout_margin="@dimen/activity_horizontal_margin"
            android:hint="TextInputEditText" />


        <android.support.design.widget.TextInputLayout
            android:layout_width="match_parent"
            android:layout_height="match_parent"
            android:layout_margin="@dimen/activity_horizontal_margin">

            <android.support.design.widget.TextInputEditText
                android:layout_width="match_parent"
                android:layout_height="wrap_content"
                android:hint="Floating Hint Enabled Default" />

        </android.support.design.widget.TextInputLayout>


        <android.support.design.widget.TextInputLayout
            android:layout_width="match_parent"
            android:layout_height="wrap_content"
            android:layout_margin="@dimen/activity_horizontal_margin"
            app:hintEnabled="false">

            <android.support.design.widget.TextInputEditText
                android:layout_width="match_parent"
                android:layout_height="wrap_content"
                android:hint="Floating Hint Disabled" />

        </android.support.design.widget.TextInputLayout>

</LinearLayout>
</ScrollView>
Het derde EditText-veld heeft de zwevende hint uitgeschakeld. Laten we eens kijken welke output de bovenstaande code ons geeft: 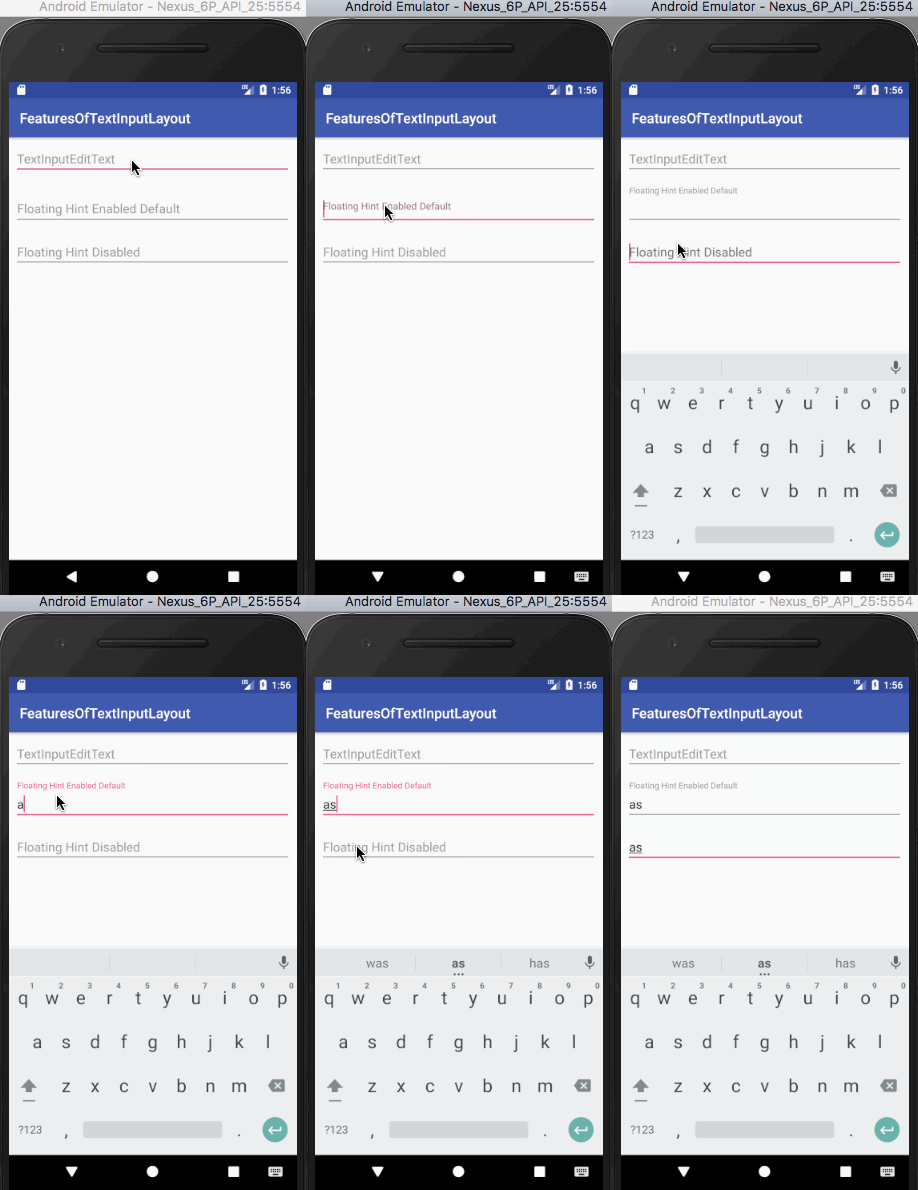
Het inschakelen/uitschakelen van de animatie voor zwevende hint
Vergelijkbaar met de vorige functie, is de animatie voor de zwevende hint standaard ingeschakeld. Om deze uit te schakelen moeten we de volgende attribuut toevoegen binnen de tag TextInputLayout. app:hintAnimationEnabled="false" De onderstaande XML-code is afkomstig van de layout activity_main.xml en heeft EditText-velden voor een van beide gevallen.
<?xml version="1.0" encoding="utf-8"?>
<ScrollView xmlns:android="https://schemas.android.com/apk/res/android"
    xmlns:app="https://schemas.android.com/apk/res-auto"
    xmlns:tools="https://schemas.android.com/tools"
    android:layout_width="match_parent"
    android:layout_height="wrap_content"
    tools:context="com.journaldev.featuresoftextinputlayout.MainActivity">

    <LinearLayout
        android:layout_width="match_parent"
        android:layout_height="wrap_content"
        android:orientation="vertical">

        <android.support.design.widget.TextInputLayout
            android:layout_width="match_parent"
            android:layout_height="match_parent"
            android:layout_margin="@dimen/activity_horizontal_margin">

            <android.support.design.widget.TextInputEditText
                android:layout_width="match_parent"
                android:layout_height="wrap_content"
                android:hint="Floating Hint Enabled Default" />

        </android.support.design.widget.TextInputLayout>


        <android.support.design.widget.TextInputLayout
            android:layout_width="match_parent"
            android:layout_height="wrap_content"
            android:layout_margin="@dimen/activity_horizontal_margin"
            app:hintAnimationEnabled="false">

            <android.support.design.widget.TextInputEditText
                android:layout_width="match_parent"
                android:layout_height="wrap_content"
                android:hint="Hint Animation Disabled" />

        </android.support.design.widget.TextInputLayout>

</LinearLayout>
</ScrollView>
De output van de bovenstaande code wordt hieronder getoond. 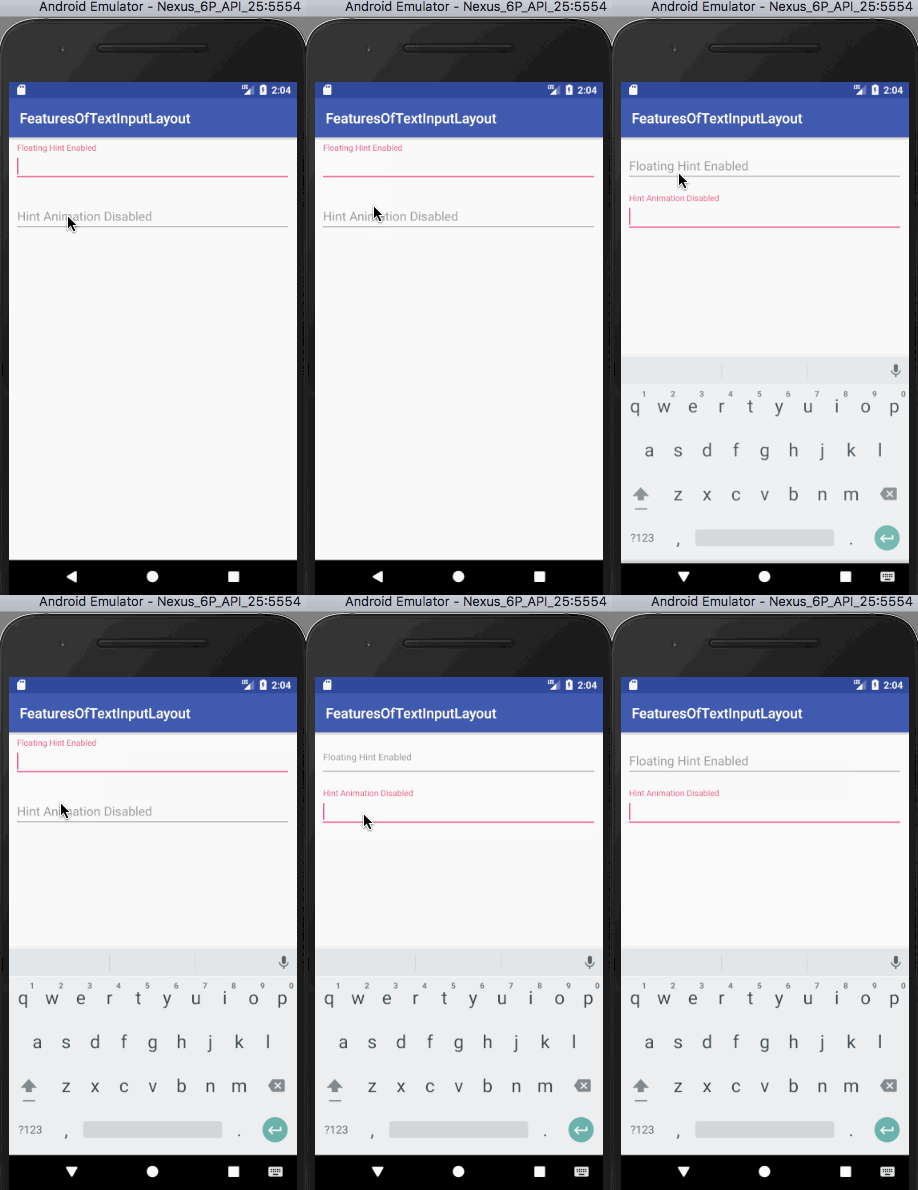 Het is het vermelden waard dat het tweede EditText-veld de zwevende hint niet animeert wanneer het is gefocust.
Het stijlen van de hint TextAppearance
Om een aangepaste textColor en textSize te gebruiken voor de hints, wordt de volgende attribuut gebruikt: app:hintTextAppearance="@style/HintText" De HintText-stijl is geschreven binnen de styles.xml zoals hieronder getoond
<style name="HintText" parent="TextAppearance.Design.Hint">
        <item name="android:textSize">16sp</item>
        <item name="android:textColor">@color/colorPrimary</item>
    </style>
De onderstaande xml-code is afkomstig van het activity_main.xml-lay-out en heeft EditText-velden voor een van de gevallen (met/zonder hintTextAppearance).
<?xml version="1.0" encoding="utf-8"?>
<ScrollView xmlns:android="https://schemas.android.com/apk/res/android"
    xmlns:app="https://schemas.android.com/apk/res-auto"
    xmlns:tools="https://schemas.android.com/tools"
    android:layout_width="match_parent"
    android:layout_height="wrap_content"
    tools:context="com.journaldev.featuresoftextinputlayout.MainActivity">

    <LinearLayout
        android:layout_width="match_parent"
        android:layout_height="wrap_content"
        android:orientation="vertical">

        <android.support.design.widget.TextInputLayout
            android:layout_width="match_parent"
            android:layout_height="match_parent"
            android:layout_margin="@dimen/activity_horizontal_margin">

            <android.support.design.widget.TextInputEditText
                android:layout_width="match_parent"
                android:layout_height="wrap_content"
                android:hint="Floating Hint Enabled" />

        </android.support.design.widget.TextInputLayout>


        <android.support.design.widget.TextInputLayout
            android:layout_width="match_parent"
            android:layout_height="match_parent"
            android:layout_margin="@dimen/activity_horizontal_margin"
            app:hintTextAppearance="@style/HintText">

            <android.support.design.widget.TextInputEditText
                android:layout_width="match_parent"
                android:layout_height="wrap_content"
                android:hint="Custom Hint TextAppearance" />

        </android.support.design.widget.TextInputLayout>

</LinearLayout>
</ScrollView>
De uitvoer van de bovenstaande code wordt hieronder getoond. 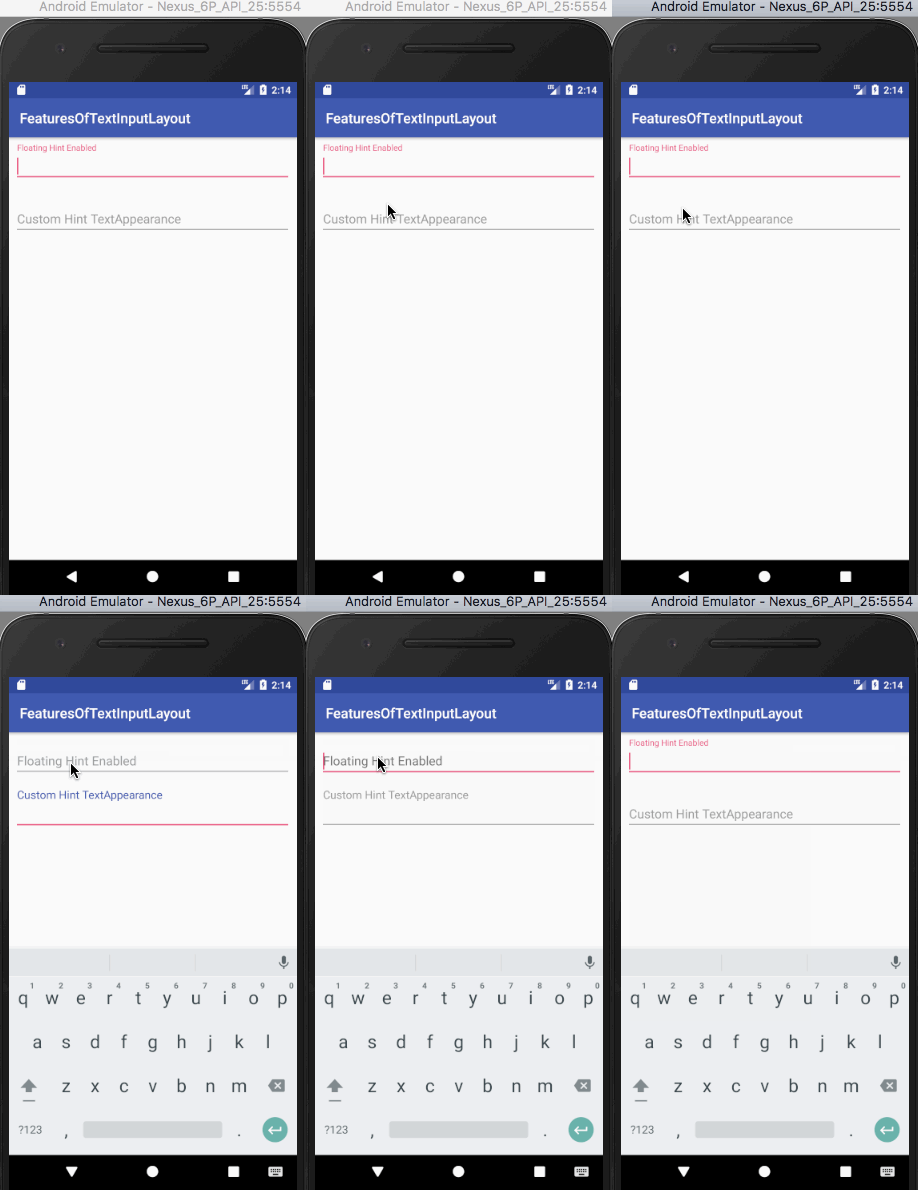
Teken Teller
Teken Teller is een functie die door heel wat toepassingen wordt gebruikt. (Herinner je je de Twitter-tekengrens?). Stel app:counterEnabled in op true en app:counterMaxLength met het maximale aantal tekens dat je wilt in de TextInputLayout. Teken Teller wordt standaard weergegeven onder de EditText (rechtsonder) en tijdens het schrijven van deze tutorial is er nog geen manier om de positie te veranderen. Het stylen van de teller is vergelijkbaar met het stylen van de hinttekst. app:counterTextAppearance is ditmaal het attribuut dat wordt gebruikt. We hebben de volgende stijl toegevoegd in het styles.xml-bestand van ons project.
<style name="CounterText" parent="TextAppearance.Design.Counter">
        <item name="android:textSize">16sp</item>
        <item name="android:textColor">@color/my_pink</item>
    </style>
De onderstaande xml-code is afkomstig van het activity_main.xml-lay-out en heeft EditText-velden met een standaard teken teller en een aangepaste.
<?xml version="1.0" encoding="utf-8"?>
<ScrollView xmlns:android="https://schemas.android.com/apk/res/android"
    xmlns:app="https://schemas.android.com/apk/res-auto"
    xmlns:tools="https://schemas.android.com/tools"
    android:layout_width="match_parent"
    android:layout_height="wrap_content"
    tools:context="com.journaldev.featuresoftextinputlayout.MainActivity">

    <LinearLayout
        android:layout_width="match_parent"
        android:layout_height="wrap_content"
        android:orientation="vertical">

        <android.support.design.widget.TextInputLayout
            android:layout_width="match_parent"
            android:layout_height="wrap_content"
            android:layout_margin="@dimen/activity_horizontal_margin"
            app:counterEnabled="true"
            app:counterMaxLength="5"
            app:hintTextAppearance="@style/HintText">

            <android.support.design.widget.TextInputEditText
                android:layout_width="match_parent"
                android:layout_height="wrap_content"
                android:hint="Character Counter Limit 10" />

        </android.support.design.widget.TextInputLayout>


        <android.support.design.widget.TextInputLayout
            android:layout_width="match_parent"
            android:layout_height="wrap_content"
            android:layout_margin="@dimen/activity_horizontal_margin"
            app:counterEnabled="true"
            app:counterMaxLength="5"
            app:counterTextAppearance="@style/CounterText"
            app:hintTextAppearance="@style/HintText">

            <android.support.design.widget.TextInputEditText
                android:layout_width="match_parent"
                android:layout_height="wrap_content"
                android:hint="Character Counter Custom TextAppearance" />

        </android.support.design.widget.TextInputLayout>

</LinearLayout>
</ScrollView>
De uitvoer van de bovenstaande code wordt hieronder gegeven. 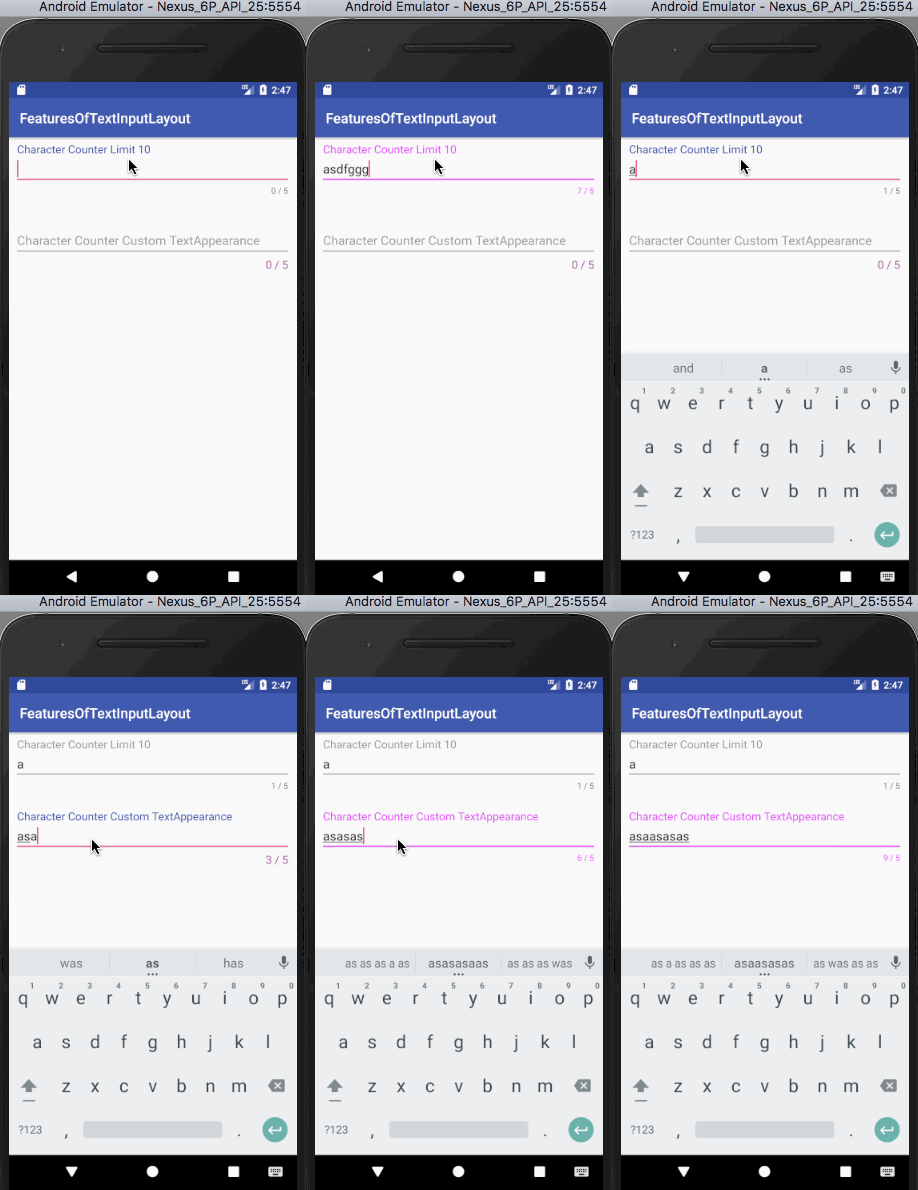 Laten we de bovenstaande uitvoer nauwkeurig bekijken.
- Het eerste EditText-veld wijzigt de kleur van de teller textColor, hint textColor en de kleur van de indicator wanneer het tekentelling wordt overschreden.
- Het tweede EditText-veld doet hetzelfde, maar verandert ook de teller aangepaste tekstkleur en aangepaste tekengrootte wanneer de limiet wordt overschreden.
Om de stijl te specificeren die we nodig hebben wanneer de tekenteller zijn limiet overschrijdt, moeten we de attribuut counterFlow gebruiken dat we hierna zullen zien.
Tekenteller Overflow
Zoals we hierboven hebben gezien, gebruikt de tekenteller tekst, wanneer het aantal tekens de gedefinieerde limiet overschrijdt, de attributen gedefinieerd in counterFlow. Als de attributen niet aanwezig waren, blijft het bij de standaardattributen zoals we hebben gezien in de bovenstaande uitvoer. We moeten de volgende param gebruiken app:counterOverflowTextAppearance De stijl voor CounterOverflow bevindt zich binnen styles.xml:
 <style name="CounterOverFlow" parent="TextAppearance.Design.Counter.Overflow">
        <item name="android:textSize">16sp</item>
        <item name="android:textColor">@color/my_orange</item>
    </style>
Voeg de onderstaande codefragment toe aan de vorige activity_main.xml lay-out:
<android.support.design.widget.TextInputLayout
            android:layout_width="match_parent"
            android:layout_height="wrap_content"
            android:layout_margin="@dimen/activity_horizontal_margin"
            app:counterEnabled="true"
            app:counterMaxLength="5"
            app:counterOverflowTextAppearance="@style/CounterOverFlow"
            app:counterTextAppearance="@style/CounterText"
            app:hintTextAppearance="@style/HintText">

            <android.support.design.widget.TextInputEditText
                android:layout_width="match_parent"
                android:layout_height="wrap_content"
                android:hint="CounterOverflow CustomTextAppearance" />

        </android.support.design.widget.TextInputLayout>
Laten we de applicatie opnieuw uitvoeren. 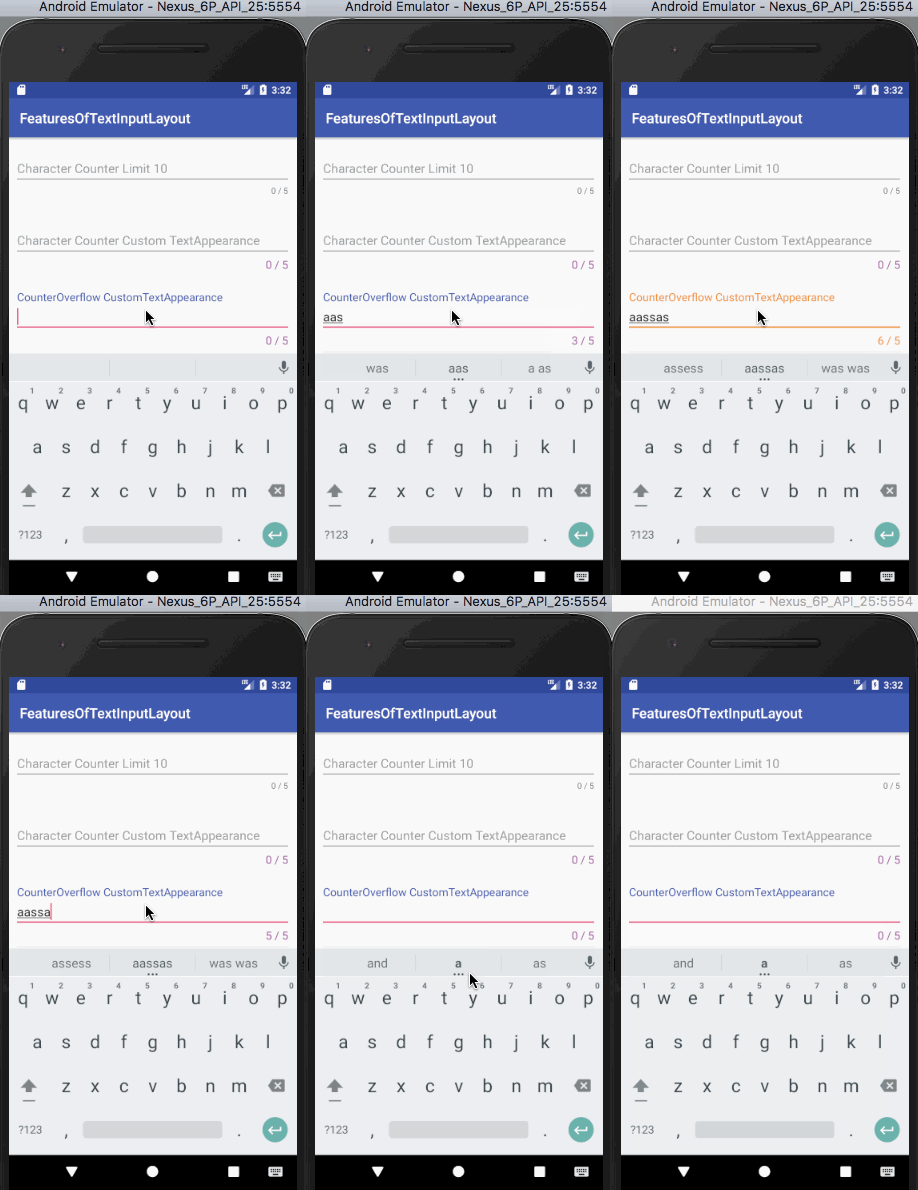
Foutlabel
Door app:errorEnabled in te stellen op true, kunnen we een fouttekst weergeven onder ons EditText-veld. Om de fouttekst op te maken, gebruiken we het attribuut app:errorTextAppearance en voegen we de volgende code toe aan ons styles.xml-bestand.
<style name="ErrorText" parent="TextAppearance.Design.Error">
        <item name="android:textSize">16sp</item>
        <item name="android:textColor">@color/my_black</item>
    </style>
De onderstaande XML-code is afkomstig van de lay-out activity_main.xml en bevat EditText-velden voor een standaardfoutlabel en een aangepast label.
<?xml version="1.0" encoding="utf-8"?>
<ScrollView xmlns:android="https://schemas.android.com/apk/res/android"
    xmlns:app="https://schemas.android.com/apk/res-auto"
    xmlns:tools="https://schemas.android.com/tools"
    android:layout_width="match_parent"
    android:layout_height="wrap_content"
    tools:context="com.journaldev.featuresoftextinputlayout.MainActivity">

    <LinearLayout
        android:layout_width="match_parent"
        android:layout_height="wrap_content"
        android:orientation="vertical">

        <android.support.design.widget.TextInputLayout
            android:id="@+id/errorInputLayout"
            android:layout_width="match_parent"
            android:layout_height="wrap_content"
            android:layout_margin="@dimen/activity_horizontal_margin"
            app:counterEnabled="true"
            app:counterMaxLength="5"
            app:counterOverflowTextAppearance="@style/CounterOverFlow"
            app:counterTextAppearance="@style/CounterText"
            app:errorEnabled="true"
            app:hintTextAppearance="@style/HintText">

            <android.support.design.widget.TextInputEditText
                android:id="@+id/errorEditText"
                android:layout_width="match_parent"
                android:layout_height="wrap_content"
                android:hint="Default Error Label" />

        </android.support.design.widget.TextInputLayout>


        <android.support.design.widget.TextInputLayout
            android:id="@+id/customErrorInputLayout"
            android:layout_width="match_parent"
            android:layout_height="wrap_content"
            android:layout_margin="@dimen/activity_horizontal_margin"
            app:counterEnabled="true"
            app:counterMaxLength="5"
            app:counterOverflowTextAppearance="@style/CounterOverFlow"
            app:counterTextAppearance="@style/CounterText"
            app:errorEnabled="true"
            app:errorTextAppearance="@style/ErrorText"
            app:hintTextAppearance="@style/HintText">

            <android.support.design.widget.TextInputEditText
                android:id="@+id/customErrorEditText"
                android:layout_width="match_parent"
                android:layout_height="wrap_content"
                android:hint="Custom Error Label" />

        </android.support.design.widget.TextInputLayout>

</LinearLayout>
</ScrollView>
Om de fouttekst weer te geven, moeten we de methode setError(String) aanroepen op een instantie van TextInputLayout in onze klasse MainActivity.java, zoals hieronder getoond.
package com.journaldev.featuresoftextinputlayout;

import android.support.design.widget.TextInputEditText;
import android.support.design.widget.TextInputLayout;
import android.support.v7.app.AppCompatActivity;
import android.os.Bundle;
import android.text.Editable;
import android.text.TextWatcher;

public class MainActivity extends AppCompatActivity {


    TextInputLayout errorInputLayout, customErrorInputLayout;
    TextInputEditText errorEditText, customErrorEditText;

    @Override
    protected void onCreate(Bundle savedInstanceState) {
        super.onCreate(savedInstanceState);
        setContentView(R.layout.activity_main);

        errorEditText = (TextInputEditText) findViewById(R.id.errorEditText);
        errorInputLayout = (TextInputLayout) findViewById(R.id.errorInputLayout);

        customErrorEditText = (TextInputEditText) findViewById(R.id.customErrorEditText);
        customErrorInputLayout = (TextInputLayout) findViewById(R.id.customErrorInputLayout);

        errorEditText.addTextChangedListener(new TextWatcher() {
            @Override
            public void beforeTextChanged(CharSequence s, int start, int count, int after) {

            }

            @Override
            public void onTextChanged(CharSequence s, int start, int before, int count) {

            }

            @Override
            public void afterTextChanged(Editable s) {

                if (s.length() > errorInputLayout.getCounterMaxLength())
                    errorInputLayout.setError("Max character length is " + errorInputLayout.getCounterMaxLength());
                else
                    errorInputLayout.setError(null);

            }
        });

        customErrorEditText.addTextChangedListener(new TextWatcher() {
            @Override
            public void beforeTextChanged(CharSequence s, int start, int count, int after) {

            }

            @Override
            public void onTextChanged(CharSequence s, int start, int before, int count) {

            }

            @Override
            public void afterTextChanged(Editable s) {

                if (s.length() > customErrorInputLayout.getCounterMaxLength())
                    customErrorInputLayout.setError("Max character length is " + customErrorInputLayout.getCounterMaxLength());
                else
                    customErrorInputLayout.setError(null);

            }
        });


    }
}
In de bovenstaande code voegen we een `TextChangedListener` (die `TextWatcher` implementeert) toe aan elk exemplaar van TextInputEditText. We tonen het foutlabel wanneer het huidige aantal tekens de maximale limiet overschrijdt. Om het foutlabel te wissen, stellen we de waarde binnen `setError()` in als `null`. De uitvoer die de bovenstaande code ons geeft, is: `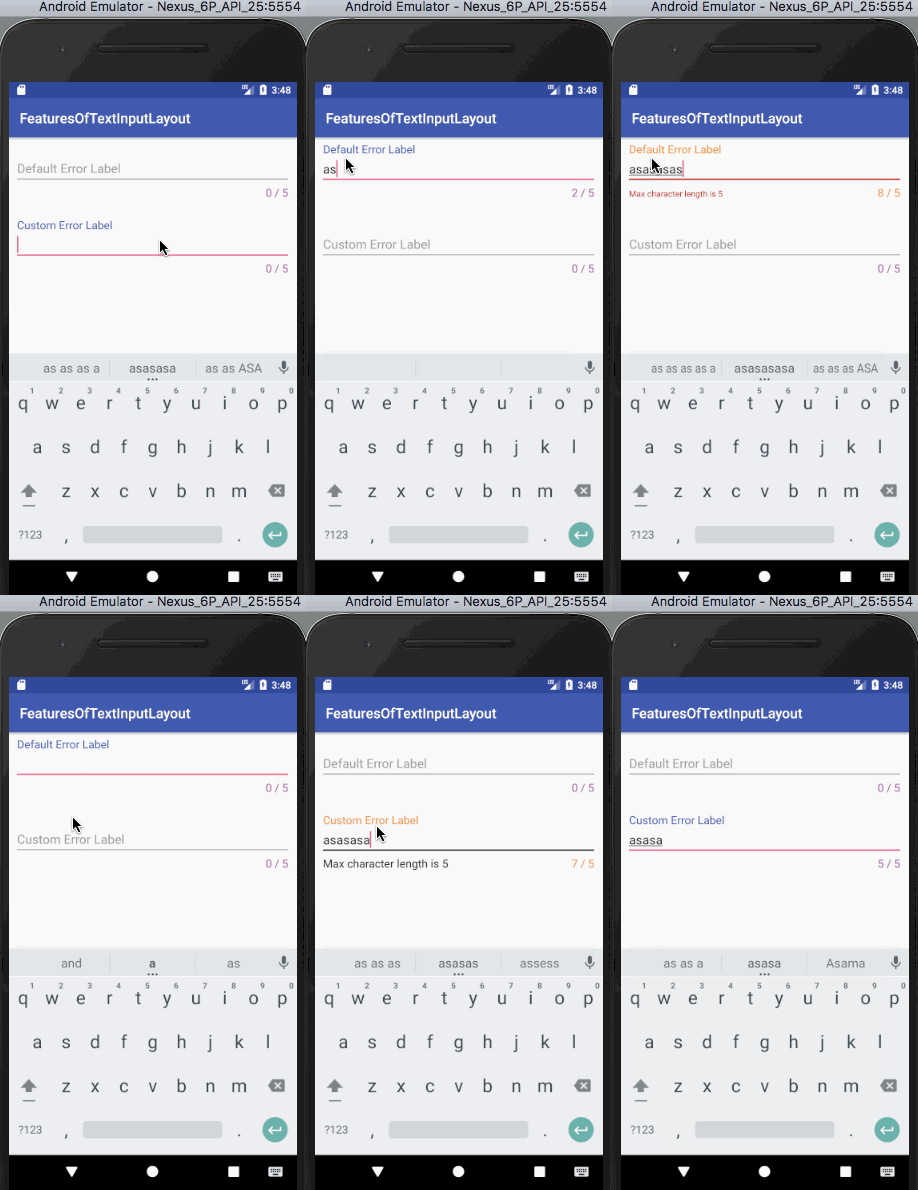 Opmerking: De indicator van het tekstveld gebruikt dezelfde kleur als het foutlabel. Het overschrijft de kleur ingesteld door `counterOverflow` en heeft daarom de hoogste prioriteit.
Wachtwoord zichtbaarheid schakelen
Het instellen van `app:passwordToggleEnabled` op `true` stelt u in staat het wachtwoord te tonen/verbergen. Gebruik `app:passwordToggleTint` om de pictogramkleur te wijzigen. De onderstaande xml-code is afkomstig van de `activity_main.xml` lay-out en bevat EditText-velden voor een wachtwoord zichtbaarheidsschakelaar (standaardpictogram en met een tint).
<?xml version="1.0" encoding="utf-8"?>
<ScrollView xmlns:android="https://schemas.android.com/apk/res/android"
    xmlns:app="https://schemas.android.com/apk/res-auto"
    xmlns:tools="https://schemas.android.com/tools"
    android:layout_width="match_parent"
    android:layout_height="wrap_content"
    tools:context="com.journaldev.featuresoftextinputlayout.MainActivity">

    <LinearLayout
        android:layout_width="match_parent"
        android:layout_height="wrap_content"
        android:orientation="vertical">

        <android.support.design.widget.TextInputLayout
            android:layout_width="match_parent"
            android:layout_height="wrap_content"
            android:layout_margin="@dimen/activity_horizontal_margin"
            app:counterEnabled="true"
            app:counterMaxLength="5"
            app:counterOverflowTextAppearance="@style/CounterOverFlow"
            app:counterTextAppearance="@style/CounterText"
            app:hintTextAppearance="@style/HintText"
            app:passwordToggleEnabled="true">

            <android.support.design.widget.TextInputEditText
                android:layout_width="match_parent"
                android:layout_height="wrap_content"
                android:hint="Password Visibility Toggle"
                android:inputType="textPassword" />

        </android.support.design.widget.TextInputLayout>


        <android.support.design.widget.TextInputLayout
            android:layout_width="match_parent"
            android:layout_height="wrap_content"
            android:layout_margin="@dimen/activity_horizontal_margin"
            app:counterEnabled="true"
            app:counterMaxLength="5"
            app:counterOverflowTextAppearance="@style/CounterOverFlow"
            app:counterTextAppearance="@style/CounterText"
            app:hintTextAppearance="@style/HintText"
            app:passwordToggleEnabled="true"
            app:passwordToggleTint="@color/my_orange">

            <android.support.design.widget.TextInputEditText
                android:layout_width="match_parent"
                android:layout_height="wrap_content"
                android:hint="Password Visibility Toggle Tint"
                android:inputType="textPassword" />

        </android.support.design.widget.TextInputLayout>
</LinearLayout>
</ScrollView>
De output weergegeven door de bovenstaande code is: 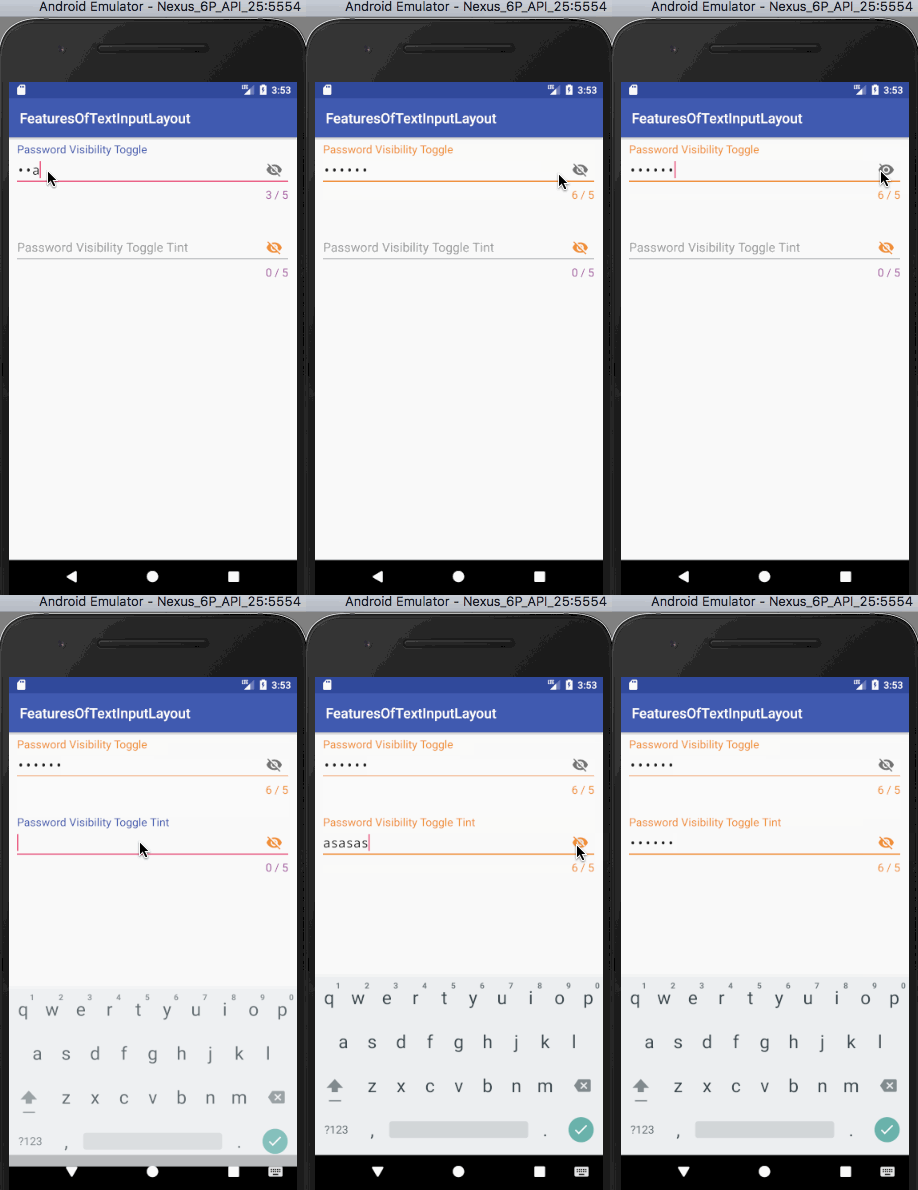 Opmerking: We kunnen onze eigen aangepaste pictogrammen gebruiken voor het wachtwoord zichtbaarheidsschakelaar met behulp van
 app:passwordToggleDrawable. Hiermee komt een einde aan deze tutorial. We hebben alle belangrijke functies behandeld die aanwezig zijn in TextInputLayout. Je kunt het Android TextInputLayout Voorbeeldproject downloaden via de onderstaande link. Het bevat elk van de bovenstaande codefragmenten.
Download Android TextInputLayout Project
Referentie: Android Officiële Documentatie
Source:
https://www.digitalocean.com/community/tutorials/android-textinputlayout-example


