오늘은 @MultipartConfig 주석과 javax.servlet.http.Part를 사용한 Servlet 3 파일 업로드 예제를 살펴보겠습니다. 얼마 전에 Servlet 파일 업로드에 관한 기사를 썼는데, 그 때는 Apache FileUpload API를 사용했지만 여기서는 Servlet 3 파일 업로드 기능을 사용할 것입니다.
Servlet 3 파일 업로드
파일 업로드는 웹 애플리케이션에서 흔한 작업이므로, Servlet Specs 3.0은 서버로 파일을 업로드하는 데 추가적인 지원을 제공하며 이를 위해 제3 자 API에 의존할 필요가 없습니다. 이 튜토리얼에서는 어떻게 Servlet 3.0 API를 사용하여 파일을 서버에 업로드하는지 살펴볼 것입니다.
MultipartConfig
파일 업로드 핸들러 서블릿을 MultipartConfig 주석으로 주석 처리하여 서버로 파일을 업로드하는 데 사용되는 multipart/form-data 요청을 처리해야 합니다. MultipartConfig 주석에는 다음과 같은 속성이 있습니다:
- fileSizeThreshold: 파일이 디스크에 기록되기 전에 크기 임계값을 지정할 수 있습니다. 크기 값은 바이트 단위이므로 1024*1024*10은 10MB입니다.
- 위치: 기본적으로 파일이 저장될 디렉터리입니다. 기본 값은 “”입니다.
- maxFileSize: 파일을 업로드할 수 있는 최대 크기로, 값은 바이트 단위로 제공됩니다. 기본 값은 -1L로 무제한을 의미합니다.
- maxRequestSize: multipart/form-data 요청에 허용된 최대 크기입니다. 기본 값은 -1L로 무제한을 의미합니다.
자세한 내용은 Java Annotations Tutorial에서 어노테이션에 대해 더 읽어보세요.
Part Interface
Part 인터페이스는 multipart/form-data POST 요청에서 받은 부분 또는 폼 항목을 나타냅니다. getInputStream(), write(String fileName)과 같은 중요한 메서드를 사용하여 파일을 읽고 쓸 수 있습니다.
HttpServletRequest 변경사항
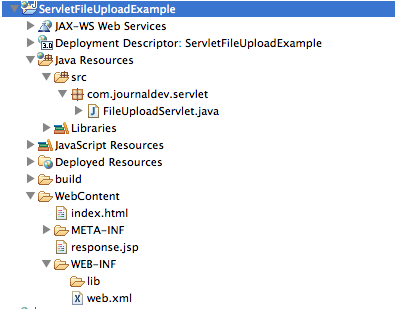
새로운 메소드가 HttpServletRequest에 추가되어 multipart/form-data 요청에서 모든 부분을 가져올 수 있습니다. getParts() 메소드를 통해. 특정 부분을 가져오려면 getPart(String partName) 메소드를 사용할 수 있습니다. 위의 API 메소드를 사용하여 서블릿을 통해 파일을 업로드하는 간단한 프로젝트를 살펴보겠습니다. 우리의 프로젝트 구조는 아래 이미지와 같습니다. 
HTML Form
파일을 업로드하고 서버에 업로드된 파일을 가져오기 위해 서버에 요청을 제출할 수 있는 간단한 HTML 페이지가 있습니다. index.html
<html>
<head></head>
<body>
<form action="FileUploadServlet" method="post" enctype="multipart/form-data">
Select File to Upload:<input type="file" name="fileName">
<br>
<input type="submit" value="Upload">
</form>
</body>
</html>
File Upload Servlet
다음은 파일 업로드 서블릿 구현입니다. FileUploadServlet.java
package com.journaldev.servlet;

import java.io.File;
import java.io.IOException;

import javax.servlet.ServletException;
import javax.servlet.annotation.MultipartConfig;
import javax.servlet.annotation.WebServlet;
import javax.servlet.http.HttpServlet;
import javax.servlet.http.HttpServletRequest;
import javax.servlet.http.HttpServletResponse;
import javax.servlet.http.Part;

@WebServlet("/FileUploadServlet")
@MultipartConfig(fileSizeThreshold=1024*1024*10, 	// 10 MB
                 maxFileSize=1024*1024*50,      	// 50 MB
                 maxRequestSize=1024*1024*100)   	// 100 MB
public class FileUploadServlet extends HttpServlet {

    private static final long serialVersionUID = 205242440643911308L;

    /**
     * Directory where uploaded files will be saved, its relative to
     * the web application directory.
     */
    private static final String UPLOAD_DIR = "uploads";

    protected void doPost(HttpServletRequest request,
            HttpServletResponse response) throws ServletException, IOException {
        // 웹 애플리케이션의 절대 경로를 가져옴
        String applicationPath = request.getServletContext().getRealPath("");
        // 업로드된 파일을 저장할 디렉토리의 경로를 구성함
        String uploadFilePath = applicationPath + File.separator + UPLOAD_DIR;

        // 디렉토리가 존재하지 않으면 저장 디렉토리를 생성함
        File fileSaveDir = new File(uploadFilePath);
        if (!fileSaveDir.exists()) {
            fileSaveDir.mkdirs();
        }
        System.out.println("Upload File Directory="+fileSaveDir.getAbsolutePath());

        String fileName = null;
        // 요청에서 모든 부분을 가져와 서버에 파일로 작성함
        for (Part part : request.getParts()) {
            fileName = getFileName(part);
            part.write(uploadFilePath + File.separator + fileName);
        }

        request.setAttribute("message", fileName + " File uploaded successfully!");
        getServletContext().getRequestDispatcher("/response.jsp").forward(
                request, response);
    }

    /**
     * Utility method to get file name from HTTP header content-disposition
     */
    private String getFileName(Part part) {
        String contentDisp = part.getHeader("content-disposition");
        System.out.println("content-disposition header= "+contentDisp);
        String[] tokens = contentDisp.split(";");
        for (String token : tokens) {
            if (token.trim().startsWith("filename")) {
                return token.substring(token.indexOf("=") + 2, token.length()-1);
            }
        }
        return "";
    }
}
주의: @MultipartConfig 주석을 사용하여 업로드 파일에 대한 다른 크기 매개변수를 지정합니다. 클라이언트가 보낸 파일 이름을 가져 오려면 요청 헤더 “content-disposition” 속성을 사용해야하며 동일한 이름으로 파일을 저장합니다. 디렉토리 위치는 파일을 저장하는 웹 애플리케이션에 상대적이며 Apache Commons FileUpload 예제와 같은 다른 위치로 구성할 수 있습니다.
응답 JSP
A simple JSP page that will be sent as response to client once the file is uploaded successfully to server. response.jsp
<%@ page language="java" contentType="text/html; charset=ISO-8859-1"
    pageEncoding="ISO-8859-1"%>
<!DOCTYPE html PUBLIC "-//W3C//DTD HTML 4.01 Transitional//EN"
    "https://www.w3.org/TR/html4/loose.dtd">
<html>
<head>
<title>Upload File Response</title>
</head>
<body>
	<%-- Using JSP EL to get message attribute value from request scope --%>
    <h2>${requestScope.message}</h2>
</body>
</html>
배포 설명자
서블릿 파일 업로드에 대한 web.xml 파일에는 새로운 내용이 없으며 index.html을 환영 파일로 사용합니다. web.xml
<?xml version="1.0" encoding="UTF-8"?>
<web-app xmlns:xsi="https://www.w3.org/2001/XMLSchema-instance" xmlns="https://java.sun.com/xml/ns/javaee" xsi:schemaLocation="https://java.sun.com/xml/ns/javaee https://java.sun.com/xml/ns/javaee/web-app_3_0.xsd" version="3.0">
  <display-name>ServletFileUploadExample</display-name>
  <welcome-file-list>
    <welcome-file>index.html</welcome-file>
  </welcome-file-list>
</web-app>
이제 응용 프로그램을 실행하면 다음 페이지가 응답으로 표시됩니다. 
 로그에는 파일이 저장된 디렉토리 위치와 content-disposition 헤더 정보가 표시됩니다.
Upload File Directory=/Users/pankaj/Documents/workspace/j2ee/.metadata/.plugins/org.eclipse.wst.server.core/tmp0/wtpwebapps/ServletFileUploadExample/uploads
content-disposition header= form-data; name="fileName"; filename="IMG_2046.jpg"
I am running Tomcat through Eclipse, that’s why file location is like this. If you run tomcat through command line and deploy application by exporting as WAR file into webapps directory, you will get different structure but a clear one.
Source:
https://www.digitalocean.com/community/tutorials/servlet-3-file-upload-multipartconfig-part


