이것은 Struts 2 자습서 시리즈의 두 번째 기사입니다. 여기에 직접 왔다면, 이전 게시물도 확인하는 것을 추천합니다. Struts 2 초보자 튜토리얼 지난 튜토리얼에서는 Struts 2 아키텍처를 살펴보고, 그 구성 요소를 살펴보고 XML 기반 구성 (struts.xml)을 사용하여 간단한 Struts 2 웹 애플리케이션을 빌드했습니다. 이 튜토리얼에서는 어노테이션 또는 네이밍 컨벤션을 사용하여 struts 구성 파일을 완전히 피하는 방법을 살펴볼 것입니다.
Struts 2 컨벤션 개념
Struts 2는 액션 클래스와 결과 클래스를 찾기 위해 두 가지 방법론을 사용합니다. 이러한 방법 중 하나를 사용하려면 struts2-convention-plugin API를 사용해야합니다. 일반적인 웹 애플리케이션을 사용하는 경우 해당 jar 파일을 다운로드하여 웹 애플리케이션 lib 디렉토리에 넣을 수 있습니다. 메이븐 프로젝트의 경우 아래와 같이 의존성을 추가하기만 하면 됩니다.
<dependency>
	<groupId>org.apache.struts</groupId>
	<artifactId>struts2-convention-plugin</artifactId>
	<version>2.3.15.1</version>
</dependency>
-
스캔: 이 방법에서는 액션 클래스를 스캔해야 할 패키지를 지정합니다. Struts 2 필터의 웹.xml에서 다음과 같이 구성해야 합니다.
<filter>
	<filter-name>struts2</filter-name>
	<filter-class>org.apache.struts2.dispatcher.ng.filter.StrutsPrepareAndExecuteFilter</filter-class>
	<init-param>
		<param-name>actionPackages</param-name>
		<param-value>com.journaldev.struts2.actions</param-value>
	</init-param>
</filter>
Struts 2는 다음과 같은 방법으로 액션 클래스를 찾습니다.
-
명명 규칙: Struts 2는 자동으로 Action으로 끝나는 클래스에 대한 액션을 생성합니다. 액션 이름은 Action 접미사를 제거하고 첫 글자를 소문자로 변환하여 결정됩니다. 따라서 클래스 이름이 HomeAction인 경우 액션은 “home”이 됩니다. 이러한 클래스가 @Result로 주석 처리되지 않으면 결과 페이지는 WEB-INF/content 디렉토리에서 찾아야 하며 이름은 {액션}-{리턴_문자열}.jsp 여야 합니다. 따라서 HomeAction 액션 클래스가 “success”를 반환하는 경우 요청은 WEB-INF/content/home-success.jsp 페이지로 전달됩니다. 명명 규칙만 사용하면 매우 혼란스러울 수 있으며 다른 액션 클래스에 동일한 JSP 페이지를 사용할 수 없습니다. 따라서 이를 피하고 주석 기반 구성을 사용해야 합니다.
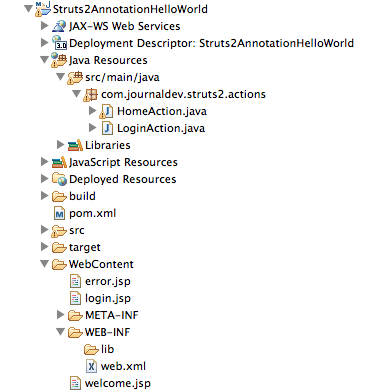
이제 주석을 사용하여 Hello World Struts 2 애플리케이션을 만들 준비가 되었습니다. Struts2AnnotationHelloWorld라는 Eclipse 동적 웹 프로젝트를 만들고 Maven 프로젝트로 변환합니다. 최종 프로젝트는 아래 이미지와 같습니다. 
Maven 구성
우리는 pom.xml에 struts2-core 및 struts2-convention-plugin 종속성을 추가했습니다. 최종 pom.xml 코드는 다음과 같습니다:
<project xmlns="https://maven.apache.org/POM/4.0.0" xmlns:xsi="https://www.w3.org/2001/XMLSchema-instance"
	xsi:schemaLocation="https://maven.apache.org/POM/4.0.0 https://maven.apache.org/xsd/maven-4.0.0.xsd">
	<modelVersion>4.0.0</modelVersion>
	<groupId>Struts2AnnotationHelloWorld</groupId>
	<artifactId>Struts2AnnotationHelloWorld</artifactId>
	<version>0.0.1-SNAPSHOT</version>
	<packaging>war</packaging>

	<dependencies>
		<dependency>
			<groupId>org.apache.struts</groupId>
			<artifactId>struts2-core</artifactId>
			<version>2.3.15.1</version>
		</dependency>
		<dependency>
			<groupId>org.apache.struts</groupId>
			<artifactId>struts2-convention-plugin</artifactId>
			<version>2.3.15.1</version>
		</dependency>
	</dependencies>

	<build>
		<plugins>
			<plugin>
				<artifactId>maven-compiler-plugin</artifactId>
				<version>3.1</version>
				<configuration>
					<source>1.6</source>
					<target>1.6</target>
				</configuration>
			</plugin>
			<plugin>
				<artifactId>maven-war-plugin</artifactId>
				<version>2.3</version>
				<configuration>
					<warSourceDirectory>WebContent</warSourceDirectory>
					<failOnMissingWebXml>false</failOnMissingWebXml>
				</configuration>
			</plugin>
		</plugins>
		<finalName>${project.artifactId}</finalName>
	</build>
</project>
배포 설명자 구성
<?xml version="1.0" encoding="UTF-8"?>
<web-app xmlns:xsi="https://www.w3.org/2001/XMLSchema-instance"
	xmlns="https://java.sun.com/xml/ns/javaee"
	xsi:schemaLocation="https://java.sun.com/xml/ns/javaee https://java.sun.com/xml/ns/javaee/web-app_3_0.xsd"
	id="WebApp_ID" version="3.0">
	<display-name>Struts2AnnotationHelloWorld</display-name>

	<filter>
		<filter-name>struts2</filter-name>
		<filter-class>org.apache.struts2.dispatcher.ng.filter.StrutsPrepareAndExecuteFilter</filter-class>
		<init-param>
			<param-name>actionPackages</param-name>
			<param-value>com.journaldev.struts2.actions</param-value>
		</init-param>
	</filter>

	<filter-mapping>
		<filter-name>struts2</filter-name>
		<url-pattern>/*</url-pattern>
	</filter-mapping>

</web-app>
init-param 요소에 주목하십시오. 여기에서는 스트럿츠 2에서 스캔할 작업 클래스 패키지를 제공합니다.
결과 페이지
우리의 애플리케이션에는 세 개의 결과 페이지가 있습니다. login.jsp
<%@ page language="java" contentType="text/html; charset=US-ASCII"
    pageEncoding="US-ASCII"%>
<!DOCTYPE html PUBLIC "-//W3C//DTD HTML 4.01 Transitional//EN" "https://www.w3.org/TR/html4/loose.dtd">
<%-- Using Struts2 Tags in JSP --%>
<%@ taglib uri="/struts-tags" prefix="s"%>
<html>
<head>
<meta http-equiv="Content-Type" content="text/html; charset=US-ASCII">
<title>Login Page</title>
</head>
<body>
<h3>Welcome User, please login below</h3>
<s:form action="login">
	<s:textfield name="name" label="User Name"></s:textfield>
	<s:textfield name="pwd" label="Password" type="password"></s:textfield>
	<s:submit value="Login"></s:submit>
</s:form>
</body>
</html>
error.jsp
<%@ page language="java" contentType="text/html; charset=US-ASCII"
    pageEncoding="US-ASCII"%>
<%@ taglib uri="/struts-tags" prefix="s"%>

<!DOCTYPE html PUBLIC "-//W3C//DTD HTML 4.01 Transitional//EN" "https://www.w3.org/TR/html4/loose.dtd">
<html>
<head>
<meta http-equiv="Content-Type" content="text/html; charset=US-ASCII">
<title>Error Page</title>
</head>
<body>
<h4>User Name or Password is wrong</h4>
<s:include value="login.jsp"></s:include>
</body>
</html>
welcome.jsp
<%@ page language="java" contentType="text/html; charset=US-ASCII"
    pageEncoding="US-ASCII"%>
<%@ taglib uri="/struts-tags" prefix="s"%>
<!DOCTYPE html PUBLIC "-//W3C//DTD HTML 4.01 Transitional//EN" "https://www.w3.org/TR/html4/loose.dtd">
<html>
<head>
<meta http-equiv="Content-Type" content="text/html; charset=US-ASCII">
<title>Welcome Page</title>
</head>
<body>
<h3>Welcome <s:property value="name"></s:property></h3>
</body>
</html>
이제 액션 및 결과 페이지를 구성하기 위해 어노테이션을 지정할 액션 클래스를 만들어 봅시다.
어노테이션을 사용한 액션 클래스
package com.journaldev.struts2.actions;

import org.apache.struts2.convention.annotation.Action;
import org.apache.struts2.convention.annotation.Actions;
import org.apache.struts2.convention.annotation.Namespace;
import org.apache.struts2.convention.annotation.Namespaces;
import org.apache.struts2.convention.annotation.Result;

import com.opensymphony.xwork2.ActionSupport;

/**
 * An empty class for default Action implementation for:
 *
 *  <action name="home">
 *		<result>/login.jsp</result>
 *	</action>
 * HomeAction class will be automatically mapped for home.action
 * Default page is login.jsp which will be served to client
 * @author pankaj
 *
 */

@Namespaces(value={@Namespace("/User"),@Namespace("/")})
@Result(location="/login.jsp")
@Actions(value={@Action(""),@Action("home")})
public class HomeAction extends ActionSupport {
}
HomeAction이 로그인.jsp 페이지로 요청을 전달하기 위한 목적으로만 있는 빈 클래스임을 주목하세요.
package com.journaldev.struts2.actions;

import org.apache.struts2.convention.annotation.Action;
import org.apache.struts2.convention.annotation.Namespace;
import org.apache.struts2.convention.annotation.Namespaces;
import org.apache.struts2.convention.annotation.Result;

/**
 * Notice the @Action annotation where action and result pages are declared
 * Also notice that we don't need to implement Action interface or extend ActionSupport
 * class, only we need is an execute() method with same signature
 * @author pankaj
 *
 */
@Action(value = "login", results = {
		@Result(name = "SUCCESS", location = "/welcome.jsp"),
		@Result(name = "ERROR", location = "/error.jsp") })
@Namespaces(value={@Namespace("/User"),@Namespace("/")})
public class LoginAction {

	public String execute() throws Exception {
		if("pankaj".equals(getName()) && "admin".equals(getPwd()))
		return "SUCCESS";
		else return "ERROR";
	}

	//양식 매개변수를 보유하는 자바 빈
	private String name;
	private String pwd;
	public String getName() {
		return name;
	}
	public void setName(String name) {
		this.name = name;
	}
	public String getPwd() {
		return pwd;
	}
	public void setPwd(String pwd) {
		this.pwd = pwd;
	}
}
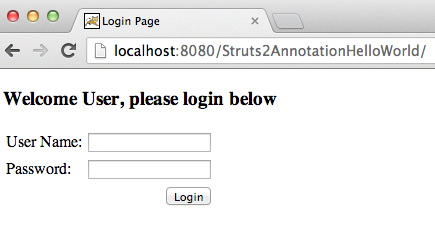
알림: @Action, @Actions, @Result, @Namespace, 그리고 @Namespaces 주석의 사용은 자명합니다. 이제 우리 애플리케이션을 실행하면 다음과 같은 응답 페이지가 표시됩니다. 

 지난 게시물을 읽은 적이 있다면 struts.xml 구성으로 동일한 애플리케이션을 개발한 내용을 알 수 있습니다. 거의 동일한 것을 알 수 있습니다. 변경된 것은 애플리케이션 액션 클래스와 결과 페이지를 연결하는 방법 뿐입니다.


