환영합니다. Spring Restful 웹 서비스 XML 및 JSON 예제로 이동했습니다. 얼마 전에 나는 Spring REST JSON에 관한 기사를 썼고, 많은 댓글에서 프로그램을 XML을 지원하도록 어떻게 변경할지에 대한 질문을 받았습니다. 또한 응용 프로그램이 XML 및 JSON을 모두 지원하도록 하는 방법에 대한 이메일도 몇 통 받았습니다.
Spring REST XML 및 JSON
I thought to write an article about Spring REST XML and JSON application where I will show you how easily we can extend the existing application to support XML. Since I will be making changes to the existing project, make sure you first download it from below link.
Spring Restful Webservice 프로젝트 다운로드
이제 spring 빈 구성 파일에 다음과 같은 변경을 수행하십시오.
-
Jaxb2RootElementHttpMessageConverter유형의 빈을 정의하십시오.<beans:bean id="xmlMessageConverter" class="org.springframework.http.converter.xml.Jaxb2RootElementHttpMessageConverter"> </beans:bean> -
위에서 구성한 빈을
RequestMappingHandlerAdapter속성messageConverters에 추가하십시오.<beans:bean class="org.springframework.web.servlet.mvc.method.annotation.RequestMappingHandlerAdapter"> <beans:property name="messageConverters"> <beans:list> <beans:ref bean="jsonMessageConverter"/> <beans:ref bean="xmlMessageConverter"/> </beans:list> </beans:property> </beans:bean>
위의 변경 후, 최종 spring 빈 구성 파일은 다음과 같이 보일 것입니다. servlet-context.xml
<?xml version="1.0" encoding="UTF-8"?>
<beans:beans xmlns="https://www.springframework.org/schema/mvc"
xmlns:xsi="https://www.w3.org/2001/XMLSchema-instance"
xmlns:beans="https://www.springframework.org/schema/beans"
xmlns:context="https://www.springframework.org/schema/context"
xsi:schemaLocation="https://www.springframework.org/schema/mvc https://www.springframework.org/schema/mvc/spring-mvc.xsd
https://www.springframework.org/schema/beans https://www.springframework.org/schema/beans/spring-beans.xsd
https://www.springframework.org/schema/context https://www.springframework.org/schema/context/spring-context.xsd">
<!-- DispatcherServlet Context: defines this servlet's request-processing infrastructure -->
<!-- Enables the Spring MVC @Controller programming model -->
<annotation-driven />
<!-- Handles HTTP GET requests for /resources/** by efficiently serving up static resources in the ${webappRoot}/resources directory -->
<resources mapping="/resources/**" location="/resources/" />
<!-- Resolves views selected for rendering by @Controllers to .jsp resources in the /WEB-INF/views directory -->
<beans:bean class="org.springframework.web.servlet.view.InternalResourceViewResolver">
<beans:property name="prefix" value="/WEB-INF/views/" />
<beans:property name="suffix" value=".jsp" />
</beans:bean>
<!-- Configure to plugin JSON as request and response in method handler -->
<beans:bean class="org.springframework.web.servlet.mvc.method.annotation.RequestMappingHandlerAdapter">
<beans:property name="messageConverters">
<beans:list>
<beans:ref bean="jsonMessageConverter"/>
<beans:ref bean="xmlMessageConverter"/>
</beans:list>
</beans:property>
</beans:bean>
<!-- Configure bean to convert JSON to POJO and vice versa -->
<beans:bean id="jsonMessageConverter" class="org.springframework.http.converter.json.MappingJackson2HttpMessageConverter">
</beans:bean>
<beans:bean id="xmlMessageConverter" class="org.springframework.http.converter.xml.Jaxb2RootElementHttpMessageConverter">
</beans:bean>
<context:component-scan base-package="com.journaldev.spring.controller" />
</beans:beans>
JAXB marshalling을 위해 클래스에서 작업할 때, 해당 클래스에 @XmlRootElement 주석을 추가해야 합니다. 그러므로 이를 Employee 모델 클래스에 추가하십시오. Employee.java
@XmlRootElement
public class Employee implements Serializable{

//코드에 변경 없음
}
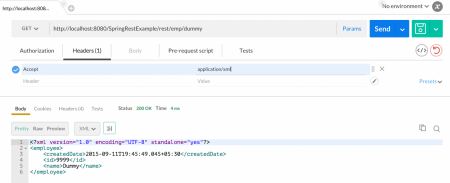
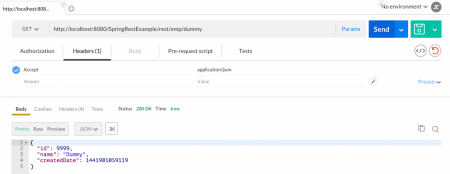
제거했습니다. 봄 어플리케이션은 JSON 및 XML을 모두 지원할 것입니다. 심지어는 JSON 응답 및 그 반대의 XML 요청도 지원할 것입니다. 아래는 이를 시연하는 몇 가지 스크린샷입니다. 참고: 나는 이를 테스트하기 위해 Postman Chrome 어플리케이션을 사용하고 있지만, 여러분은 이를 위해 어떤 REST 클라이언트든 사용할 수 있습니다. 1. XML 응답: “application/xml”으로 Accept 헤더를 전달해야 합니다.  2. JSON 응답: “application/json”으로 Accept 헤더를 전달해야 합니다.
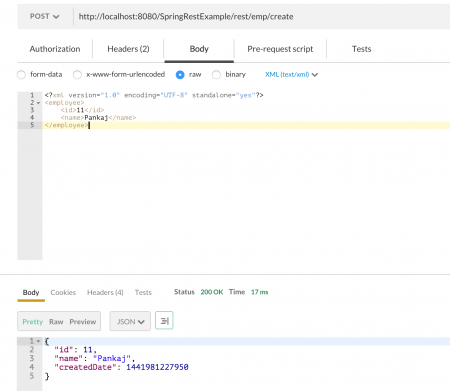
  3. JSON 응답과 함께 XML 요청: 아래 이미지에 표시된대로 Accept 헤더는 “application/json”이어야 하며, Content-Type 헤더는 “text/xml”이어야 합니다.
 봄 RESTful 웹 서비스 예제로 XML과 JSON을 모두 지원하는 것으로 마무리되었습니다. 봄 프레임워크를 확장하는 것이 얼마나 쉬운지 확인할 수 있습니다. 이것이 봄 프레임워크가 인기 있는 주요 이유 중 하나입니다.
Source:
https://www.digitalocean.com/community/tutorials/spring-rest-xml-and-json-example


