


Spring은 가장 널리 사용되는 Java EE 프레임워크 중 하나입니다. 이전에는 Java 기반 웹 애플리케이션을 만드는 데 Spring MVC를 사용하는 방법을 보았습니다. 오늘은 Spring MVC를 사용하여 Spring Restful Web Services를 생성하고 Rest 클라이언트로 테스트하는 방법을 배우겠습니다. 마지막으로, Spring RestTemplate API를 사용하여 Spring Restful 웹 서비스를 호출하는 방법도 살펴볼 것입니다. 
Spring REST
우리는 Spring의 최신 버전 4.0.0.RELEASE를 사용하고 Spring Jackson JSON 통합을 활용하여 rest 호출 응답에서 JSON 응답을 보낼 것입니다. 이 튜토리얼은 Spring STS IDE에서 Spring MVC 스켈레톤 코드를 쉽게 생성한 다음 Restful 아키텍처를 구현하기 위해 확장되었습니다. STS에서 새 Spring MVC 프로젝트를 만들고, 최종 프로젝트는 아래 이미지와 같이 보일 것입니다. 우리는 각 구성 요소를 하나씩 살펴볼 것입니다. 
Spring REST Configuration XML 파일
우리의 pom.xml 파일은 아래와 같습니다.
<?xml version="1.0" encoding="UTF-8"?>
<project xmlns="https://maven.apache.org/POM/4.0.0" xmlns:xsi="https://www.w3.org/2001/XMLSchema-instance"
	xsi:schemaLocation="https://maven.apache.org/POM/4.0.0 https://maven.apache.org/maven-v4_0_0.xsd">
	<modelVersion>4.0.0</modelVersion>
	<groupId>com.journaldev</groupId>
	<artifactId>SpringRestExample</artifactId>
	<name>SpringRestExample</name>
	<packaging>war</packaging>
	<version>1.0.0-BUILD-SNAPSHOT</version>
	<properties>
		<java-version>1.6</java-version>
		<org.springframework-version>4.0.0.RELEASE</org.springframework-version>
		<org.aspectj-version>1.7.4</org.aspectj-version>
		<org.slf4j-version>1.7.5</org.slf4j-version>
		<jackson.databind-version>2.2.3</jackson.databind-version>
	</properties>
	<dependencies>
		<!-- Jackson -->
		<dependency>
			<groupId>com.fasterxml.jackson.core</groupId>
			<artifactId>jackson-databind</artifactId>
			<version>${jackson.databind-version}</version>
		</dependency>
		<!-- Spring -->
		<dependency>
			<groupId>org.springframework</groupId>
			<artifactId>spring-context</artifactId>
			<version>${org.springframework-version}</version>
			<exclusions>
				<!-- Exclude Commons Logging in favor of SLF4j -->
				<exclusion>
					<groupId>commons-logging</groupId>
					<artifactId>commons-logging</artifactId>
				</exclusion>
			</exclusions>
		</dependency>
		<dependency>
			<groupId>org.springframework</groupId>
			<artifactId>spring-webmvc</artifactId>
			<version>${org.springframework-version}</version>
		</dependency>

		<!-- AspectJ -->
		<dependency>
			<groupId>org.aspectj</groupId>
			<artifactId>aspectjrt</artifactId>
			<version>${org.aspectj-version}</version>
		</dependency>

		<!-- Logging -->
		<dependency>
			<groupId>org.slf4j</groupId>
			<artifactId>slf4j-api</artifactId>
			<version>${org.slf4j-version}</version>
		</dependency>
		<dependency>
			<groupId>org.slf4j</groupId>
			<artifactId>jcl-over-slf4j</artifactId>
			<version>${org.slf4j-version}</version>
			<scope>runtime</scope>
		</dependency>
		<dependency>
			<groupId>org.slf4j</groupId>
			<artifactId>slf4j-log4j12</artifactId>
			<version>${org.slf4j-version}</version>
			<scope>runtime</scope>
		</dependency>
		<dependency>
			<groupId>log4j</groupId>
			<artifactId>log4j</artifactId>
			<version>1.2.15</version>
			<exclusions>
				<exclusion>
					<groupId>javax.mail</groupId>
					<artifactId>mail</artifactId>
				</exclusion>
				<exclusion>
					<groupId>javax.jms</groupId>
					<artifactId>jms</artifactId>
				</exclusion>
				<exclusion>
					<groupId>com.sun.jdmk</groupId>
					<artifactId>jmxtools</artifactId>
				</exclusion>
				<exclusion>
					<groupId>com.sun.jmx</groupId>
					<artifactId>jmxri</artifactId>
				</exclusion>
			</exclusions>
			<scope>runtime</scope>
		</dependency>

		<!-- @Inject -->
		<dependency>
			<groupId>javax.inject</groupId>
			<artifactId>javax.inject</artifactId>
			<version>1</version>
		</dependency>

		<!-- Servlet -->
		<dependency>
			<groupId>javax.servlet</groupId>
			<artifactId>servlet-api</artifactId>
			<version>2.5</version>
			<scope>provided</scope>
		</dependency>
		<dependency>
			<groupId>javax.servlet.jsp</groupId>
			<artifactId>jsp-api</artifactId>
			<version>2.1</version>
			<scope>provided</scope>
		</dependency>
		<dependency>
			<groupId>javax.servlet</groupId>
			<artifactId>jstl</artifactId>
			<version>1.2</version>
		</dependency>

		<!-- Test -->
		<dependency>
			<groupId>junit</groupId>
			<artifactId>junit</artifactId>
			<version>4.7</version>
			<scope>test</scope>
		</dependency>
	</dependencies>
	<build>
		<plugins>
			<plugin>
				<artifactId>maven-eclipse-plugin</artifactId>
				<version>2.9</version>
				<configuration>
					<additionalProjectnatures>
						<projectnature>org.springframework.ide.eclipse.core.springnature</projectnature>
					</additionalProjectnatures>
					<additionalBuildcommands>
						<buildcommand>org.springframework.ide.eclipse.core.springbuilder</buildcommand>
					</additionalBuildcommands>
					<downloadSources>true</downloadSources>
					<downloadJavadocs>true</downloadJavadocs>
				</configuration>
			</plugin>
			<plugin>
				<groupId>org.apache.maven.plugins</groupId>
				<artifactId>maven-compiler-plugin</artifactId>
				<version>2.5.1</version>
				<configuration>
					<source>1.6</source>
					<target>1.6</target>
					<compilerArgument>-Xlint:all</compilerArgument>
					<showWarnings>true</showWarnings>
					<showDeprecation>true</showDeprecation>
				</configuration>
			</plugin>
			<plugin>
				<groupId>org.codehaus.mojo</groupId>
				<artifactId>exec-maven-plugin</artifactId>
				<version>1.2.1</version>
				<configuration>
					<mainClass>org.test.int1.Main</mainClass>
				</configuration>
			</plugin>
		</plugins>

	</build>
</project>
STS 도구가 pom.xml 파일을 자동으로 생성해줍니다. 그러나 오늘 기준으로 Spring 프레임워크, AspectJ, SLF4J 및 Jackson 버전을 최신 버전으로 업데이트했습니다. 대부분은 일반적이고 자동으로 생성되지만, 중요한 점은 Jackson JSON 라이브러리를 종속성에 추가했다는 것입니다. 이 라이브러리를 사용하여 객체를 JSON으로 변환하고 그 반대로 사용할 것입니다.
<?xml version="1.0" encoding="UTF-8"?>
<web-app version="2.5" xmlns="https://java.sun.com/xml/ns/javaee"
	xmlns:xsi="https://www.w3.org/2001/XMLSchema-instance"
	xsi:schemaLocation="https://java.sun.com/xml/ns/javaee https://java.sun.com/xml/ns/javaee/web-app_2_5.xsd">

	<!-- The definition of the Root Spring Container shared by all Servlets and Filters -->
	<context-param>
		<param-name>contextConfigLocation</param-name>
		<param-value>/WEB-INF/spring/root-context.xml</param-value>
	</context-param>

	<!-- Creates the Spring Container shared by all Servlets and Filters -->
	<listener>
		<listener-class>org.springframework.web.context.ContextLoaderListener</listener-class>
	</listener>

	<!-- Processes application requests -->
	<servlet>
		<servlet-name>appServlet</servlet-name>
		<servlet-class>org.springframework.web.servlet.DispatcherServlet</servlet-class>
		<init-param>
			<param-name>contextConfigLocation</param-name>
			<param-value>/WEB-INF/spring/appServlet/servlet-context.xml</param-value>
		</init-param>
		<load-on-startup>1</load-on-startup>
	</servlet>

	<servlet-mapping>
		<servlet-name>appServlet</servlet-name>
		<url-pattern>/</url-pattern>
	</servlet-mapping>

</web-app>
이 파일은 자동으로 생성되었으며 내용을 변경하지 않았습니다. 그러나 컨텍스트 구성 파일과 위치를 변경하려면 web.xml 파일에서 할 수 있습니다.
<?xml version="1.0" encoding="UTF-8"?>
<beans xmlns="https://www.springframework.org/schema/beans"
	xmlns:xsi="https://www.w3.org/2001/XMLSchema-instance"
	xsi:schemaLocation="https://www.springframework.org/schema/beans https://www.springframework.org/schema/beans/spring-beans.xsd">

	<!-- Root Context: defines shared resources visible to all other web components -->

</beans>
이 파일에는 모든 웹 구성 요소에서 볼 수있는 공유 리소스가 포함되어 있습니다. 우리는 간단한 REST 서비스를 개발할 것이므로 여기서는 아무 것도 변경하지 않았습니다.
<?xml version="1.0" encoding="UTF-8"?>
<beans:beans xmlns="https://www.springframework.org/schema/mvc"
	xmlns:xsi="https://www.w3.org/2001/XMLSchema-instance"
	xmlns:beans="https://www.springframework.org/schema/beans"
	xmlns:context="https://www.springframework.org/schema/context"
	xsi:schemaLocation="https://www.springframework.org/schema/mvc https://www.springframework.org/schema/mvc/spring-mvc.xsd
		https://www.springframework.org/schema/beans https://www.springframework.org/schema/beans/spring-beans.xsd
		https://www.springframework.org/schema/context https://www.springframework.org/schema/context/spring-context.xsd">

	<!-- DispatcherServlet Context: defines this servlet's request-processing infrastructure -->

	<!-- Enables the Spring MVC @Controller programming model -->
	<annotation-driven />

	<!-- Handles HTTP GET requests for /resources/** by efficiently serving up static resources in the ${webappRoot}/resources directory -->
	<resources mapping="/resources/**" location="/resources/" />

	<!-- Resolves views selected for rendering by @Controllers to .jsp resources in the /WEB-INF/views directory -->
	<beans:bean class="org.springframework.web.servlet.view.InternalResourceViewResolver">
		<beans:property name="prefix" value="/WEB-INF/views/" />
		<beans:property name="suffix" value=".jsp" />
	</beans:bean>

	<!-- Configure to plugin JSON as request and response in method handler -->
	<beans:bean class="org.springframework.web.servlet.mvc.method.annotation.RequestMappingHandlerAdapter">
		<beans:property name="messageConverters">
			<beans:list>
				<beans:ref bean="jsonMessageConverter"/>
			</beans:list>
		</beans:property>
	</beans:bean>

	<!-- Configure bean to convert JSON to POJO and vice versa -->
	<beans:bean id="jsonMessageConverter" class="org.springframework.http.converter.json.MappingJackson2HttpMessageConverter">
	</beans:bean>

	<context:component-scan base-package="com.journaldev.spring.controller" />

</beans:beans>
대부분은 자동으로 생성되고 보일러플레이트 구성을 포함합니다. 그러나 주목할 중요한 점은 어노테이션 기반 구성을 지원하기 위한 annotation-driven 요소와 MappingJackson2HttpMessageConverter를 RequestMappingHandlerAdapter messageConverters에 연결하여 Jackson API가 작동하여 JSON을 자바 빈으로 변환하고 그 반대로 변환합니다. 이 구성을 통해 요청 본문에 JSON을 사용하고 응답에서 JSON 데이터를 수신할 것입니다.
스프링 REST 모델 클래스
우리는 Restful 웹 서비스 메소드의 입력 및 출력으로 사용될 간단한 POJO 클래스를 작성해 봅시다.
package com.journaldev.spring.model;

import java.io.Serializable;
import java.util.Date;

import com.fasterxml.jackson.databind.annotation.JsonSerialize;
import com.fasterxml.jackson.databind.ser.std.DateSerializer;

public class Employee implements Serializable{

	private static final long serialVersionUID = -7788619177798333712L;

	private int id;
	private String name;
	private Date createdDate;

	public int getId() {
		return id;
	}
	public void setId(int id) {
		this.id = id;
	}
	public String getName() {
		return name;
	}
	public void setName(String name) {
		this.name = name;
	}

	@JsonSerialize(using=DateSerializer.class)
	public Date getCreatedDate() {
		return createdDate;
	}
	public void setCreatedDate(Date createdDate) {
		this.createdDate = createdDate;
	}


}
주목해야 할 유일한 중요한 점은 Date 형식에서 JSON 형식으로 및 그 반대로의 Date 변환에 @JsonSerialize 어노테이션을 사용하는 것입니다.
Spring Restful 웹 서비스 엔드 포인트
다음과 같은 rest 웹 서비스 엔드 포인트가 있을 것입니다.
| Sl. No | URI | HTTP Method | Details |
|---|---|---|---|
| 1 | /rest/emp/dummy | GET | Health Check service, to insert a dummy data in the Employees data storage |
| 2 | /rest/emp/{id} | GET | To get the Employee object based on the id |
| 3 | /rest/emps | GET | To get the list of all the Employees in the data store |
| 4 | /rest/emp/create | POST | To create the Employee object and store it |
| 5 | /rest/emp/delete/{id} | PUT | To delete the Employee object from the data storage based on the id |
이러한 URI를 문자열 상수로 정의하는 클래스가 있습니다.
package com.journaldev.spring.controller;

public class EmpRestURIConstants {

	public static final String DUMMY_EMP = "/rest/emp/dummy";
	public static final String GET_EMP = "/rest/emp/{id}";
	public static final String GET_ALL_EMP = "/rest/emps";
	public static final String CREATE_EMP = "/rest/emp/create";
	public static final String DELETE_EMP = "/rest/emp/delete/{id}";
}
Spring Restful 웹 서비스 컨트롤러 클래스
우리의 EmployeeController 클래스는 위에서 언급한 모든 웹 서비스 엔드 포인트를 게시할 것입니다. 클래스의 코드를 살펴보고 각 메서드에 대해 자세히 배워 보겠습니다.
package com.journaldev.spring.controller;

import java.util.ArrayList;
import java.util.Date;
import java.util.HashMap;
import java.util.List;
import java.util.Map;
import java.util.Set;

import org.slf4j.Logger;
import org.slf4j.LoggerFactory;
import org.springframework.stereotype.Controller;
import org.springframework.web.bind.annotation.PathVariable;
import org.springframework.web.bind.annotation.RequestBody;
import org.springframework.web.bind.annotation.RequestMapping;
import org.springframework.web.bind.annotation.RequestMethod;
import org.springframework.web.bind.annotation.ResponseBody;

import com.journaldev.spring.model.Employee;

/**
 * Handles requests for the Employee service.
 */
@Controller
public class EmployeeController {

	private static final Logger logger = LoggerFactory.getLogger(EmployeeController.class);

	//이상적으로 데이터베이스를 사용해야 하는 직원을 저장하는 Map
	Map empData = new HashMap();

	@RequestMapping(value = EmpRestURIConstants.DUMMY_EMP, method = RequestMethod.GET)
	public @ResponseBody Employee getDummyEmployee() {
		logger.info("Start getDummyEmployee");
		Employee emp = new Employee();
		emp.setId(9999);
		emp.setName("Dummy");
		emp.setCreatedDate(new Date());
		empData.put(9999, emp);
		return emp;
	}

	@RequestMapping(value = EmpRestURIConstants.GET_EMP, method = RequestMethod.GET)
	public @ResponseBody Employee getEmployee(@PathVariable("id") int empId) {
		logger.info("Start getEmployee. ID="+empId);

		return empData.get(empId);
	}

	@RequestMapping(value = EmpRestURIConstants.GET_ALL_EMP, method = RequestMethod.GET)
	public @ResponseBody List getAllEmployees() {
		logger.info("Start getAllEmployees.");
		List emps = new ArrayList();
		Set empIdKeys = empData.keySet();
		for(Integer i : empIdKeys){
			emps.add(empData.get(i));
		}
		return emps;
	}

	@RequestMapping(value = EmpRestURIConstants.CREATE_EMP, method = RequestMethod.POST)
	public @ResponseBody Employee createEmployee(@RequestBody Employee emp) {
		logger.info("Start createEmployee.");
		emp.setCreatedDate(new Date());
		empData.put(emp.getId(), emp);
		return emp;
	}

	@RequestMapping(value = EmpRestURIConstants.DELETE_EMP, method = RequestMethod.PUT)
	public @ResponseBody Employee deleteEmployee(@PathVariable("id") int empId) {
		logger.info("Start deleteEmployee.");
		Employee emp = empData.get(empId);
		empData.remove(empId);
		return emp;
	}

}
간편함을 위해 모든 직원 데이터를 HashMap empData에 저장하고 있습니다. @RequestMapping 주석은 요청 URI를 핸들러 메서드에 매핑하는 데 사용됩니다. 클라이언트 응용 프로그램이 나머지 메서드를 호출하는 데 사용해야 할 HTTP 메서드를 지정할 수도 있습니다. @ResponseBody 주석은 응답 객체를 응답 본문에 매핑하는 데 사용됩니다. 한 번 핸들러 메서드에서 반환된 응답 객체가 있으면 MappingJackson2HttpMessageConverter가 활성화되어 JSON 응답으로 변환됩니다. @PathVariable 주석은 나머지 URI에서 데이터를 추출하고 메서드 인수에 매핑하는 간단한 방법입니다. @RequestBody 주석은 요청 본문 JSON 데이터를 Employee 객체로 매핑하는 데 사용됩니다. 다시 말하지만, 이 작업은 MappingJackson2HttpMessageConverter 매핑에 의해 수행됩니다. 코드의 나머지 부분은 간단하며 자명합니다. 애플리케이션은 배포 및 테스트를 위해 준비되었습니다. WAR 파일로 내보내고 서블릿 컨테이너 웹 앱 디렉토리에 복사하면 됩니다. STS에서 서버를 구성한 경우 서버에서 실행하여 배포할 수 있습니다. 나는 WizTools RestClient를 사용하여 나머지 호출을 호출하고 있지만 Chrome 확장 프로그램 Postman도 사용할 수 있습니다. 아래 스크린샷은 응용 프로그램에서 노출 된 rest API의 다양한 호출과 그 출력을 보여줍니다. Health Check – 더미 직원 Rest 호출  직원 생성 POST Rest 호출: 요청 Content-Type이 “application/json”으로 설정되어 있는지 확인하십시오. 그렇지 않으면 HTTP 오류 코드 415를 받게 됩니다.
  직원 가져오기 Rest 호출
  직원 삭제 Rest 호출
 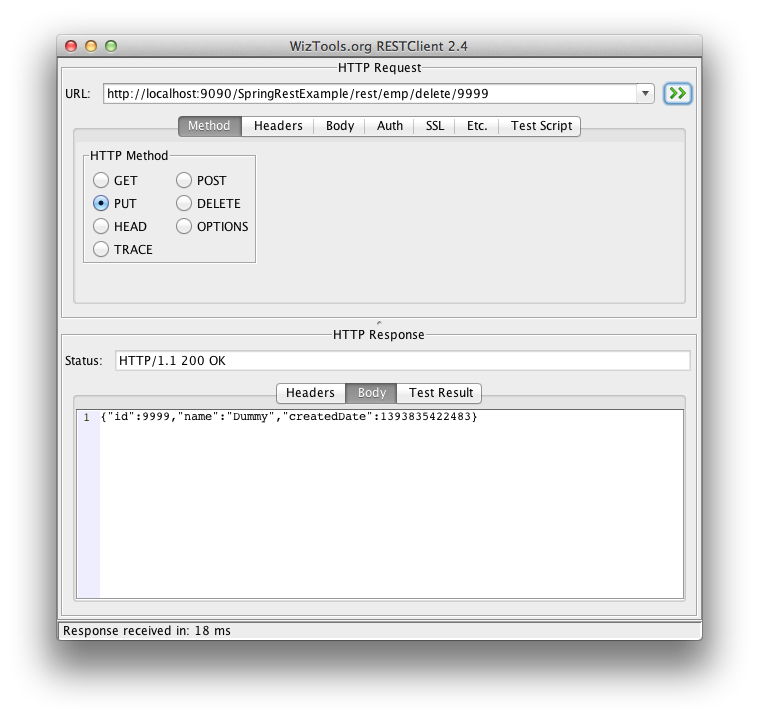 모든 직원 가져오기 Rest 호출
스프링 Rest 클라이언트 프로그램
Rest 클라이언트는 Rest 웹 서비스를 테스트하는 데 유용하지만 대부분의 경우, 프로그램을 통해 Rest 서비스를 호출해야 합니다. 우리는 Spring RestTemplate을 사용하여 이러한 메소드를 쉽게 호출할 수 있습니다. 아래는 RestTemplate API를 사용하여 우리의 애플리케이션 Rest 메소드를 호출하는 간단한 프로그램입니다.
package com.journaldev.spring;

import java.util.LinkedHashMap;
import java.util.List;

import org.springframework.web.client.RestTemplate;

import com.journaldev.spring.controller.EmpRestURIConstants;
import com.journaldev.spring.model.Employee;

public class TestSpringRestExample {

	public static final String SERVER_URI = "https://localhost:9090/SpringRestExample";

	public static void main(String args[]){

		testGetDummyEmployee();
		System.out.println("*****");
		testCreateEmployee();
		System.out.println("*****");
		testGetEmployee();
		System.out.println("*****");
		testGetAllEmployee();
	}

	private static void testGetAllEmployee() {
		RestTemplate restTemplate = new RestTemplate();
		// JSON 컨버터가 목록 안의 객체의 유형을 알지 못하기 때문에 List를 얻을 수 없습니다. 따라서 기본 JSON 객체 유형인 LinkedHashMap으로 변환됩니다.
		//
		List emps = restTemplate.getForObject(SERVER_URI+EmpRestURIConstants.GET_ALL_EMP, List.class);
		System.out.println(emps.size());
		for(LinkedHashMap map : emps){
			System.out.println("ID="+map.get("id")+",Name="+map.get("name")+",CreatedDate="+map.get("createdDate"));;
		}
	}

	private static void testCreateEmployee() {
		RestTemplate restTemplate = new RestTemplate();
		Employee emp = new Employee();
		emp.setId(1);emp.setName("Pankaj Kumar");
		Employee response = restTemplate.postForObject(SERVER_URI+EmpRestURIConstants.CREATE_EMP, emp, Employee.class);
		printEmpData(response);
	}

	private static void testGetEmployee() {
		RestTemplate restTemplate = new RestTemplate();
		Employee emp = restTemplate.getForObject(SERVER_URI+"/rest/emp/1", Employee.class);
		printEmpData(emp);
	}

	private static void testGetDummyEmployee() {
		RestTemplate restTemplate = new RestTemplate();
		Employee emp = restTemplate.getForObject(SERVER_URI+EmpRestURIConstants.DUMMY_EMP, Employee.class);
		printEmpData(emp);
	}

	public static void printEmpData(Employee emp){
		System.out.println("ID="+emp.getId()+",Name="+emp.getName()+",CreatedDate="+emp.getCreatedDate());
	}
}
프로그램 대부분은 이해하기 쉽지만, 컬렉션을 반환하는 rest 메소드를 호출할 때, Employee 객체에 대해 JSON을 객체로 변환하지 못하기 때문에 LinkedHashMap을 사용해야 합니다. LinkedHashMap에서 Java Bean 객체로 변환하는 유틸리티 메소드를 작성할 수 있습니다. 위 프로그램을 실행하면 콘솔에서 다음 출력을 얻을 수 있습니다.
ID=9999,Name=Dummy,CreatedDate=Tue Mar 04 21:02:41 PST 2014
*****
ID=1,Name=Pankaj Kumar,CreatedDate=Tue Mar 04 21:02:41 PST 2014
*****
ID=1,Name=Pankaj Kumar,CreatedDate=Tue Mar 04 21:02:41 PST 2014
*****
2
ID=1,Name=Pankaj Kumar,CreatedDate=1393995761654
ID=9999,Name=Dummy,CreatedDate=1393995761381
또 다른 포인트는 RestTemplate의 put 메소드에는 응답 객체를 설정하는 옵션이 없다는 것입니다. PUT 메소드는 서버에 무언가를 저장해야 하므로 간단한 HTTP 200 상태 코드만으로 충분합니다.
Spring Restful Webservice 프로젝트 다운로드
그것이 모두 Spring Restful 웹 애플리케이션 튜토리얼입니다. 위 링크에서 샘플 프로젝트를 다운로드하여 더 많이 배울 수 있습니다. 업데이트: XML을 사용하는 비슷한 예제를 제공하고 XML 및 JSON을 모두 지원하도록 확장했기 때문에 많은 요청이 있었습니다. 이 애플리케이션은 Spring REST XML JSON Example에 확장되었습니다. XML 및 JSON 요청 및 응답을 모두 지원합니다. 스프링 프레임워크의 아름다움과 이를 달성하는 것이 얼마나 쉬운지를 보기 위해 그것을 꼭 살펴보시기 바랍니다.
저희 GitHub 저장소에서 완성된 프로젝트를 다운로드할 수 있습니다.