환영합니다. Spring ORM 예제 튜토리얼에 오신 것을 환영합니다. 오늘은 Hibernate JPA 트랜잭션 관리를 사용한 Spring ORM 예제를 살펴볼 것입니다. 다음 기능을 갖춘 매우 간단한 Spring 독립형 애플리케이션 예제를 보여드리겠습니다.
- 의존성 주입 (@Autowired 어노테이션)
- JPA EntityManager (Hibernate에서 제공)
- 주석이 달린 트랜잭션 메서드 (@Transactional 어노테이션)
Spring ORM 예제
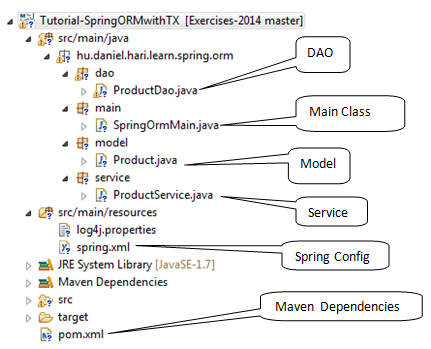
 Spring ORM 예제에는 메모리 내 데이터베이스를 사용했으므로 데이터베이스 설정이 필요하지 않습니다 (그러나 spring.xml 데이터 소스 섹션에서 다른 데이터베이스로 변경할 수 있습니다). 이것은 모든 종속성을 최소화하기 위한 Spring ORM 독립형 애플리케이션입니다 (그러나 spring에 익숙해지면 구성을 통해 웹 프로젝트로 쉽게 변경할 수 있습니다). 참고: @Transactional 주석 없이 Spring AOP 기반 트랜잭션 메서드 해결 방법에 대해서는 이 튜토리얼을 확인하십시오: Spring ORM AOP 트랜잭션 관리. 아래 이미지는 최종 Spring ORM 예제 프로젝트를 보여줍니다.
  이제 Spring ORM 예제 프로젝트 구성 요소를 하나씩 살펴보겠습니다.
Spring ORM Maven 종속성
아래는 Spring ORM 종속성이 있는 최종 pom.xml 파일입니다. 우리는 Spring 4와 Hibernate 4를 사용했습니다.
<project xmlns="https://maven.apache.org/POM/4.0.0" xmlns:xsi="https://www.w3.org/2001/XMLSchema-instance" xsi:schemaLocation="https://maven.apache.org/POM/4.0.0 https://maven.apache.org/xsd/maven-4.0.0.xsd">
	<modelVersion>4.0.0</modelVersion>

	<groupId>hu.daniel.hari.learn.spring</groupId>
	<artifactId>Tutorial-SpringORMwithTX</artifactId>
	<version>0.0.1-SNAPSHOT</version>
	<packaging>jar</packaging>

	<properties>
		<!-- Generic properties -->
		<project.build.sourceEncoding>UTF-8</project.build.sourceEncoding>
		<java.version>1.7</java.version>

		<!-- SPRING & HIBERNATE / JPA -->
		<spring.version>4.0.0.RELEASE</spring.version>
		<hibernate.version>4.1.9.Final</hibernate.version>

	</properties>

	<dependencies>
		<!-- LOG -->
		<dependency>
			<groupId>log4j</groupId>
			<artifactId>log4j</artifactId>
			<version>1.2.17</version>
		</dependency>

		<!-- Spring -->
		<dependency>
			<groupId>org.springframework</groupId>
			<artifactId>spring-context</artifactId>
			<version>${spring.version}</version>
		</dependency>
		<dependency>
			<groupId>org.springframework</groupId>
			<artifactId>spring-orm</artifactId>
			<version>${spring.version}</version>
		</dependency>

		<!-- JPA Vendor -->
		<dependency>
			<groupId>org.hibernate</groupId>
			<artifactId>hibernate-entitymanager</artifactId>
			<version>${hibernate.version}</version>
		</dependency>

		<!-- IN MEMORY Database and JDBC Driver -->
		<dependency>
			<groupId>hsqldb</groupId>
			<artifactId>hsqldb</artifactId>
			<version>1.8.0.7</version>
		</dependency>

	</dependencies>

	<build>
		<plugins>
			<plugin>
				<groupId>org.apache.maven.plugins</groupId>
				<artifactId>maven-compiler-plugin</artifactId>
				<version>3.1</version>
				<configuration>
					<source>${java.version}</source>
					<target>${java.version}</target>
				</configuration>
			</plugin>
		</plugins>
	</build>

</project>
- 우리는
spring-context및spring-orm을 Spring 종속성으로 사용합니다. - 우리는 Hibernate의 JPA 구현으로
hibernate-entitymanager를 사용합니다.hibernate-entitymanager은hibernate-core에 종속되어 있기 때문에 pom.xml에 명시적으로 hibernate-core를 추가할 필요가 없습니다. Maven의 전이 종속성을 통해 프로젝트로 가져옵니다. - 데이터베이스 액세스를 위한 JDBC 드라이버도 종속성으로 필요합니다. 우리는 HSQLDB를 사용하고 있으며 해당 JDBC 드라이버와 작동하는 인메모리 데이터베이스를 포함하고 있습니다.
Spring ORM 모델 클래스
우리는 Hibernate이 JPA 구현을 제공하기 때문에 모델 빈의 매핑에 표준 JPA 주석을 사용할 수 있습니다.
package hu.daniel.hari.learn.spring.orm.model;

import javax.persistence.Entity;
import javax.persistence.Id;

@Entity
public class Product {

	@Id
	private Integer id;
	private String name;

	public Product() {
	}

	public Product(Integer id, String name) {
		this.id = id;
		this.name = name;
	}
	public Integer getId() {
		return id;
	}
	public void setId(Integer id) {
		this.id = id;
	}
	public String getName() {
		return name;
	}
	public void setName(String name) {
		this.name = name;
	}

	@Override
	public String toString() {
		return "Product [id=" + id + ", name=" + name + "]";
	}

}
@Entity 및 @Id JPA 주석을 사용하여 POJO를 엔터티로 표시하고 기본 키를 정의합니다.
Spring ORM DAO 클래스
우리는 persist 및 findALL 메서드를 제공하는 매우 간단한 DAO 클래스를 만듭니다.
package hu.daniel.hari.learn.spring.orm.dao;

import hu.daniel.hari.learn.spring.orm.model.Product;

import java.util.List;

import javax.persistence.EntityManager;
import javax.persistence.PersistenceContext;

import org.springframework.stereotype.Component;

@Component
public class ProductDao {

	@PersistenceContext
	private EntityManager em;

	public void persist(Product product) {
		em.persist(product);
	}

	public List<Product> findAll() {
		return em.createQuery("SELECT p FROM Product p").getResultList();
	}

}
- @Component는 Spring 주석으로, 이 클래스를 Spring IoC (의존성 주입)을 통해 사용할 수 있다고 Spring 컨테이너에 알려줍니다.
- 우리는 JPA
@PersistenceContext주석을 사용하여 EntityManager에 대한 종속성 주입을 나타냅니다. Spring은 spring.xml 구성에 따라 EntityManager의 적절한 인스턴스를 주입합니다.
Spring ORM 서비스 클래스
우리 간단한 서비스 클래스에는 2개의 쓰기 메서드와 1개의 읽기 메서드가 있습니다 – add, addAll 및 listAll입니다.
package hu.daniel.hari.learn.spring.orm.service;

import hu.daniel.hari.learn.spring.orm.dao.ProductDao;
import hu.daniel.hari.learn.spring.orm.model.Product;

import java.util.Collection;
import java.util.List;

import org.springframework.beans.factory.annotation.Autowired;
import org.springframework.stereotype.Component;
import org.springframework.transaction.annotation.Transactional;

@Component
public class ProductService {

	@Autowired
	private ProductDao productDao;

	@Transactional
	public void add(Product product) {
		productDao.persist(product);
	}

	@Transactional
	public void addAll(Collection<Product> products) {
		for (Product product : products) {
			productDao.persist(product);
		}
	}

	@Transactional(readOnly = true)
	public List<Product> listAll() {
		return productDao.findAll();

	}

}
- 우리는 서비스 클래스에서 ProductDao를 주입하기 위해 Spring @Autowired 주석을 사용합니다.
- 트랜잭션 관리를 사용하고 싶으므로 메서드에는
@TransactionalSpring 주석이 달려 있습니다. listAll 메서드는 데이터베이스를 읽기만 하므로 최적화를 위해 읽기 전용으로 @Transactional 주석을 설정합니다.
Spring ORM 예제 빈 구성 XML
우리의 Spring ORM 예제 프로젝트 Java 클래스가 준비되었습니다. 이제 우리의 Spring 빈 구성 파일을 살펴보겠습니다. spring.xml
<?xml version="1.0" encoding="UTF-8"?>
<beans xmlns="https://www.springframework.org/schema/beans"
	xmlns:p="https://www.springframework.org/schema/p"
	xmlns:context="https://www.springframework.org/schema/context"
	xmlns:tx="https://www.springframework.org/schema/tx"
	xmlns:xsi="https://www.w3.org/2001/XMLSchema-instance"
	xsi:schemaLocation="
		https://www.springframework.org/schema/beans
		https://www.springframework.org/schema/beans/spring-beans-3.0.xsd
		https://www.springframework.org/schema/context
		https://www.springframework.org/schema/context/spring-context-3.0.xsd
		https://www.springframework.org/schema/tx
		https://www.springframework.org/schema/tx/spring-tx.xsd
		">

	<!-- Scans the classpath for annotated components that will be auto-registered as Spring beans -->
	<context:component-scan base-package="hu.daniel.hari.learn.spring" />
	<!-- Activates various annotations to be detected in bean classes e.g: @Autowired -->
	<context:annotation-config />

	<bean id="dataSource" class="org.springframework.jdbc.datasource.DriverManagerDataSource">
		<property name="driverClassName" value="org.hsqldb.jdbcDriver" />
		<property name="url" value="jdbc:hsqldb:mem://productDb" />
		<property name="username" value="sa" />
		<property name="password" value="" />
	</bean>

	<bean id="entityManagerFactory"
			class="org.springframework.orm.jpa.LocalContainerEntityManagerFactoryBean"
			p:packagesToScan="hu.daniel.hari.learn.spring.orm.model"
            p:dataSource-ref="dataSource"
			>
		<property name="jpaVendorAdapter">
			<bean class="org.springframework.orm.jpa.vendor.HibernateJpaVendorAdapter">
				<property name="generateDdl" value="true" />
				<property name="showSql" value="true" />
			</bean>
		</property>
	</bean>

	<!-- Transactions -->
	<bean id="transactionManager" class="org.springframework.orm.jpa.JpaTransactionManager">
		<property name="entityManagerFactory" ref="entityManagerFactory" />
	</bean>
	<!-- enable the configuration of transactional behavior based on annotations -->
	<tx:annotation-driven transaction-manager="transactionManager" />

</beans>
- 먼저, 우리는 Spring 컴포넌트 (서비스, DAO)를 하나씩 spring xml에 정의하는 대신 클래스패스 스캐닝을 사용하고 싶다고 Spring에게 알립니다. 또한 Spring 주석 감지를 활성화했습니다.
- 추가된 데이터 소스는 현재 HSQLDB 인메모리 데이터베이스입니다.
- 우리는 애플리케이션이 EntityManager를 얻기 위해 사용할 JPA
EntityManagerFactory를 설정했습니다. Spring은 이를 수행하는 데 세 가지 다른 방법을 지원하며, 우리는 전체 JPA 기능을 갖춘LocalContainerEntityManagerFactoryBean을 사용했습니다. 우리는 다음과 같이LocalContainerEntityManagerFactoryBean의 속성을 설정했습니다:- model 클래스 패키지를 가리키는 packagesToScan 속성.
- 이전에 스프링 구성 파일에서 정의된 데이터 소스.
- Hibernate로 지정된 jpaVendorAdapter 및 일부 Hibernate 속성 설정.
- 우리는 JpaTransactionManager로 Spring PlatformTransactionManager 인스턴스를 생성합니다. 이 트랜잭션 매니저는 트랜잭션 데이터 액세스에 단일 JPA EntityManagerFactory를 사용하는 응용 프로그램에 적합합니다.
- 우리는 주석을 기반으로 한 트랜잭션 동작의 구성을 활성화하고 만든 transactionManager를 설정합니다.
Spring ORM Hibernate JPA 예제 테스트 프로그램
우리의 Spring ORM JPA Hibernate 예제 프로젝트가 준비되었으므로 애플리케이션을 테스트하는 테스트 프로그램을 작성해 봅시다.
public class SpringOrmMain {

	public static void main(String[] args) {

		//Spring 애플리케이션 컨텍스트 생성
		ClassPathXmlApplicationContext ctx = new ClassPathXmlApplicationContext("classpath:/spring.xml");

		//컨텍스트에서 서비스 가져오기. (서비스의 종속성 (ProductDAO)이 ProductService에 자동 연결됨)
		ProductService productService = ctx.getBean(ProductService.class);

		//일부 데이터 작업 수행

		productService.add(new Product(1, "Bulb"));
		productService.add(new Product(2, "Dijone mustard"));

		System.out.println("listAll: " + productService.listAll());

		//트랜잭션 롤백 테스트 (중복 키)

		try {
			productService.addAll(Arrays.asList(new Product(3, "Book"), new Product(4, "Soap"), new Product(1, "Computer")));
		} catch (DataAccessException dataAccessException) {
		}

		//롤백 후 요소 목록 테스트
		System.out.println("listAll: " + productService.listAll());

		ctx.close();

	}
}
Spring 컨테이너를 메인 메서드에서 쉽게 시작할 수 있는 방법을 볼 수 있습니다. 첫 번째 종속성이 주입된 진입점인 서비스 클래스 인스턴스를 가져오고 있습니다. ProductDao 클래스 참조가 Spring 컨텍스트가 초기화된 후 ProductService 클래스에 주입됩니다. ProductService 인스턴스를 얻은 후에는 해당 메서드를 테스트할 수 있으며, Spring의 프록시 메커니즘으로 인해 모든 메서드 호출이 트랜잭션으로 처리됩니다. 또한 이 예제에서 롤백도 테스트합니다. 위의 spring ORM 예제 테스트 프로그램을 실행하면 아래 로그가 표시됩니다.
Hibernate: insert into Product (name, id) values (?, ?)
Hibernate: insert into Product (name, id) values (?, ?)
Hibernate: select product0_.id as id0_, product0_.name as name0_ from Product product0_
listAll: [Product [id=1, name=Bulb], Product [id=2, name=Dijone mustard]]
Hibernate: insert into Product (name, id) values (?, ?)
Hibernate: insert into Product (name, id) values (?, ?)
Hibernate: insert into Product (name, id) values (?, ?)
Hibernate: select product0_.id as id0_, product0_.name as name0_ from Product product0_
listAll: [Product [id=1, name=Bulb], Product [id=2, name=Dijone mustard]]
두 번째 트랜잭션이 롤백되었음에 유의하십시오. 이로 인해 제품 목록이 변경되지 않았습니다. 첨부된 소스의 log4j.properties 파일을 사용하면 내부 동작을 확인할 수 있습니다. 참고 자료: https://docs.spring.io/spring/docs/current/spring-framework-reference/html/orm.html 아래 링크에서 최종 Spring ORM JPA Hibernate 예제 프로젝트를 다운로드하여 더 많이 배울 수 있습니다.
Source:
https://www.digitalocean.com/community/tutorials/spring-orm-example-jpa-hibernate-transaction


