이 Spring MVC 튜토리얼에서는 Spring Tool Suite를 사용하여 Spring MVC 웹 애플리케이션을 개발하는 방법을 배우게 될 것입니다. Spring MVC 프레임워크는 자바 웹 애플리케이션에 널리 사용됩니다.
Spring MVC
 스트럿츠 프레임워크와 마찬가지로 Spring MVC도 Java EE Servlet 및 JSP 기술을 기반으로 하고 있으며 모델–뷰–컨트롤러 디자인 패턴을 구현합니다.
Spring MVC 튜토리얼
우리는 이전에 Spring 의존성 주입이 작동하는 방법을 보았고이 자습서에서는 Spring MVC 프레임워크를 사용하여 간단한 웹 애플리케이션을 만드는 방법을 배우게 될 것입니다. Spring 프로젝트 개발에는 Eclipse 또는 IntelliJ IDE를 사용할 수 있지만 SpringSource는 Spring Tool Suite (STS)를 제공합니다. 이것은 Eclipse 기반의 IDE이며 Apache Tomcat 컨테이너 위에 구축된 VMware vFabric tc Server가 내장되어 있으며 Spring 기반 애플리케이션을 위해 최적화되어 있습니다. 저는 Spring MVC 자습서와 기타 미래의 자습서에서 STS를 사용할 것입니다. 다음과 같은 기능을 제공함으로써 개발자의 생활을 더 쉽게 만들어 줍니다:
- Spring 응용 프로그램의 뼈대를 생성하는 기능 제공 (MVC, Rest, Batch 등), 프로젝트를 처음부터 시작하는 데 좋습니다. 이 스프링 MVC 자습서에서는 얼마나 쉽게 스프링 MVC 프로젝트를 만들 수 있는지 곧 확인하게 될 것입니다.
- Spring 구성 파일을 생성하고 구문 분석하여 유용한 정보를 제공하는 기능을 제공합니다.
- Spring 애플리케이션의 자동 유효성 검사
- 프로젝트 변경을 쉽게 만들기 위한 리팩토링 지원, 변경 사항은 구성 파일에도 반영됩니다.
- 클래스 뿐만 아니라 구성 파일에 대한 코드 지원도 제공되며, 이 기능이 매우 마음에 듭니다. 대부분의 경우 사용할 수 있는 것과 해당 세부 정보를 알아야 합니다.
- Aspect Oriented Programming (AOP)을 위한 최고의 지원을 제공합니다.
모든 기능을 제공하는 STS를 살펴보고 난 후에 이것에 흥미를 느끼고 Spring 애플리케이션에 사용하기로 결정했습니다. 그리고 지금까지 매우 만족하고 있습니다. STS를 STS 공식 다운로드 페이지에서 다운로드하여 설치하십시오. 저는 Eclipse 4.3.1 릴리스를 기반으로 한 STS 3.4.0.RELEASE를 사용하고 있습니다.  STS를 사용하지 않고 기존 Eclipse에서 해당 기능을 사용하려면 Eclipse Marketplace에서 플러그인을 설치해야 합니다. 아래 이미지를 참고하여 올바른 STS 버전을 선택하여 설치하십시오. 아래 플러그인은 Eclipse Kepler에 적합합니다.
 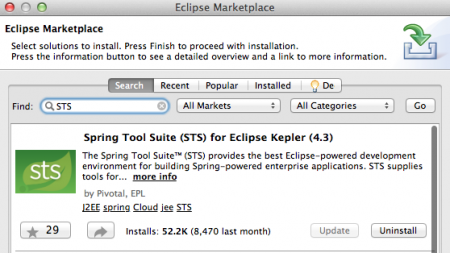 SpringSource 서버를 사용하지 않고도 응용 프로그램을 Tomcat, JBoss 등의 다른 Java EE 컨테이너에 배포할 수 있습니다. 이 자습서에서는 STS와 함께 제공되는 서버를 사용할 것이지만 WAR 파일로 응용 프로그램을 별도의 톰캣 서버에 내보내어 작동 여부를 테스트했습니다. 이제 서버 환경과 IDE가 준비되었으므로 첫 번째 Spring MVC 프로젝트를 만들어 보겠습니다. 아래 단계는 STS 및 STS 플러그인이 있는 Eclipse에도 유효합니다.
STS나 Eclipse에서 Spring MVC 애플리케이션 만들기
단계 1: 메뉴에서 새로운 Spring 프로젝트를 생성합니다.  단계 2: 새 프로젝트 창에서 이름을 “SpringMVCExample”로 지정하고 템플릿을 “Spring MVC 프로젝트”로 선택합니다. 이 템플릿을 처음 사용하는 경우 STS가 SpringSource 웹 사이트에서 다운로드합니다. 원한다면 프로젝트를 작업 세트에 추가할 수 있습니다.
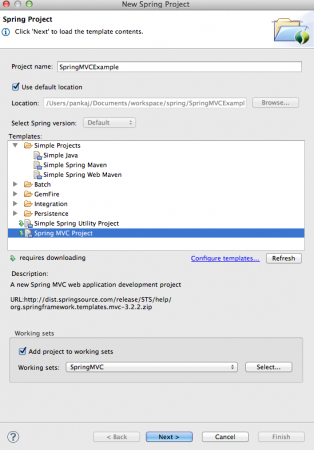
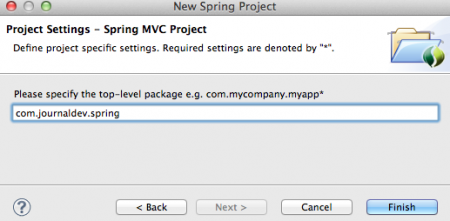
 단계 3: 템플릿이 다운로드되면 다음 화면에서 최상위 패키지 이름을 제공해야 합니다. 이 패키지는 Spring 구성 요소의 기본 패키지로 사용됩니다.
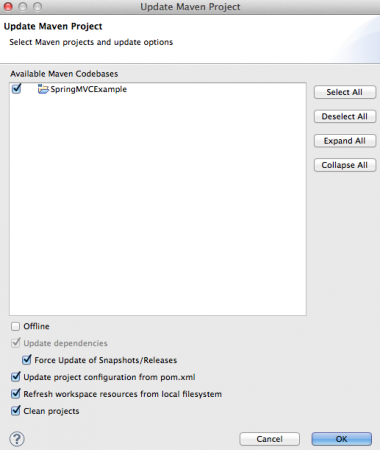
  단계 4: Spring MVC 템플릿에 의해 프로젝트가 생성되면 아래 이미지처럼 보일 것입니다. User.java 클래스, login.jsp 및 user.jsp 파일이 표시되지 않는다면 걱정하지 마십시오. 이것들은 나중에 저에 의해 추가되었습니다. 프로젝트가 컴파일되지 않고 오류가 표시된다면 Maven/Update Project를 실행하세요. “스냅샷/릴리스 강제 업데이트” 옵션을 확인해야 합니다. 아래 이미지를 참조하세요.
  전체 프로젝트는 일반적인 Maven 기반 웹 애플리케이션과 같이 보입니다. 이제 프로젝트의 다른 부분을 분석하고 약간 확장할 시간입니다.
Spring MVC Dependencies
생성된 pom.xml 파일은 아래와 같습니다.
<?xml version="1.0" encoding="UTF-8"?>
<project xmlns="https://maven.apache.org/POM/4.0.0" xmlns:xsi="https://www.w3.org/2001/XMLSchema-instance"
	xsi:schemaLocation="https://maven.apache.org/POM/4.0.0 https://maven.apache.org/maven-v4_0_0.xsd">
	<modelVersion>4.0.0</modelVersion>
	<groupId>com.journaldev</groupId>
	<artifactId>SpringMVCExample</artifactId>
	<name>SpringMVCExample</name>
	<packaging>war</packaging>
	<version>1.0.0-BUILD-SNAPSHOT</version>
	<properties>
		<java-version>1.6</java-version>
		<org.springframework-version>4.0.0.RELEASE</org.springframework-version>
		<org.aspectj-version>1.7.4</org.aspectj-version>
		<org.slf4j-version>1.7.5</org.slf4j-version>
	</properties>
	<dependencies>
		<!-- Spring -->
		<dependency>
			<groupId>org.springframework</groupId>
			<artifactId>spring-context</artifactId>
			<version>${org.springframework-version}</version>
			<exclusions>
				<!-- Exclude Commons Logging in favor of SLF4j -->
				<exclusion>
					<groupId>commons-logging</groupId>
					<artifactId>commons-logging</artifactId>
				 </exclusion>
			</exclusions>
		</dependency>
		<dependency>
			<groupId>org.springframework</groupId>
			<artifactId>spring-webmvc</artifactId>
			<version>${org.springframework-version}</version>
		</dependency>

		<!-- AspectJ -->
		<dependency>
			<groupId>org.aspectj</groupId>
			<artifactId>aspectjrt</artifactId>
			<version>${org.aspectj-version}</version>
		</dependency>

		<!-- Logging -->
		<dependency>
			<groupId>org.slf4j</groupId>
			<artifactId>slf4j-api</artifactId>
			<version>${org.slf4j-version}</version>
		</dependency>
		<dependency>
			<groupId>org.slf4j</groupId>
			<artifactId>jcl-over-slf4j</artifactId>
			<version>${org.slf4j-version}</version>
			<scope>runtime</scope>
		</dependency>
		<dependency>
			<groupId>org.slf4j</groupId>
			<artifactId>slf4j-log4j12</artifactId>
			<version>${org.slf4j-version}</version>
			<scope>runtime</scope>
		</dependency>
		<dependency>
			<groupId>log4j</groupId>
			<artifactId>log4j</artifactId>
			<version>1.2.15</version>
			<exclusions>
				<exclusion>
					<groupId>javax.mail</groupId>
					<artifactId>mail</artifactId>
				</exclusion>
				<exclusion>
					<groupId>javax.jms</groupId>
					<artifactId>jms</artifactId>
				</exclusion>
				<exclusion>
					<groupId>com.sun.jdmk</groupId>
					<artifactId>jmxtools</artifactId>
				</exclusion>
				<exclusion>
					<groupId>com.sun.jmx</groupId>
					<artifactId>jmxri</artifactId>
				</exclusion>
			</exclusions>
			<scope>runtime</scope>
		</dependency>

		<!-- @Inject -->
		<dependency>
			<groupId>javax.inject</groupId>
			<artifactId>javax.inject</artifactId>
			<version>1</version>
		</dependency>

		<!-- Servlet -->
		<dependency>
			<groupId>javax.servlet</groupId>
			<artifactId>servlet-api</artifactId>
			<version>2.5</version>
			<scope>provided</scope>
		</dependency>
		<dependency>
			<groupId>javax.servlet.jsp</groupId>
			<artifactId>jsp-api</artifactId>
			<version>2.1</version>
			<scope>provided</scope>
		</dependency>
		<dependency>
			<groupId>javax.servlet</groupId>
			<artifactId>jstl</artifactId>
			<version>1.2</version>
		</dependency>

		<!-- Test -->
		<dependency>
			<groupId>junit</groupId>
			<artifactId>junit</artifactId>
			<version>4.7</version>
			<scope>test</scope>
		</dependency>
	</dependencies>
    <build>
        <plugins>
            <plugin>
                <artifactId>maven-eclipse-plugin</artifactId>
                <version>2.9</version>
                <configuration>
                    <additionalProjectnatures>
                        <projectnature>org.springframework.ide.eclipse.core.springnature</projectnature>
                    </additionalProjectnatures>
                    <additionalBuildcommands>
                        <buildcommand>org.springframework.ide.eclipse.core.springbuilder</buildcommand>
                    </additionalBuildcommands>
                    <downloadSources>true</downloadSources>
                    <downloadJavadocs>true</downloadJavadocs>
                </configuration>
            </plugin>
            <plugin>
                <groupId>org.apache.maven.plugins</groupId>
                <artifactId>maven-compiler-plugin</artifactId>
                <version>2.5.1</version>
                <configuration>
                    <source>1.6</source>
                    <target>1.6</target>
                    <compilerArgument>-Xlint:all</compilerArgument>
                    <showWarnings>true</showWarnings>
                    <showDeprecation>true</showDeprecation>
                </configuration>
            </plugin>
            <plugin>
                <groupId>org.codehaus.mojo</groupId>
                <artifactId>exec-maven-plugin</artifactId>
                <version>1.2.1</version>
                <configuration>
                    <mainClass>org.test.int1.Main</mainClass>
                </configuration>
            </plugin>
        </plugins>
    </build>
</project>
artifactId는 웹 애플리케이션의 서블릿 컨텍스트가 될 것이므로 원하는 다른 이름으로 변경할 수 있습니다. Spring Framework, AspectJ 및 SLF4j 버전에 대한 몇 가지 속성이 정의되어 있으며, 최신 버전을 반영하지 않았음을 발견하여 오늘의 최신 안정 버전으로 변경했습니다. 관심 있는 프로젝트 의존성은 다음과 같습니다;
- spring-context: Spring Core 의존성. SLF4J의 공통 로깅을 제외한 점에 유의하십시오.
- spring-webmvc: MVC 지원을 위한 Spring artifact
- aspectjrt: AspectJ API 참조
- SLF4J 및 Log4j: 로깅 용도로, SLF4J 통합 덕분에 Spring은 log4j 또는 Java Logging API를 설정하기가 매우 쉽습니다.
- javax.inject – 의존성 주입을 위한 JSR330 API
시작 애플리케이션을 위해 서블릿, JSP, JSTL 및 JUnit API와 같은 기타 종속성이 추가되었지만, 우리는 그것들을 넘어갈 수 있습니다.
Spring MVC 튜토리얼 – Log4j 구성
생성된 log4j.xml 파일은 아래와 같습니다.
<?xml version="1.0" encoding="UTF-8"?>
<!DOCTYPE log4j:configuration PUBLIC "-//APACHE//DTD LOG4J 1.2//EN" "log4j.dtd">
<log4j:configuration xmlns:log4j="https://jakarta.apache.org/log4j/">

	<!-- Appenders -->
	<appender name="console" class="org.apache.log4j.ConsoleAppender">
		<param name="Target" value="System.out" />
		<layout class="org.apache.log4j.PatternLayout">
			<param name="ConversionPattern" value="%-5p: %c - %m%n" />
		</layout>
	</appender>

	<!-- Application Loggers -->
	<logger name="com.journaldev.spring">
		<level value="info" />
	</logger>

	<!-- 3rdparty Loggers -->
	<logger name="org.springframework.core">
		<level value="info" />
	</logger>

	<logger name="org.springframework.beans">
		<level value="info" />
	</logger>

	<logger name="org.springframework.context">
		<level value="info" />
	</logger>

	<logger name="org.springframework.web">
		<level value="info" />
	</logger>

	<!-- Root Logger -->
	<root>
		<priority value="warn" />
		<appender-ref ref="console" />
	</root>

</log4j:configuration>
모든 내용을 콘솔에 출력하고 있음을 주목하세요. 우리는 쉽게 어펜더를 추가하여 로깅을 파일로 리디렉션 할 수 있습니다.
Spring MVC 튜토리얼 – 배포 서술자 구성
우리의 web.xml을 살펴보고 분석해 봅시다.
<?xml version="1.0" encoding="UTF-8"?>
<web-app version="2.5" xmlns="https://java.sun.com/xml/ns/javaee"
	xmlns:xsi="https://www.w3.org/2001/XMLSchema-instance"
	xsi:schemaLocation="https://java.sun.com/xml/ns/javaee https://java.sun.com/xml/ns/javaee/web-app_2_5.xsd">

	<!-- The definition of the Root Spring Container shared by all Servlets and Filters -->
	<context-param>
		<param-name>contextConfigLocation</param-name>
		<param-value>/WEB-INF/spring/root-context.xml</param-value>
	</context-param>

	<!-- Creates the Spring Container shared by all Servlets and Filters -->
	<listener>
		<listener-class>org.springframework.web.context.ContextLoaderListener</listener-class>
	</listener>

	<!-- Processes application requests -->
	<servlet>
		<servlet-name>appServlet</servlet-name>
		<servlet-class>org.springframework.web.servlet.DispatcherServlet</servlet-class>
		<init-param>
			<param-name>contextConfigLocation</param-name>
			<param-value>/WEB-INF/spring/appServlet/servlet-context.xml</param-value>
		</init-param>
		<load-on-startup>1</load-on-startup>
	</servlet>

	<servlet-mapping>
		<servlet-name>appServlet</servlet-name>
		<url-pattern>/</url-pattern>
	</servlet-mapping>

</web-app>
ContextLoaderListener는 ApplicationContext 수명주기를 ServletContext 수명주기에 묶고 ApplicationContext의 자동 생성을 자동화합니다. ApplicationContext는 Spring 빈들을 위한 공간이며 contextConfigLocation 컨텍스트 매개변수를 통해 설정을 제공할 수 있습니다. root-context.xml 파일은 WebApplicationContext의 구성 세부 정보를 제공합니다. DispatcherServlet은 Spring MVC 애플리케이션의 컨트롤러 클래스이며 모든 클라이언트 요청은 이 서블릿에 의해 처리됩니다. 구성은 servlet-context.xml 파일에서 로드됩니다.
스프링 MVC 튜토리얼 – 설정 파일
root-context.xml 파일:
<?xml version="1.0" encoding="UTF-8"?>
<beans xmlns="https://www.springframework.org/schema/beans"
	xmlns:xsi="https://www.w3.org/2001/XMLSchema-instance"
	xsi:schemaLocation="https://www.springframework.org/schema/beans https://www.springframework.org/schema/beans/spring-beans.xsd">

	<!-- Root Context: defines shared resources visible to all other web components -->

</beans>
여기에서 공유된 빈을 정의할 수 있습니다. 현재는 아무 것도 없습니다. servlet-context.xml 코드:
<?xml version="1.0" encoding="UTF-8"?>
<beans:beans xmlns="https://www.springframework.org/schema/mvc"
	xmlns:xsi="https://www.w3.org/2001/XMLSchema-instance"
	xmlns:beans="https://www.springframework.org/schema/beans"
	xmlns:context="https://www.springframework.org/schema/context"
	xsi:schemaLocation="https://www.springframework.org/schema/mvc https://www.springframework.org/schema/mvc/spring-mvc.xsd
		https://www.springframework.org/schema/beans https://www.springframework.org/schema/beans/spring-beans.xsd
		https://www.springframework.org/schema/context https://www.springframework.org/schema/context/spring-context.xsd">

	<!-- DispatcherServlet Context: defines this servlet's request-processing infrastructure -->

	<!-- Enables the Spring MVC @Controller programming model -->
	<annotation-driven />

	<!-- Handles HTTP GET requests for /resources/** by efficiently serving up static resources in the ${webappRoot}/resources directory -->
	<resources mapping="/resources/**" location="/resources/" />

	<!-- Resolves views selected for rendering by @Controllers to .jsp resources in the /WEB-INF/views directory -->
	<beans:bean class="org.springframework.web.servlet.view.InternalResourceViewResolver">
		<beans:property name="prefix" value="/WEB-INF/views/" />
		<beans:property name="suffix" value=".jsp" />
	</beans:bean>

	<context:component-scan base-package="com.journaldev.spring" />

</beans:beans>
표준 스프링 구성 파일은 이렇게 생겼으며, 모든 내용을 직접 작성하고 있는 것을 상상하면 STS 도구를 좋아하기 시작할 것입니다. annotation-driven 요소는 컨트롤러 서블릿이 주석을 사용하여 빈 구성을 알 수 있도록합니다. resources 요소는 이미지, HTML 페이지 등을 Spring 프레임워크를 통해 가져 오지 않을 정적 파일을 넣을 위치를 정의합니다. InternalResourceViewResolver는 뷰 리졸버로서 접두사와 접미사 속성을 통해 뷰 페이지 위치를 제공할 수 있습니다. 따라서 모든 JSP 페이지는 /WEB-INF/views/ 디렉토리에 있어야합니다. context:component-scan 요소는 컨트롤러 클래스를 스캔하는 기본 패키지 위치를 제공하는 데 사용됩니다. 프로젝트 생성 시 최상위 패키지 값 기억하세요. 여기서 사용되는 값과 동일합니다.
스프링 MVC 컨트롤러 클래스
HomeController는 home() 메소드와 함께 자동으로 생성되지만, loginPage()와 login() 메소드를 추가하여 약간 확장했습니다.
package com.journaldev.spring;

import java.text.DateFormat;
import java.util.Date;
import java.util.Locale;

import org.slf4j.Logger;
import org.slf4j.LoggerFactory;
import org.springframework.stereotype.Controller;
import org.springframework.ui.Model;
import org.springframework.validation.annotation.Validated;
import org.springframework.web.bind.annotation.RequestMapping;
import org.springframework.web.bind.annotation.RequestMethod;

/**
 * Handles requests for the application home page.
 */
@Controller
public class HomeController {

	private static final Logger logger = LoggerFactory.getLogger(HomeController.class);

	/**
	 * Simply selects the home view to render by returning its name.
	 */
	@RequestMapping(value = "/", method = RequestMethod.GET)
	public String home(Locale locale, Model model) {
		logger.info("Welcome home! The client locale is {}.", locale);

		Date date = new Date();
		DateFormat dateFormat = DateFormat.getDateTimeInstance(DateFormat.LONG, DateFormat.LONG, locale);

		String formattedDate = dateFormat.format(date);

		model.addAttribute("serverTime", formattedDate );

		return "home";
	}

	@RequestMapping(value = "/login", method = RequestMethod.GET)
	public String loginPage(Locale locale, Model model) {
		return "login";
	}

	@RequestMapping(value = "/home", method = RequestMethod.POST)
	public String login(@Validated User user, Model model) {
		model.addAttribute("userName", user.getUserName());
		return "user";
	}
}
@Controller 주석은 웹 컨트롤러 클래스임을 나타내는 데 사용됩니다. @RequestMapping은 클래스와 메소드에 사용되어 클라이언트 요청을 특정 핸들러 메소드로 리디렉션합니다. 핸들러 메소드가 String을 반환하는 것을 알 수 있습니다. 이는 응답으로 사용될 뷰 페이지의 이름이어야 합니다. 서로 다른 문자열을 반환하는 세 개의 메소드가 있는데, 따라서 동일한 이름의 JSP 페이지를 생성해야 합니다. login() 메소드는 HTTP 메소드로 POST로 호출되므로 여기에 어떤 폼 데이터를 기대하고 있습니다. 따라서 User 모델 클래스가 있으며 @Validated 주석을 사용하여 유효성 검사를 위해 표시되었습니다. 각 메소드에는 Model이 인수로 포함되어 있으며, JSP 응답 페이지에서 나중에 사용할 속성을 설정할 수 있습니다.
Spring MVC 모델 클래스
모델 클래스는 폼 변수를 보유하는 데 사용됩니다. User 모델 빈은 아래와 같습니다.
package com.journaldev.spring;

public class User {

	private String userName;

	public String getUserName() {
		return userName;
	}

	public void setUserName(String userName) {
		this.userName = userName;
	}

}
A simple java bean with the variable name and its getter and setter methods.
Spring MVC 튜토리얼 – 뷰 페이지
우리는 다음과 같이 세 개의 JSP 페이지를 가지고 있습니다. home.jsp 코드:
<%@ taglib uri="https://java.sun.com/jsp/jstl/core" prefix="c" %>
<%@ page session="false" %>
<html>
<head>
	<title>Home</title>
</head>
<body>
<h1>
	Hello world!
</h1>

<P>  The time on the server is ${serverTime}. </P>
</body>
</html>
JSP 표현 언어를 사용하여 속성 값을 얻는 방법에 주목하십시오. login.jsp 코드:
<%@ page language="java" contentType="text/html; charset=UTF-8"
    pageEncoding="UTF-8"%>
<!DOCTYPE html PUBLIC "-//W3C//DTD HTML 4.01 Transitional//EN" "https://www.w3.org/TR/html4/loose.dtd">
<html>
<head>
<meta http-equiv="Content-Type" content="text/html; charset=UTF-8">
<title>Login Page</title>
</head>
<body>
<form action="home" method="post">
<input type="text" name="userName"><br>
<input type="submit" value="Login">
</form>
</body>
</html>
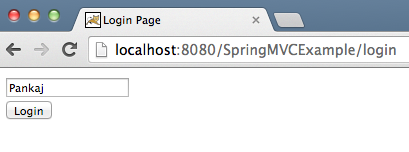
A simple JSP page for the user to provide the userName as input. Notice that form variable name is same as User class variable name. Also, form action is “home” and method is “post”. It’s clear that HomeController login() method will handle this request. user.jsp code:
<%@ page language="java" contentType="text/html; charset=UTF-8"
    pageEncoding="UTF-8"%>
<!DOCTYPE html PUBLIC "-//W3C//DTD HTML 4.01 Transitional//EN" "https://www.w3.org/TR/html4/loose.dtd">
<html>
<head>
<meta http-equiv="Content-Type" content="text/html; charset=UTF-8">
<title>User Home Page</title>
</head>
<body>
<h3>Hi ${userName}</h3>
</body>
</html>
사용자를 위한 간단한 홈 페이지이며, 사용자 이름이 표시되는 것에 주목하십시오. 이 속성은 로그인 메소드에서 설정하고 있습니다.
Spring MVC 예제 응용 프로그램 테스트
우리의 애플리케이션은 실행 준비가 되어 있으며, VMware tc Server 또는 다른 서블릿 컨테이너를 선택하여 실행하면 아래 페이지가 응답으로 표시됩니다. 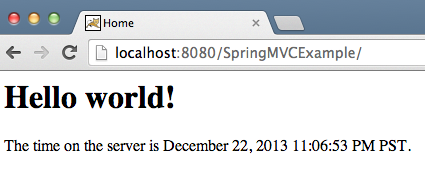
 이것이 Spring MVC 튜토리얼입니다. STS 플러그인을 사용하여 Spring MVC 애플리케이션을 만드는 것이 얼마나 쉬운지 확인할 수 있습니다. 코드 크기는 매우 작고 대부분의 구성은 Spring MVC가 처리하기 때문에 비즈니스 로직에 집중할 수 있습니다. 아래 링크에서 예제 Spring MVC 프로젝트를 다운로드하여 실험해보세요.
Source:
https://www.digitalocean.com/community/tutorials/spring-mvc-tutorial


