환영합니다. 봄 국제화 (i18n) 튜토리얼에 오신 것을 환영합니다. 전 세계 사용자가 있는 웹 애플리케이션은 사용자 상호 작용을 개선하기 위해 국제화 (i18n) 또는 로컬라이제이션 (L10n)이 매우 중요합니다. 대부분의 웹 애플리케이션 프레임워크는 사용자 로캘 설정을 기반으로 애플리케이션을 로컬라이즈하는 간단한 방법을 제공합니다. 스프링도 이러한 패턴을 따르며 Spring 인터셉터, 로케일 리졸버 및 다른 로케일을 위한 리소스 번들을 통해 광범위한 국제화 (i18n) 지원을 제공합니다. 자바의 이전 i18n에 관한 몇 가지 기사.
Spring Internationalization i18n
프로젝트를 생성하여 사용자 로케일을 얻기 위해 요청 매개변수를 사용하고 해당 로케일별로 응답 페이지 레이블 값을 설정할 Spring MVC 프로젝트를 만들어 보겠습니다. 우리의 애플리케이션에 대한 기본 코드가 있는 Spring Tool Suite에서 Spring MVC 프로젝트를 만듭니다. Spring Tool Suite 또는 Spring MVC 프로젝트에 익숙하지 않은 경우 Spring MVC 예제를 읽어보세요. 로컬라이제이션 변경이 적용된 최종 프로젝트는 아래 이미지처럼 보입니다. 애플리케이션의 모든 부분을 하나씩 살펴보겠습니다. 
Spring i18n Maven Configuration
Spring MVC의 pom.xml은 아래와 같습니다.
<?xml version="1.0" encoding="UTF-8"?>
<project xmlns="https://maven.apache.org/POM/4.0.0" xmlns:xsi="https://www.w3.org/2001/XMLSchema-instance"
	xsi:schemaLocation="https://maven.apache.org/POM/4.0.0 https://maven.apache.org/maven-v4_0_0.xsd">
	<modelVersion>4.0.0</modelVersion>
	<groupId>com.journaldev</groupId>
	<artifactId>spring</artifactId>
	<name>Springi18nExample</name>
	<packaging>war</packaging>
	<version>1.0.0-BUILD-SNAPSHOT</version>
	<properties>
		<java-version>1.6</java-version>
		<org.springframework-version>4.0.2.RELEASE</org.springframework-version>
		<org.aspectj-version>1.7.4</org.aspectj-version>
		<org.slf4j-version>1.7.5</org.slf4j-version>
	</properties>
	<dependencies>
		<!-- Spring -->
		<dependency>
			<groupId>org.springframework</groupId>
			<artifactId>spring-context</artifactId>
			<version>${org.springframework-version}</version>
			<exclusions>
				<!-- Exclude Commons Logging in favor of SLF4j -->
				<exclusion>
					<groupId>commons-logging</groupId>
					<artifactId>commons-logging</artifactId>
				 </exclusion>
			</exclusions>
		</dependency>
		<dependency>
			<groupId>org.springframework</groupId>
			<artifactId>spring-webmvc</artifactId>
			<version>${org.springframework-version}</version>
		</dependency>

		<!-- AspectJ -->
		<dependency>
			<groupId>org.aspectj</groupId>
			<artifactId>aspectjrt</artifactId>
			<version>${org.aspectj-version}</version>
		</dependency>

		<!-- Logging -->
		<dependency>
			<groupId>org.slf4j</groupId>
			<artifactId>slf4j-api</artifactId>
			<version>${org.slf4j-version}</version>
		</dependency>
		<dependency>
			<groupId>org.slf4j</groupId>
			<artifactId>jcl-over-slf4j</artifactId>
			<version>${org.slf4j-version}</version>
			<scope>runtime</scope>
		</dependency>
		<dependency>
			<groupId>org.slf4j</groupId>
			<artifactId>slf4j-log4j12</artifactId>
			<version>${org.slf4j-version}</version>
			<scope>runtime</scope>
		</dependency>
		<dependency>
			<groupId>log4j</groupId>
			<artifactId>log4j</artifactId>
			<version>1.2.15</version>
			<exclusions>
				<exclusion>
					<groupId>javax.mail</groupId>
					<artifactId>mail</artifactId>
				</exclusion>
				<exclusion>
					<groupId>javax.jms</groupId>
					<artifactId>jms</artifactId>
				</exclusion>
				<exclusion>
					<groupId>com.sun.jdmk</groupId>
					<artifactId>jmxtools</artifactId>
				</exclusion>
				<exclusion>
					<groupId>com.sun.jmx</groupId>
					<artifactId>jmxri</artifactId>
				</exclusion>
			</exclusions>
			<scope>runtime</scope>
		</dependency>

		<!-- @Inject -->
		<dependency>
			<groupId>javax.inject</groupId>
			<artifactId>javax.inject</artifactId>
			<version>1</version>
		</dependency>

		<!-- Servlet -->
		<dependency>
			<groupId>javax.servlet</groupId>
			<artifactId>servlet-api</artifactId>
			<version>2.5</version>
			<scope>provided</scope>
		</dependency>
		<dependency>
			<groupId>javax.servlet.jsp</groupId>
			<artifactId>jsp-api</artifactId>
			<version>2.1</version>
			<scope>provided</scope>
		</dependency>
		<dependency>
			<groupId>javax.servlet</groupId>
			<artifactId>jstl</artifactId>
			<version>1.2</version>
		</dependency>

		<!-- Test -->
		<dependency>
			<groupId>junit</groupId>
			<artifactId>junit</artifactId>
			<version>4.7</version>
			<scope>test</scope>
		</dependency>
	</dependencies>
    <build>
        <plugins>
            <plugin>
                <artifactId>maven-eclipse-plugin</artifactId>
                <version>2.9</version>
                <configuration>
                    <additionalProjectnatures>
                        <projectnature>org.springframework.ide.eclipse.core.springnature</projectnature>
                    </additionalProjectnatures>
                    <additionalBuildcommands>
                        <buildcommand>org.springframework.ide.eclipse.core.springbuilder</buildcommand>
                    </additionalBuildcommands>
                    <downloadSources>true</downloadSources>
                    <downloadJavadocs>true</downloadJavadocs>
                </configuration>
            </plugin>
            <plugin>
                <groupId>org.apache.maven.plugins</groupId>
                <artifactId>maven-compiler-plugin</artifactId>
                <version>2.5.1</version>
                <configuration>
                    <source>1.6</source>
                    <target>1.6</target>
                    <compilerArgument>-Xlint:all</compilerArgument>
                    <showWarnings>true</showWarnings>
                    <showDeprecation>true</showDeprecation>
                </configuration>
            </plugin>
            <plugin>
                <groupId>org.codehaus.mojo</groupId>
                <artifactId>exec-maven-plugin</artifactId>
                <version>1.2.1</version>
                <configuration>
                    <mainClass>org.test.int1.Main</mainClass>
                </configuration>
            </plugin>
        </plugins>
    </build>
</project>
대부분의 코드는 STS에 의해 자동으로 생성되었으며, Spring 버전은 4.0.2.RELEASE를 사용하도록 업데이트했습니다. 다른 종속성의 의존성을 제거하거나 버전을 업데이트할 수도 있지만, 간단함을 유지하기 위해 그대로 두었습니다.
Spring 리소스 번들
간단히 말하자면, 우리의 애플리케이션은 두 가지 로케일 – 영어와 프랑스어 – 만 지원한다고 가정해 봅시다. 사용자 로케일이 지정되지 않은 경우, 우리는 기본 로케일로 영어를 사용할 것입니다. 이 두 로케일에 대한 스프링 리소스 번들을 만들어서 JSP 페이지에서 사용할 것입니다. messages_en.properties 코드:
label.title=Login Page
label.firstName=First Name
label.lastName=Last Name
label.submit=Login
messages_fr.properties 코드:
label.title=Connectez-vous page
label.firstName=Pr\u00E9nom
label.lastName=Nom
label.submit=Connexion
프랑스어 로케일 리소스 번들에는 특수 문자를 올바르게 해석할 수 있도록 유니코드를 사용하고 있음을 유의하세요. 또한, 두 리소스 번들 모두 애플리케이션의 클래스패스에 있으며 이름은 “messages_{locale}.properties”와 같은 패턴을 가지고 있음을 중요한 점으로 유의하십시오. 이것이 나중에 왜 중요한지 살펴보겠습니다.
스프링 i18n 컨트롤러 클래스
우리의 컨트롤러 클래스는 매우 간단합니다. 사용자 로케일을 로그로 기록하고 home.jsp 페이지를 응답으로 반환합니다.
package com.journaldev.spring;

import java.util.Locale;

import org.slf4j.Logger;
import org.slf4j.LoggerFactory;
import org.springframework.stereotype.Controller;
import org.springframework.ui.Model;
import org.springframework.web.bind.annotation.RequestMapping;
import org.springframework.web.bind.annotation.RequestMethod;

/**
 * Handles requests for the application home page.
 */
@Controller
public class HomeController {

	private static final Logger logger = LoggerFactory.getLogger(HomeController.class);

	/**
	 * Simply selects the home view to render by returning its name.
	 */
	@RequestMapping(value = "/", method = RequestMethod.GET)
	public String home(Locale locale, Model model) {
		logger.info("Welcome home! The client locale is {}.", locale);

		return "home";
	}

}
스프링 i18n JSP 페이지
우리의 home.jsp 페이지 코드는 아래와 같습니다.
<%@taglib uri="https://www.springframework.org/tags" prefix="spring"%>
<%@ page session="false"%>
<html>
<head>
<title><spring:message code="label.title" /></title>
</head>
<body>
	<form method="post" action="login">
		<table>
			<tr>
				<td><label> <strong><spring:message
								code="label.firstName" /></strong>
				</label></td>
				<td><input name="firstName" /></td>
			</tr>
			<tr>
				<td><label> <strong><spring:message
								code="label.lastName" /></strong>
				</label></td>
				<td><input name="lastName" /></td>
			</tr>
			<tr>
				<spring:message code="label.submit" var="labelSubmit"></spring:message>
				<td colspan="2"><input type="submit" value="${labelSubmit}" /></td>
			</tr>
		</table>
	</form>
</body>
</html>
유일하게 언급할 가치가 있는 부분은 주어진 코드로 메시지를 검색하기 위해 spring:message를 사용하는 것입니다. 스프링 태그 라이브러리가 taglib jsp 지시문을 사용하여 구성되도록 확인하십시오. 스프링은 적절한 리소스 번들 메시지를로드하고 JSP 페이지에서 사용할 수 있도록합니다.
스프링 국제화 i18n – 빈 구성 파일
스프링 빈 구성 파일은 모든 마법이 일어나는 곳입니다. 이것이 Spring 프레임 워크의 아름다움입니다. 이는 우리가 비즈니스 로직에 집중할 수 있도록 도와줍니다. 다음은 spring bean 구성 파일이 어떻게 보이는지 살펴보겠습니다. 그리고 각 빈을 하나씩 살펴보겠습니다. servlet-context.xml 코드:
<?xml version="1.0" encoding="UTF-8"?>
<beans:beans xmlns="https://www.springframework.org/schema/mvc"
	xmlns:xsi="https://www.w3.org/2001/XMLSchema-instance" xmlns:beans="https://www.springframework.org/schema/beans"
	xmlns:context="https://www.springframework.org/schema/context"
	xsi:schemaLocation="https://www.springframework.org/schema/mvc https://www.springframework.org/schema/mvc/spring-mvc.xsd
		https://www.springframework.org/schema/beans https://www.springframework.org/schema/beans/spring-beans.xsd
		https://www.springframework.org/schema/context https://www.springframework.org/schema/context/spring-context.xsd">

	<!-- DispatcherServlet Context: defines this servlet's request-processing
		infrastructure -->

	<!-- Enables the Spring MVC @Controller programming model -->
	<annotation-driven />

	<!-- Handles HTTP GET requests for /resources/** by efficiently serving
		up static resources in the ${webappRoot}/resources directory -->
	<resources mapping="/resources/**" location="/resources/" />

	<!-- Resolves views selected for rendering by @Controllers to .jsp resources
		in the /WEB-INF/views directory -->
	<beans:bean
		class="org.springframework.web.servlet.view.InternalResourceViewResolver">
		<beans:property name="prefix" value="/WEB-INF/views/" />
		<beans:property name="suffix" value=".jsp" />
	</beans:bean>

	<beans:bean id="messageSource"
		class="org.springframework.context.support.ReloadableResourceBundleMessageSource">
		<beans:property name="basename" value="classpath:messages" />
		<beans:property name="defaultEncoding" value="UTF-8" />
	</beans:bean>

	<beans:bean id="localeResolver"
		class="org.springframework.web.servlet.i18n.CookieLocaleResolver">
		<beans:property name="defaultLocale" value="en" />
		<beans:property name="cookieName" value="myAppLocaleCookie"></beans:property>
		<beans:property name="cookieMaxAge" value="3600"></beans:property>
	</beans:bean>

	<interceptors>
		<beans:bean
			class="org.springframework.web.servlet.i18n.LocaleChangeInterceptor">
			<beans:property name="paramName" value="locale" />
		</beans:bean>
	</interceptors>

	<context:component-scan base-package="com.journaldev.spring" />

</beans:beans>
-
annotation-driven 태그는 Controller 프로그래밍 모델을 활성화하며, 이것이 없으면 Spring은 홈 컨트롤러를 클라이언트 요청 핸들러로 인식하지 않습니다.
-
context:component-scan은 Spring이 주석이 달린 구성 요소를 찾을 패키지를 제공하고 자동으로 Spring 빈으로 등록합니다.
-
messageSource 빈은 응용 프로그램의 i18n을 활성화하기 위해 구성되었습니다. basename 속성은 리소스 번들의 위치를 제공하는 데 사용됩니다.
classpath:messages는 리소스 번들이 클래스 경로에 있으며messages_{locale}.properties와 같은 이름 패턴을 따른다는 것을 의미합니다. defaultEncoding 속성은 메시지에 사용되는 인코딩을 정의하는 데 사용됩니다. -
localeResolver 타입의 빈인
org.springframework.web.servlet.i18n.CookieLocaleResolver은 클라이언트 요청에 쿠키를 설정하여 이후 요청이 사용자의 로캘을 쉽게 인식할 수 있도록 합니다. 예를 들어, 웹 애플리케이션을 처음으로 시작할 때 사용자에게 로캘을 선택하도록 요청할 수 있으며 쿠키를 사용하여 사용자의 로캘을 식별하고 자동으로 로캘별 응답을 보낼 수 있습니다. 또한 쿠키의 기본 로캘, 쿠키 이름 및 쿠키의 만료되어 클라이언트 브라우저에 의해 삭제되기 전의 최대 기간을 지정할 수도 있습니다. 애플리케이션이 사용자 세션을 유지하는 경우에는 사용자 세션의 로캘 속성을 사용하기 위해org.springframework.web.servlet.i18n.SessionLocaleResolver를 localeResolver로 사용할 수도 있습니다. 이 구성은 CookieLocaleResolver와 유사합니다.<bean id="localeResolver" class="org.springframework.web.servlet.i18n.SessionLocaleResolver"> <property name="defaultLocale" value="en" /> </bean>만약 “localeResolver”를 등록하지 않으면 기본적으로 AcceptHeaderLocaleResolver가 사용됩니다. 이는 클라이언트 HTTP 요청의
accept-language헤더를 확인하여 사용자 로캘을 해결합니다. -
org.springframework.web.servlet.i18n.LocaleChangeInterceptor인터셉터는 사용자 요청을 가로채어 사용자 로캘을 식별하도록 구성됩니다. 매개변수 이름은 구성 가능하며, 우리는 로캘을 위한 요청 매개변수 이름으로 “locale”을 사용하고 있습니다. 이 인터셉터가 없으면 사용자 로캘을 변경하고 사용자의 새로운 로캘 설정에 따라 응답을 보낼 수 없습니다. 이것은 반드시 interceptors 요소의 일부여야 합니다. 그렇지 않으면 Spring은 인터셉터로 구성하지 않습니다.
Spring 프레임워크에 우리의 컨텍스트 구성을로드하도록 지시하는 구성에 대해 궁금하다면, 이것은 우리의 MVC 애플리케이션의 배치 설명자에 있습니다.
<servlet>
	<servlet-name>appServlet</servlet-name>
	<servlet-class>org.springframework.web.servlet.DispatcherServlet</servlet-class>
	<init-param>
		<param-name>contextConfigLocation</param-name>
		<param-value>/WEB-INF/spring/appServlet/servlet-context.xml</param-value>
	</init-param>
	<load-on-startup>1</load-on-startup>
</servlet>

<servlet-mapping>
	<servlet-name>appServlet</servlet-name>
	<url-pattern>/</url-pattern>
</servlet-mapping>
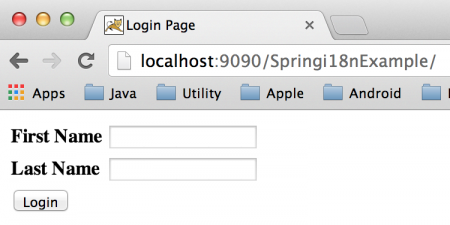
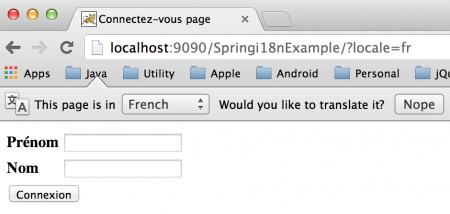
web.xml 설정을 변경하여 컨텍스트 파일의 위치 또는 이름을 변경할 수 있습니다. 저희 Spring i18n 애플리케이션은 이미 준비되어 있습니다. 그냥 어떤 서블릿 컨테이너에 배포하면 됩니다. 일반적으로 나는 스탠드얼론 톰캣 웹 서버의 webapps 디렉토리에 WAR 파일로 내보냅니다. 여기는 다양한 로케일을 사용하여 애플리케이션 홈페이지의 스크린샷입니다. 기본 홈페이지 (en 로케일):  로케일을 매개변수로 전달 (fr 로케일):
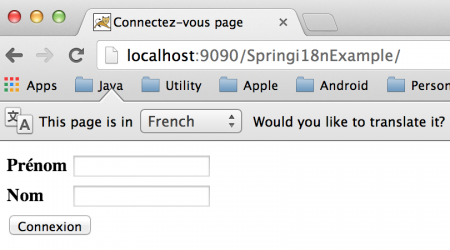
  로케일 없이 추가 요청:
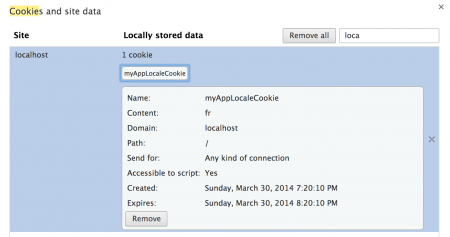
  위 이미지에서 확인할 수 있듯이 클라이언트 요청에서 로케일 정보를 전달하지 않지만 여전히 애플리케이션은 사용자 로케일을 식별합니다. 여러분은 이미 알아차렸겠지만 이것은 우리 spring bean 설정 파일에서 구성한 CookieLocaleResolver 빈 덕분입니다. 그러나 확인하려면 브라우저 쿠키 데이터를 확인할 수 있습니다. 나는 크롬을 사용하고 아래 이미지는 애플리케이션이 저장한 쿠키 데이터를 보여줍니다.
  쿠키 만료 시간이 1시간, 즉 3600초로 cookieMaxAge 속성에 구성된 것을 주목하세요. 서버 로그를 확인하면 로케일이 기록되어 있는 것을 확인할 수 있습니다.
INFO : com.journaldev.spring.HomeController - Welcome home! The client locale is en.
INFO : com.journaldev.spring.HomeController - Welcome home! The client locale is fr.
INFO : com.journaldev.spring.HomeController - Welcome home! The client locale is fr.
그것이 봄 i18n 예제 응용 프로그램에 대한 모두입니다. 아래 링크에서 예제 프로젝트를 다운로드하여 더 많이 배우십시오.


