파일 업로드는 웹 애플리케이션에서 매우 일반적인 작업입니다. 이전에는 Servlet에서 파일을 업로드하는 방법과 Struts2 파일 업로드를 살펴보았습니다. 오늘은 Spring 파일 업로드, 특히 단일 및 다중 파일에 대해 배우겠습니다.
Spring MVC 파일 업로드
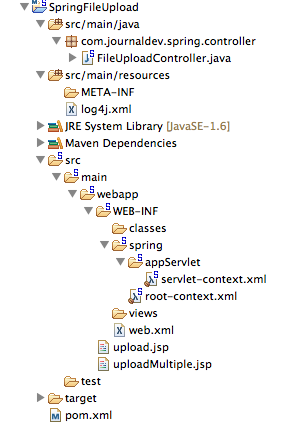
Spring MVC 프레임워크는 Apache Commons FileUpload API를 통합하여 파일을 업로드하는 기능을 제공합니다. 파일을 업로드하는 프로세스는 매우 간단하며 간단한 구성이 필요합니다. STS에서 아래 이미지와 같은 간단한 Spring MVC 프로젝트를 생성할 것입니다.  대부분은 STS 도구에서 생성한 보일러플레이트 코드입니다. Spring 파일 업로드 통합을 활용하기 위해 필요한 변경 사항에 초점을 맞출 것입니다.
Apache Commons FileUpload에 대한 Maven 종속성
우선, 필요한 jar 파일이 웹 애플리케이션의 일부가 되도록 pom.xml 파일에 Apache Commons FileUpload 종속성을 추가해야 합니다. 아래는 내 pom.xml 파일에서 종속성 스니펫입니다.
<!-- Apache Commons FileUpload -->
<dependency>
	<groupId>commons-fileupload</groupId>
	<artifactId>commons-fileupload</artifactId>
	<version>1.3.1</version>
</dependency>

<!-- Apache Commons IO -->
<dependency>
	<groupId>commons-io</groupId>
	<artifactId>commons-io</artifactId>
	<version>2.4</version>
</dependency>
스프링 파일 업로드 폼 뷰
우리는 스프링 웹 애플리케이션에서 단일 및 다중 파일 업로드를 허용하기 위해 두 개의 JSP 페이지를 생성할 것입니다. upload.jsp 뷰 코드:
<%@ taglib uri="https://java.sun.com/jsp/jstl/core" prefix="c" %>
<%@ page session="false" %>
<html>
<head>
<title>Upload File Request Page</title>
</head>
<body>
	<form method="POST" action="uploadFile" enctype="multipart/form-data">
		File to upload: <input type="file" name="file"><br />
		Name: <input type="text" name="name"><br /> <br />
		<input type="submit" value="Upload"> Press here to upload the file!
	</form>
</body>
</html>
uploadMultiple.jsp 뷰 코드:
<%@ taglib uri="https://java.sun.com/jsp/jstl/core" prefix="c" %>
<%@ page session="false" %>
<html>
<head>
<title>Upload Multiple File Request Page</title>
</head>
<body>
	<form method="POST" action="uploadMultipleFile" enctype="multipart/form-data">
		File1 to upload: <input type="file" name="file"><br />
		Name1: <input type="text" name="name"><br /> <br />
		File2 to upload: <input type="file" name="file"><br />
		Name2: <input type="text" name="name"><br /> <br />
		<input type="submit" value="Upload"> Press here to upload the file!
	</form>
</body>
</html>
이 파일들이 단순한 HTML 파일임에 유의하십시오. 복잡성을 피하기 위해 어떤 JSP나 스프링 태그도 사용하지 않았습니다. 중요한 점은 form enctype이 multipart/form-data여야 한다는 것입니다. 이렇게 하면 Spring 웹 애플리케이션이 요청에 파일 데이터가 포함되어 처리되어야 함을 알 수 있습니다. 또한 여러 파일의 경우, 입력 필드의 “file”과 “name”이 같아야 하며, 이렇게 하면 데이터가 배열 형식으로 전송됩니다. 우리는 입력 배열을 가져와 파일 데이터를 구문 분석하고 지정된 파일 이름에 저장할 것입니다.
Spring MVC Multipart Configuration
멀티파트 요청 처리를 위해 Apache Commons FileUpload를 활용하려면, multipartResolver 빈을 org.springframework.web.multipart.commons.CommonsMultipartResolver 클래스로 구성하기만 하면 됩니다. 최종 스프링 구성 파일은 다음과 같습니다. servlet-context.xml 코드:
<?xml version="1.0" encoding="UTF-8"?>
<beans:beans xmlns="https://www.springframework.org/schema/mvc"
	xmlns:xsi="https://www.w3.org/2001/XMLSchema-instance" xmlns:beans="https://www.springframework.org/schema/beans"
	xmlns:context="https://www.springframework.org/schema/context"
	xsi:schemaLocation="https://www.springframework.org/schema/mvc https://www.springframework.org/schema/mvc/spring-mvc.xsd
		https://www.springframework.org/schema/beans https://www.springframework.org/schema/beans/spring-beans.xsd
		https://www.springframework.org/schema/context https://www.springframework.org/schema/context/spring-context.xsd">

	<!-- DispatcherServlet Context: defines this servlet's request-processing
		infrastructure -->

	<!-- Enables the Spring MVC @Controller programming model -->
	<annotation-driven />

	<!-- Handles HTTP GET requests for /resources/** by efficiently serving
		up static resources in the ${webappRoot}/resources directory -->
	<resources mapping="/**" location="/" />

	<!-- Resolves views selected for rendering by @Controllers to .jsp resources
		in the /WEB-INF/views directory -->
	<beans:bean
		class="org.springframework.web.servlet.view.InternalResourceViewResolver">
		<beans:property name="prefix" value="/WEB-INF/views/" />
		<beans:property name="suffix" value=".jsp" />
	</beans:bean>

	<beans:bean id="multipartResolver"
		class="org.springframework.web.multipart.commons.CommonsMultipartResolver">

		 <!-- setting maximum upload size -->
		<beans:property name="maxUploadSize" value="100000" />

	</beans:bean>

	<context:component-scan base-package="com.journaldev.spring.controller" />

</beans:beans>
multipartResolver 빈에 대한 maxUploadSize 속성 값을 제공하여 최대 업로드 크기 제한을 설정하고 있음에 주목하십시오. DispatcherServlet 클래스의 소스 코드를 살펴보면, 아래 메서드에서 이름이 multipartResolver인 MultipartResolver 변수가 정의되고 초기화된 것을 볼 수 있습니다.
private void initMultipartResolver(ApplicationContext context)
  {
    try
    {
      this.multipartResolver = ((MultipartResolver)context.getBean("multipartResolver", MultipartResolver.class));
      if (this.logger.isDebugEnabled()) {
        this.logger.debug("Using MultipartResolver [" + this.multipartResolver + "]");
      }
    }
    catch (NoSuchBeanDefinitionException ex)
    {
      this.multipartResolver = null;
      if (this.logger.isDebugEnabled())
        this.logger.debug("Unable to locate MultipartResolver with name 'multipartResolver': no multipart request handling provided");
    }
  }
이 구성으로 인해 enctype이 multipart/form-data로 설정된 모든 요청은 Controller 클래스로 전달되기 전에 multipartResolver에 의해 처리됩니다.
Spring 파일 업로드 컨트롤러 클래스
컨트롤러 클래스 코드는 매우 간단합니다. uploadFile 및 uploadMultipleFile URI에 대한 핸들러 메서드를 정의해야 합니다. FileUploadController.java 코드:
package com.journaldev.spring.controller;

import java.io.BufferedOutputStream;
import java.io.File;
import java.io.FileOutputStream;

import org.slf4j.Logger;
import org.slf4j.LoggerFactory;
import org.springframework.stereotype.Controller;
import org.springframework.web.bind.annotation.RequestMapping;
import org.springframework.web.bind.annotation.RequestMethod;
import org.springframework.web.bind.annotation.RequestParam;
import org.springframework.web.bind.annotation.ResponseBody;
import org.springframework.web.multipart.MultipartFile;

/**
 * Handles requests for the application file upload requests
 */
@Controller
public class FileUploadController {

	private static final Logger logger = LoggerFactory
			.getLogger(FileUploadController.class);

	/**
	 * Upload single file using Spring Controller
	 */
	@RequestMapping(value = "/uploadFile", method = RequestMethod.POST)
	public @ResponseBody
	String uploadFileHandler(@RequestParam("name") String name,
			@RequestParam("file") MultipartFile file) {

		if (!file.isEmpty()) {
			try {
				byte[] bytes = file.getBytes();

				// 파일을 저장할 디렉토리 생성
				String rootPath = System.getProperty("catalina.home");
				File dir = new File(rootPath + File.separator + "tmpFiles");
				if (!dir.exists())
					dir.mkdirs();

				// 서버에 파일 생성
				File serverFile = new File(dir.getAbsolutePath()
						+ File.separator + name);
				BufferedOutputStream stream = new BufferedOutputStream(
						new FileOutputStream(serverFile));
				stream.write(bytes);
				stream.close();

				logger.info("Server File Location="
						+ serverFile.getAbsolutePath());

				return "You successfully uploaded file=" + name;
			} catch (Exception e) {
				return "You failed to upload " + name + " => " + e.getMessage();
			}
		} else {
			return "You failed to upload " + name
					+ " because the file was empty.";
		}
	}

	/**
	 * Upload multiple file using Spring Controller
	 */
	@RequestMapping(value = "/uploadMultipleFile", method = RequestMethod.POST)
	public @ResponseBody
	String uploadMultipleFileHandler(@RequestParam("name") String[] names,
			@RequestParam("file") MultipartFile[] files) {

		if (files.length != names.length)
			return "Mandatory information missing";

		String message = "";
		for (int i = 0; i < files.length; i++) {
			MultipartFile file = files[i];
			String name = names[i];
			try {
				byte[] bytes = file.getBytes();

				// 파일을 저장할 디렉토리 생성
				String rootPath = System.getProperty("catalina.home");
				File dir = new File(rootPath + File.separator + "tmpFiles");
				if (!dir.exists())
					dir.mkdirs();

				// 서버에 파일 생성
				File serverFile = new File(dir.getAbsolutePath()
						+ File.separator + name);
				BufferedOutputStream stream = new BufferedOutputStream(
						new FileOutputStream(serverFile));
				stream.write(bytes);
				stream.close();

				logger.info("Server File Location="
						+ serverFile.getAbsolutePath());

				message = message + "You successfully uploaded file=" + name
						+ "
";
			} catch (Exception e) {
				return "You failed to upload " + name + " => " + e.getMessage();
			}
		}
		return message;
	}
}
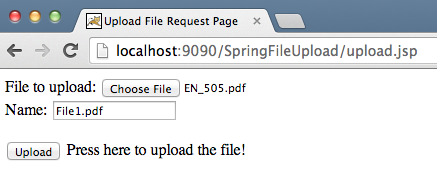
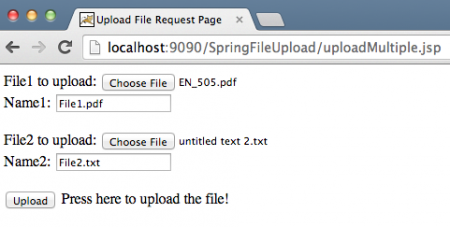
Spring 어노테이션을 사용하여 우리의 삶을 더 쉽게 만들고 코드가 더 읽기 쉽게 보이도록 합니다. uploadFileHandler 메서드는 단일 파일 업로드 시나리오를 처리하는 데 사용되며, uploadMultipleFileHandler 메서드는 여러 파일 업로드 시나리오를 처리하는 데 사용됩니다. 사실은 두 시나리오를 모두 처리하는 단일 메서드를 가질 수도 있었습니다. 이제 애플리케이션을 WAR 파일로 내보내고 Tomcat 서블릿 컨테이너에 배포합니다. 애플리케이션을 실행하면 아래 이미지에서 요청과 응답을 확인할 수 있습니다.
Spring MVC 파일 업로드 예제


 파일이 저장된 위치를 확인하려면 서버 로그를 확인할 수 있습니다. 위 링크에서 프로젝트를 다운로드하여 더 많은 것을 배우세요.


