서블릿 파일 업로드 및 파일 다운로드는 자바 웹 애플리케이션에서 흔한 작업입니다. 최근에 자바 서블릿에 대해 많이 써 왔으므로 서블릿 파일 업로드를 서버로 다운로드하는 샘플 예제를 제공하기로 생각했습니다.
서블릿 파일 업로드
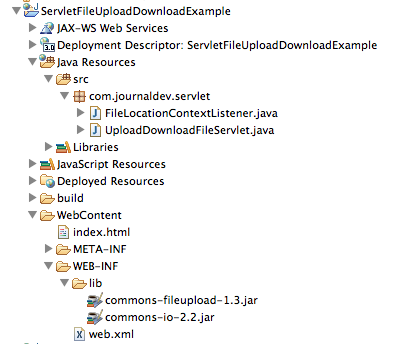
우리의 사용 사례는 클라이언트가 로컬 파일을 선택하여 서버로 업로드 할 수 있는 간단한 HTML 페이지를 제공하는 것입니다. 파일을 업로드하기 위한 요청을 제출하면 서블릿 프로그램이 서버의 디렉터리로 파일을 업로드 한 다음 사용자가 파일을 다운로드 할 수있는 URL을 제공합니다. 보안상의 이유로 사용자에게 파일을 다운로드하기 위한 직접적인 URL을 제공하지 않으며 대신 파일을 다운로드 할 수있는 링크가 제공되고 서블릿이 요청을 처리하고 파일을 사용자에게 보냅니다. Eclipse에서 동적 웹 프로젝트를 만들고 프로젝트 구조는 아래 이미지처럼 보일 것입니다.  웹 애플리케이션의 모든 구성 요소를 살펴보고 구현을 이해해 보겠습니다.
서버로 파일 업로드하기 위한 HTML 페이지
우리는 서블릿에 POST 요청을 보내고 폼을 제출하여 파일을 서버에 업로드할 수 있습니다. 파일을 업로드할 때는 GET 방식을 사용할 수 없습니다. 또 다른 중요한 점은 폼의 enctype이 multipart/form-data여야 한다는 것입니다. 사용자 파일 시스템에서 파일을 선택하려면 input 요소를 사용하고 type을 file로 지정해야 합니다. 그래서 파일을 업로드하기 위한 간단한 HTML 페이지인 index.html을 다음과 같이 만들 수 있습니다:
<html>
<head></head>
<body>
<form action="UploadDownloadFileServlet" method="post" enctype="multipart/form-data">
Select File to Upload:<input type="file" name="fileName">
<br>
<input type="submit" value="Upload">
</form>
</body>
</html>
파일 업로드용 서버 파일 위치
파일을 서버의 특정 디렉토리에 저장해야 합니다. 이 디렉토리를 프로그램에 하드코딩할 수 있지만 더 유연하게 사용하기 위해 배포 기술자 컨텍스트 매개변수로 구성 가능하게 유지할 것입니다. 또한 업로드 파일 HTML 페이지를 환영 파일 목록에 추가할 것입니다. 우리의 web.xml 파일은 아래와 같이 보일 것입니다:
<?xml version="1.0" encoding="UTF-8"?>
<web-app xmlns:xsi="https://www.w3.org/2001/XMLSchema-instance" xmlns="https://java.sun.com/xml/ns/javaee" xsi:schemaLocation="https://java.sun.com/xml/ns/javaee https://java.sun.com/xml/ns/javaee/web-app_3_0.xsd" version="3.0">
  <display-name>ServletFileUploadDownloadExample</display-name>
  <welcome-file-list>
    <welcome-file>index.html</welcome-file>
  </welcome-file-list>
  <context-param>
    <param-name>tempfile.dir</param-name>
    <param-value>tmpfiles</param-value>
  </context-param>
</web-app>
파일 업로드 위치용 ServletContextListener
이 파일의 위치에 대한 컨텍스트 매개변수를 읽고 File 객체를 만들어야 하므로, 우리는 컨텍스트가 초기화될 때 이를 수행하는 ServletContextListener를 작성할 수 있습니다. 절대 디렉토리 위치와 File 객체를 컨텍스트 속성으로 설정하여 다른 서블릿에서 사용할 수 있습니다. 우리의 ServletContextListener 구현 코드는 아래와 같습니다.
package com.journaldev.servlet;

import java.io.File;

import javax.servlet.ServletContext;
import javax.servlet.ServletContextEvent;
import javax.servlet.ServletContextListener;
import javax.servlet.annotation.WebListener;

@WebListener
public class FileLocationContextListener implements ServletContextListener {

    public void contextInitialized(ServletContextEvent servletContextEvent) {
    	String rootPath = System.getProperty("catalina.home");
    	ServletContext ctx = servletContextEvent.getServletContext();
    	String relativePath = ctx.getInitParameter("tempfile.dir");
    	File file = new File(rootPath + File.separator + relativePath);
    	if(!file.exists()) file.mkdirs();
    	System.out.println("File Directory created to be used for storing files");
    	ctx.setAttribute("FILES_DIR_FILE", file);
    	ctx.setAttribute("FILES_DIR", rootPath + File.separator + relativePath);
    }

	public void contextDestroyed(ServletContextEvent servletContextEvent) {
		// 필요한 경우 정리를 수행합니다.
	}

}
파일 업로드 다운로드 서블릿
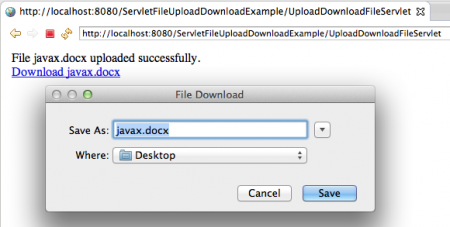
업데이트: 서블릿 사양 3은 API에서 서버에 파일을 업로드하는 기능을 추가했으므로 제3 자 API를 사용할 필요가 없습니다. Servlet 3 파일 업로드를 확인하십시오. 파일 업로드에는 프로젝트에서 버전 1.3을 사용하는 유틸리티인 아파치 커먼스 파일 업로드를 사용할 것입니다. FileUpload는 아파치 커먼스 IO jar에 종속되므로 프로젝트의 lib 디렉토리에 두어야 합니다. 위의 이미지에서 프로젝트 구조를 볼 수 있듯이. 우리는 DiskFileItemFactory 팩토리를 사용할 것입니다. 이 팩토리는 HttpServletRequest 객체를 구문 분석하고 FileItem 목록을 반환하는 메서드를 제공합니다. FileItem은 업로드해야 하는 파일의 파일 이름, 폼의 필드 이름, 크기 및 컨텐츠 유형 세부 정보를 가져오는 유용한 메서드를 제공합니다. 디렉토리에 파일을 쓰려면 File 객체를 만들고 FileItem의 write() 메서드에 전달하면 됩니다. 서블릿의 전체 목적이 파일을 업로드하는 것이므로 서블릿의 init() 메서드를 재정의하여 서블릿의 DiskFileItemFactory 객체 인스턴스를 초기화할 것입니다. 우리는 이 객체를 doPost() 메서드 구현에서 서버 디렉토리에 파일을 업로드하는 데 사용할 것입니다. 파일이 성공적으로 업로드되면 파일을 다운로드할 수 있는 URL을 클라이언트에게 응답으로 보낼 것입니다. HTML 링크는 GET 메서드를 사용하므로 URL에 파일 이름을 매개변수로 추가하고 동일한 서블릿의 doGet() 메서드를 사용하여 파일 다운로드 프로세스를 구현할 수 있습니다. 파일 다운로드 서블릿을 구현하기 위해 먼저 파일의 InputStream을 열고 ServletContext.getMimeType() 메서드를 사용하여 파일의 MIME 유형을 가져와 응답 콘텐츠 유형으로 설정할 것입니다. 또한 파일의 길이를 응답 콘텐츠 길이로 설정해야 합니다. 파일을 응답으로 보내고 있다는 것을 클라이언트가 이해하도록 하려면 “Content-Disposition” 헤더를 설정해야 하며 값은 “첨부; 파일 이름=“fileName”으로 설정해야 합니다. 응답 구성 설정이 완료되면 InputStream에서 파일 콘텐츠를 읽어 ServletOutputStream에 쓰고 출력을 클라이언트에 플러시하면 됩니다. 최종적으로 구현한 UploadDownloadFileServlet 서블릿은 아래와 같습니다.
package com.journaldev.servlet;

import java.io.File;
import java.io.FileInputStream;
import java.io.IOException;
import java.io.InputStream;
import java.io.PrintWriter;
import java.util.Iterator;
import java.util.List;

import javax.servlet.ServletContext;
import javax.servlet.ServletException;
import javax.servlet.ServletOutputStream;
import javax.servlet.annotation.WebServlet;
import javax.servlet.http.HttpServlet;
import javax.servlet.http.HttpServletRequest;
import javax.servlet.http.HttpServletResponse;

import org.apache.commons.fileupload.FileItem;
import org.apache.commons.fileupload.FileUploadException;
import org.apache.commons.fileupload.disk.DiskFileItemFactory;
import org.apache.commons.fileupload.servlet.ServletFileUpload;

@WebServlet("/UploadDownloadFileServlet")
public class UploadDownloadFileServlet extends HttpServlet {
	private static final long serialVersionUID = 1L;
    private ServletFileUpload uploader = null;
	@Override
	public void init() throws ServletException{
		DiskFileItemFactory fileFactory = new DiskFileItemFactory();
		File filesDir = (File) getServletContext().getAttribute("FILES_DIR_FILE");
		fileFactory.setRepository(filesDir);
		this.uploader = new ServletFileUpload(fileFactory);
	}
	protected void doGet(HttpServletRequest request, HttpServletResponse response) throws ServletException, IOException {
		String fileName = request.getParameter("fileName");
		if(fileName == null || fileName.equals("")){
			throw new ServletException("File Name can't be null or empty");
		}
		File file = new File(request.getServletContext().getAttribute("FILES_DIR")+File.separator+fileName);
		if(!file.exists()){
			throw new ServletException("File doesn't exists on server.");
		}
		System.out.println("File location on server::"+file.getAbsolutePath());
		ServletContext ctx = getServletContext();
		InputStream fis = new FileInputStream(file);
		String mimeType = ctx.getMimeType(file.getAbsolutePath());
		response.setContentType(mimeType != null? mimeType:"application/octet-stream");
		response.setContentLength((int) file.length());
		response.setHeader("Content-Disposition", "attachment; filename=\"" + fileName + "\"");

		ServletOutputStream os = response.getOutputStream();
		byte[] bufferData = new byte[1024];
		int read=0;
		while((read = fis.read(bufferData))!= -1){
			os.write(bufferData, 0, read);
		}
		os.flush();
		os.close();
		fis.close();
		System.out.println("File downloaded at client successfully");
	}

	protected void doPost(HttpServletRequest request, HttpServletResponse response) throws ServletException, IOException {
		if(!ServletFileUpload.isMultipartContent(request)){
			throw new ServletException("Content type is not multipart/form-data");
		}

		response.setContentType("text/html");
		PrintWriter out = response.getWriter();
		out.write("<html><head></head><body>");
		try {
			List<FileItem> fileItemsList = uploader.parseRequest(request);
			Iterator<FileItem> fileItemsIterator = fileItemsList.iterator();
			while(fileItemsIterator.hasNext()){
				FileItem fileItem = fileItemsIterator.next();
				System.out.println("FieldName="+fileItem.getFieldName());
				System.out.println("FileName="+fileItem.getName());
				System.out.println("ContentType="+fileItem.getContentType());
				System.out.println("Size in bytes="+fileItem.getSize());

				File file = new File(request.getServletContext().getAttribute("FILES_DIR")+File.separator+fileItem.getName());
				System.out.println("Absolute Path at server="+file.getAbsolutePath());
				fileItem.write(file);
				out.write("File "+fileItem.getName()+ " uploaded successfully.");
				out.write("<br>");
				out.write("<a href=\"UploadDownloadFileServlet?fileName="+fileItem.getName()+"\">Download "+fileItem.getName()+"</a>");
			}
		} catch (FileUploadException e) {
			out.write("Exception in uploading file.");
		} catch (Exception e) {
			out.write("Exception in uploading file.");
		}
		out.write("</body></html>");
	}

}
서블릿 파일 업로드 다운로드 프로젝트 다운로드
아파치 커먼즈 IO jar 및 아파치 커먼즈 파일 업로드 jar은 아래 URL에서 다운로드할 수 있습니다. https://commons.apache.org/proper/commons-fileupload/download_fileupload.cgi https://commons.apache.org/proper/commons-io/download_io.cgi
다음 기사를 확인하십시오. Servlet 예외 처리에 관한 시리즈 중 하나입니다.
Source:
https://www.digitalocean.com/community/tutorials/servlet-upload-file-download-example


