


이번 시리즈에서는 적어도 두 가지의 접근 제어 방법을 자세히 살펴보았습니다: 표준 ugo/rwx 권한 (사용자 및 그룹 관리 – 파트 3) 및 액세스 제어 목록 (파일 시스템에서 ACL 구성 – 파트 7).
첫 번째 수준의 권한 및 액세스 제어 메커니즘으로 필요하지만, 보안 향상된 리눅스 (줄여서 SELinux)에 의해 해결되는 일부 제한 사항이 있습니다.
그러한 제한 사항 중 하나는 사용자가 잘못된 chmod 명령을 통해 파일이나 디렉토리를 보안 위반으로 노출시킬 수 있고, 결과적으로 해당 사용자가 시작한 모든 프로세스가 해당 사용자가 소유한 파일에 대해 원하는 대로 할 수 있게 되어, 악의적이거나 다른 방식으로 손상된 소프트웨어가 전체 시스템에 루트 수준 액세스를 얻을 수 있습니다.
이러한 제한 사항을 고려하여 미국 국가 안보국 (NSA)가 먼저 SELinux이라는 유연한 의무적 액세스 제어 방법을 고안하여 프로세스가 시스템 객체(파일, 디렉토리, 네트워크 포트 등)에 액세스하거나 다른 작업을 수행하는 능력을 제한하여 필요에 따라 나중에 수정할 수 있는 최소 권한 모델로 만들었습니다. 간단히 말해, 시스템의 각 요소에는 기능 수행에 필요한 액세스만 부여됩니다.
RHEL 7, SELinux은 커널 자체에 통합되어 있으며 기본적으로 Enforcing 모드로 활성화됩니다. 이 문서에서는 SELinux와 그 작동과 관련된 기본 개념을 간단히 설명하겠습니다.
SELinux 모드
SELinux는 세 가지 다른 방식으로 작동할 수 있습니다:
- Enforcing: SELinux는 SELinux 정책 규칙에 따라 액세스를 거부하며, 이는 보안 엔진을 제어하는 일련의 지침입니다.
- Permissive: SELinux는 액세스를 거부하지 않지만, Enforcing 모드에서 실행 중이었다면 거부되었을 작업에 대한 로그가 기록됩니다.
- Disabled (자명한).
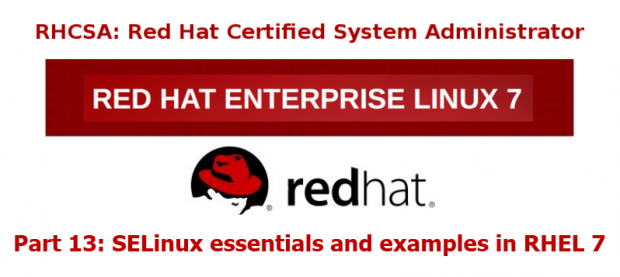
getenforce 명령은 현재 SELinux 모드를 표시하며, setenforce (뒤에 1 또는 0을 붙인)은 현재 세션 중에 모드를 Enforcing 또는 Permissive로 변경하는 데 사용됩니다.
로그아웃 및 재부팅 시 지속성을 달성하려면 /etc/selinux/config 파일을 편집하고 SELINUX 변수를 enforcing, permissive, 또는 disabled 중 하나로 설정해야 합니다:
# getenforce
# setenforce 0
# getenforce
# setenforce 1
# getenforce
# cat /etc/selinux/config
일반적으로 SELinux 모드 간 전환을 위해 setenforce를 사용하여 첫 번째 문제 해결 단계로 사용합니다. 현재 SELinux가 enforcing로 설정되어 있고 특정 문제가 발생할 때 이를 permissive로 설정하면 SELinux 권한 문제를 확인할 수 있습니다.
SELinux 컨텍스트
A SELinux context consists of an access control environment where decisions are made based on SELinux user, role, and type (and optionally a level):
- A SELinux user complements a regular Linux user account by mapping it to a SELinux user account, which in turn is used in the SELinux context for processes in that session, in order to explicitly define their allowed roles and levels.
- 역할의 개념은 도메인과 SELinux 사용자 사이에 중개자로 기능하며, 어떤 프로세스 도메인과 파일 유형이 어떻게 アクセ스 할 수 있는지 정의합니다. 이것은 您的 시스템을 特权提升攻撃에 대한 漏洞로부터 보호하게 됩니다.
- A type defines an SELinux file type or an SELinux process domain. Under normal circumstances, processes are prevented from accessing files that other processes use, and and from accessing other processes, thus access is only allowed if a specific SELinux policy rule exists that allows it.
다음의 예제를 통해 모든 것이 어떻게 동작하는지 보겠습니다.
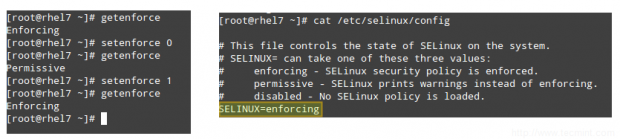
EXAMPLE 1: sshd 守护进程的默认端口更改
在 Securing SSH – Part 8 我们解释了更改 sshd 监听的默认端口是保护您的服务器免受外部攻击的第一个安全措施之一。让我们编辑 /etc/ssh/sshd_config 文件并将端口更改为 9999:
Port 9999
保存更改,并重新启动 sshd:
# systemctl restart sshd
# systemctl status sshd
正如您所见,sshd 未能启动。但这到底是怎么回事呢?
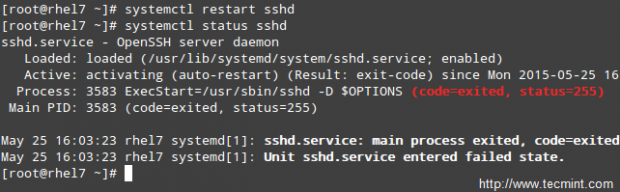
A quick inspection of /var/log/audit/audit.log indicates that sshd has been denied permissions to start on port 9999 (SELinux log messages include the word “AVC” so that they might be easily identified from other messages) because that is a reserved port for the JBoss Management service:
# cat /var/log/audit/audit.log | grep AVC | tail -1

此时,您可以禁用 SELinux(但是不要这样做!)如之前所述,并尝试再次启动 sshd,它应该可以工作。然而,semanage 工具可以告诉我们需要更改什么,以便我们可以在任何端口上无问题地启动 sshd。
运行,
# semanage port -l | grep ssh
以获取 SELinux 允许 sshd 监听的端口列表。
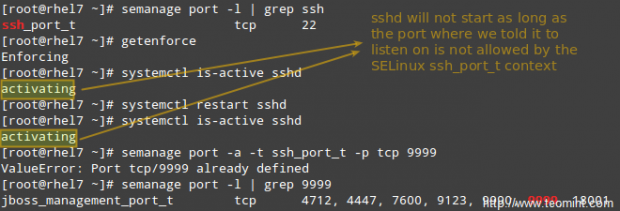
所以让我们将 /etc/ssh/sshd_config 文件中的端口更改为端口 9998,将端口添加到 ssh_port_t 上下文,然后重新启动服务:
# semanage port -a -t ssh_port_t -p tcp 9998
# systemctl restart sshd
# systemctl is-active sshd

이번에는 서비스가 성공적으로 시작되었음을 알 수 있습니다. 이 예제는 SELinux가 TCP 포트 번호를 자체 포트 유형 내부 정의로 제어한다는 사실을 보여줍니다.
예제 2: httpd가 sendmail에 액세스 허용
이 예제는 SELinux가 한 프로세스가 다른 프로세스에 액세스하는 것을 관리하는 것을 보여줍니다. RHEL 7 서버에서 Apache와 함께 mod_security 및 mod_evasive를 구현한다면, httpd가 sendmail에 액세스하도록 허용해야하는 (D)DoS 공격 이후에 메일 알림을 보내기 위해서입니다. 다음 명령에서 -P 플래그를 생략하면 변경이 재부팅 간에 지속되지 않습니다.
# semanage boolean -1 | grep httpd_can_sendmail
# setsebool -P httpd_can_sendmail 1
# semanage boolean -1 | grep httpd_can_sendmail

위의 예제에서 알 수 있듯이, SELinux boolean 설정(또는 boolean)은 SELinux 정책에 내장된 true/false 규칙입니다. 모든 불리언을 semanage boolean -l로 나열할 수 있으며, 출력을 필터링하기 위해 grep에 파이프로 전달할 수도 있습니다.
예제 3: 기본 디렉토리가 아닌 다른 디렉토리에서 정적 사이트 제공
기본 디렉토리(/var/www/html)가 아닌 다른 디렉토리(/websites)에서 정적 웹사이트를 제공한다고 가정해보겠습니다(예를 들어 웹 파일을 공유 네트워크 드라이브에 저장하고 /websites에 마운트해야 하는 경우).
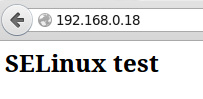
a). Create an index.html file inside /websites with the following contents:
<html>
<h2>SELinux test</h2>
</html>
그렇다면,
# ls -lZ /websites/index.html
index.html 파일이 default_t SELinux 형식으로 표시되어 있으며, Apache에서 접근할 수 없습니다:

b). Change the DocumentRoot directive in /etc/httpd/conf/httpd.conf to /websites and don’t forget to update the corresponding Directory block. Then, restart Apache.
c). Browse to http://<web server IP address>, and you should get a 503 Forbidden HTTP response.
d). Next, change the label of /websites, recursively, to the httpd_sys_content_t type in order to grant Apache read-only access to that directory and its contents:
# semanage fcontext -a -t httpd_sys_content_t "/websites(/.*)?"
e). Finally, apply the SELinux policy created in d):
# restorecon -R -v /websites
이제 Apache를 다시 시작하고 http://<web server IP address>로 다시 접속하면 HTML 파일이 정확하게 보여지는 것을 확인할 수 있습니다:
요약
이 글에서는 SELinux의 기본적인 내용을 familiarize 했습니다. 주요 주제에 대한 전체 자세한 explication은 單独의 記事에서는 모두 표현할 수 없이, 이 가이드에 표현된 principes를 기반으로 더 상세한 주제로 進军하고자 하시면 도울 수 있습니다.
제가 추천하고자 하는 기본적인 자료가 두 가지입니다: NSA SELinux 페이지와 RHEL 7 SELinux 사용자와 관리자 가이드。
문의 사항이나 코멘트를 달면 기다립니다.
Source:
https://www.tecmint.com/selinux-essentials-and-control-filesystem-access/