


그래픽 사용자 인터페이스(GUI) 응용 프로그램 만들기는 이Grid를 실제로 표현하고 프로그램을 사용자 friednly하게 만들어 주는 fantastiic한 방법입니다.
PyGObject는 Python 라이브러리로, 개발자들이 Linux 데스크톱에서 GTK(GIMP Toolkit) 프레임웍을 사용하여 GUI 응용 프로그램을 만들 수 있도록 합니다. GTK는 Linux 환경에서 широ하게 사용되며, 많은 인기 있는 데스크톱 응용 프로그램 같은 Gedit, GNOME terminal를 동시에 지원합니다.
이 記事で는 PyGObject을 사용하여 Linux 데스크톱 환경에서 GUI 응용 프로그램을 만드는 방법을 탐구할 것입니다. 우리는 시작하기 전에 PyGObject이란 무엇인지, 어떻게 설치하는지, 그리고 간단한 GUI 응용 프로그램을 만들어 봐야 합니다.
Schp 1: Python과 GTK 설치하기
PyGObject을 사용하기 위해서는 Python이 설치되어 있어야 합니다. 대부분의 오늘날의 Linux 배포판은 Python을 이미 기본적으로 설치되어 있지만, 실제 실행하면 다음과 같습니다.
python3 --version

Python 3.12.3
Python이 설치되지 않았다면, 자신의 Linux 배포판에 적절한 명령어를 사용하여 설치할 수 있습니다.
sudo apt install python3       [On Debian, Ubuntu and Mint]
sudo dnf install python3       [On RHEL/CentOS/Fedora and Rocky/AlmaLinux]
sudo apk add python3           [On Alpine Linux]
sudo pacman -S python          [On Arch Linux]
sudo zypper install python3    [On OpenSUSE]
지금은 Python의 PyGObject binding과 GTK 开発 라이브러리를 설치해야 합니다.
sudo apt install python3-gi gir1.2-gtk-3.0    [On Debian, Ubuntu and Mint]
sudo dnf install python3-gobject gtk3         [On RHEL/CentOS/Fedora and Rocky/AlmaLinux]
sudo apk add py3-gobject gtk+3                [On Alpine Linux]
sudo pacman -S python-gobject gtk3            [On Arch Linux]
sudo zypper install python3-gobject gtk3      [On OpenSUSE]
2단계: 리눅스에서 PyGObject 설치
파이썬과 GTK 개발 라이브러리가 설치되었으면, 특정 리눅스 배포판에 맞는 명령어로 PyGObject를 설치할 수 있습니다.
sudo apt install python3-gi           [On Debian, Ubuntu and Mint]
sudo dnf install pygobject3           [On RHEL/CentOS/Fedora and Rocky/AlmaLinux]
sudo apk add py3-gobject              [On Alpine Linux]
sudo pacman -S python-gobject         [On Arch Linux]
sudo zypper install python3-gobject   [On OpenSUSE]
설치 후, PyGObject와 GTK로 GUI 애플리케이션 개발을 시작할 준비가 됩니다.
리눅스에서 첫 번째 PyGObject GUI 애플리케이션 만들기
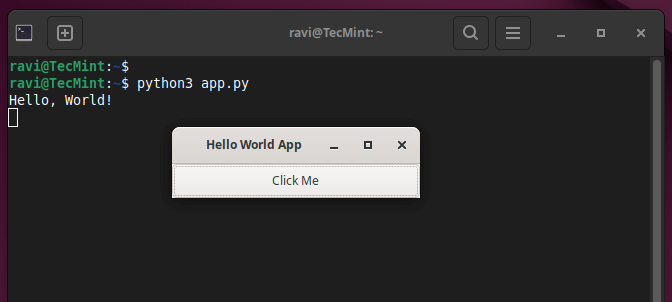
이제 간단한 PyGObject 애플리케이션을 만들어 보겠습니다. 이 애플리케이션은 단 하나의 버튼을 가진 창을 보여줍니다. 버튼을 클릭하면 “Hello, World!” 이라는 메시지를 표시합니다.
`app.py`라는 파이썬 파일을 생성하고, PyGObject 애플리케이션의 기본 구조를 작성하겠습니다.
import gi
gi.require_version("Gtk", "3.0")
from gi.repository import Gtk

class MyApp(Gtk.Window):
    def __init__(self):
        Gtk.Window.__init__(self, title="Hello World App")
        self.set_size_request(300, 100)

        # Creating a button and adding it to the window
        button = Gtk.Button(label="Click Me")
        button.connect("clicked", self.on_button_clicked)
        self.add(button)

    def on_button_clicked(self, widget):
        print("Hello, World!")

# Initialize the application
app = MyApp()
app.connect("destroy", Gtk.main_quit)  # Close the app when window is closed
app.show_all()
Gtk.main()
코드 설명:
- 最初의 두 줄은 필요한 PyGObject 모듈을 가져옵니다. 우리는 사용하고자 하는 GTK 버전을 지정합니다 (
3.0이 경우입니다). MyApp클래스는 애플리케이션의 주 창을 나타내는Gtk.Window를 상속받습니다.Gtk.Button를 사용하여 버튼을 생성하고, 버튼의 레이블을 “Click Me“로 설정합니다. 또한 버튼의 “clicked” 신호를on_button_clicked메서드에 연결하여 클릭 시 “Hello, World!“을 인쇄합니다.- 애플리케이션의 메인 루프는
Gtk.main()을 호출하여 시작됩니다. 이 루프는 이벤트(클릭 등)를 기다리고 애플리케이션을 적절하게 업데이트합니다.
애플리케이션을 실행하려면 app.py 파일을 저장한 디렉토리로 이동하고 다음 명령을 실행합니다:
python3 app.py
버튼이 “클릭하세요”라고 표시된 창이 나타납니다. 버튼을 클릭하면 터미널에 “안녕, 세계!”가 출력됩니다.
PyGObject 애플리케이션에 더 많은 기능 추가하기
이제 더 많은 위젯과 상호 작용을 추가하여 애플리케이션을 확장해봅시다.
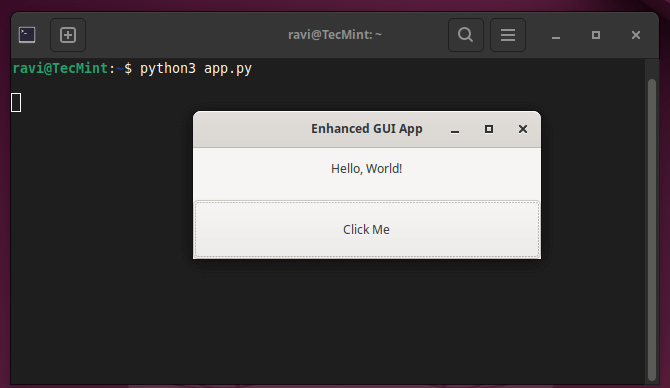
1. 레이블 추가
Gtk.Label을 추가하여 터미널에 출력하는 대신 창 내에서 메시지를 표시하고 애플리케이션을 강화할 수 있습니다.
import gi
gi.require_version("Gtk", "3.0")
from gi.repository import Gtk

class MyApp(Gtk.Window):
    def __init__(self):
        Gtk.Window.__init__(self, title="Enhanced GUI App")
        self.set_size_request(400, 200)

        # Create a vertical box layout
        vbox = Gtk.Box(orientation=Gtk.Orientation.VERTICAL, spacing=10)
        self.add(vbox)

        # Create a label
        self.label = Gtk.Label(label="Press the button to see a message")
        vbox.pack_start(self.label, True, True, 0)

        # Create a button
        button = Gtk.Button(label="Click Me")
        button.connect("clicked", self.on_button_clicked)
        vbox.pack_start(button, True, True, 0)

    def on_button_clicked(self, widget):
        self.label.set_text("Hello, World!")

# Initialize the application
app = MyApp()
app.connect("destroy", Gtk.main_quit)
app.show_all()
Gtk.main()
변경 사항 설명:
Gtk.Box를 사용하여 위젯을 수직으로 정렬하고, 레이블과 버튼을 하나紧接着 다른 것 처럼 배열할 수 있습니다.Gtk.Label위젯을 추가하여 창 내에서 메시지를 표시합니다.- 터미널에 출력하는 대신
on_button_clicked함수는 이제 레이블의 텍스트를 업데이트합니다.
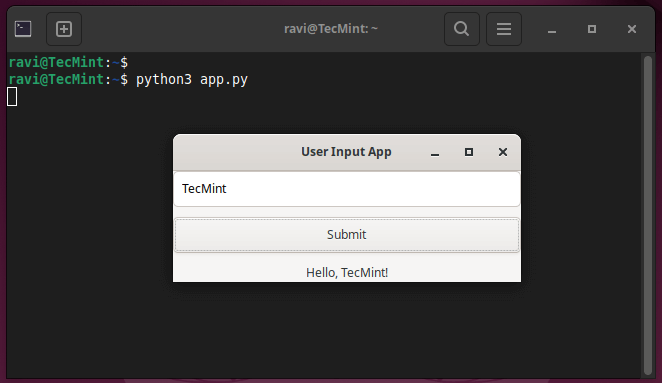
2. 사용자 입력을 위한 엔트리 필드 추가
다음으로 Gtk.Entry 위젯을 추가하여 사용자 입력을 허용하고, 사용자가 이름을 입력하고 버튼을 클릭하여 개인化的인 인사말을 표시하는 간단한 애플리케이션을 만들 수 있습니다.
import gi
gi.require_version("Gtk", "3.0")
from gi.repository import Gtk

class MyApp(Gtk.Window):
    def __init__(self):
        Gtk.Window.__init__(self, title="User Input App")
        self.set_size_request(400, 200)

        # Create a vertical box layout
        vbox = Gtk.Box(orientation=Gtk.Orientation.VERTICAL, spacing=10)
        self.add(vbox)

        # Create an Entry widget for user input
        self.entry = Gtk.Entry()
        self.entry.set_placeholder_text("Enter your name")
        vbox.pack_start(self.entry, True, True, 0)

        # Create a button
        button = Gtk.Button(label="Submit")
        button.connect("clicked", self.on_button_clicked)
        vbox.pack_start(button, True, True, 0)

        # Create a label to display the greeting
        self.label = Gtk.Label(label="")
        vbox.pack_start(self.label, True, True, 0)

    def on_button_clicked(self, widget):
        name = self.entry.get_text()
        if name:
            self.label.set_text(f"Hello, {name}!")
        else:
            self.label.set_text("Please enter your name.")

# Initialize the application
app = MyApp()
app.connect("destroy", Gtk.main_quit)
app.show_all()
Gtk.main()
코드 설명:
Gtk.Entry는 사용자가 이름을 입력할 수 있는 입력 필드입니다.set_placeholder_text메서드는 사용자가 무언가를 입력하기 전까지 입력 상자에 힌트를 보여줍니다.- 눌러진 按钮 之后, 입력한 이름을
get_text()로 가져와 라벨에 사용자 지정 인사로 보여줍니다.
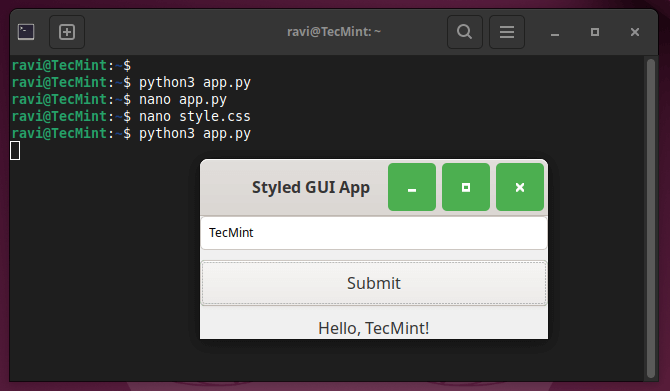
3. CSS를 사용하여 응용 프로그램 스타일링
PyGObject는 style.css라는 CSS 파일을 사용하여 응용 프로그램 위젯에 사용자 정의 스타일을 적용할 수 있습니다.
window {
    background-color: #f0f0f0;
}

button {
    background-color: #4CAF50;
    color: white;
    border-radius: 5px;
    padding: 10px;
}

label {
    font-size: 16px;
    color: #333;
}
现在, Python 코드를 수정하여 이 CSS 파일을 로드하고 적용하는 것을 해봅시다:
import gi
gi.require_version("Gtk", "3.0")
from gi.repository import Gtk, Gdk

class MyApp(Gtk.Window):
    def __init__(self):
        Gtk.Window.__init__(self, title="Styled GUI App")
        self.set_size_request(400, 200)

        # Load CSS
        css_provider = Gtk.CssProvider()
        css_provider.load_from_path("style.css")
        screen = Gdk.Screen.get_default()
        style_context = Gtk.StyleContext()
        style_context.add_provider_for_screen(screen, css_provider, Gtk.STYLE_PROVIDER_PRIORITY_USER)

        # Create a vertical box layout
        vbox = Gtk.Box(orientation=Gtk.Orientation.VERTICAL, spacing=10)
        self.add(vbox)

        # Create an Entry widget for user input
        self.entry = Gtk.Entry()
        self.entry.set_placeholder_text("Enter your name")
        vbox.pack_start(self.entry, True, True, 0)

        # Create a button
        button = Gtk.Button(label="Submit")
        button.connect("clicked", self.on_button_clicked)
        vbox.pack_start(button, True, True, 0)

        # Create a label to display the greeting
        self.label = Gtk.Label(label="")
        vbox.pack_start(self.label, True, True, 0)

    def on_button_clicked(self, widget):
        name = self.entry.get_text()
        if name:
            self.label.set_text(f"Hello, {name}!")
        else:
            self.label.set_text("Please enter your name.")

# Initialize the application
app = MyApp()
app.connect("destroy", Gtk.main_quit)
app.show_all()
Gtk.main()
CSS 변경 설명:
- 按钮에 초록색 배경이 있고, 라abel은 사용자 지정 글씨 사이즈와 색상을 가지고 있습니다.
- 按钮의 경계는 现代化的 모습을 위해 둥글게 만들어 졌습니다.
결론
PyGObject는 Python과 GTK의 풍부한 기능을 이용하여 Linux 데스크톱에서 GUI 응용 프로그램을 만드는 強力한 도구입니다.GTK의 풍부한 기능과 Python의 유연성과 간단성을 이용하여 기능이 풍부하고 시각적인 응용 프로그램을 개발할 수 있습니다.
이 가이드에서는 PyGObject의 기본적인 세팅, 간단한 윈도우 생성, 按钮 눌렀을 때 이벤트 처리, 사용자 입력 추가, 그리고 사용자 지정 CSS 스타일을 적용하는 것을 涵蓋하였습니다.
이러한 예를 확장하여 더 複雑한 응용 프로그램을 개발할 수 있습니다. 예를 들어 file managers, media players, oder 甚至 전문적 수준의 ソフト웨어를 생성할 수 있습니다.PyGObject과 GTK를 사용하면 데스크톱 응용 프로그램을 만들 수 있는 가능성이 ほぼ 无线이기 때문입니다!
Source:
https://www.tecmint.com/pygobject-create-python-gui-application-linux/