


몇 년 동안 이러한 프레임워크, 제품, 그리고 서비스를 발굴해 기술 전문가들이 지능적 재산의 가치를 늘릴 수 있도록 하는 것을 목표로 하고 있습니다. 이는 나에게는 여전히 기술적인 학습 기회를 가득 덮은 멋진 여정입니다.
내가 엔지니어로서 최근 생각한 것은 이미 이전에 얘기했던 기존의 개념에 대해 두 번째의 이득을 발견할 수 있는 상황이 있는지였습니다. 즉, 기존의 원본 솔루션과 같은 영향력을 가진 다른 이득을 발견할 수 있는지 여부입니다.
이篇文章에서는 GraphQL에 대해 더 깊이 있게 살펴보고자 합니다.
“REST를 내려놓을 때가 되었을 때”라는 기사에서 GraphQL이 RESTful 서비스보다 우수한 실제 상황을 다루었습니다. Apollo Server를 사용하여 GraphQL API를 구축하고 배포하는 방법을 살펴보았습니다.
이에따라 이어지는 글에서는 실시간 데이터 수신을 위한 구독(subscriptions)을 통해 GraphQL에 대한 지식을 더욱 높이고자 합니다. 또한 구독을 위해 WebSocket 서비스를 구축해 보겠습니다.
리캡: 고객 360 사용 사례
지난 기사에서는 고객 360 사용 사례를 중심으로 다음과 같은 데이터 집합을 유지하는 가상 사업의 고객들을 다루었습니다:
- 고객 정보
- 주소 정보
- 연락 방법
- 신용 속성
그래큐(GraphQL)의 큰 장점은 하나의 그래큐 요청으로 고객 토큰(独占的 아이디)에 필요한 모든 데이터를 가져올 수 있다는 것입니다.
type Query {
    addresses: [Address]
    address(customer_token: String): Address
    contacts: [Contact]
    contact(customer_token: String): Contact
    customers: [Customer]
    customer(token: String): Customer
    credits: [Credit]
    credit(customer_token: String): Credit
}
顧客의 (360) 각面을 보기 위해 RESTful 접근法을 사용하는 것은 여러 요청과 응답을 结合起来할 필요가 있었습니다. 그래큐는 이러한 문제를 해결하는 좋은 솔루션을 제시합니다.
레벨 업 목표
인생의 어떤 부분에서 발전을 하기 위해서는 새로운 목표를 달성해야 합니다. 저의 목표에 대해서는 다음과 같습니다:
- 그래큐 내에서
subscriptions가치 기 dogma를 이해하고 실제로 적용하는 것 - WebSocket 구현을 사용하여 GraphQL subscription을 CONSUME하는 것
그래큐 내에서 문제 보고와 변화를 사용하는 것이 다음과 같은 조건을 만족시키는 것이 좋은 방법이라고 생각합니다:
- 大局에 대한 小幅, 좀 더 많은 변화를 감안하는 것
- 낮은 latency, 실시간 갱신 (예를 들어 챗 응용 프로그램)
이러한 이유로 GraphQL 내에서 subscription을 사용하는 것이 간단하지 않은 것에 의해 중요합니다. 하지만 그래큐 내에서 subscription을 구현하는 것은 서버를 깊이 dive deeper하고, 옆에 있는 응용 프로그램을 다시 설계해야 하는 것을 의미합니다.
幸運的是, 우리가 고객 360 예시를 사용하는 사용 사례는 subscriptions에 좋은 일정입니다. 또한, WebSocket 기반으로 그렇게 subscription을 사용하는 것을 도울 것입니다.
다시 한 遍, 나는 앞으로도 Apollo를 계속해서 사용할 것입니다.
subscriptions의 이해와 자신의 감안에 대한 인정하는 것을 통한 발전입니다.
まず、Apollo GraphQL 서버를 사용하여 구독을 지원하기 위해 필요한 라이브러리를 설치해야 합니다.
npm install ws
npm install graphql-ws @graphql-tools/schema
npm install graphql-subscriptions
이러한 항목을 설치한 후、원래의 저장소의 index.ts 파일을 更新하여 typedefs 상수를 다음과 같이 확장하는 것을 concentrating했습니다.
type Subscription {
    creditUpdated: Credit
}
또한 새 PubSub 인스턴스를 위한 상수를 설정하고 나중에 사용할 예시 구독을 생성했습니다.
const pubsub = new PubSub();

pubsub.publish('CREDIT_BALANCE_UPDATED', {
    creditUpdated: {
    }
});
기존의 解析器(resolvers)을 정리하고 이번에 사용할 新的 Subscription을 추가했습니다.
const resolvers = {
    Query: {
        addresses: () => addresses,
        address: (parent, args) => {
            const customer_token = args.customer_token;
            return addresses.find(address => address.customer_token === customer_token);
        },
        contacts: () => contacts,
        contact: (parent, args) => {
            const customer_token = args.customer_token;
            return contacts.find(contact => contact.customer_token === customer_token);
        },
        customers: () => customers,
        customer: (parent, args) => {
            const token = args.token;
            return customers.find(customer => customer.token === token);
        },
        credits: () => credits,
        credit: (parent, args) => {
            const customer_token = args.customer_token;
            return credits.find(credit => credit.customer_token === customer_token);
        }
    },
    Subscription: {
        creditUpdated: {
            subscribe: () => pubsub.asyncIterator(['CREDIT_BALANCE_UPDATED']),
        }
    }
};
그 다음으로 서버 구성을 重构(refactoring)하고 구독 디자인을 introduced했습니다.
const app = express();
const httpServer = createServer(app);
const wsServer = new WebSocketServer({
    server: httpServer,
    path: '/graphql'
});

const schema = makeExecutableSchema({ typeDefs, resolvers });
const serverCleanup = useServer({ schema }, wsServer);

const server = new ApolloServer({
    schema,
    plugins: [
        ApolloServerPluginDrainHttpServer({ httpServer }),
        {
            async serverWillStart() {
                return {
                    async drainServer() {
                        serverCleanup.dispose();
                    }
                };
            }
        }
    ],
});

await server.start();

app.use('/graphql', cors(), express.json(), expressMiddleware(server, {
    context: async () => ({ pubsub })
}));

const PORT = Number.parseInt(process.env.PORT) || 4000;
httpServer.listen(PORT, () => {
    console.log(`Server is now running on http://localhost:${PORT}/graphql`);
    console.log(`Subscription is now running on ws://localhost:${PORT}/graphql`);
});
고객이 주도적으로 更新(updates)하기를 위해 다음 메서드를 생성했습니다. 서비스가 실행되는 동안 ivafive secondsinterval로 $50의 クレジット Balanc을 增加了하고, 이 Balanc가 $10,000의 クレジット 한도를 달성하거나 초과되면, 이전 Balanc를 $2,500으로 리셋하여 クレジット 한도를 결제하는 것을 仿真했습니다.
function incrementCreditBalance() {
    if (credits[0].balance >= credits[0].credit_limit) {
        credits[0].balance = 0.00;
        console.log(`Credit balance reset to ${credits[0].balance}`);

    } else {
        credits[0].balance += 50.00;
        console.log(`Credit balance updated to ${credits[0].balance}`);
    }

    pubsub.publish('CREDIT_BALANCE_UPDATED', { creditUpdated: credits[0] });
    setTimeout(incrementCreditBalance, 5000);
}

incrementCreditBalance();
index.ts 전체 파일을 여기에서 찾을 수 있습니다.
Heroku에 배포하기
서비스가 준비되면 이제 이를 상호로 시행할 수 있는 것으로 서비스를 배포해야 합니다. 지난 것처럼 Heroku가 좋았으며 저는 이를 사용하기 위해 쉽다고 생각하므로 이 방법을 继续保持할 것입니다.
시작하기 위해서는 다음과 같은 Heroku CLI 명령을 실행해야 합니다.
$ heroku login
$ heroku create jvc-graphql-server-sub

Creating jvc-graphql-server-sub... done
https://jvc-graphql-server-sub-1ec2e6406a82.herokuapp.com/ | https://git.heroku.com/jvc-graphql-server-sub.git
명령어는 자동으로 Heroku가 사용하는 저장소의 远处(remote)를 추가합니다.
$ git remote
heroku
origin
지난 記事에서 我已经提到 Apollo Server가 생산 環境에서 Apollo Explorer를 사용하지 않는다. Apollo Explorer를 우리의 需求에 맞게 사용할 수 있는 것을 위해, NODE_ENV 환경 변수를 開発 모드로 설정해야 했습니다. 다음과 같은 CLI 명령어로 설정했습니다.:
$ heroku config:set NODE_ENV=development

Setting NODE_ENV and restarting jvc-graphql-server-sub... done, v3
NODE_ENV: development
이제 코드를 Heroku에 배포할 준비가 되었습니다:
$ git commit --allow-empty -m 'Deploy to Heroku'
$ git push heroku
Heroku 대시보드로 素早く 보았더니, Apollo Server가 문제 없이 실행되고 있었습니다:
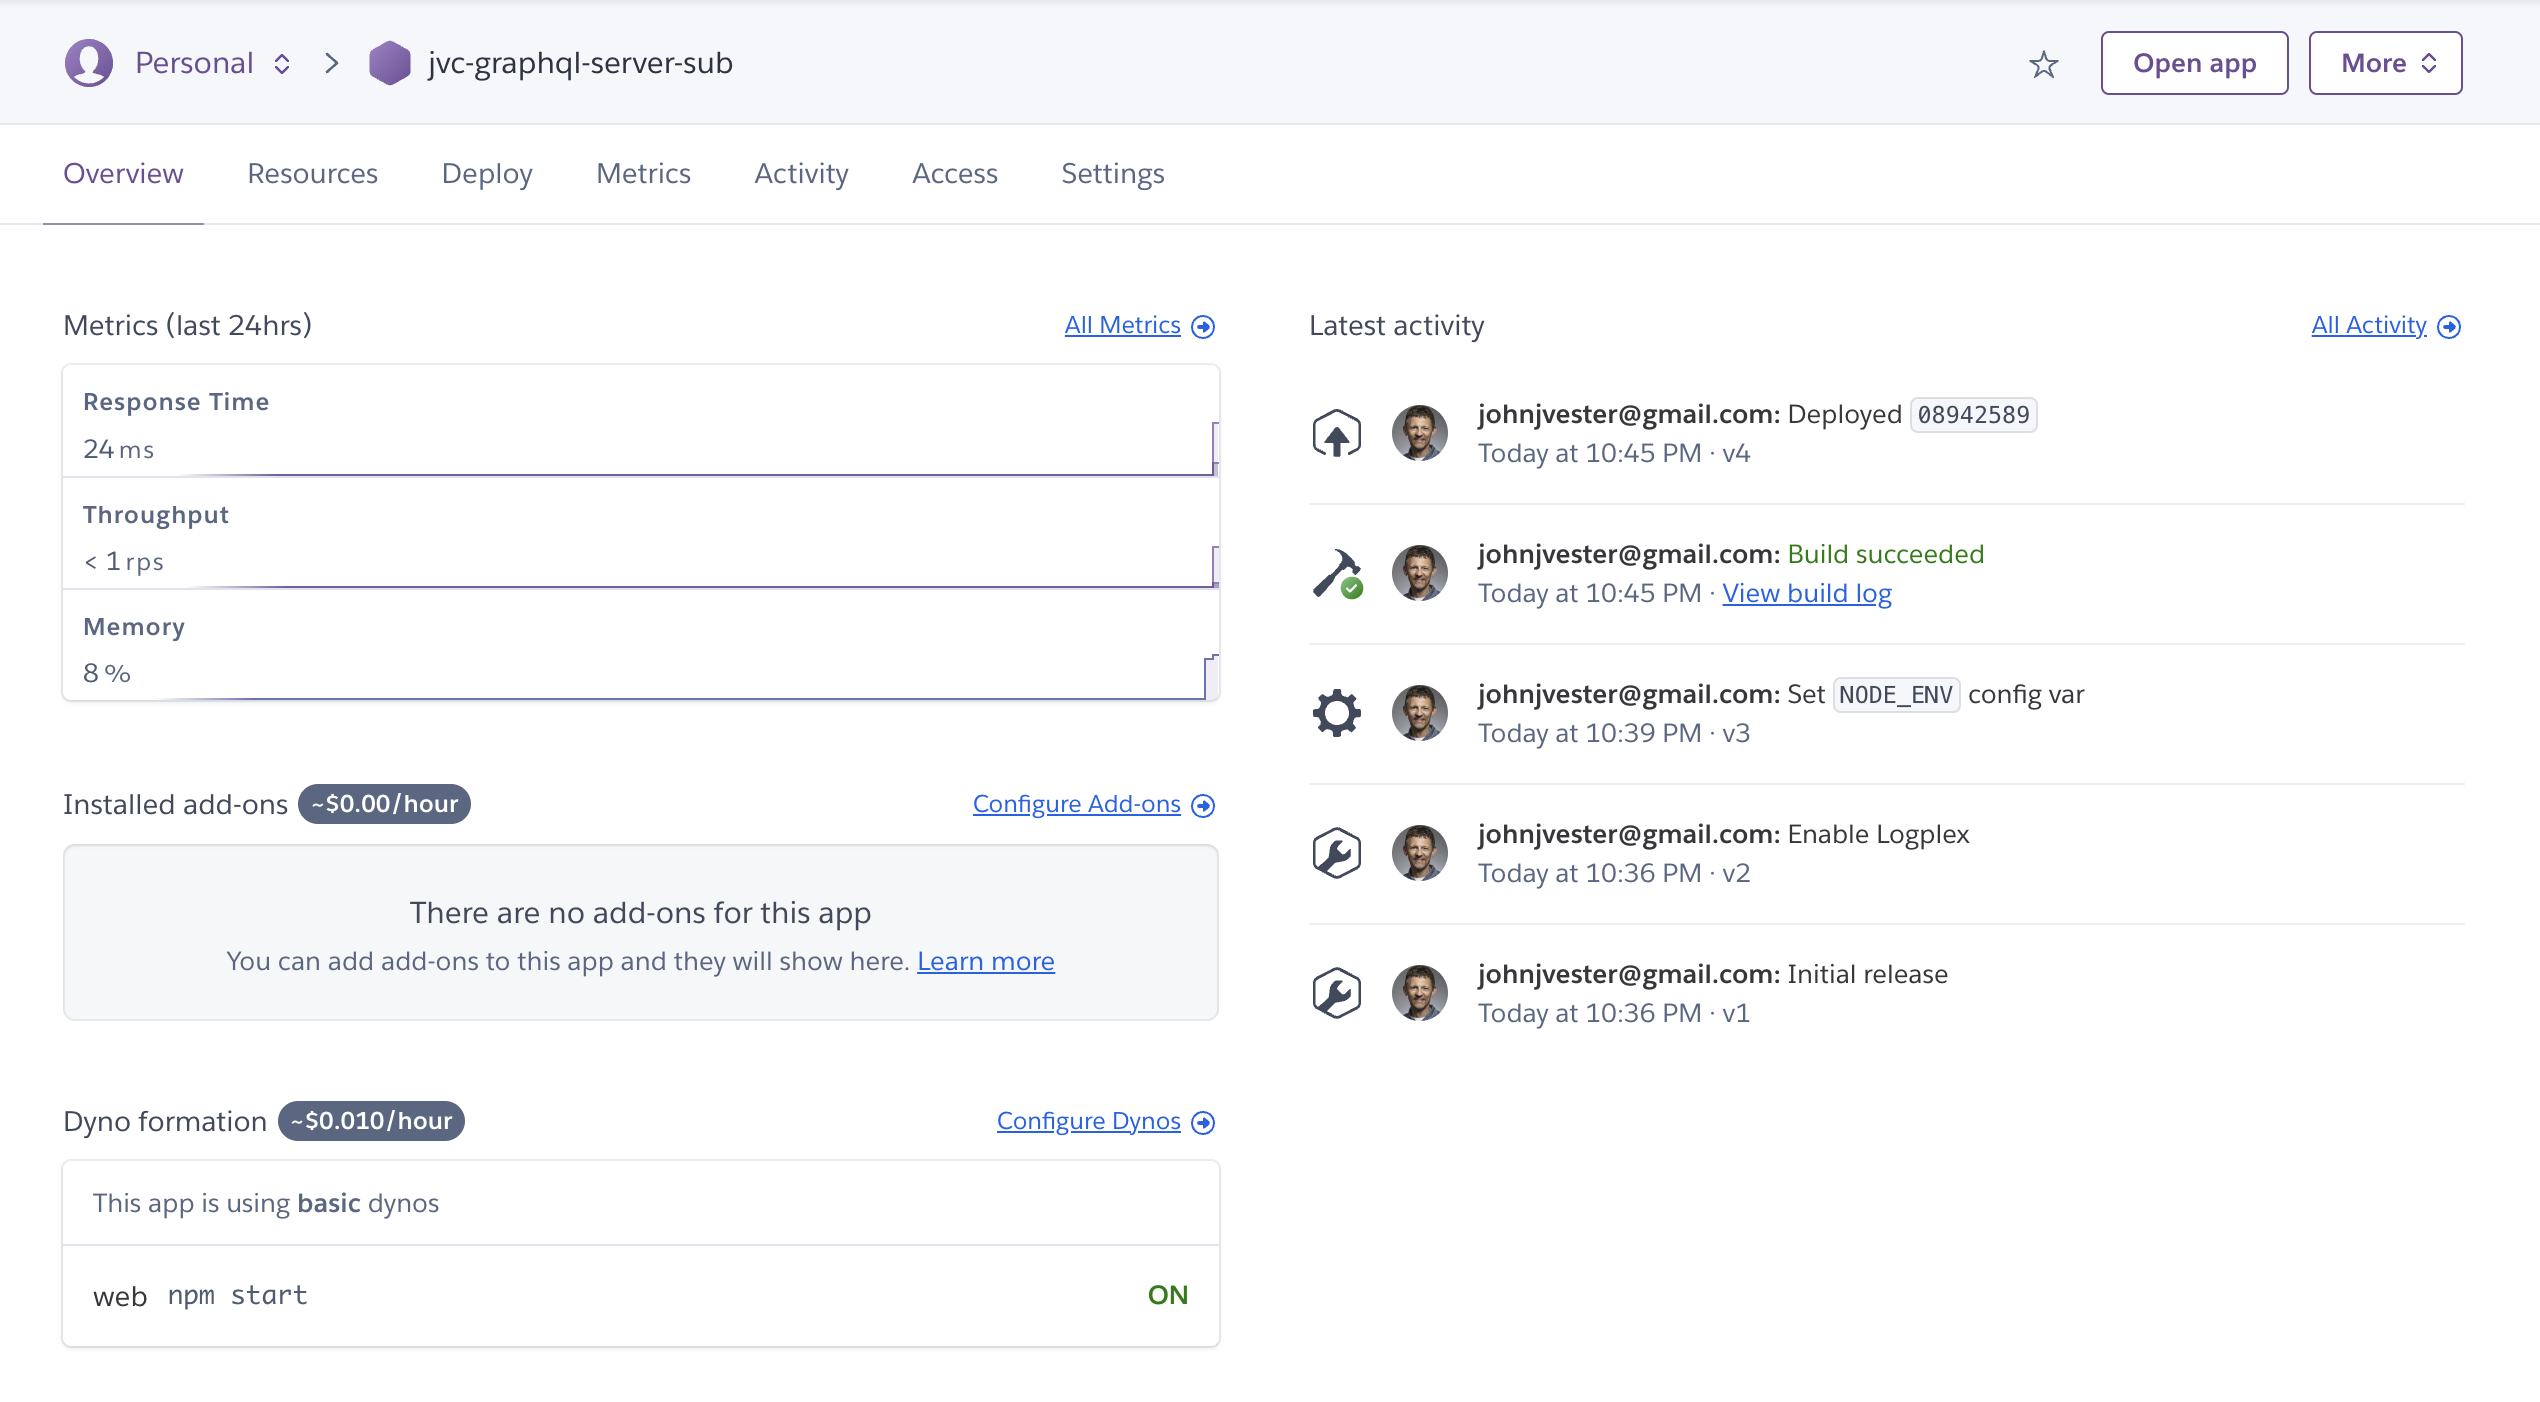
Settings sectioin에서, 이 서비스 인스턴스에 대한 Heroku 앱 URL을 발견했습니다:
https://jvc-graphql-server-sub-1ec2e6406a82.herokuapp.com/
- Please note: 이 链接은 이 記事이 published되는 시점에서 더 이상 사용되지 않습니다.
현재 시점에서는, 이 URL에 graphql를 붙여서 Apollo Server Studio를 실행할 수 있습니다. 이렇게 하면 Subscriptions가 기대대로 작동하는지 확인할 수 있습니다:
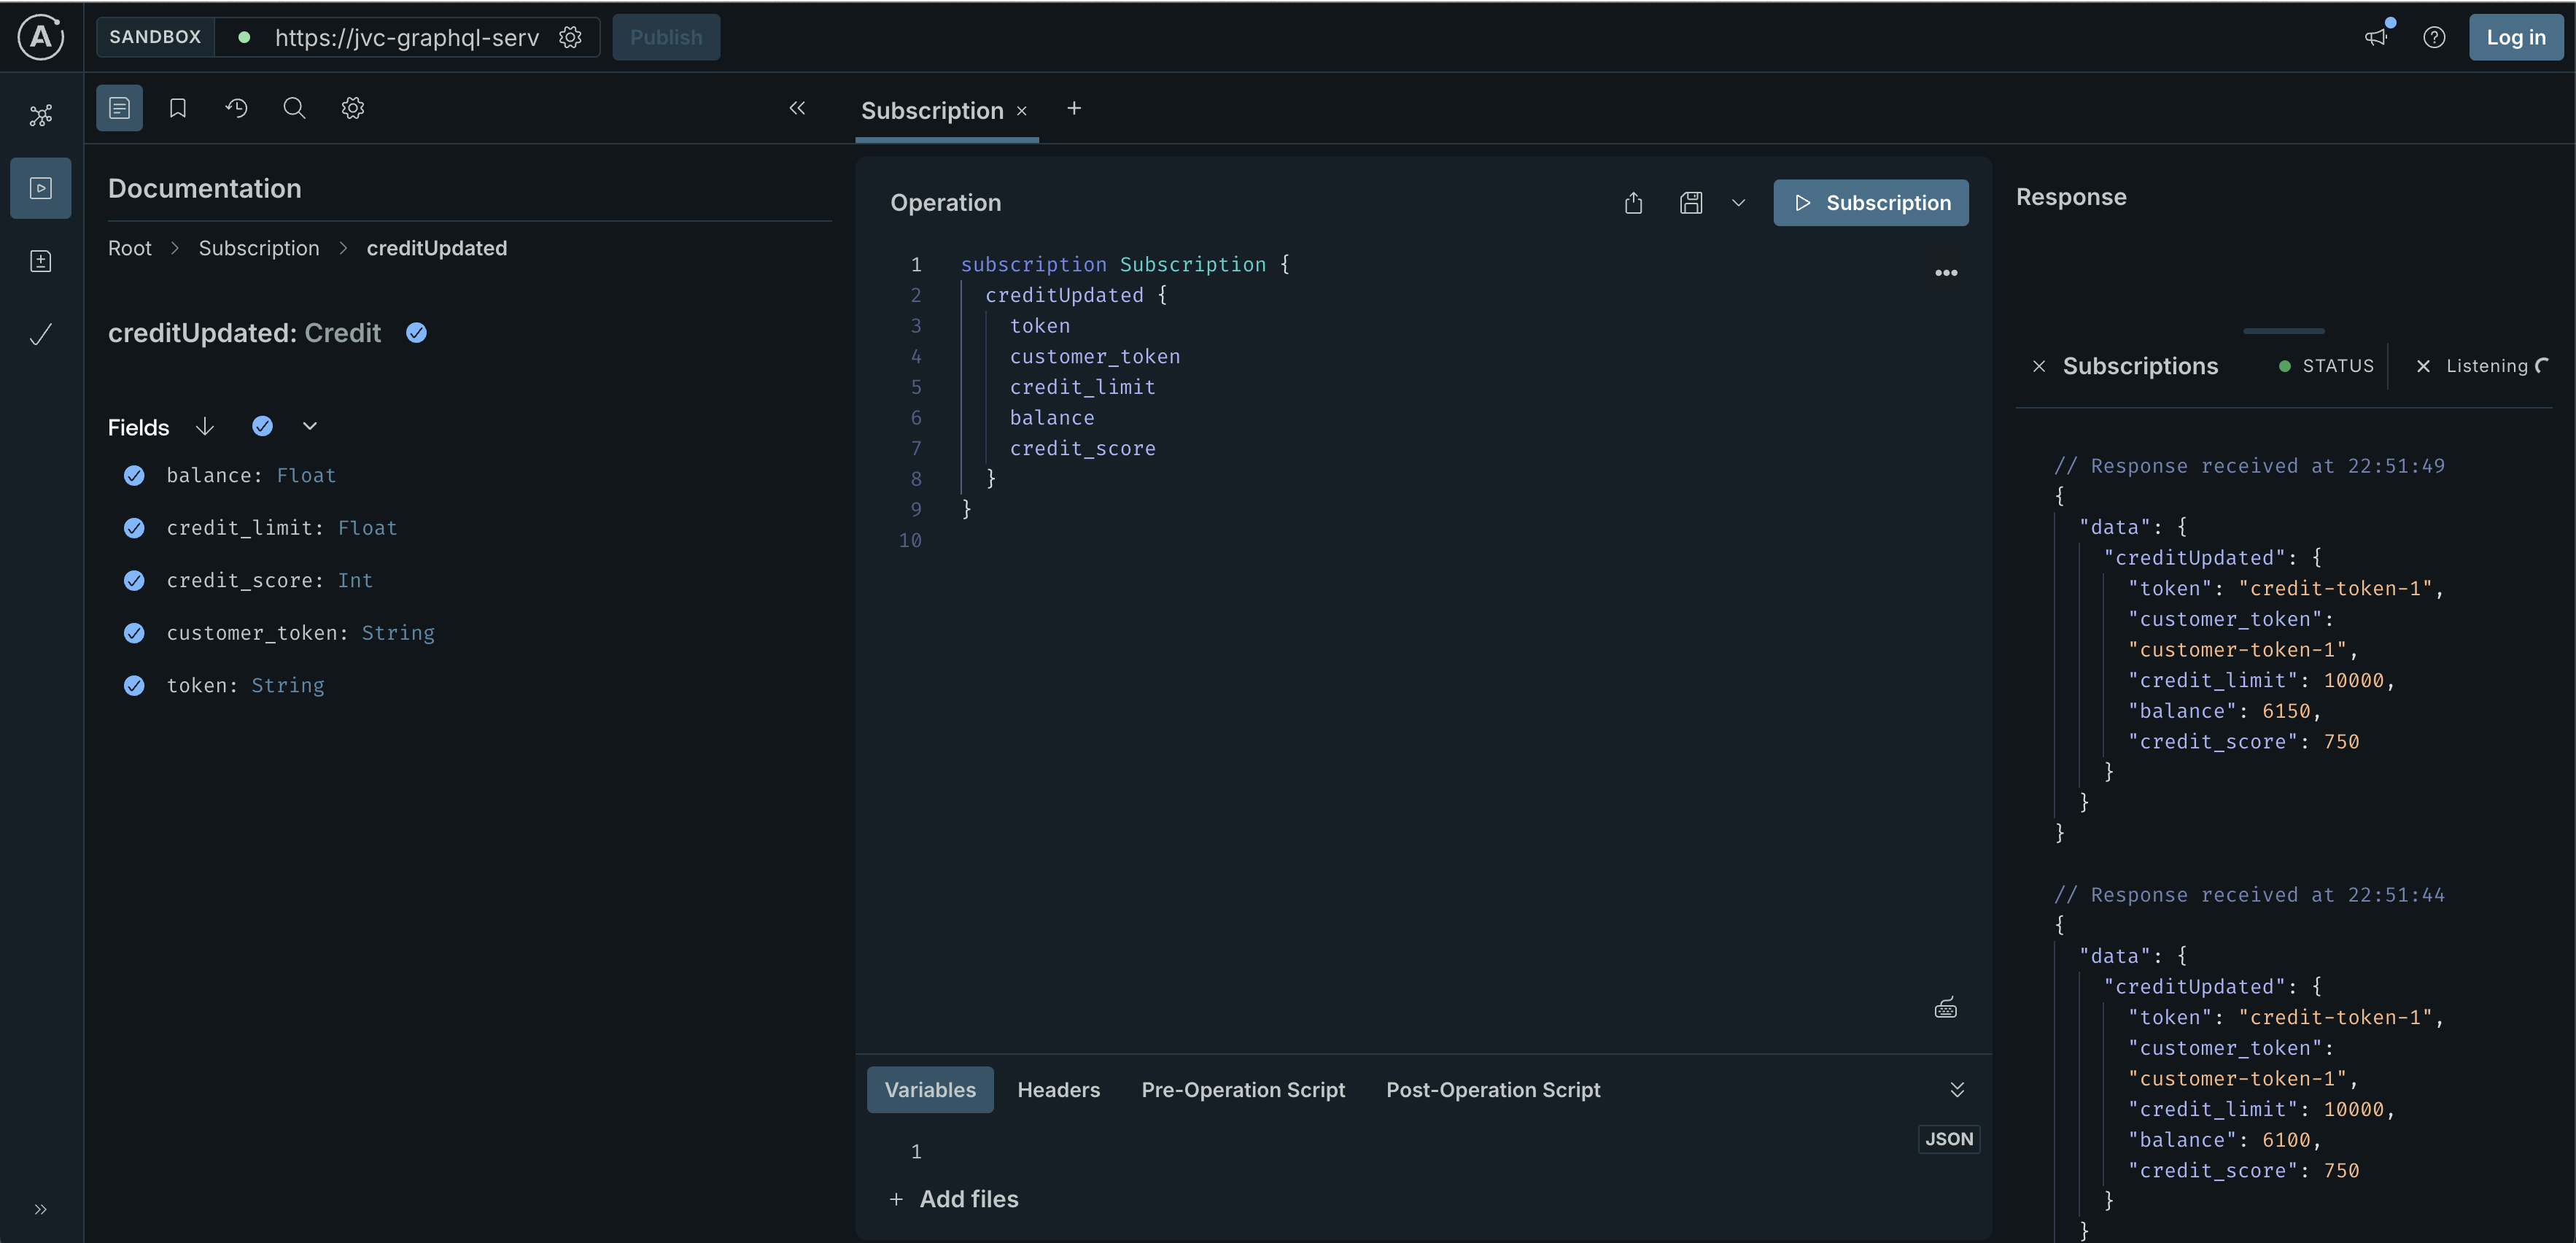
Subscription 응답을 화면의 오른쪽 panel에 유의하세요.
WebSocket Skillz로 层次 이동하기
WebSocket 지원을 사용하고 Heroku의 기능을 이용하여 우리가 생성한 Subscription을 사용하는 인스턴스를 생성할 수 있습니다.
在我的情况, index.js 파일을 다음과 같은 내용으로 생성했습니다. 이렇게 WebSocket 클라이언트를 생성하고, 또한 가짜 HTTP 서비스를 생성하여 클라이언트가 실행되었는지 확인할 수 있는 것입니다:
// Heroku의 $PORT에 연결하는 가짜 HTTP 서버를 생성하는 것
import { createClient } from "graphql-ws";
import { WebSocket } from "ws";
import http from "http";


// creditUpdated Subscription에  susbcribe하는 것
const PORT = process.env.PORT || 3000;
http.createServer((req, res) => res.end('Server is running')).listen(PORT, () => {
  console.log(`HTTP server running on port ${PORT}`);
});

const host_url = process.env.GRAPHQL_SUBSCRIPTION_HOST || 'ws://localhost:4000/graphql';

const client = createClient({
  url: host_url,
  webSocketImpl: WebSocket
});

const query = `subscription {
  creditUpdated {
    token
    customer_token
    credit_limit
    balance
    credit_score
  }
}`;

function handleCreditUpdated(data) {
  console.log('Received credit update:', data);
}


client.subscribe(
  {
    query,
  },
  {
    next: (data) => handleCreditUpdated(data.data.creditUpdated),
    error: (err) => console.error('Subscription error:', err),
    complete: () => console.log('Subscription complete'),
  }
);
전체 index.js 파일은 여기서 발견할 수 있습니다.
Heroku에 이 간단한 Node.js 애플리케이션을 배포할 수도 있으며, 이전에 사용한 Heroku 앱 URL로 GRAPHQL_SUBSCRIPTION_HOST 환경 변수를 설정합니다.
아래의 Procfile 를 생성하여 Heroku가 앱을 시작하는 방법을 알려주었습니다:
web: node src/index.js다음으로, 새 Heroku 앱을 생성했습니다:
$ heroku create jvc-websocket-example

Creating jvc-websocket-example... done
https://jvc-websocket-example-62824c0b1df4.herokuapp.com/ | https://git.heroku.com/jvc-websocket-example.git
그런 다음, GRAPHQL_SUBSCRIPTION_HOST 환경 변수를 우리의 실행 중인 GraphQL 서버를 가리키도록 설정했습니다:
$ heroku --app jvc-websocket-example \
    config:set \
GRAPHQL_SUBSCRIPTION_HOST=ws://jvc-graphql-server-sub-1ec2e6406a82.herokuapp.com/graphql
이제 코드를 Heroku에 배포할 준비가 되었습니다:
$ git commit --allow-empty -m 'Deploy to Heroku'
$ git push heroku
WebSocket 클라이언트가 시작되면 Heroku 대시보드에서 그 상태를 볼 수 있습니다:
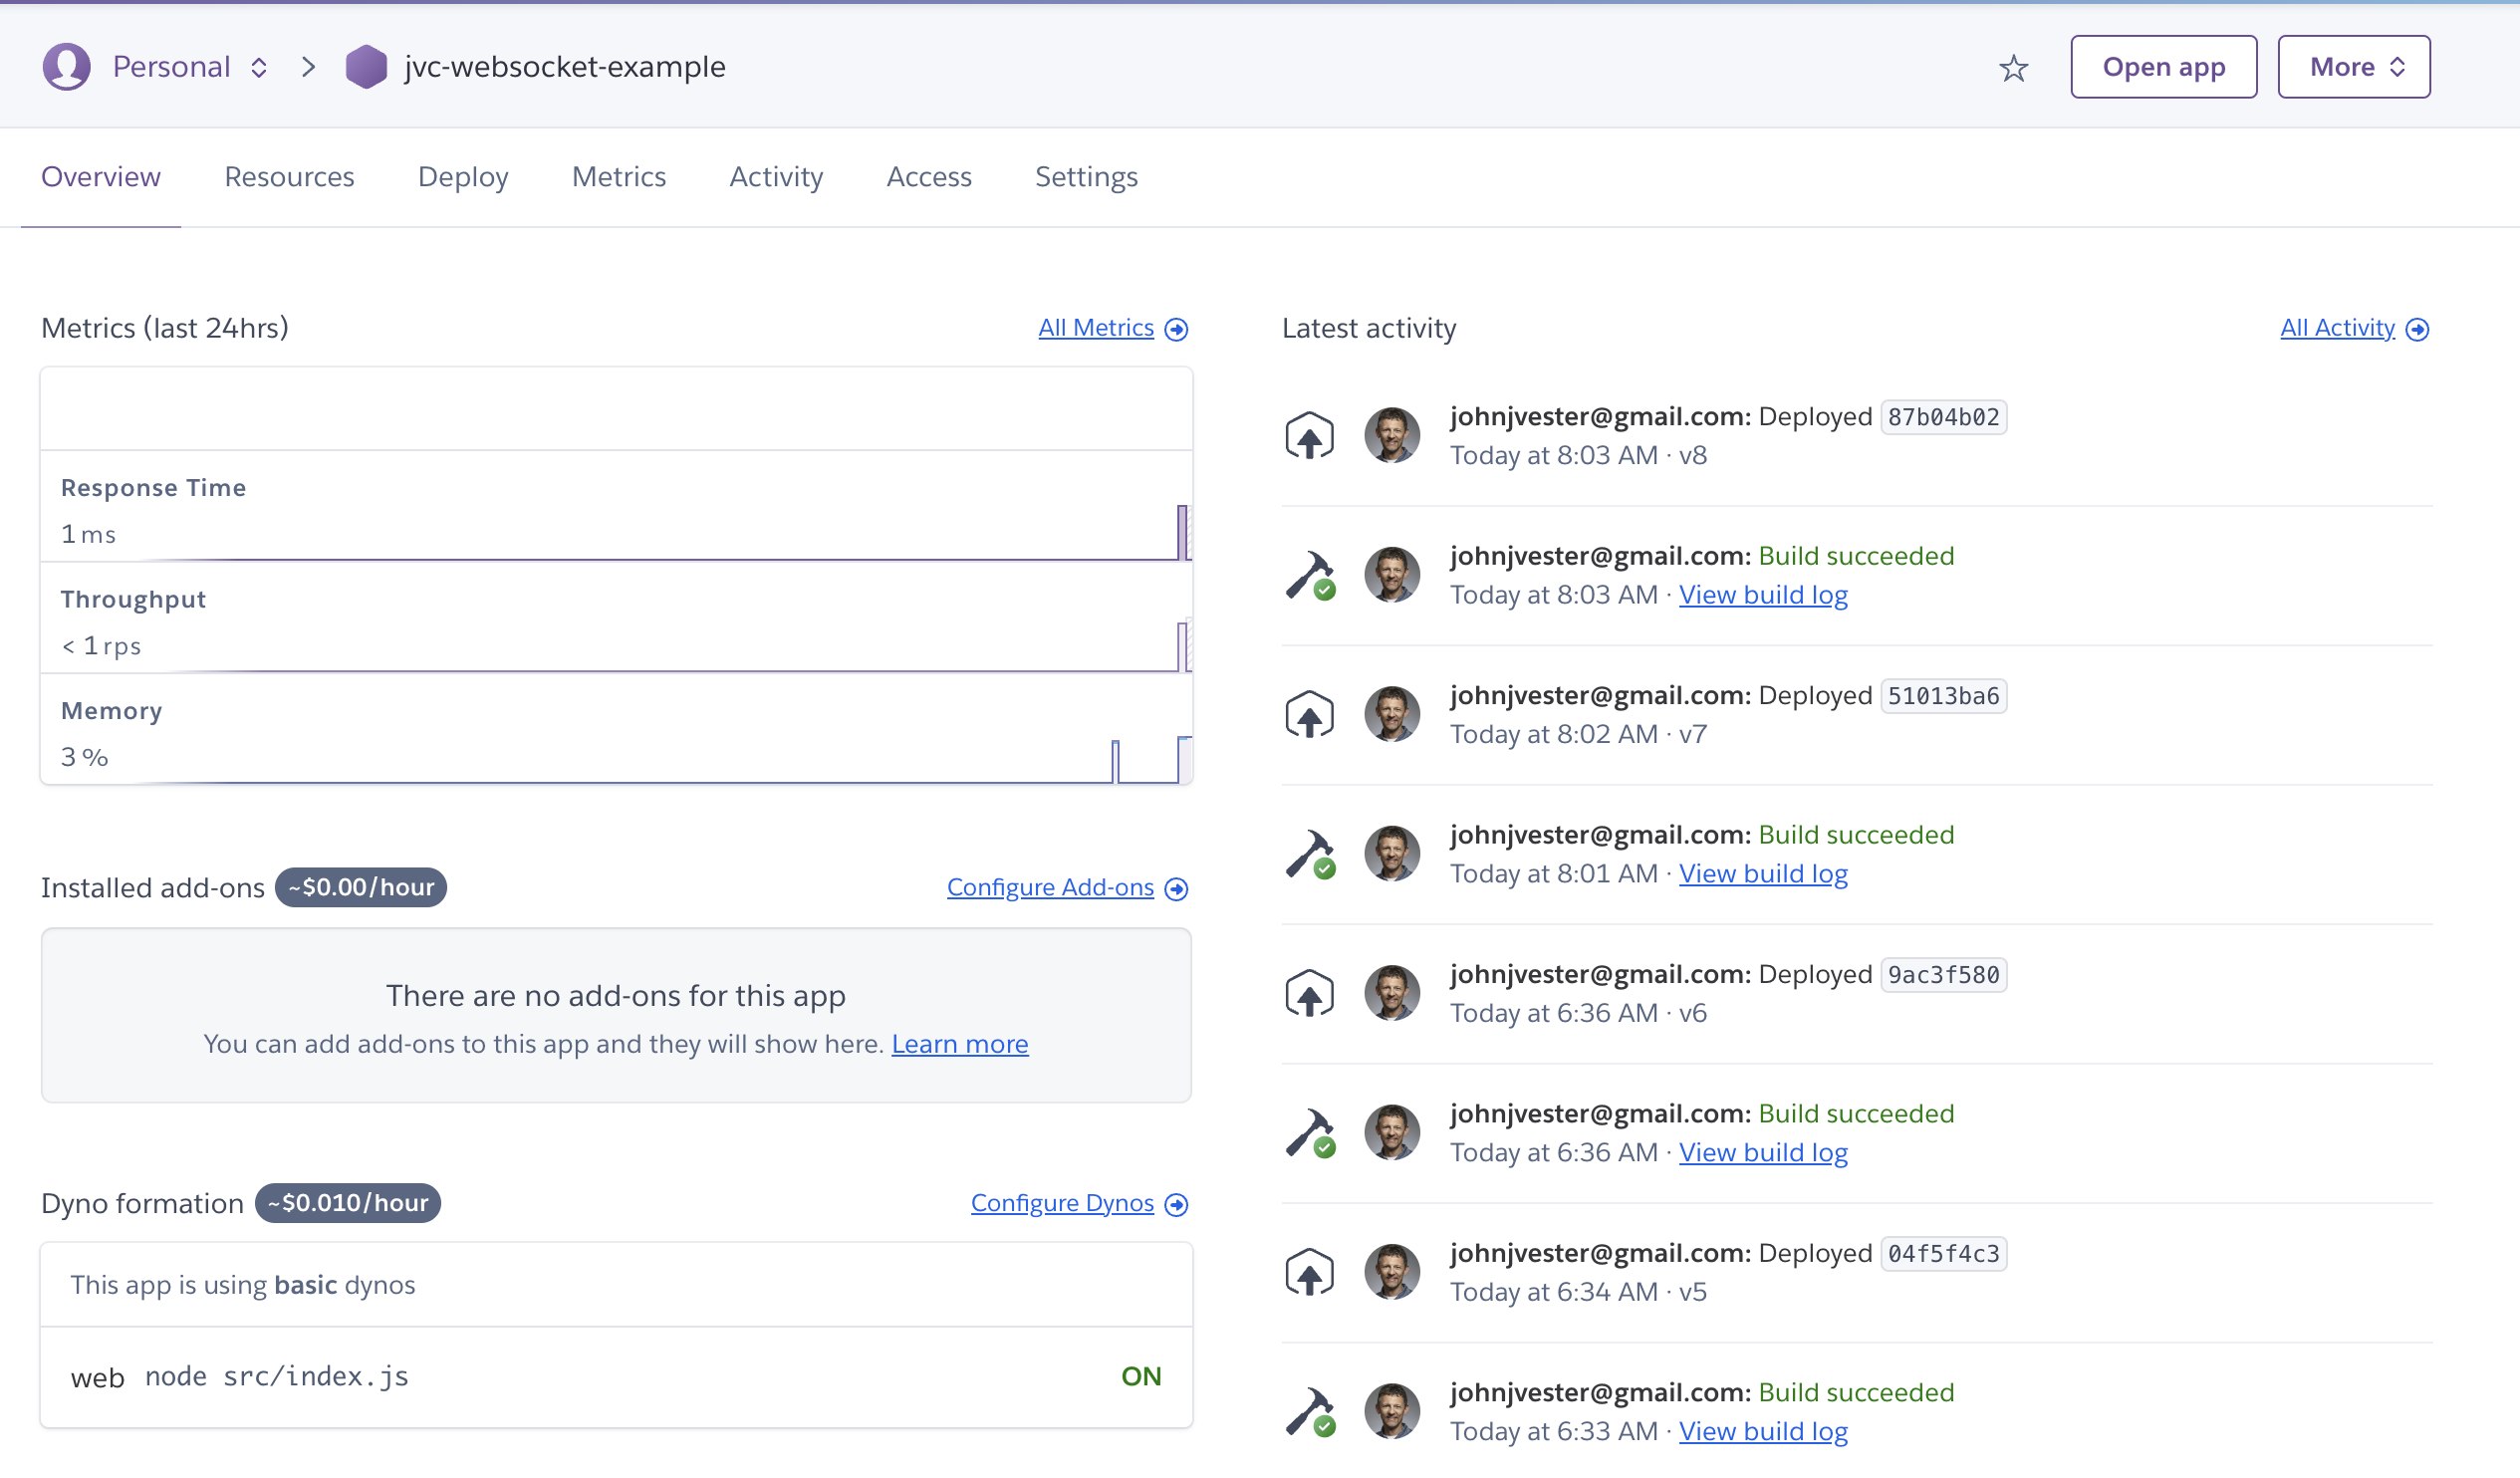
jvc-websocket-example 인스턴스의 로그를 Heroku 대시보드에서 볼 수 있으며, jvc-graphql-server-sub 서비스의 balance 속성에 대한 여러 업데이트를 볼 수 있습니다. 데모에서는 잔액이 0으로 감소되었을 때, 결제가 이루어졌다고 가정한 케이스를 캡쳐할 수 있었습니다:

터미널에서 CLI 명령 heroku logs로 같은 로그에 접근할 수 있습니다.
2024-08-28T12:14:48.463846+00:00 app[web.1]: Received credit update: {
2024-08-28T12:14:48.463874+00:00 app[web.1]:   token: 'credit-token-1',
2024-08-28T12:14:48.463875+00:00 app[web.1]:   customer_token: 'customer-token-1',
2024-08-28T12:14:48.463875+00:00 app[web.1]:   credit_limit: 10000,
2024-08-28T12:14:48.463875+00:00 app[web.1]:   balance: 9950,
2024-08-28T12:14:48.463876+00:00 app[web.1]:   credit_score: 750
2024-08-28T12:14:48.463876+00:00 app[web.1]: }
GraphQL 서비스는 구독 구현이 실행 중인 것뿐만 아니라, 이제 WebSocket 클라이언트가 그러한 업데이트를 소비하고 있습니다.
결론
독자诸君은 제 개인 미션 선언을 기억할 수 있을 것입니다. 이는 IT 전문가에게도 적용되는 것입니다:
“知的재산의 가치를 확장시키는 기능성/특징을 제공하는 것에 시간을 专注于하자. 다른 모든 것을 FRAMEWORK, 제품, 서비스를 이용해라.”
— J. Vester
이번에는 GraphQL subscriptions에 대한 深入的な 探究을 하며, Heroku 上に運営중인 Apollo Serverからの更新を 成功的に 消費하였습니다. 하eroku 上に 運営중인 다른 서비스를 사용하여 노드.js 기반의 응용 프로그램을 통해 WebSocket을 사용하였습니다. 가벼운 subscriptions를 이용하여, unchanging data에 대한 쿼리를 보내지 않고, 대기 상태로 credit balance updates를 구독하여 받았습니다.
인TRODUCTION에서, 이전에 적었던 주제 내에서 추가적인 가치 원칙을 search하는 것을 mention했습니다. GraphQL subscriptions는 이러한 의미에서 최적의 example가 되었습니다. 이는 소비자가 现场 데이터에 대한 쿼리를 보내지 않고 즉시 갱신을 받을 수 있도록 해줍니다. 이는 고객 360 데이터의 소비자가 现场 갱신을 받을 수 있음을 알고 기쁩니다.
Heroku는 기존과 마찬가지로 나의 missions statement를 따르고 있습니다. CLI와 표준 Git 명령어를 사용하여 快速に 기능 시험 솔루션을 만들 수 있는 플랫폼을 제공합니다. 이는 subscriptions 사용 사례를 쉽게 보여주는 것뿐만 아니라 WebSocket을 사용하여 소비자를 구현할 수 있게 해줍니다.
이 記事의 소스 코드에 대해 관심이 있으시면 GitLab에서 저의 저장소를 확인하십시오.:
이 노력 하다보니 GraphQL 기술의 수준을 显著하게 높여 放置할 수 있다고 확신이 있습니다. 이 여행은 나에게 새롭고 도전적이었고, 그리고 정말 재미있었습니다!
次に 인증에 들어가고 있습니다. 이를 통해 GraphQL과 Apollo Server를 통한 또 다른 수준 提升 기회를 얻을 수 있도록 기대します. 기대하세요!
정말 좋은 하루 되세요!
Source:
https://dzone.com/articles/leveling-up-my-graphql-skills-real-time-subscriptions