


JUnit5 튜토리얼
이 JUnit 튜토리얼에서는 JUnit5의 기본 개념과 예제를 사용하여 새로운 기능을 소개합니다. Java 세계에서 JUnit은 Java 코드에 대한 단위 테스트를 구현하는 데 사용되는 인기있는 프레임워크 중 하나입니다. JUnit은 개발자가 JVM에서 코드를 직접 테스트할 수 있도록 돕습니다.
JUnit5 아키텍처
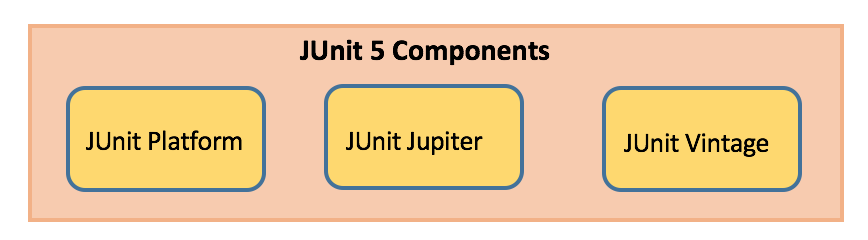
JUnit 플랫폼
- JVM에서 테스트 프레임워크를 실행하는 데 사용됩니다.
- JUnit 플랫폼에서 실행되는 테스트 프레임워크를 빌드하는 데 사용되는 TestEngine API가 있습니다.
JUnit Jupiter
- 테스트를 작성하기 위한 새로운 프로그래밍 모델과 확장을 위한 확장 모델의 혼합입니다.
- 새로운 주석 추가, 예를 들면
@BeforeEach,@AfterEach,@AfterAll,@BeforeAll등이 있습니다.
JUnit Vintage
- 이 새로운 플랫폼에서 이전 JUnit 버전 3 및 4 테스트를 실행하는 데 도움이 됩니다.
JUnit Maven Dependencies
프로젝트에서 JUnit5 기반의 테스트 케이스를 구현하려면 프로젝트의 pom.xml 파일에 다음 종속성을 추가하십시오:
- JUnit 5 라이브러리
<dependency>
     <groupId>org.junit.jupiter</groupId>
     <artifactId>junit-jupiter-engine</artifactId>
     <version>5.1.1</version>
     <scope>test</scope>
</dependency>
<dependency>
     <groupId>org.junit.platform</groupId>
     <artifactId>junit-platform-runner</artifactId>
     <version> 1.1.1</version>
     <scope>test</scope>
</dependency>
- IDE에 JUnit5 지원이 없는 경우 단위 테스트를 실행하기 위한 JUnit5 메이븐 서파이어 프로바이더(IDE에서 지원되면이 지점은 필요하지 않음)
<plugin>
     <artifactId>maven-surefire-plugin</artifactId>
     <version>2.19.1</version>
     <dependencies>
          <dependency>
               <groupId>org.junit.platform</groupId>
               <artifactId>junit-platform-surefire-provider</artifactId>
               <version>1.0.2</version>
          </dependency>
     </dependencies>
</plugin>
JUnit5 새로운 기능
런타임에서 Java 8 이상이 필요하지만 이전 Java 버전을 사용하여 컴파일된 코드를 여전히 테스트할 수 있습니다. 여러 새로운 기능이 도입되었습니다.
JUnit 주석
다음은 일반적으로 사용되는 주석 몇 가지가 나와 있습니다:
| Annotation | Description |
|---|---|
| @Test | Denotes a test method |
| @DisplayName | Declares a custom display name for the test class or test method |
| @BeforeEach | Denotes that the annotated method should be executed before each test method |
| @AfterEach | Denotes that the annotated method should be executed after each test method |
| @BeforeAll | Denotes that the annotated method should be executed before all test methods |
| @AfterAll | Denotes that the annotated method should be executed after all test methods |
| @Disable | Used to disable a test class or test method |
| @Nested | Denotes that the annotated class is a nested, non-static test class |
| @Tag | Declare tags for filtering tests |
| @ExtendWith | Register custom extensions |
package com.journaldev;

import org.junit.jupiter.api.AfterAll;
import org.junit.jupiter.api.AfterEach;
import org.junit.jupiter.api.BeforeAll;
import org.junit.jupiter.api.BeforeEach;
import org.junit.jupiter.api.Disabled;
import org.junit.jupiter.api.DisplayName;
import org.junit.jupiter.api.Test;

public class JUnit5Sample1Test {

  @BeforeAll
  static void beforeAll() {
    System.out.println("**--- Executed once before all test methods in this class ---**");
  }

  @BeforeEach
  void beforeEach() {
    System.out.println("**--- Executed before each test method in this class ---**");
  }

  @Test
  void testMethod1() {
    System.out.println("**--- Test method1 executed ---**");
  }

  @DisplayName("Test method2 with condition")
  @Test
  void testMethod2() {
    System.out.println("**--- Test method2 executed ---**");
  }

  @Test
  @Disabled("implementation pending")
  void testMethod3() {
	  System.out.println("**--- Test method3 executed ---**");
  }

  @AfterEach
  void afterEach() {
    System.out.println("**--- Executed after each test method in this class ---**");
  }

  @AfterAll
  static void afterAll() {
    System.out.println("**--- Executed once after all test methods in this class ---**");
  }


}
위의 JUnit 테스트 클래스를 실행할 수 있습니다 Eclipse -> Run As -> JUnit Test. 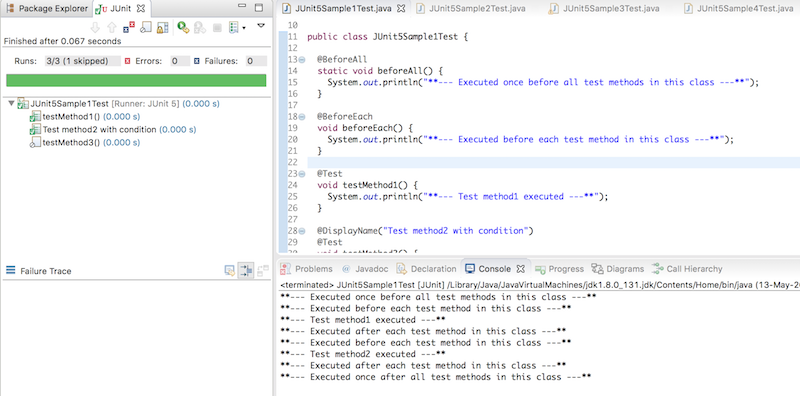
JUnit 어서션
모든 테스트 메서드는 테스트가 계속 실행될 수 있도록 참 조건으로 평가되어야 합니다. JUnit Jupiter 어서션은 org.junit.jupiter.api.Assertions 클래스에 유지됩니다. 모든 메서드는 정적입니다.
| Assertion | Description |
|---|---|
| assertEquals(expected, actual) | Fails when expected does not equal actual |
| assertFalse(expression) | Fails when expression is not false |
| assertNull(actual) | Fails when actual is not null |
| assertNotNull(actual) | Fails when actual is null |
| assertAll() | Group many assertions and every assertion is executed even if one or more of them fails |
| assertTrue(expression) | Fails if expression is not true |
| assertThrows() | Class to be tested is expected to throw an exception |
@Test
void testAssertEqual() {
	 assertEquals("ABC", "ABC");
	 assertEquals(20, 20, "optional assertion message");
	 assertEquals(2 + 2, 4);
}

@Test
void testAssertFalse() {
	 assertFalse("FirstName".length() == 10);
	 assertFalse(10 > 20, "assertion message");
}

@Test
void testAssertNull() {
     String str1 = null;
	 String str2 = "abc";
	 assertNull(str1);
	 assertNotNull(str2);
}

@Test
void testAssertAll() {
	 String str1 = "abc";
	 String str2 = "pqr";
	 String str3 = "xyz";
	 assertAll("numbers",
	      () -> assertEquals(str1,"abc"),
		  () -> assertEquals(str2,"pqr"),
		  () -> assertEquals(str3,"xyz")
	 );
	 // 아래 코드의 주석을 해제하고 각 assert 실행을 이해하십시오
     /*assertAll("numbers",
		  () -> assertEquals(str1,"abc"),
		  () -> assertEquals(str2,"pqr1"),
		  () -> assertEquals(str3,"xyz1")
	 );*/
}

@Test
void testAssertTrue() {
	 assertTrue("FirstName".startsWith("F"));
	 assertTrue(10  {
	      throw new IllegalArgumentException("Illegal Argument Exception occured");
	 });
	 assertEquals("Illegal Argument Exception occured", exception.getMessage());
}
JUnit5 가져오기
그 테스트 클래스는 org.junit.jupiter.api.Test 가져오기 문이 필요하며 org.junit.Test가 아닙니다. 또한, 테스트 메서드는 public이거나 로컬 패키지일 필요가 없습니다.
import org.junit.jupiter.api.Test;
JUnit5 가정
가정은 org.junit.jupiter.api.Assumptions 클래스의 정적 메서드입니다. 지정된 조건이 충족될 때에만 테스트가 실행되며 그렇지 않으면 테스트가 중단됩니다. 중단된 테스트는 빌드 실패를 유발하지 않습니다. 가정이 실패하면 org.opentest4j.TestAbortedException이 throw되고 테스트가 건너뛰어집니다.
| Assumptions | Description |
|---|---|
| assumeTrue | Execute the body of lamda when the positive condition hold else test will be skipped |
| assumeFalse | Execute the body of lamda when the negative condition hold else test will be skipped |
| assumingThat | Portion of the test method will execute if an assumption holds true and everything after the lambda will execute irrespective of the assumption in assumingThat() holds |
@Test
void testAssumeTrue() {
     boolean b = 'A' == 'A';
     assumeTrue(b);
     assertEquals("Hello", "Hello");
}

@Test
@DisplayName("test executes only on Saturday")
public void testAssumeTrueSaturday() {
     LocalDateTime dt = LocalDateTime.now();
     assumeTrue(dt.getDayOfWeek().getValue() == 6);
     System.out.println("further code will execute only if above assumption holds true");
}

@Test
void testAssumeFalse() {
     boolean b = 'A' != 'A';
     assumeFalse(b);
     assertEquals("Hello", "Hello");
}

@Test
void testAssumeFalseEnvProp() {
     System.setProperty("env", "prod");
     assumeFalse("dev".equals(System.getProperty("env")));
     System.out.println("further code will execute only if above assumption hold");
}

@Test
void testAssumingThat() {
     System.setProperty("env", "test");
     assumingThat("test".equals(System.getProperty("env")),
          () -> {
               assertEquals(10, 10);
               System.out.println("perform below assertions only on the test env");
               });

     assertEquals(20, 20);
     System.out.println("perform below assertions on all env");
}
JUnit 중첩 테스트 클래스
중첩 테스트를 사용하면 중첩 클래스를 만들고 해당 클래스의 모든 테스트 메서드를 실행할 수 있습니다. 내부 클래스는 정적이어서는 안됩니다. 내부 클래스에 @Nested 어노테이션을 붙이기만 하면 해당 클래스 내의 모든 테스트 메서드가 실행됩니다.
@BeforeAll
static void beforeAll() {
     System.out.println("**--- JUnit5Sample4Test :: beforeAll :: Executed once before all test methods ---**");
}

@BeforeEach
void beforeEach() {
	 System.out.println("**--- JUnit5Sample4Test :: beforeEach :: Executed before each test method ---**");
}

@AfterEach
void afterEach() {
	 System.out.println("**--- JUnit5Sample4Test :: afterEach :: Executed after each test method ---**");
}

@AfterAll
static void afterAll() {
	 System.out.println("**--- JUnit5Sample4Test :: afterAll :: Executed after all test method ---**");
}

     @Nested
     class InnerClass {

          @BeforeEach
          void beforeEach() {
               System.out.println("**--- InnerClass :: beforeEach :: Executed before each test method ---**");
          }

          @AfterEach
          void afterEach() {
        	   System.out.println("**--- InnerClass :: afterEach :: Executed after each test method ---**");
          }

          @Test
          void testMethod1() {
        	   System.out.println("**--- InnerClass :: testMethod1 :: Executed test method1 ---**");
          }

          @Nested
          class InnerMostClass {

               @BeforeEach
               void beforeEach() {
                    System.out.println("**--- InnerMostClass :: beforeEach :: Executed before each test method ---**");
               }

               @AfterEach
               void afterEach() {
            	    System.out.println("**--- InnerMostClass :: afterEach :: Executed after each test method ---**");
               }

               @Test
               void testMethod2() {
            	    System.out.println("**--- InnerMostClass :: testMethod2 :: Executed test method2 ---**");
               }
        }
    }
JUnit 테스트 예외
특정 조건 하에서 메서드가 예외를 throw하기를 기대하는 상황이 있습니다. assertThrows는 주어진 메서드가 지정된 예외를 throw하지 않으면 테스트가 실패합니다.
Throwable exception = assertThrows(IllegalArgumentException.class, () -> {
     throw new IllegalArgumentException("Illegal Argument Exception occured");
});
assertEquals("Illegal Argument Exception occured", exception.getMessage());
JUnit 테스트 실행
단위 테스트는 여러 가지 방법으로 실행할 수 있습니다. 두 가지 방법은 다음과 같습니다:
- Eclipse IDE Oxygen.3a (4.7.3a) 릴리스를 사용하고 실행할 테스트 파일을 엽니다. 파일을 마우스 오른쪽 버튼으로 클릭한 다음 JUnit Test를 선택합니다.
- Windows 명령 프롬프트에서 mvn test 명령을 사용합니다.
요약
저희는 몇 가지 예제를 통해 JUnit5와 그의 새로운 기능을 살펴보았습니다. 또한 JUnit 주석, 단언, 가정, 예외를 사용하는 방법과 중첩된 테스트 클래스를 작성하는 방법도 살펴보았습니다.
전체 예제 프로젝트는 저희의 GitHub 저장소에서 다운로드할 수 있습니다.
Source:
https://www.digitalocean.com/community/tutorials/junit5-tutorial