


작가는 전자 프런티어 재단을 기부를 위해 쓰기 프로그램의 일환으로 선택했습니다.
소개
Ruby on Rails은 인기 있는 서버 측 웹 응용 프로그램 프레임워크입니다. 그것은 오늘날 웹에서 많은 인기있는 애플리케이션인 GitHub, Basecamp, SoundCloud, Airbnb 및 Twitch 등을 구동합니다. Ruby on Rails은 프로그래머 경험과 그 주위에 구축된 열정적인 커뮤니티에 중점을 두고 있으며, 현대적인 웹 애플리케이션을 구축하고 유지할 수 있는 도구를 제공합니다.
React는 프론트엔드 사용자 인터페이스를 만들기 위해 사용되는 JavaScript 라이브러리입니다. 페이스북의 지원을 받아, 현재 웹에서 가장 인기있는 프론트엔드 라이브러리 중 하나입니다. React는 가상 Document Object Model (DOM), 컴포넌트 아키텍처 및 상태 관리와 같은 기능을 제공하여 프론트엔드 개발 과정을 조직화하고 효율적으로 만들어줍니다.
웹의 프론트엔드가 서버 사이드 코드와 분리되는 추세로 가면서, Rails의 우아함과 React의 효율성을 결합하면 현재 트렌드에 기반한 강력하고 현대적인 애플리케이션을 구축할 수 있습니다. Rails 템플릿 엔진 대신에 Rails 뷰에서 React를 사용하여 컴포넌트를 렌더링하면, 애플리케이션이 JavaScript와 프론트엔드 개발의 최신 동향을 활용하면서 동시에 Ruby on Rails의 표현력을 활용할 수 있습니다.
이 튜토리얼에서는 즐겨찾는 레시피를 저장하고 React 프론트엔드로 표시하는 Ruby on Rails 애플리케이션을 생성합니다. 완료하면 React 인터페이스로 레시피를 생성, 보기, 삭제할 수 있습니다. 이 인터페이스는 Bootstrap으로 스타일링됩니다.
사전 요구 사항
이 튜토리얼을 따르려면 다음이 필요합니다:
-
Node.js 및 개발 머신에 npm이 설치되어 있어야 합니다. 이 튜토리얼은 Node.js 버전 16.14.0과 npm 버전 8.3.1을 사용합니다. Node.js는 브라우저 외부에서 코드를 실행할 수 있는 JavaScript 런타임 환경입니다. 미리 설치된 패키지 관리자인 npm을 함께 제공합니다. 이를 사용하여 패키지를 설치하고 업데이트할 수 있습니다. Ubuntu 20.04 또는 macOS에 이를 설치하려면 Ubuntu 20.04에서 Node.js 설치하는 방법의 “PPA를 사용하여 설치하기” 섹션을 따르거나 macOS에 Node.js 설치 및 로컬 개발 환경 만들기의 단계를 따르세요.
-
리액트 프레임워크를 다운로드할 수 있는 개발 컴퓨터에 Yarn 패키지 관리자가 설치되어 있어야 합니다. 이 튜토리얼은 버전 1.22.10에서 테스트되었으며, 이 종속성을 설치하려면 공식 Yarn 설치 가이드를 따르십시오.
-
Ruby on Rails가 설치되었습니다. 이를 얻으려면 Ubuntu 20.04에서 rbenv를 사용하여 Ruby on Rails 설치하는 방법 가이드를 따르세요. macOS에서이 응용 프로그램을 개발하려면 macOS에서 rbenv를 사용하여 Ruby on Rails 설치하는 방법을 사용할 수 있습니다. 이 자습서는 Ruby 버전 3.1.2 및 Rails 버전 7.0.4에서 테스트되었으므로 설치 프로세스 중에 이러한 버전을 지정해야합니다.
참고: Rails 버전 7은 역 호환되지 않습니다. Rails 버전 5를 사용하는 경우 Ubuntu 18.04에서 React 프론트 엔드가있는 Ruby on Rails v5 프로젝트 설정하는 방법 자습서를 참조하십시오.
- 스텝 1과 2에서 설명한대로 PostgreSQL이 설치되었습니다. Ubuntu 20.04에서 Ruby on Rails 애플리케이션과 함께 PostgreSQL 사용하는 방법 또는 macOS에서 Ruby on Rails 애플리케이션과 함께 PostgreSQL 사용하는 방법을 참고하세요. 이 튜토리얼을 따르기 위해 PostgreSQL 버전 12 이상을 사용할 수 있습니다. 다른 리눅스 배포판이나 다른 운영체제에서 이 애플리케이션을 개발하려는 경우, 공식 PostgreSQL 다운로드 페이지를 참조하세요. PostgreSQL 사용 방법에 대한 자세한 정보는 PostgreSQL 설치 및 사용 방법을 참조하세요.
스텝 1 – 새로운 Rails 애플리케이션 생성
이 단계에서는 Rails 애플리케이션 프레임워크를 사용하여 레시피 애플리케이션을 구축합니다. 먼저, React와 함께 작동하도록 설정된 새로운 Rails 애플리케이션을 생성합니다.
Rails는 모던 웹 애플리케이션을 구축하는 데 필요한 모든 요소를 생성하는 여러 스크립트인 제너레이터를 제공합니다. 이 명령들의 완전한 목록과 기능을 검토하려면 터미널에서 다음 명령을 실행하세요.
- rails -h
이 명령은 애플리케이션의 매개변수를 설정할 수 있는 포괄적인 옵션 목록을 생성합니다. 명령 중 하나는 새로운 Rails 애플리케이션을 생성하는 new 명령입니다.
이제 new 생성기를 사용하여 새로운 Rails 애플리케이션을 생성합니다. 터미널에서 다음 명령을 실행하세요:
- rails new rails_react_recipe -d postgresql -j esbuild -c bootstrap -T
앞의 명령은 rails_react_recipe라는 디렉토리에 새로운 Rails 애플리케이션을 생성하고, 필요한 Ruby 및 JavaScript 종속성을 설치하며, Webpack을 설정합니다. 이 new 생성기 명령과 관련된 플래그는 다음과 같습니다:
-d플래그는 선호하는 데이터베이스 엔진을 지정하는데, 이 경우 PostgreSQL입니다.-j플래그는 애플리케이션의 JavaScript 접근 방식을 지정합니다. Rails는 Rails 애플리케이션에서 JavaScript 코드를 처리하는 몇 가지 다른 방법을 제공합니다.-j플래그에 전달된esbuild옵션은 Rails가 기본적으로 JavaScript 번들러로 esbuild를 사전구성하도록 지시합니다.-c플래그는 애플리케이션의 CSS 프로세서를 지정합니다. 이 경우에는 Bootstrap이 선호 옵션입니다.-T플래그는 이 튜토리얼에서 테스트 파일 생성을 건너뛰도록 Rails에 지시합니다. 이 명령은 Rails에서 제공하는 Ruby 테스트 도구와 다른 도구를 사용하려는 경우에도 권장됩니다.
명령이 완료되면 앱의 루트 디렉토리인 rails_react_recipe 디렉토리로 이동하세요:
- cd rails_react_recipe
다음으로 디렉토리의 내용을 나열하세요:
- ls
내용은 다음과 유사하게 출력됩니다:
OutputGemfile       README.md  bin        db   node_modules  storage  yarn.lock
Gemfile.lock  Rakefile   config     lib  package.json  tmp
Procfile.dev  app        config.ru  log  public        vendor
이 루트 디렉토리에는 레일즈 애플리케이션의 구조를 이루는 여러 자동 생성 파일과 폴더가 포함되어 있습니다. 이 중에는 React 애플리케이션의 종속성을 포함하는 package.json 파일도 있습니다.
이제 새로운 레일즈 애플리케이션을 성공적으로 생성했으므로 다음 단계에서 데이터베이스에 연결할 것입니다.
단계 2 – 데이터베이스 설정
새로운 레일즈 애플리케이션을 실행하기 전에 먼저 데이터베이스에 연결해야 합니다. 이 단계에서는 새로 생성된 레일즈 애플리케이션을 PostgreSQL 데이터베이스에 연결하여 필요한 레시피 데이터를 저장하고 검색할 수 있게 합니다.
config/database.yml 파일은 다양한 개발 환경에 대한 데이터베이스 이름과 같은 데이터베이스 세부 정보를 포함하고 있습니다. 레일즈는 환경 이름 뒤에 밑줄(_)을 추가하여 다양한 개발 환경에 대한 데이터베이스 이름을 지정합니다. 이 튜토리얼에서는 기본 데이터베이스 구성 값을 사용하지만 필요한 경우 구성 값을 변경할 수 있습니다.
참고: 이 시점에서 config/database.yml을 변경하여 Rails가 데이터베이스를 생성하는 데 사용할 PostgreSQL 역할을 설정할 수 있습니다. 전제 조건에서 Ruby on Rails 애플리케이션에서 PostgreSQL 사용하기 튜토리얼에서 비밀번호로 보호되는 역할을 만들었습니다. 사용자를 설정하지 않은 경우 동일한 전제 조건 튜토리얼의 단계 4 — 데이터베이스 구성 및 생성 지침을 따르십시오.
Rails는 create, drop, reset과 같은 데이터베이스 작업을 수행하는 명령을 포함하여 웹 애플리케이션 개발을 쉽게 할 수 있는 많은 명령을 제공합니다. 응용 프로그램을 위한 데이터베이스를 생성하려면 터미널에서 다음 명령을 실행하십시오:
- rails db:create
이 명령은 development 및 test 데이터베이스를 생성하며, 다음 출력을 생성합니다:
OutputCreated database 'rails_react_recipe_development'
Created database 'rails_react_recipe_test'
애플리케이션이 데이터베이스에 연결되었으므로 다음 명령을 실행하여 애플리케이션을 시작합니다:
- bin/dev
Rails는 Foreman 젬을 사용하여 앱의 루트 디렉토리의 Procfile.dev 파일에서 명령을 실행하여 Rails 애플리케이션을 시작하는 대체 bin/dev 스크립트를 제공합니다.
이 명령을 실행하면 명령 프롬프트가 사라지고 다음 출력이 표시됩니다:
Outputstarted with pid 70099
started with pid 70100
started with pid 70101
yarn run v1.22.10
yarn run v1.22.10
$ esbuild app/javascript/*.* --bundle --sourcemap --outdir=app/assets/builds --public-path=assets --watch
$ sass ./app/assets/stylesheets/application.bootstrap.scss:./app/assets/builds/application.css --no-source-map --load-path=node_modules --watch
=> Booting Puma
=> Rails 7.0.4 application starting in development
=> Run `bin/rails server --help` for more startup options
[watch] build finished, watching for changes...
Puma starting in single mode...
* Puma version: 5.6.5 (ruby 3.1.2-p20) ("Birdie's Version")
*  Min threads: 5
*  Max threads: 5
*  Environment: development
*          PID: 70099
* Listening on http://127.0.0.1:3000
* Listening on http://[::1]:3000
Use Ctrl-C to stop
Sass is watching for changes. Press Ctrl-C to stop.
애플리케이션에 액세스하려면 브라우저 창을 열고 http://localhost:3000으로 이동하십시오. Rails의 기본 환영 페이지가로드되면 올바르게 Rails 애플리케이션을 설정한 것입니다:
웹 서버를 중지하려면 서버가 실행 중인 터미널에서 CTRL+C를 누르십시오. Puma에서 작별 메시지를 받게됩니다:
Output^C SIGINT received, starting shutdown
- Gracefully stopping, waiting for requests to finish
=== puma shutdown: 2019-07-31 14:21:24 -0400 ===
- Goodbye!
Exiting
sending SIGTERM to all processes
terminated by SIGINT
terminated by SIGINT
exited with code 0
그런 다음 터미널 프롬프트가 다시 나타납니다.
음식 레시피 애플리케이션에 대한 데이터베이스를 성공적으로 설정했습니다. 다음 단계에서는 React 프론트 엔드를 구성하는 데 필요한 JavaScript 종속성을 설치하게됩니다.
단계 3 — 프론트 엔드 종속성 설치
이 단계에서는 음식 레시피 애플리케이션의 프론트 엔드에 필요한 JavaScript 종속성을 설치합니다. 다음이 포함됩니다:
- 사용자 인터페이스 작성을 위한 React.
- React DOM, React가 브라우저 DOM과 상호 작용 할 수 있도록합니다.
- React Router, React 애플리케이션 내에서 탐색을 처리합니다.
다음 명령을 사용하여 Yarn 패키지 관리자를 사용하여 이러한 패키지를 설치하십시오:
- yarn add react react-dom react-router-dom
이 명령은 지정된 패키지를 설치하기 위해 Yarn을 사용하고, 이를 package.json 파일에 추가합니다. 확인하려면 프로젝트의 루트 디렉토리에 있는 package.json 파일을 엽니다:
- nano package.json
설치된 패키지는 dependencies 키 아래에 나열됩니다:
{
  "name": "app",
  "private": "true",
  "dependencies": {
    "@hotwired/stimulus": "^3.1.0",
    "@hotwired/turbo-rails": "^7.1.3",
    "@popperjs/core": "^2.11.6",
    "bootstrap": "^5.2.1",
    "bootstrap-icons": "^1.9.1",
    "esbuild": "^0.15.7",
    "react": "^18.2.0",
    "react-dom": "^18.2.0",
    "react-router-dom": "^6.3.0",
    "sass": "^1.54.9"
  },
  "scripts": {
    "build": "esbuild app/javascript/*.* --bundle --sourcemap --outdir=app/assets/builds --public-path=assets",
    "build:css": "sass ./app/assets/stylesheets/application.bootstrap.scss:./app/assets/builds/application.css --no-source-map --load-path=node_modules"
  }
}
파일을 닫으려면 CTRL+X를 누릅니다.
애플리케이션에 몇 가지 프론트엔드 종속성을 설치했습니다. 다음으로, 음식 레시피 애플리케이션을 위한 홈페이지를 설정하겠습니다.
4단계 – 홈페이지 설정
필요한 종속성이 설치되었으므로, 사용자가 애플리케이션을 처음 방문했을 때 랜딩 페이지로 사용할 홈페이지를 만들게 됩니다.
Rails는 애플리케이션에 대해 모델-뷰-컨트롤러 아키텍처 패턴을 따릅니다. MVC 패턴에서 컨트롤러의 목적은 특정 요청을 수신하고 해당 모델 또는 뷰로 전달하는 것입니다. 현재 루트 URL이 브라우저에서 로드될 때 Rails 환영 페이지가 표시됩니다. 이를 변경하기 위해 홈페이지용 컨트롤러와 뷰를 생성한 다음, 해당 컨트롤러와 뷰를 라우트에 매칭시킬 것입니다.
레일즈는 컨트롤러를 생성하기 위한 controller 생성기를 제공합니다. controller 생성기는 컨트롤러 이름과 해당 액션을 받습니다. 이에 대한 자세한 내용은 레일즈 문서를 확인하십시오.
이 튜토리얼에서는 컨트롤러를 홈페이지라고 부를 것입니다. 다음 명령을 실행하여 홈페이지 컨트롤러와 index 액션을 생성하십시오:
- rails g controller Homepage index
참고:
리눅스에서는 FATAL: Listen error: unable to monitor directories for changes.라는 오류가 시스템에서 변경 사항을 모니터링할 수 있는 파일 수 제한으로 인해 발생할 수 있습니다. 다음 명령을 실행하여 이를 해결하십시오:
- echo fs.inotify.max_user_watches=524288 | sudo tee -a /etc/sysctl.conf && sudo sysctl -p
이 명령은 Listen으로 모니터링할 수 있는 디렉토리 수를 524288로 영구적으로 증가시킵니다. 이를 다시 변경하려면 동일한 명령을 실행하고 524288을 원하는 수로 대체하면 됩니다.
controller 명령을 실행하면 다음과 같은 파일이 생성됩니다:
- A
homepage_controller.rbfile for receiving all homepage-related requests. This file contains theindexaction you specified in the command. - A
homepage_helper.rbfile for adding helper methods related to theHomepagecontroller. - 홈페이지와 관련된 내용을 렌더링하기 위한
index.html.erb파일입니다.
레일즈 명령을 실행하여 생성된 이외의 페이지들 외에도, 레일즈는 라우트 파일(config/routes.rb)도 업데이트하여 홈페이지에 대한 get 라우트를 추가합니다. 이는 루트 라우트로 수정할 것입니다.
A root route in Rails specifies what will show up when users visit the root URL of your application. In this case, you want your users to see your homepage. Open the routes file located at config/routes.rb in your favorite editor:
- nano config/routes.rb
이 파일에서 get 'homepage/index'를 root 'homepage#index'로 변경하여 파일이 다음과 일치하도록 하십시오.
Rails.application.routes.draw do
  root 'homepage#index'
  이 파일 내에서 사용 가능한 DSL에 대한 자세한 내용은 http://guides.rubyonrails.org/routing.html을 참조하십시오.
end
이 수정은 Rails에게 애플리케이션의 루트에 대한 요청을 Homepage 컨트롤러의 index 액션에 매핑하도록 지시합니다. 이 액션은 브라우저에서 app/views/homepage/index.html.erb에 위치한 파일의 내용을 렌더링합니다.
파일을 저장하고 닫으십시오.
이 작업이 작동하는지 확인하려면 애플리케이션을 시작하십시오.
- bin/dev
브라우저에서 애플리케이션을 열거나 새로 고침하면 애플리케이션의 새로운 랜딩 페이지가 로드됩니다.

애플리케이션이 작동하는 것을 확인한 후 서버를 중지하려면 CTRL+C를 누르십시오.
다음으로, ~/rails_react_recipe/app/views/homepage/index.html.erb 파일을 엽니다.
- nano ~/rails_react_recipe/app/views/homepage/index.html.erb
파일 내부의 코드를 제거한 다음 빈 파일로 저장하십시오. 이렇게 하면 index.html.erb의 내용이 frontend의 React 렌더링에 방해되지 않습니다.
애플리케이션의 홈페이지를 설정했으므로 다음 섹션으로 이동하여 애플리케이션의 frontend를 React로 구성할 수 있습니다.
단계 5 — Rails Frontend로서의 React 구성
이 단계에서는 Rails를 구성하여 템플릿 엔진 대신 응용 프로그램의 프런트 엔드에 React를 사용하도록 설정합니다. 이 새로운 구성을 통해 React를 사용하여 시각적으로 매력적인 홈페이지를 만들 수 있습니다.
Rails 애플리케이션을 생성할 때 지정한 esbuild 옵션의 도움으로 JavaScript가 Rails와 원활하게 작동할 수 있도록하는 대부분의 설정이 이미 완료되었습니다. 남은 작업은 React 앱의 진입점을 JavaScript 파일의 esbuild 진입점으로 로드하는 것입니다. 이를 위해 먼저 app/javascript 디렉토리에 components 디렉토리를 생성하세요:
- mkdir ~/rails_react_recipe/app/javascript/components
components 디렉토리에는 홈페이지를위한 컴포넌트와 애플리케이션의 다른 React 컴포넌트, React 애플리케이션으로의 진입 파일이 포함됩니다.
그런 다음, app/javascript/application.js 경로에있는 application.js 파일을 엽니다:
- nano ~/rails_react_recipe/app/javascript/application.js
파일에 하이라이트 된 코드 줄을 추가하세요:
// 패키지의 빌드 스크립트 진입점
import "@hotwired/turbo-rails"
import "./controllers"
import * as bootstrap from "bootstrap"
import "./components"
application.js 파일에 추가 된 코드 줄은 진입 index.jsx 파일의 코드를 가져와 esbuild에 번들링 할 수 있도록합니다. Rails 앱의 JavaScript 진입점에 /components 디렉토리가 가져와지면 홈페이지용 React 컴포넌트를 만들 수 있습니다. 홈페이지에는 텍스트와 모든 레시피를 볼 수있는 작업 버튼이 포함됩니다.
파일을 저장하고 닫으세요.
그런 다음 components 디렉토리에 Home.jsx 파일을 생성하세요:
- nano ~/rails_react_recipe/app/javascript/components/Home.jsx
다음 코드를 파일에 추가하세요:
import React from "react";
import { Link } from "react-router-dom";

export default () => (
  <div className="vw-100 vh-100 primary-color d-flex align-items-center justify-content-center">
    <div className="jumbotron jumbotron-fluid bg-transparent">
      <div className="container secondary-color">
        <h1 className="display-4">Food Recipes</h1>
        <p className="lead">
          A curated list of recipes for the best homemade meal and delicacies.
        </p>
        <hr className="my-4" />
        <Link
          to="/recipes"
          className="btn btn-lg custom-button"
          role="button"
        >
          View Recipes
        </Link>
      </div>
    </div>
  </div>
);
이 코드에서는 React와 React Router의 Link 컴포넌트를 가져옵니다. Link 컴포넌트는 다른 페이지로 이동하기 위한 하이퍼링크를 생성합니다. 그런 다음 부트스트랩 클래스로 스타일이 지정된 홈페이지를 위한 마크업 언어를 포함하는 함수형 컴포넌트를 생성하고 내보냅니다.
파일을 저장하고 닫습니다.
Home 컴포넌트를 설정했으므로 이제 React Router를 사용하여 라우팅을 설정합니다. app/javascript 디렉토리에 routes 디렉토리를 생성합니다.
- mkdir ~/rails_react_recipe/app/javascript/routes
routes 디렉토리에는 몇 가지 라우트와 해당하는 컴포넌트가 포함됩니다. 지정된 라우트가 로드될 때 해당 컴포넌트가 브라우저에 렌더링됩니다.
routes 디렉토리에 index.jsx 파일을 생성합니다.
- nano ~/rails_react_recipe/app/javascript/routes/index.jsx
다음 코드를 추가합니다.
import React from "react";
import { BrowserRouter as Router, Routes, Route } from "react-router-dom";
import Home from "../components/Home";

export default (
  <Router>
    <Routes>
      <Route path="/" element={<Home />} />
    </Routes>
  </Router>
);
이 index.jsx 라우트 파일에서는 다음 모듈을 가져옵니다: React를 사용할 수 있게 해주는 React 모듈, 라우트 간에 이동하는 데 도움이 되는 React Router의 BrowserRouter, Routes, Route 모듈. 마지막으로, 루트(/) 경로와 일치하는 요청이 있을 때 렌더링되는 Home 컴포넌트를 가져옵니다. 애플리케이션에 더 많은 페이지를 추가하려면 이 파일에서 라우트를 선언하고 해당 페이지에 대해 렌더링할 컴포넌트와 일치시키면 됩니다.
파일을 저장하고 종료합니다.
이제 React Router를 사용하여 라우팅을 설정했습니다. React가 사용 가능한 경로를 인식하고 사용하려면 이러한 경로가 응용 프로그램의 진입 지점에서 사용 가능해야 합니다. 이를 위해 라우트를 React가 진입 파일에서 렌더링할 컴포넌트에 렌더링합니다.
app/javascript/components 디렉토리에 App.jsx 파일을 만듭니다:
- nano ~/rails_react_recipe/app/javascript/components/App.jsx
다음 코드를 App.jsx 파일에 추가합니다:
import React from "react";
import Routes from "../routes";

export default props => <>{Routes}</>;
App.jsx 파일에서 React와 방금 만든 라우트 파일을 가져옵니다. 그런 다음 프래그먼트 안에서 라우트를 렌더링하는 컴포넌트를 내보냅니다. 이 컴포넌트는 응용 프로그램이 로드될 때 진입 지점에 렌더링되어 라우트를 사용할 수 있도록 합니다.
파일을 저장하고 닫습니다.
이제 App.jsx를 진입 파일에서 렌더링할 수 있습니다. components 디렉토리에 index.jsx 파일을 만듭니다:
- nano ~/rails_react_recipe/app/javascript/components/index.jsx
다음 코드를 index.js 파일에 추가합니다:
import React from "react";
import { createRoot } from "react-dom/client";
import App from "./App";

document.addEventListener("turbo:load", () => {
  const root = createRoot(
    document.body.appendChild(document.createElement("div"))
  );
  root.render(<App />);
});
import 줄에서 React 라이브러리, ReactDOM의 createRoot 함수 및 App 컴포넌트를 가져옵니다. ReactDOM의 createRoot 함수를 사용하여 페이지에 추가된 div 요소로 루트 요소를 만들고 App 컴포넌트를 렌더링합니다. 애플리케이션이 로드될 때 React는 div 요소 내에서 App 컴포넌트의 내용을 렌더링합니다.
파일을 저장하고 종료합니다.
마지막으로 홈페이지에 일부 CSS 스타일을 추가합니다.
다음 디렉토리에서 application.bootstrap.scss 파일을 엽니다: ~/rails_react_recipe/app/assets/stylesheets/application.bootstrap.scss
- nano ~/rails_react_recipe/app/assets/stylesheets/application.bootstrap.scss
그런 다음, application.bootstrap.scss 파일의 내용을 다음 코드로 대체합니다:
@import 'bootstrap/scss/bootstrap';
@import 'bootstrap-icons/font/bootstrap-icons';

.bg_primary-color {
  background-color: #FFFFFF;
}
.primary-color {
  background-color: #FFFFFF;
}
.bg_secondary-color {
  background-color: #293241;
}
.secondary-color {
  color: #293241;
}
.custom-button.btn {
  background-color: #293241;
  color: #FFF;
  border: none;
}
.hero {
  width: 100vw;
  height: 50vh;
}
.hero img {
  object-fit: cover;
  object-position: top;
  height: 100%;
  width: 100%;
}
.overlay {
  height: 100%;
  width: 100%;
  opacity: 0.4;
}
페이지에 사용자 정의 색상을 설정했습니다. .hero 섹션은 웹 사이트의 첫 페이지에 추가할 큰 웹 배너 또는 히어로 이미지의 프레임워크를 만듭니다. 또한, custom-button.btn은 사용자가 응용 프로그램에 입력하는 버튼에 스타일을 적용합니다.
CSS 스타일이 적용된 상태에서 파일을 저장하고 종료합니다.
다음으로, 응용 프로그램의 웹 서버를 재시작합니다:
- bin/dev
그런 다음 브라우저에서 응용 프로그램을 다시로드합니다. 새로운 홈페이지가 로드됩니다:

CTRL+C로 웹 서버를 중지합니다.
이 단계에서 응용 프로그램을 프론트엔드로 React를 사용하도록 구성했습니다. 다음 단계에서는 레시피를 생성, 읽기, 업데이트 및 삭제할 수 있는 모델 및 컨트롤러를 생성합니다.
단계 6 — 레시피 컨트롤러 및 모델 생성
이제 React 프론트엔드를 애플리케이션에 설정했으므로, 레시피 모델과 컨트롤러를 만들 것입니다. 레시피 모델은 사용자의 레시피에 대한 정보를 포함하는 데이터베이스 테이블을 나타내며, 컨트롤러는 레시피를 생성, 읽기, 업데이트 또는 삭제하기 위해 요청을 받고 처리합니다. 사용자가 레시피를 요청하면, 레시피 컨트롤러는 이 요청을 받아서 레시피 모델에 전달하고, 모델은 데이터베이스에서 요청된 데이터를 검색합니다. 그런 다음 모델은 레시피 데이터를 컨트롤러에게 응답으로 반환합니다. 마지막으로, 이 정보는 브라우저에 표시됩니다.
먼저, Rails에서 제공하는 generate model 하위 명령을 사용하여 Recipe 모델을 생성합니다. 모델의 이름과 열 및 데이터 유형을 지정합니다. 다음 명령을 실행하세요:
- rails generate model Recipe name:string ingredients:text instruction:text image:string
위 명령은 Rails에게 Recipe 모델을 생성하고, 타입이 string인 name 열, 타입이 text인 ingredients 및 instruction 열, 타입이 string인 image 열을 함께 생성하라고 지시합니다. 이 튜토리얼에서는 모델 이름을 Recipe로 지정했으며, Rails에서 모델은 단수 이름을 사용하고, 해당하는 데이터베이스 테이블은 복수 이름을 사용합니다.
generate model 명령을 실행하면 두 개의 파일이 생성되고 다음 출력이 표시됩니다:
Output      invoke  active_record
      create    db/migrate/20221017220817_create_recipes.rb
      create    app/models/recipe.rb
생성된 두 개의 파일은 다음과 같습니다:
- A
recipe.rbfile that holds all the model-related logic. - A
20221017220817_create_recipes.rbfile (the number at the beginning of the file may differ depending on the date when you run the command). This migration file contains the instruction for creating the database structure.
다음으로, 데이터베이스에 유효한 데이터만 저장되도록 레시피 모델 파일을 편집합니다. 이를 위해 모델에 일부 데이터베이스 유효성 검사를 추가할 수 있습니다.
app/models/recipe.rb에 위치한 레시피 모델 파일을 엽니다.
- nano ~/rails_react_recipe/app/models/recipe.rb
다음의 코드 줄을 파일에 추가하십시오:
class Recipe < ApplicationRecord
  validates :name, presence: true
  validates :ingredients, presence: true
  validates :instruction, presence: true
end
이 코드에서는 name, ingredients, instruction 필드의 존재 여부를 확인하는 모델 유효성 검사를 추가합니다. 이 세 가지 필드가 없으면 레시피는 유효하지 않으며 데이터베이스에 저장되지 않습니다.
파일을 저장하고 닫으십시오.
데이터베이스에 recipes 테이블을 생성하려면 마이그레이션(migration)을 실행해야 합니다. 마이그레이션은 데이터베이스에 프로그래밍적으로 변경 사항을 적용하는 방법입니다. 마이그레이션이 설정한 데이터베이스와 호환되도록 20221017220817_create_recipes.rb 파일을 수정해야 합니다.
편집기에서 이 파일을 엽니다:
- nano ~/rails_react_recipe/db/migrate/20221017220817_create_recipes.rb
다음과 같이 파일을 수정하여 하이라이트된 자료를 추가하십시오:
class CreateRecipes < ActiveRecord::Migration[5.2]
  def change
    create_table :recipes do |t|
      t.string :name, null: false
      t.text :ingredients, null: false
      t.text :instruction, null: false
      t.string :image, default: 'https://raw.githubusercontent.com/do-community/react_rails_recipe/master/app/assets/images/Sammy_Meal.jpg'

      t.timestamps
    end
  end
end
이 마이그레이션 파일은 change 메소드와 recipes라는 테이블, 그리고 해당 열과 데이터 유형을 생성하는 명령을 포함한 Ruby 클래스를 포함합니다. 또한, 20221017220817_create_recipes.rb 파일을 수정하여 name, ingredients, instruction 열에 null: false 제약 조건을 추가하여 데이터베이스 변경 전에 이러한 열에 값이 있도록 합니다. 마지막으로, 이미지 열을 위한 기본 이미지 URL을 추가합니다. 다른 이미지를 사용하려면 다른 URL을 지정할 수 있습니다.
이러한 변경 사항을 저장하고 파일을 종료하십시오. 이제 마이그레이션을 실행하고 테이블을 생성할 준비가 되었습니다. 터미널에서 다음 명령을 실행하십시오:
- rails db:migrate
데이터베이스 마이그레이션 명령을 사용하여 마이그레이션 파일의 지시문을 실행합니다. 명령이 성공적으로 실행되면 다음과 유사한 출력을 받게 됩니다:
Output== 20190407161357 CreateRecipes: migrating ====================================
-- create_table(:recipes)
   -> 0.0140s
== 20190407161357 CreateRecipes: migrated (0.0141s) ===========================
레시피 모델이 준비되었다면, 다음으로는 레시피를 생성, 읽기 및 삭제하는 논리를 추가하기 위해 레시피 컨트롤러를 생성합니다. 다음 명령을 실행하세요:
- rails generate controller api/v1/Recipes index create show destroy --skip-template-engine --no-helper
이 명령에서는 api/v1 디렉토리에 Recipes 컨트롤러를 생성하고, index, create, show, destroy 액션을 포함합니다. index 액션은 모든 레시피를 가져오는 작업을 처리하며, create 액션은 새로운 레시피를 생성하는 작업을 담당합니다. show 액션은 단일 레시피를 가져오고, destroy 액션은 레시피를 삭제하는 논리를 처리합니다.
또한, 컨트롤러를 좀 더 가볍게 만들기 위해 다음과 같은 플래그를 전달합니다:
--skip-template-engine는 React가 프론트엔드 요구 사항을 처리하므로 Rails가 Rails 뷰 파일 생성을 건너뛰도록 지시합니다.--no-helper는 컨트롤러를 위한 도우미 파일 생성을 건너뛰도록 Rails에 지시합니다.
이 명령을 실행하면 Recipes 컨트롤러의 각 액션에 대한 경로가 라우트 파일에 업데이트됩니다.
명령이 실행되면 다음과 같은 출력이 표시됩니다:
Output      create  app/controllers/api/v1/recipes_controller.rb
       route  namespace :api do
                namespace :v1 do
                  get 'recipes/index'
                  get 'recipes/create'
                  get 'recipes/show'
                  get 'recipes/destroy'
                end
              end
이러한 경로를 사용하려면 config/routes.rb 파일을 수정해야 합니다. 텍스트 편집기에서 routes.rb 파일을 엽니다:
- nano ~/rails_react_recipe/config/routes.rb
이 파일을 다음 코드와 같이 수정하여 강조된 줄을 변경하거나 추가하십시오.
Rails.application.routes.draw do
  namespace :api do
    namespace :v1 do
      get 'recipes/index'
      post 'recipes/create'
      get '/show/:id', to: 'recipes#show'
      delete '/destroy/:id', to: 'recipes#destroy'
    end
  end
  root 'homepage#index'
  get '/*path' => 'homepage#index'
  # https://guides.rubyonrails.org/routing.html

  # 루트 경로 라우트를 정의합니다 ("/")
  # root "articles#index"
end
이 라우트 파일에서는 create 및 destroy 라우트의 HTTP 동사를 수정하여 데이터를 post 및 delete 할 수 있도록 합니다. 또한 show 및 destroy 액션의 라우트에 :id 매개변수를 추가하여 수정합니다. :id는 읽거나 삭제할 레시피의 식별 번호를 보유합니다.
존재하는 라우트와 일치하지 않는 다른 요청을 homepage 컨트롤러의 index 액션으로 리디렉션하는 get '/*path'로 캐치 올 라우트를 추가합니다. 프론트엔드 라우팅은 레시피 생성, 읽기 또는 삭제와 관련 없는 요청을 처리할 것입니다.
파일을 저장하고 종료하세요.
다음 명령을 실행하여 애플리케이션에서 사용 가능한 라우트 목록을 확인할 수 있습니다:
- rails routes
이 명령을 실행하면 프로젝트의 URI 패턴, 동사 및 일치하는 컨트롤러 또는 액션의 긴 목록이 표시됩니다.
다음으로, 한 번에 모든 레시피를 가져오는 로직을 추가합니다. Rails는 이와 같은 데이터베이스 관련 작업을 처리하기 위해 ActiveRecord 라이브러리를 사용합니다. ActiveRecord는 클래스를 관계형 데이터베이스 테이블에 연결하고 작업하기 위한 풍부한 API를 제공합니다.
모든 레시피를 가져오기 위해, ActiveRecord를 사용하여 레시피 테이블을 쿼리하고 데이터베이스에 있는 모든 레시피를 가져올 것입니다.
다음 명령을 사용하여 recipes_controller.rb 파일을 엽니다:
- nano ~/rails_react_recipe/app/controllers/api/v1/recipes_controller.rb
다음 줄을 레시피 컨트롤러에 추가합니다:
class Api::V1::RecipesController < ApplicationController
  def index
    recipe = Recipe.all.order(created_at: :desc)
    render json: recipe
  end

  def create
  end

  def show
  end

  def destroy
  end
end
인덱스 액션에서는 ActiveRecord의 all 메소드를 사용하여 데이터베이스의 모든 레시피를 가져옵니다. order 메소드를 사용하여 생성된 날짜에 따라 내림차순으로 정렬하여 가장 최신의 레시피를 먼저 배치합니다. 마지막으로, 레시피 목록을 JSON 응답으로 render합니다.
다음으로, 새로운 레시피를 만드는 논리를 추가합니다. 모든 레시피를 가져오는 것과 마찬가지로, 제공된 레시피 세부정보를 유효성 검사하고 저장하기 위해 ActiveRecord를 사용할 것입니다. 레시피 컨트롤러를 다음과 같이 업데이트하세요.
class Api::V1::RecipesController < ApplicationController
  def index
    recipe = Recipe.all.order(created_at: :desc)
    render json: recipe
  end

  def create
    recipe = Recipe.create!(recipe_params)
    if recipe
      render json: recipe
    else
      render json: recipe.errors
    end
  end

  def show
  end

  def destroy
  end

  private

  def recipe_params
    params.permit(:name, :image, :ingredients, :instruction)
  end
end
create 액션에서는 ActiveRecord의 create 메서드를 사용하여 새로운 레시피를 생성합니다. create 메서드는 모든 컨트롤러 매개변수를 한 번에 모델에 할당할 수 있습니다. 이 메서드는 레코드를 쉽게 생성할 수 있게 해주지만, 악용의 가능성도 열어둡니다. Rails에서 제공하는 강력한 매개변수 기능을 사용하여 악용을 방지할 수 있습니다. 이렇게 하면 허용되지 않은 경우 매개변수를 할당할 수 없습니다. 코드에서 create 메서드에 recipe_params 매개변수를 전달합니다. recipe_params는 컨트롤러 매개변수를 허용하여 잘못된 또는 악의적인 내용이 데이터베이스에 들어가지 않도록하는 private 메서드입니다. 이 경우, name, image, ingredients 및 instruction 매개변수를 create 메서드의 유효한 사용을 위해 허용합니다.
이제 레시피 컨트롤러는 레시피를 읽고 생성할 수 있습니다. 남은 작업은 단일 레시피를 읽고 삭제하는 논리입니다. 강조 표시된 코드로 레시피 컨트롤러를 업데이트하십시오:
class Api::V1::RecipesController < ApplicationController
  before_action :set_recipe, only: %i[show destroy]

  def index
    recipe = Recipe.all.order(created_at: :desc)
    render json: recipe
  end

  def create
    recipe = Recipe.create!(recipe_params)
    if recipe
      render json: recipe
    else
      render json: recipe.errors
    end
  end

  def show
    render json: @recipe
  end

  def destroy
    @recipe&.destroy
    render json: { message: 'Recipe deleted!' }
  end

  private

  def recipe_params
    params.permit(:name, :image, :ingredients, :instruction)
  end

  def set_recipe
    @recipe = Recipe.find(params[:id])
  end
end
새로운 코드 라인에서는, show와 delete 액션이 요청과 일치할 때만 호출되는 before_action에 의해 호출되는 개인 set_recipe 메소드를 생성합니다. set_recipe 메소드는 ActiveRecord의 find 메소드를 사용하여 params에서 제공된 id와 일치하는 레시피를 찾아 인스턴스 변수 @recipe에 할당합니다. show 액션에서는 set_recipe 메소드에 의해 설정된 @recipe 객체를 JSON 응답으로 반환합니다.
destroy 액션에서는 Ruby의 안전한 탐색 연산자 &.를 사용하여 비슷한 작업을 수행했습니다. 이 추가는 레시피가 존재하는 경우에만 레시피를 삭제하고 응답으로 메시지를 보낼 수 있도록 합니다.
recipes_controller.rb에 이러한 변경 사항을 적용한 후 파일을 저장하고 닫습니다.
이 단계에서는 레시피에 대한 모델과 컨트롤러를 생성했습니다. 백엔드에서 레시피를 처리하는 데 필요한 모든 로직을 작성했습니다. 다음 섹션에서는 레시피를 보기 위한 구성 요소를 생성합니다.
7단계 – 레시피 보기
이 섹션에서는 레시피를 보기 위한 구성 요소를 생성합니다. 모든 기존 레시피를 보는 페이지와 개별 레시피를 보는 페이지를 만듭니다.
모든 레시피를 볼 수 있는 페이지를 만들기 위해 시작합니다. 페이지를 만들기 전에 현재 데이터베이스가 비어 있으므로 작업할 레시피가 필요합니다. Rails는 애플리케이션에 시드 데이터를 생성하는 방법을 제공합니다.
편집할 시드 파일인 seeds.rb 파일을 엽니다:
- nano ~/rails_react_recipe/db/seeds.rb
시드 파일의 초기 내용을 다음 코드로 바꿉니다:
9.times do |i|
  Recipe.create(
    name: "Recipe #{i + 1}",
    ingredients: '227g tub clotted cream, 25g butter, 1 tsp cornflour,100g parmesan, grated nutmeg, 250g fresh fettuccine or tagliatelle, snipped chives or chopped parsley to serve (optional)',
    instruction: 'In a medium saucepan, stir the clotted cream, butter, and cornflour over a low-ish heat and bring to a low simmer. Turn off the heat and keep warm.'
  )
end
이 코드에서는 name, ingredients, instruction 섹션을 가진 레시피 9개를 생성하기 위해 루프를 사용합니다. 파일을 저장하고 종료합니다.
이 데이터로 데이터베이스를 시드하려면 터미널에서 다음 명령을 실행합니다:
- rails db:seed
이 명령을 실행하면 데이터베이스에 레시피 9개가 추가됩니다. 이제 이를 가져와 프론트엔드에서 렌더링할 수 있습니다.
모든 레시피를 볼 수 있는 구성 요소는 RecipesController의 index 액션에 HTTP 요청을 보내 모든 레시피 목록을 가져옵니다. 그런 다음 이 레시피를 페이지의 카드에 표시합니다.
app/javascript/components 디렉토리에 Recipes.jsx 파일을 생성하세요:
- nano ~/rails_react_recipe/app/javascript/components/Recipes.jsx
파일을 여는 대신 다음 줄을 추가하여 React, useState, useEffect, Link, useNavigate 모듈을 가져옵니다:
import React, { useState, useEffect } from "react";
import { Link, useNavigate } from "react-router-dom";
다음으로, 하이라이트된 줄을 추가하여 Recipes라는 기능적인 React 컴포넌트를 생성하고 내보냅니다:
import React, { useState, useEffect } from "react";
import { Link, useNavigate } from "react-router-dom";

const Recipes = () => {
  const navigate = useNavigate();
  const [recipes, setRecipes] = useState([]);
};

export default Recipes;
Recipe 컴포넌트 내에서 React Router의 네비게이션 API는 useNavigate 훅을 호출합니다. React의 useState 훅은 recipes 상태를 초기화하는데 사용되며, 이는 빈 배열 ([])이고, recipes 상태를 업데이트하는 setRecipes 함수도 초기화됩니다.
다음으로, useEffect 훅에서 HTTP 요청을 통해 모든 레시피를 가져오는 작업을 수행합니다. 이를 위해 다음 라인을 추가하세요:
import React, { useState, useEffect } from "react";
import { Link, useNavigate } from "react-router-dom";

const Recipes = () => {
  const navigate = useNavigate();
  const [recipes, setRecipes] = useState([]);

  useEffect(() => {
    const url = "/api/v1/recipes/index";
    fetch(url)
      .then((res) => {
        if (res.ok) {
          return res.json();
        }
        throw new Error("Network response was not ok.");
      })
      .then((res) => setRecipes(res))
      .catch(() => navigate("/"));
  }, []);
};

export default Recipes;
useEffect 훅에서는 Fetch API를 사용하여 모든 레시피를 가져오기 위해 HTTP 요청을 수행합니다. 응답이 성공적인 경우, 애플리케이션은 레시피 배열을 recipes 상태에 저장합니다. 오류가 발생하는 경우, 사용자를 홈페이지로 리다이렉트합니다.
마지막으로, 컴포넌트가 렌더링될 때 브라우저 페이지에 평가 및 표시될 요소들의 마크업을 반환합니다. 이 경우, 컴포넌트는 recipes 상태의 레시피 카드를 렌더링합니다. Recipes.jsx에 다음 라인을 추가하세요:
import React, { useState, useEffect } from "react";
import { Link, useNavigate } from "react-router-dom";

const Recipes = () => {
  const navigate = useNavigate();
  const [recipes, setRecipes] = useState([]);

  useEffect(() => {
    const url = "/api/v1/recipes/index";
    fetch(url)
      .then((res) => {
        if (res.ok) {
          return res.json();
        }
        throw new Error("Network response was not ok.");
      })
      .then((res) => setRecipes(res))
      .catch(() => navigate("/"));
  }, []);

  const allRecipes = recipes.map((recipe, index) => (
    <div key={index} className="col-md-6 col-lg-4">
      <div className="card mb-4">
        <img
          src={recipe.image}
          className="card-img-top"
          alt={`${recipe.name} image`}
        />
        <div className="card-body">
          <h5 className="card-title">{recipe.name}</h5>
          <Link to={`/recipe/${recipe.id}`} className="btn custom-button">
            View Recipe
          </Link>
        </div>
      </div>
    </div>
  ));
  const noRecipe = (
    <div className="vw-100 vh-50 d-flex align-items-center justify-content-center">
      <h4>
        No recipes yet. Why not <Link to="/new_recipe">create one</Link>
      </h4>
    </div>
  );

  return (
    <>
      <section className="jumbotron jumbotron-fluid text-center">
        <div className="container py-5">
          <h1 className="display-4">Recipes for every occasion</h1>
          <p className="lead text-muted">
            We’ve pulled together our most popular recipes, our latest
            additions, and our editor’s picks, so there’s sure to be something
            tempting for you to try.
          </p>
        </div>
      </section>
      <div className="py-5">
        <main className="container">
          <div className="text-end mb-3">
            <Link to="/recipe" className="btn custom-button">
              Create New Recipe
            </Link>
          </div>
          <div className="row">
            {recipes.length > 0 ? allRecipes : noRecipe}
          </div>
          <Link to="/" className="btn btn-link">
            Home
          </Link>
        </main>
      </div>
    </>
  );
};

export default Recipes;
Recipes.jsx를 저장하고 종료하세요.
이제 모든 레시피를 표시하는 컴포넌트를 생성했으므로, 해당 컴포넌트에 대한 라우트를 생성합니다. 프론트엔드 라우트 파일 app/javascript/routes/index.jsx를 엽니다:
- nano app/javascript/routes/index.jsx
파일에 다음 라인을 추가하세요:
import React from "react";
import { BrowserRouter as Router, Routes, Route } from "react-router-dom";
import Home from "../components/Home";
import Recipes from "../components/Recipes";

export default (
  <Router>
    <Routes>
      <Route path="/" exact component={Home} />
      <Route path="/recipes" element={<Recipes />} />
    </Routes>
  </Router>
);
파일을 저장하고 종료하세요.
이 시점에서 코드가 예상대로 작동하는지 확인하는 것이 좋습니다. 이전과 같이 다음 명령을 사용하여 서버를 시작하세요:
- bin/dev
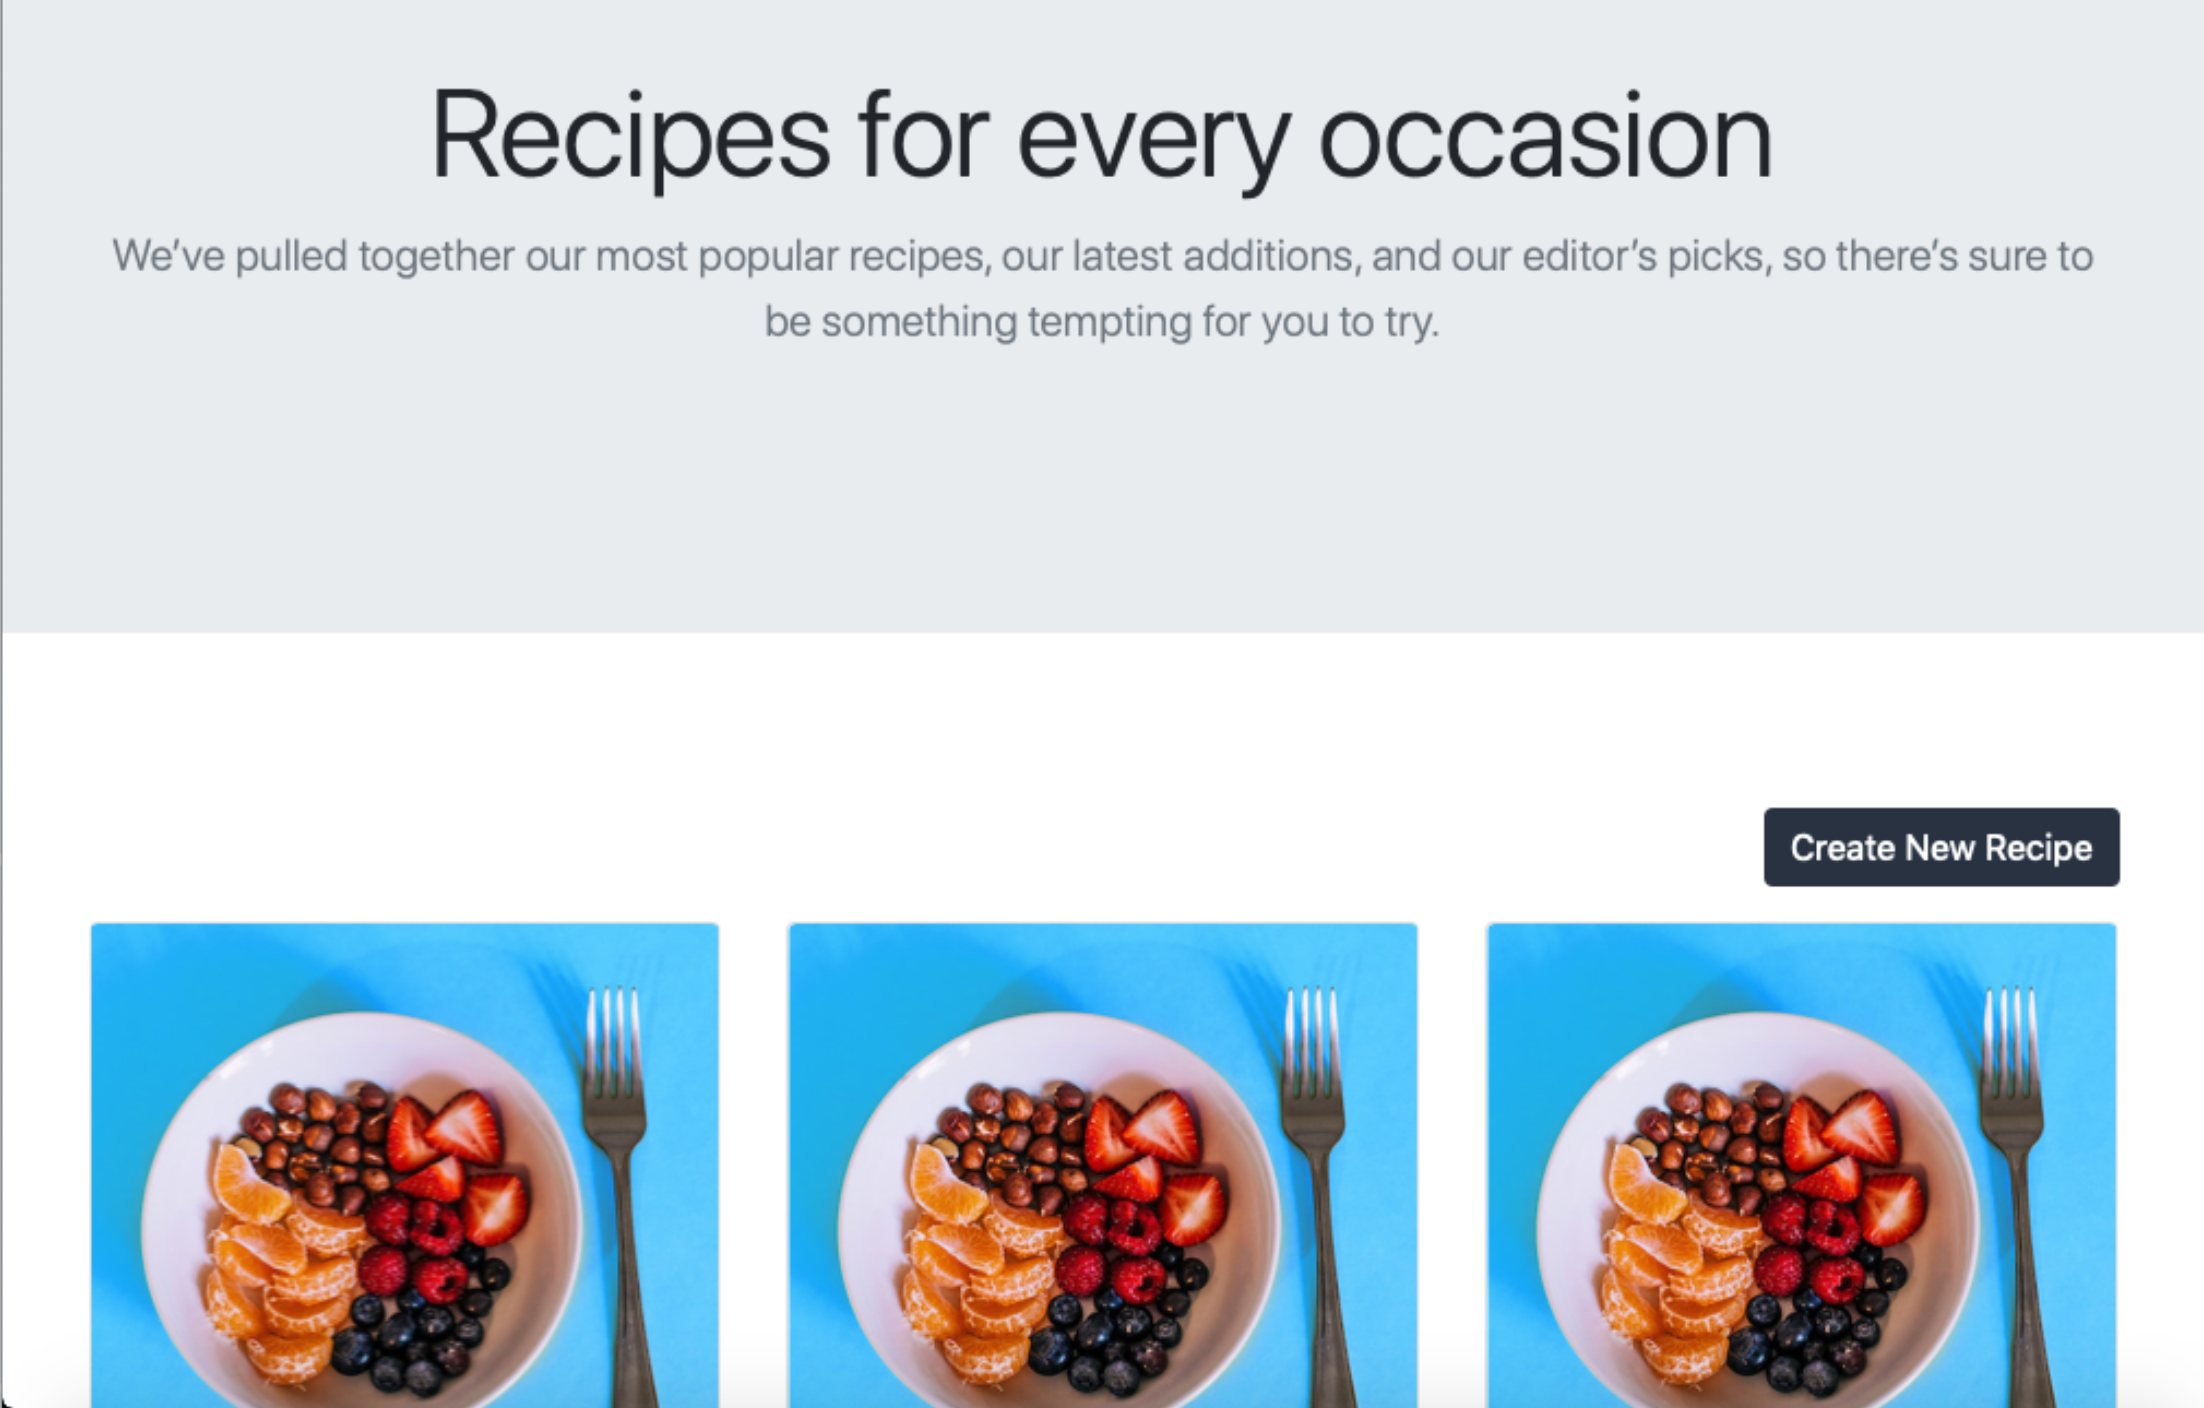
그런 다음 브라우저에서 앱을 열어보세요. 홈페이지에서 레시피 보기 버튼을 눌러 시드 레시피가 표시되는 페이지에 액세스하세요:

터미널에서 CTRL+C를 눌러 서버를 중지하고 프롬프트로 돌아갑니다.
이제 애플리케이션에서 모든 레시피를 볼 수 있으므로 개별 레시피를 보기 위한 두 번째 컴포넌트를 생성하는 시간입니다. app/javascript/components 디렉토리에 Recipe.jsx 파일을 생성하세요:
- nano app/javascript/components/Recipe.jsx
Recipes 컴포넌트와 마찬가지로 다음 줄을 추가하여 React, useState, useEffect, Link, useNavigate, useParam 모듈을 가져옵니다:
import React, { useState, useEffect } from "react";
import { Link, useNavigate, useParams } from "react-router-dom";
다음으로 강조된 줄을 추가하여 Recipe이라는 함수형 React 컴포넌트를 생성하고 내보냅니다:
import React, { useState, useEffect } from "react";
import { Link, useNavigate, useParams } from "react-router-dom";

const Recipe = () => {
  const params = useParams();
  const navigate = useNavigate();
  const [recipe, setRecipe] = useState({ ingredients: "" });
};

export default Recipe;
Recipes 컴포넌트와 마찬가지로 useNavigate 훅을 사용하여 React Router 내비게이션을 초기화합니다. useState 훅을 사용하여 recipe 상태와 setRecipe 함수를 업데이트합니다. 또한, useParams 훅을 호출하여 URL 매개변수의 키/값 쌍으로 구성된 객체를 반환합니다.
특정 레시피를 찾기 위해서는 애플리케이션이 레시피의 id를 알아야 하므로, Recipe 컴포넌트는 URL에 id param을 필요로 합니다. 이는 useParams 훅의 반환 값을 저장하는 params 객체를 통해 액세스할 수 있습니다.
다음으로, params 객체에서 id param에 접근할 useEffect 훅을 선언하세요. 레시피 id param을 가져온 후, 레시피를 가져오기 위해 HTTP 요청을 보냅니다. 파일에 아래에 강조된 부분을 추가하세요:
import React, { useState, useEffect } from "react";
import { Link, useNavigate, useParams } from "react-router-dom";

const Recipe = () => {
  const params = useParams();
  const navigate = useNavigate();
  const [recipe, setRecipe] = useState({ ingredients: "" });

  useEffect(() => {
    const url = `/api/v1/show/${params.id}`;
    fetch(url)
      .then((response) => {
        if (response.ok) {
          return response.json();
        }
        throw new Error("Network response was not ok.");
      })
      .then((response) => setRecipe(response))
      .catch(() => navigate("/recipes"));
  }, [params.id]);
};

export default Recipe;
useEffect 훅에서 params.id 값을 사용하여 id를 가진 레시피를 가져오는 GET HTTP 요청을 보내고, 그 결과를 setRecipe 함수를 사용하여 컴포넌트 상태에 저장합니다. 레시피가 없을 경우 앱은 사용자를 레시피 페이지로 리다이렉트합니다.
다음으로, 컴포넌트에서 HTML 엔티티로 이스케이프된 문자를 대체하는 addHtmlEntities 함수를 추가하세요. addHtmlEntities 함수는 문자열을 가져와 이스케이프된 여는 괄호와 닫는 괄호를 HTML 엔티티로 대체합니다. 이 함수는 레시피 지시사항에 저장된 이스케이프된 문자를 변환하는 데 도움이 될 것입니다. 아래에 강조된 부분을 추가하세요:
import React, { useState, useEffect } from "react";
import { Link, useNavigate, useParams } from "react-router-dom";
const Recipe = () => {
const params = useParams();
const navigate = useNavigate();
const [recipe, setRecipe] = useState({ ingredients: "" });
useEffect(() => {
const url = `/api/v1/show/${params.id}`;
fetch(url)
.then((response) => {
if (response.ok) {
return response.json();
}
throw new Error("Network response was not ok.");
})
.then((response) => setRecipe(response))
.catch(() => navigate("/recipes"));
}, [params.id]);
const addHtmlEntities = (str) => {
return String(str).replace(/</g, "<").replace(/>/g, ">");
};
};
export default Recipe;
마지막으로, 아래에 강조된 부분을 추가하여 컴포넌트 상태에 있는 레시피를 페이지에 렌더링하는 마크업을 반환하세요:
import React, { useState, useEffect } from "react";
import { Link, useNavigate, useParams } from "react-router-dom";
const Recipe = () => {
const params = useParams();
const navigate = useNavigate();
const [recipe, setRecipe] = useState({ ingredients: "" });
useEffect(() => {
const url = `/api/v1/show/${params.id}`;
fetch(url)
.then((response) => {
if (response.ok) {
return response.json();
}
throw new Error("Network response was not ok.");
})
.then((response) => setRecipe(response))
.catch(() => navigate("/recipes"));
}, [params.id]);
const addHtmlEntities = (str) => {
return String(str).replace(/</g, "<").replace(/>/g, ">");
};
const ingredientList = () => {
let ingredientList = "No ingredients available";
if (recipe.ingredients.length > 0) {
ingredientList = recipe.ingredients
.split(",")
.map((ingredient, index) => (
<li key={index} className="list-group-item">
{ingredient}
</li>
));
}
return ingredientList;
};
const recipeInstruction = addHtmlEntities(recipe.instruction);
return (
<div className="">
<div className="hero position-relative d-flex align-items-center justify-content-center">
<img
src={recipe.image}
alt={`${recipe.name} image`}
className="img-fluid position-absolute"
/>
<div className="overlay bg-dark position-absolute" />
<h1 className="display-4 position-relative text-white">
{recipe.name}
</h1>
</div>
<div className="container py-5">
<div className="row">
<div className="col-sm-12 col-lg-3">
<ul className="list-group">
<h5 className="mb-2">Ingredients</h5>
{ingredientList()}
</ul>
</div>
<div className="col-sm-12 col-lg-7">
<h5 className="mb-2">Preparation Instructions</h5>
<div
dangerouslySetInnerHTML={{
__html: `${recipeInstruction}`,
}}
/>
</div>
<div className="col-sm-12 col-lg-2">
<button
type="button"
className="btn btn-danger"
>
Delete Recipe
</button>
</div>
</div>
<Link to="/recipes" className="btn btn-link">
Back to recipes
</Link>
</div>
</div>
);
};
export default Recipe;
ingredientList 함수를 사용하여 쉼표로 구분된 레시피 재료를 배열로 분할하고 이를 맵하여 재료 목록을 생성합니다. 만약 재료가 없다면 앱은 사용 가능한 재료가 없습니다라는 메시지를 표시합니다. 또한, 레시피 지시에 있는 모든 여는 괄호와 닫는 괄호를 addHtmlEntities 함수를 통해 바꿉니다. 마지막으로, 이 코드는 레시피 이미지를 히어로 이미지로 표시하고, 레시피 지시 옆에 레시피 삭제 버튼을 추가하며, 레시피 페이지로 돌아가는 버튼을 추가합니다.
참고: React의 dangerouslySetInnerHTML 속성을 사용하는 것은 크로스 사이트 스크립팅 공격에 취약할 수 있습니다. 이 위험은 레시피를 생성할 때 입력된 특수 문자를 NewRecipe 컴포넌트에서 선언된 stripHtmlEntities 함수를 사용하여 대체함으로써 줄일 수 있습니다.
파일을 저장하고 종료하세요.
Recipe 컴포넌트를 페이지에서 보려면 라우트 파일에 추가해야 합니다. 라우트 파일을 열어 편집하세요:
- nano app/javascript/routes/index.jsx
다음 강조된 줄을 파일에 추가하세요:
import React from "react";
import { BrowserRouter as Router, Routes, Route } from "react-router-dom";
import Home from "../components/Home";
import Recipes from "../components/Recipes";
import Recipe from "../components/Recipe";

export default (
  <Router>
    <Routes>
      <Route path="/" exact component={Home} />
      <Route path="/recipes" exact component={Recipes} />
      <Route path="/recipe/:id" element={<Recipe />} />
    </Routes>
  </Router>
);
이 라우트 파일에서 Recipe 컴포넌트를 가져와 라우트를 추가합니다. 해당 라우트에는 볼 레시피의 id로 대체될 :id param이 있습니다.
파일을 저장하고 닫으세요.
bin/dev 스크립트를 사용하여 서버를 다시 시작하고, 브라우저에서 http://localhost:3000을 방문하세요. View Recipes 버튼을 클릭하여 레시피 페이지로 이동하세요. 레시피 페이지에서는 각 레시피의 View Recipe 버튼을 클릭하여 해당 레시피에 액세스할 수 있습니다. 데이터베이스에서 가져온 데이터로 채워진 페이지가 표시됩니다:
CTRL+C를 사용하여 서버를 중지할 수 있습니다.
이 단계에서는 데이터베이스에 9개의 레시피를 추가하고, 개별적으로 레시피를 보거나 컬렉션으로 보기 위한 구성 요소를 생성했습니다. 다음 단계에서는 레시피를 생성하는 컴포넌트를 추가할 것입니다.
단계 8 – 레시피 생성
사용 가능한 음식 레시피 애플리케이션을 위한 다음 단계는 새로운 레시피를 생성하는 기능입니다. 이 단계에서는 이 기능을 위한 컴포넌트를 만들 것입니다. 이 컴포넌트에는 사용자로부터 필요한 레시피 세부 정보를 수집하기 위한 폼이 포함되며, 그런 다음 레시피 데이터를 저장하기 위해 Recipe 컨트롤러의 create 액션에 요청을 보냅니다.
app/javascript/components 디렉토리에 NewRecipe.jsx 파일을 생성하세요:
- nano app/javascript/components/NewRecipe.jsx
새 파일에서 다른 컴포넌트에서 사용한 React, useState, Link, useNavigate 모듈을 가져오세요:
import React, { useState } from "react";
import { Link, useNavigate } from "react-router-dom";
다음으로, 강조된 줄을 추가하여 NewRecipe 함수형 컴포넌트를 생성하고 내보내세요:
import React, { useState } from "react";
import { Link, useNavigate } from "react-router-dom";

const NewRecipe = () => {
  const navigate = useNavigate();
  const [name, setName] = useState("");
  const [ingredients, setIngredients] = useState("");
  const [instruction, setInstruction] = useState("");
};

export default NewRecipe;
이전 구성 요소와 마찬가지로, React 라우터 탐색을 useNavigate 훅으로 초기화한 다음, useState 훅을 사용하여 각각 해당 업데이트 함수와 함께 name, ingredients, instruction 상태를 초기화합니다. 이들은 유효한 레시피를 생성하는 데 필요한 필드입니다.
다음으로, 특수 문자 (예: <)를 해당 이스케이프/인코딩 값 (예: <)으로 변환하는 stripHtmlEntities 함수를 생성합니다. 이를 위해 NewRecipe 컴포넌트에 다음과 같이 강조된 줄을 추가하세요:
import React, { useState } from "react";
import { Link, useNavigate } from "react-router-dom";
const NewRecipe = () => {
const navigate = useNavigate();
const [name, setName] = useState("");
const [ingredients, setIngredients] = useState("");
const [instruction, setInstruction] = useState("");
const stripHtmlEntities = (str) => {
return String(str)
.replace(/\n/g, "<br> <br>")
.replace(/</g, "<")
.replace(/>/g, ">");
};
};
export default NewRecipe;
stripHtmlEntities 함수에서는 < 및 > 문자를 해당 이스케이프 값으로 대체합니다. 이렇게 하면 데이터베이스에 원시 HTML을 저장하지 않습니다.
다음으로, 강조된 줄을 NewRecipe 컴포넌트에 추가하여 폼의 편집 및 제출을 처리하는 onChange 및 onSubmit 함수를 추가하세요.
import React, { useState } from "react";
import { Link, useNavigate } from "react-router-dom";
const NewRecipe = () => {
const navigate = useNavigate();
const [name, setName] = useState("");
const [ingredients, setIngredients] = useState("");
const [instruction, setInstruction] = useState("");
const stripHtmlEntities = (str) => {
return String(str)
.replace(/\n/g, "<br> <br>")
.replace(/</g, "<")
.replace(/>/g, ">");
};
const onChange = (event, setFunction) => {
setFunction(event.target.value);
};
const onSubmit = (event) => {
event.preventDefault();
const url = "/api/v1/recipes/create";
if (name.length == 0 || ingredients.length == 0 || instruction.length == 0)
return;
const body = {
name,
ingredients,
instruction: stripHtmlEntities(instruction),
};
const token = document.querySelector('meta[name="csrf-token"]').content;
fetch(url, {
method: "POST",
headers: {
"X-CSRF-Token": token,
"Content-Type": "application/json",
},
body: JSON.stringify(body),
})
.then((response) => {
if (response.ok) {
return response.json();
}
throw new Error("Network response was not ok.");
})
.then((response) => navigate(`/recipe/${response.id}`))
.catch((error) => console.log(error.message));
};
};
export default NewRecipe;
onChange 함수는 사용자 입력 이벤트 event와 상태 설정 함수를 인수로 받아 사용자 입력 값으로 상태를 갱신합니다. onSubmit 함수에서는 필수 입력란이 비어있지 않은지 확인합니다. 그런 다음 새로운 레시피를 생성하는 데 필요한 매개변수를 포함하는 객체를 작성합니다. stripHtmlEntities 함수를 사용하여 레시피 지시문에서 <와 > 문자를 이스케이프된 값으로 대체하고 모든 줄 바꿈 문자를 줄 바꿈 태그로 대체하여 사용자가 입력한 텍스트 형식을 유지합니다. 마지막으로 새로운 레시피를 생성하기 위해 POST HTTP 요청을 수행하고 응답이 성공적인 경우 해당 레시피 페이지로 리디렉션합니다.
크로스 사이트 요청 위조 (CSRF) 공격에 대비하여 Rails는 HTML 문서에 CSRF 보안 토큰을 첨부합니다. 이 토큰은 비-GET 요청이 있는 경우에 필요합니다. 이전 코드의 token 상수를 사용하여 응용 프로그램은 서버에서 토큰을 확인하고 보안 토큰이 예상과 일치하지 않으면 예외를 throw합니다. onSubmit 함수에서 응용 프로그램은 Rails에 의해 HTML 문서에 포함된 CSRF 토큰을 검색한 다음 JSON 문자열로 HTTP 요청을 수행합니다. 레시피가 성공적으로 생성되면 응용 프로그램은 사용자를 레시피 페이지로 리디렉션하여 새로 생성한 레시피를 볼 수 있게 합니다.
마지막으로, 사용자가 생성하려는 레시피의 세부 정보를 입력할 수 있는 폼을 렌더링하는 마크업을 반환합니다. 강조된 줄을 추가하세요:
import React, { useState } from "react";
import { Link, useNavigate } from "react-router-dom";
const NewRecipe = () => {
const navigate = useNavigate();
const [name, setName] = useState("");
const [ingredients, setIngredients] = useState("");
const [instruction, setInstruction] = useState("");
const stripHtmlEntities = (str) => {
return String(str)
.replace(/\n/g, "<br> <br>")
.replace(/</g, "<")
.replace(/>/g, ">");
};
const onChange = (event, setFunction) => {
setFunction(event.target.value);
};
const onSubmit = (event) => {
event.preventDefault();
const url = "/api/v1/recipes/create";
if (name.length == 0 || ingredients.length == 0 || instruction.length == 0)
return;
const body = {
name,
ingredients,
instruction: stripHtmlEntities(instruction),
};
const token = document.querySelector('meta[name="csrf-token"]').content;
fetch(url, {
method: "POST",
headers: {
"X-CSRF-Token": token,
"Content-Type": "application/json",
},
body: JSON.stringify(body),
})
.then((response) => {
if (response.ok) {
return response.json();
}
throw new Error("Network response was not ok.");
})
.then((response) => navigate(`/recipe/${response.id}`))
.catch((error) => console.log(error.message));
};
return (
<div className="container mt-5">
<div className="row">
<div className="col-sm-12 col-lg-6 offset-lg-3">
<h1 className="font-weight-normal mb-5">
Add a new recipe to our awesome recipe collection.
</h1>
<form onSubmit={onSubmit}>
<div className="form-group">
<label htmlFor="recipeName">Recipe name</label>
<input
type="text"
name="name"
id="recipeName"
className="form-control"
required
onChange={(event) => onChange(event, setName)}
/>
</div>
<div className="form-group">
<label htmlFor="recipeIngredients">Ingredients</label>
<input
type="text"
name="ingredients"
id="recipeIngredients"
className="form-control"
required
onChange={(event) => onChange(event, setIngredients)}
/>
<small id="ingredientsHelp" className="form-text text-muted">
Separate each ingredient with a comma.
</small>
</div>
<label htmlFor="instruction">Preparation Instructions</label>
<textarea
className="form-control"
id="instruction"
name="instruction"
rows="5"
required
onChange={(event) => onChange(event, setInstruction)}
/>
<button type="submit" className="btn custom-button mt-3">
Create Recipe
</button>
<Link to="/recipes" className="btn btn-link mt-3">
Back to recipes
</Link>
</form>
</div>
</div>
</div>
);
};
export default NewRecipe;
반환된 마크업에는 세 개의 입력 필드를 포함하는 양식이 포함되어 있습니다. 각각 recipeName, recipeIngredients, instruction에 대한 하나의 입력 필드가 있습니다. 각 입력 필드에는 onChange 이벤트 핸들러가 있으며 onChange 함수를 호출합니다. onSubmit 이벤트 핸들러는 제출 버튼에도 연결되어 있으며 양식 데이터를 제출하는 onSubmit 함수를 호출합니다.
파일을 저장하고 종료하세요.
브라우저에서이 컴포넌트에 액세스하려면 라우트 파일을 해당 라우트로 업데이트하세요:
- nano app/javascript/routes/index.jsx
다음과 같이 라우트 파일을 수정하세요:
import React from "react";
import { BrowserRouter as Router, Routes, Route } from "react-router-dom";
import Home from "../components/Home";
import Recipes from "../components/Recipes";
import Recipe from "../components/Recipe";
import NewRecipe from "../components/NewRecipe";

export default (
  <Router>
    <Routes>
      <Route path="/" exact component={Home} />
      <Route path="/recipes" exact component={Recipes} />
      <Route path="/recipe/:id" exact component={Recipe} />
      <Route path="/recipe" element={<NewRecipe />} />
    </Routes>
  </Router>
);
라우트가 준비되면 파일을 저장하고 종료하세요.
개발 서버를 다시 시작하고 브라우저에서 http://localhost:3000을 방문하세요. 레시피 페이지로 이동하여 새 레시피 만들기 버튼을 클릭하세요. 데이터베이스에 레시피를 추가 할 수있는 양식이있는 페이지가 표시됩니다:
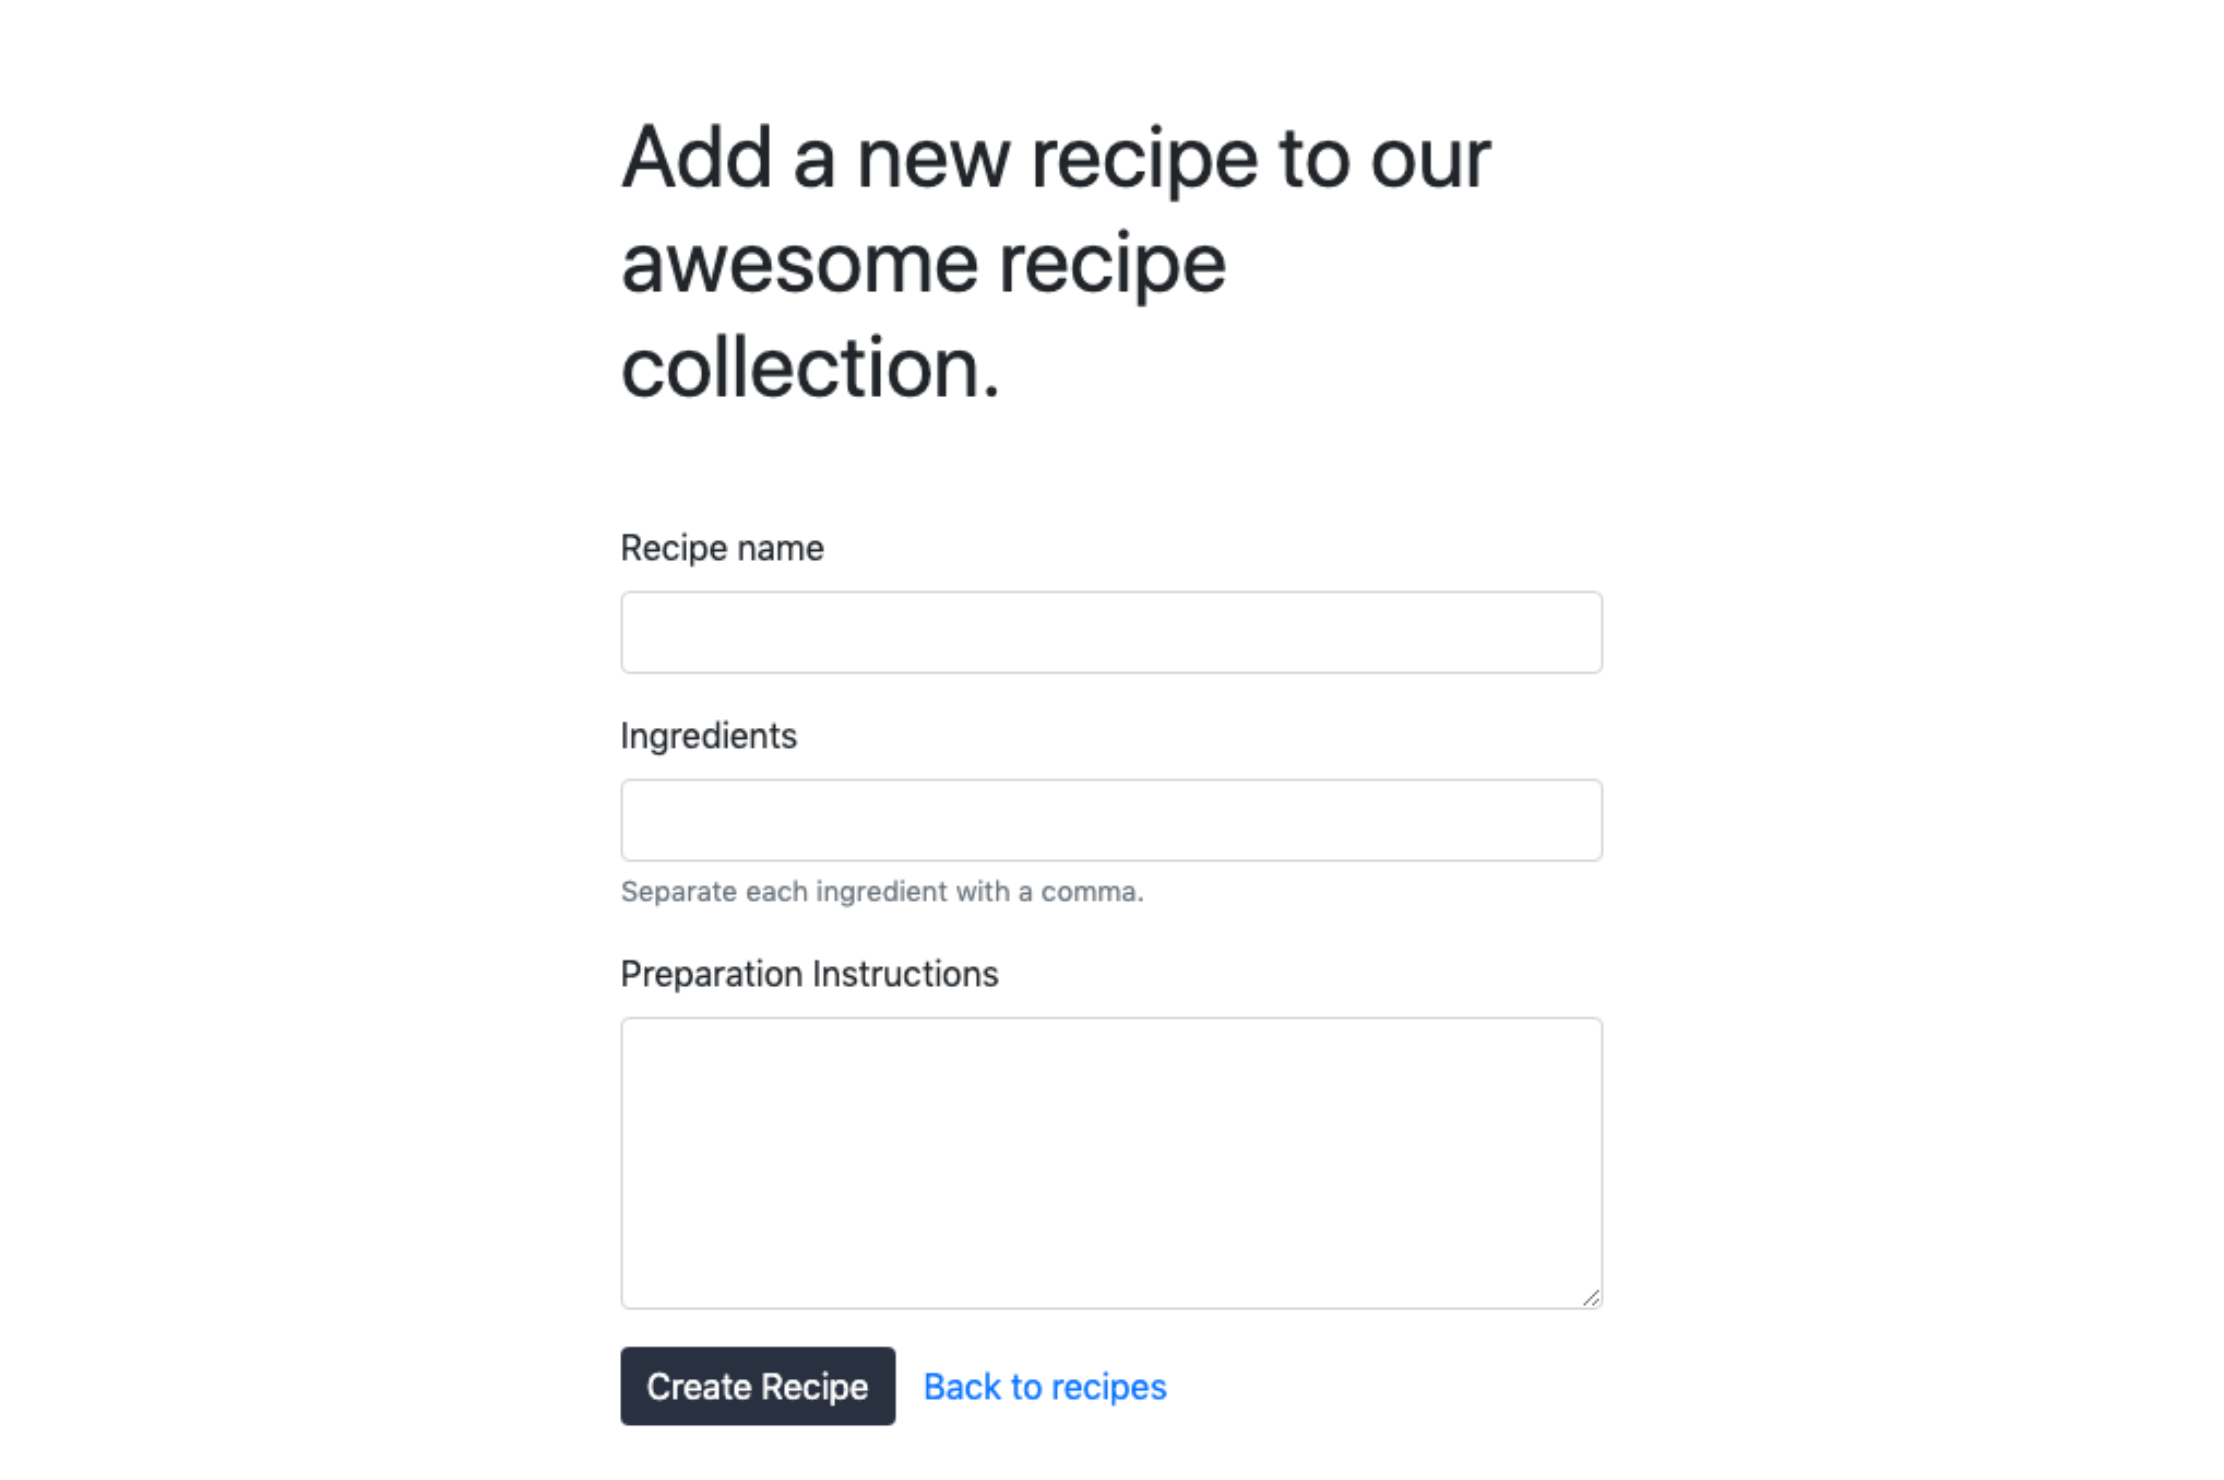
필요한 레시피 세부 정보를 입력하고 레시피 만들기 버튼을 클릭하세요. 그럼 새로 생성된 레시피가 페이지에 나타납니다. 사용이 완료되면 서버를 닫으세요.
이 단계에서는 음식 레시피 애플리케이션에 레시피를 생성하는 기능을 추가했습니다. 다음 단계에서는 레시피를 삭제하는 기능을 추가합니다.
단계 9 – 레시피 삭제
이 섹션에서는 레시피 컴포넌트를 수정하여 레시피를 삭제할 수 있는 옵션을 추가합니다. 레시피 페이지에서 삭제 버튼을 클릭하면 애플리케이션이 데이터베이스에서 레시피를 삭제하는 요청을 보냅니다.
먼저, 편집할 Recipe.jsx 파일을 엽니다:
- nano app/javascript/components/Recipe.jsx
Recipe 컴포넌트에서 하이라이트된 줄들과 함께 deleteRecipe 함수를 추가하세요:
import React, { useState, useEffect } from "react";
import { Link, useNavigate, useParams } from "react-router-dom";
const Recipe = () => {
const params = useParams();
const navigate = useNavigate();
const [recipe, setRecipe] = useState({ ingredients: "" });
useEffect(() => {
const url = `/api/v1/show/${params.id}`;
fetch(url)
.then((response) => {
if (response.ok) {
return response.json();
}
throw new Error("Network response was not ok.");
})
.then((response) => setRecipe(response))
.catch(() => navigate("/recipes"));
}, [params.id]);
const addHtmlEntities = (str) => {
return String(str).replace(/</g, "<").replace(/>/g, ">");
};
const deleteRecipe = () => {
const url = `/api/v1/destroy/${params.id}`;
const token = document.querySelector('meta[name="csrf-token"]').content;
fetch(url, {
method: "DELETE",
headers: {
"X-CSRF-Token": token,
"Content-Type": "application/json",
},
})
.then((response) => {
if (response.ok) {
return response.json();
}
throw new Error("Network response was not ok.");
})
.then(() => navigate("/recipes"))
.catch((error) => console.log(error.message));
};
const ingredientList = () => {
let ingredientList = "No ingredients available";
if (recipe.ingredients.length > 0) {
ingredientList = recipe.ingredients
.split(",")
.map((ingredient, index) => (
<li key={index} className="list-group-item">
{ingredient}
</li>
));
}
return ingredientList;
};
const recipeInstruction = addHtmlEntities(recipe.instruction);
return (
<div className="">
...
deleteRecipe 함수에서 삭제할 레시피의 id를 가져온 다음 URL을 구성하고 CSRF 토큰을 가져옵니다. 그 다음, 레시피를 삭제하기 위해 Recipes 컨트롤러에 DELETE 요청을 보냅니다. 레시피가 성공적으로 삭제되면 애플리케이션은 사용자를 레시피 페이지로 리디렉션합니다.
삭제 버튼을 클릭할 때마다 deleteRecipe 함수가 실행되도록 하려면 해당 함수를 버튼의 클릭 이벤트 핸들러로 전달하세요. 컴포넌트의 삭제 버튼 요소에 onClick 이벤트를 추가하세요:
...
return (
    <div className="">
      <div className="hero position-relative d-flex align-items-center justify-content-center">
        <img
          src={recipe.image}
          alt={`${recipe.name} image`}
          className="img-fluid position-absolute"
        />
        <div className="overlay bg-dark position-absolute" />
        <h1 className="display-4 position-relative text-white">
          {recipe.name}
        </h1>
      </div>
      <div className="container py-5">
        <div className="row">
          <div className="col-sm-12 col-lg-3">
            <ul className="list-group">
              <h5 className="mb-2">Ingredients</h5>
              {ingredientList()}
            </ul>
          </div>
          <div className="col-sm-12 col-lg-7">
            <h5 className="mb-2">Preparation Instructions</h5>
            <div
              dangerouslySetInnerHTML={{
                __html: `${recipeInstruction}`,
              }}
            />
          </div>
          <div className="col-sm-12 col-lg-2">
            <button
              type="button"
              className="btn btn-danger"
              onClick={deleteRecipe}
            >
              Delete Recipe
            </button>
          </div>
        </div>
        <Link to="/recipes" className="btn btn-link">
          Back to recipes
        </Link>
      </div>
    </div>
  );
...
지금까지의 튜토리얼에서 완성된 Recipe.jsx 파일은 다음 파일과 일치해야 합니다:
import React, { useState, useEffect } from "react";
import { Link, useNavigate, useParams } from "react-router-dom";
const Recipe = () => {
const params = useParams();
const navigate = useNavigate();
const [recipe, setRecipe] = useState({ ingredients: "" });
useEffect(() => {
const url = `/api/v1/show/${params.id}`;
fetch(url)
.then((response) => {
if (response.ok) {
return response.json();
}
throw new Error("Network response was not ok.");
})
.then((response) => setRecipe(response))
.catch(() => navigate("/recipes"));
}, [params.id]);
const addHtmlEntities = (str) => {
return String(str).replace(/</g, "<").replace(/>/g, ">");
};
const deleteRecipe = () => {
const url = `/api/v1/destroy/${params.id}`;
const token = document.querySelector('meta[name="csrf-token"]').content;
fetch(url, {
method: "DELETE",
headers: {
"X-CSRF-Token": token,
"Content-Type": "application/json",
},
})
.then((response) => {
if (response.ok) {
return response.json();
}
throw new Error("Network response was not ok.");
})
.then(() => navigate("/recipes"))
.catch((error) => console.log(error.message));
};
const ingredientList = () => {
let ingredientList = "No ingredients available";
if (recipe.ingredients.length > 0) {
ingredientList = recipe.ingredients
.split(",")
.map((ingredient, index) => (
<li key={index} className="list-group-item">
{ingredient}
</li>
));
}
return ingredientList;
};
const recipeInstruction = addHtmlEntities(recipe.instruction);
return (
<div className="">
<div className="hero position-relative d-flex align-items-center justify-content-center">
<img
src={recipe.image}
alt={`${recipe.name} image`}
className="img-fluid position-absolute"
/>
<div className="overlay bg-dark position-absolute" />
<h1 className="display-4 position-relative text-white">
{recipe.name}
</h1>
</div>
<div className="container py-5">
<div className="row">
<div className="col-sm-12 col-lg-3">
<ul className="list-group">
<h5 className="mb-2">Ingredients</h5>
{ingredientList()}
</ul>
</div>
<div className="col-sm-12 col-lg-7">
<h5 className="mb-2">Preparation Instructions</h5>
<div
dangerouslySetInnerHTML={{
__html: `${recipeInstruction}`,
}}
/>
</div>
<div className="col-sm-12 col-lg-2">
<button
type="button"
className="btn btn-danger"
onClick={deleteRecipe}
>
Delete Recipe
</button>
</div>
</div>
<Link to="/recipes" className="btn btn-link">
Back to recipes
</Link>
</div>
</div>
);
};
export default Recipe;
파일을 저장하고 종료하세요.
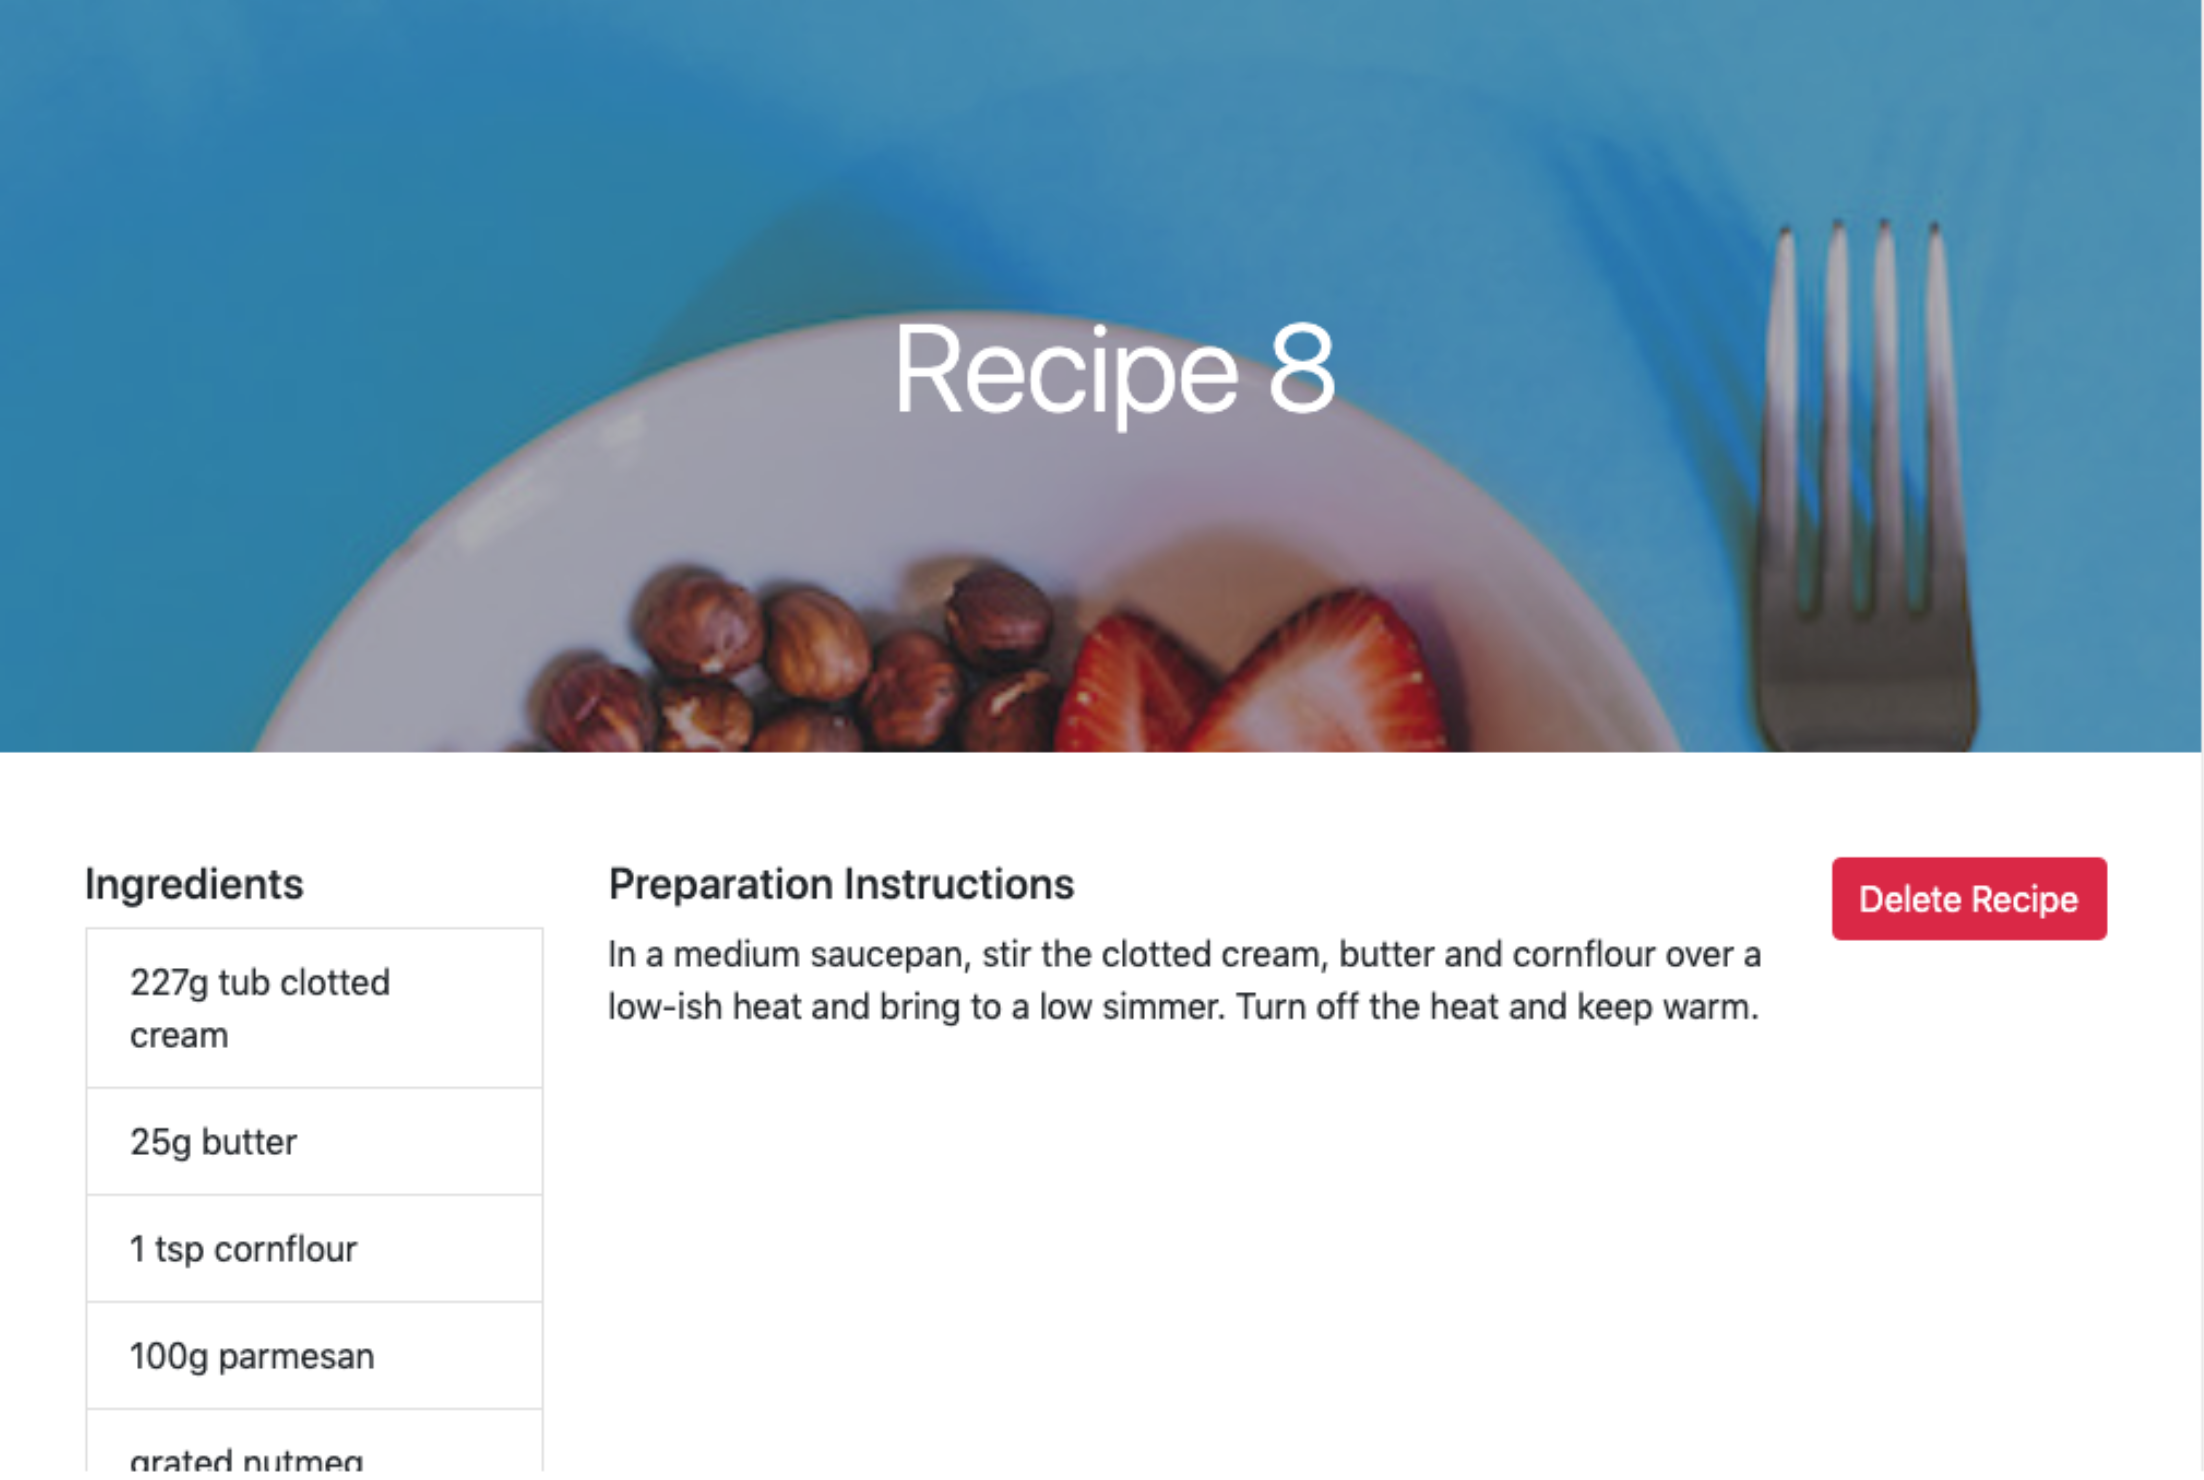
애플리케이션 서버를 다시 시작하고 홈페이지로 이동하세요. 모든 기존 레시피에 액세스하기 위해 레시피 보기 버튼을 클릭한 다음 특정 레시피를 열고 페이지에서 레시피 삭제 버튼을 클릭하여 해당 레시피를 삭제하세요. 그러면 레시피 페이지로 리디렉션되고 삭제된 레시피는 더 이상 존재하지 않습니다.
삭제 버튼이 작동하므로 이제 완전히 기능이 구현된 레시피 애플리케이션이 완성되었습니다!
결론
이 자습서에서는 PostgreSQL을 데이터베이스로 사용하여 Ruby on Rails 및 React 프론트 엔드를 사용하여 음식 레시피 애플리케이션을 만들었습니다. 스타일링을 위해 Bootstrap을 사용했습니다. Ruby on Rails로 계속해서 빌드하고 싶다면, SSH 터널을 사용하여 3계층 Rails 애플리케이션의 통신 보안 설정 자습서를 따르거나 Ruby 기술을 다시 학습하기 위해 루비로 코딩하는 방법 시리즈를 방문해보세요. React에 대해 더 깊이 알아보려면, 디지털오션 API에서 데이터를 React로 표시하는 방법을 시도해보세요.