


JPA Hibernate란 무엇인가?
하이버네이트는 자바 및 스프링 애플리케이션에 가장 인기 있는 객체 관계 매퍼(ORM) 라이브러리 중 하나입니다. 개발자가 자바 애플리케이션에서 관계형 데이터베이스에 연결하고 작업할 수 있게 도와주며 SQL 쿼리를 작성할 필요가 없습니다. 이 라이브러리는 JPA(Java Persistence API) 사양을 구현하며 애플리케이션의 지속성을 더 빠르고 쉽게 개발할 수 있는 몇 가지 추가 기능을 제공합니다.
JPA 하이버네이트의 캐싱
하이버네이트가 지원하는 멋진 기능 중 하나는 캐싱입니다. 하이버네이트는 L1과 L2의 두 가지 수준의 캐싱을 지원합니다. L1 캐시는 기본적으로 활성화되어 있으며 애플리케이션 범위 내에서 작동하므로 여러 스레드에서 공유할 수 없습니다. 예를 들어 관계형 데이터베이스 설정에서 테이블에 읽고 쓰는 스케일링된 마이크로서비스 애플리케이션이 있다면 이 L1 캐시는 마이크로서비스가 실행되는 각 컨테이너 내에서 개별적으로 유지됩니다.
L2 캐시는 외부 플러그인 인터페이스로, 이를 사용하여 하이버네이트를 통해 외부 캐싱 제공자에서 자주 액세스되는 데이터를 캐싱할 수 있습니다. 이 경우 캐시는 세션 외부에서 유지되며 마이크로서비스 스택(위의 예에서)에 걸쳐 공유할 수 있습니다.
하이버네이트는 Redis, Ignite, NCache 등과 같은 대부분의 인기 있는 캐싱 제공자와 L2 캐시를 지원합니다.
NCache란 무엇인가?
NCache는 시장에서 가장 인기 있는 분산 캐싱 제공업체 중 하나입니다. 여러 기능을 제공하고 .NET, Java 등과 같은 인기 있는 프로그래밍 스택과의 통합을 지원합니다.
NCache는 오픈 소스, 프로페셔널, 엔터프라이즈 등 여러 가지 버전으로 제공되며, 제공하는 기능에 따라 선택할 수 있습니다.
NCache와 Hibernate 통합
NCache는 Hibernate와의 통합을 L2 캐시 및 쿼리 캐싱용으로 지원합니다. 외부 분산 캐시 클러스터를 사용하여 자주 액세스되는 엔터티를 캐시하고 스케일링된 환경에서 마이크로서비스 간에 사용함으로써 데이터베이스 계층에 불필요한 부하를 가하지 않을 수 있습니다. 이렇게 하면 데이터베이스 호출을 최소화하고 애플리케이션 성능도 최적화됩니다.
시작하려면 스프링 부트 프로젝트에 필요한 패키지를 추가합시다. 보여드리기 위해 JPA 리포지토리를 사용하여 관계형 데이터베이스인 MySQL 설정으로 작업하겠습니다.
pom.xml 파일의 의존성은 다음과 같습니다:
<dependencies>

        <dependency>

            <groupId>org.springframework.boot</groupId>

            <artifactId>spring-boot-starter-actuator</artifactId>

        </dependency>

        <dependency>

            <groupId>org.springframework.boot</groupId>

            <artifactId>spring-boot-starter-data-jpa</artifactId>

        </dependency>

        <dependency>

            <groupId>org.springframework.boot</groupId>

            <artifactId>spring-boot-starter-web</artifactId>

        </dependency>


        <dependency>

            <groupId>org.springframework.boot</groupId>

            <artifactId>spring-boot-devtools</artifactId>

            <scope>runtime</scope>

            <optional>true</optional>

        </dependency>

        <dependency>

            <groupId>com.mysql</groupId>

            <artifactId>mysql-connector-j</artifactId>

            <scope>runtime</scope>

        </dependency>

        <dependency>

            <groupId>org.springframework.boot</groupId>

            <artifactId>spring-boot-starter-test</artifactId>

            <scope>test</scope>

        </dependency>

        <dependency>

            <groupId>org.springframework.security</groupId>

            <artifactId>spring-security-test</artifactId>

            <scope>test</scope>

        </dependency>

    </dependencies>
My JPARepository는 MySQL 데이터베이스의 books 테이블에 읽고 쓰기를 담당합니다. 리포지토리와 엔티티는 다음과 같습니다:
package com.myjpa.helloapp.repositories;
import com.myjpa.helloapp.models.entities.Book;
import org.springframework.data.jpa.repository.JpaRepository;
import org.springframework.stereotype.Repository;
@Repository
public interface BookRepository extends JpaRepository<Book, Integer> {}
package com.myjpa.helloapp.models.entities;

import jakarta.persistence.*;
import java.util.Date;
import org.hibernate.annotations.CreationTimestamp;

@Entity(name = "Book")
@Table(name = "Book")
public class Book {
  @Id @GeneratedValue(strategy = GenerationType.AUTO) private int bookId;
  @Column(name = "book_name") private String bookName;
  @Column(name = "isbn") private String isbn;
  @CreationTimestamp @Column(name = "created_date") private Date createdDate;

  public Book() {}

  public Book(String bookName, String isbn) {
    this.bookName = bookName;
    this.isbn = isbn;
  }
  public int getBookId() {
    return bookId;
  }
  public String getBookName() {
    return bookName;
  }
  public String getIsbn() {
    return isbn;
  }
  public Date getCreatedDate() {
    return createdDate;
  }
}
A BookService interacts with this repository and exposes GET and INSERT functionalities.
package com.myjpa.helloapp.services;

import com.myjpa.helloapp.models.entities.Book;
import com.myjpa.helloapp.repositories.BookRepository;
import java.util.List;
import org.springframework.beans.factory.annotation.Autowired;
import org.springframework.stereotype.Service;

@Service

public class BookService {
  @Autowired

  private BookRepository repository;

  public int createNew(String bookName, String isbn) {
    var book = new Book(bookName, isbn);

    // 엔티티 저장

    repository.save(book);

    // 변경 사항 커밋

    repository.flush();

    // 생성된 id 반환

    var bookId = book.getBookId();

    return bookId;
  }

  public Book findBook(int id) {
    var entity = repository.findById(id);

    if (entity.isPresent()) {
      return entity.get();
    }

    return null;
  }
}
이 설정은 완벽하게 작동하지만, 캐싱을 추가하지 않았습니다. NCache를 제공자로 사용하여 Hibernate에 캐싱을 통합하는 방법을 살펴보겠습니다.
NCache를 사용한 L2 캐싱
NCache를 Hibernate와 통합하기 위해NCache with Hibernate, 프로젝트에 두 가지 추가 종속성을 추가합니다. 아래에 표시된 것들입니다:
<dependency>

            <groupId>com.alachisoft.ncache</groupId>

            <artifactId>ncache-hibernate</artifactId>

            <version>5.3.2</version>

        </dependency>

        <dependency>

            <groupId>org.hibernate</groupId>

            <artifactId>hibernate-jcache</artifactId>

            <version>6.4.2.Final</version>

        </dependency>
또한 2차 캐싱 및 세부 사항을 구성할 Hibernate.cfg.xml 파일을 추가합니다:
<hibernate-configuration>

  <session-factory>

    <property name="hibernate.cache.use_second_level_cache">true</property>

    <property name="hibernate.cache.region.factory_class">JCacheRegionFactory</property>

    <property name="hibernate.javax.cache.provider" >com.alachisoft.ncache.hibernate.jcache.HibernateNCacheCachingProvider</property>

    <property name="ncache.application_id">booksapi</property>

</session-factory>

</hibernate-configuration>
Book 엔티티 상단에 엔티티의 캐시 상태를 설정할 주석을 추가합니다:
@Entity(name = "Book")
@Table(name = "Book")
@Cache(region = "demoCache", usage = CacheConcurrencyStrategy.READ_WRITE)
public class Book {}
I’m indicating that my entities will be cached under the region demoCache, which is basically my cache cluster name.
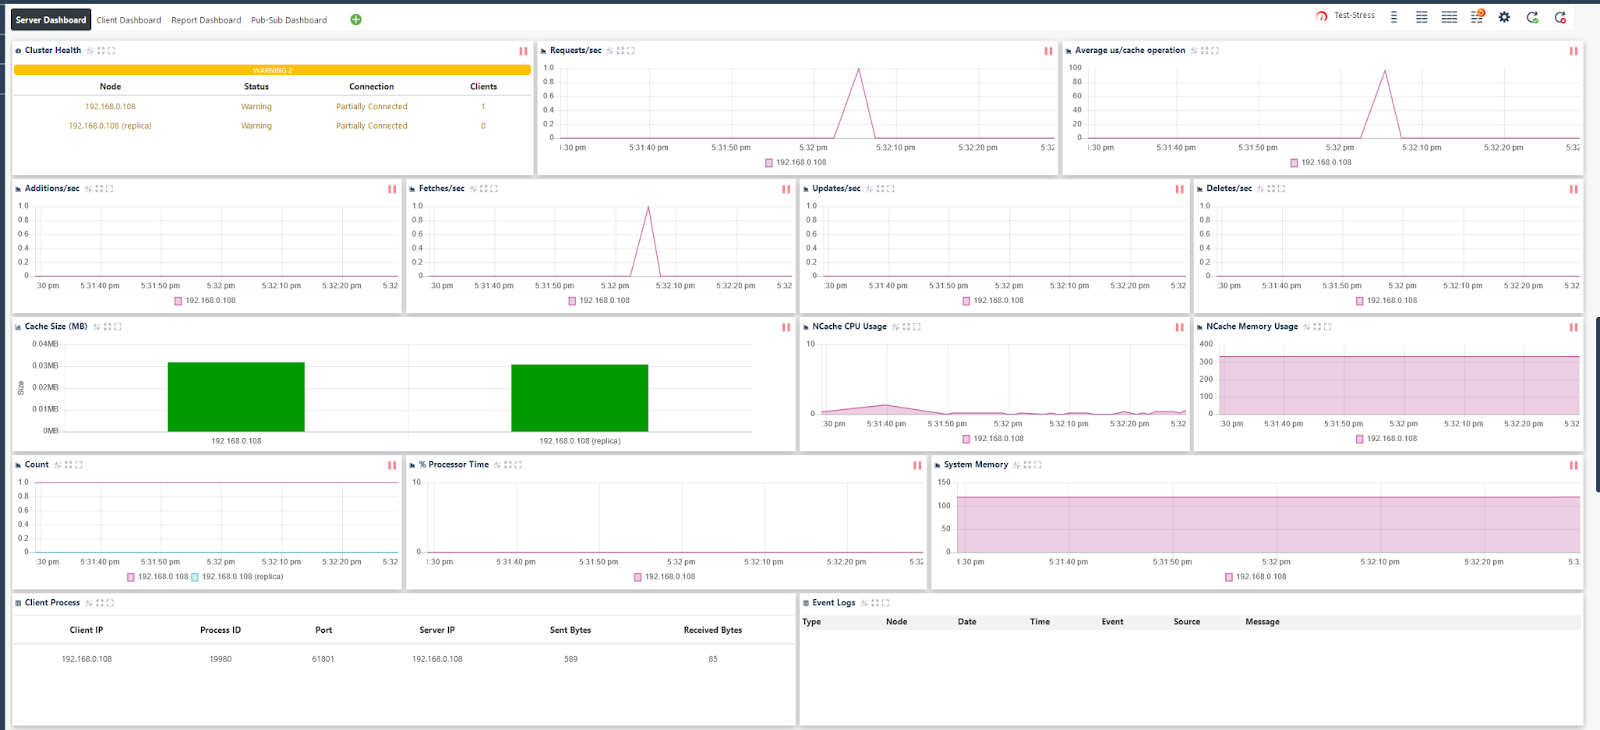
I’d also place my client.nconf and config.nconf files, which contain information about the cache cluster and its network details in the root directory of my project.
client.nconf는 다음과 같습니다:
<?xml version="1.0" encoding="UTF-8"?>
<!-- Client configuration file is used by client to connect to out-proc caches.
Light weight client also uses this configuration file to connect to the remote caches.
This file is automatically generated each time a new cache/cluster is created or
cache/cluster configuration settings are applied.
-->
<configuration>
<ncache-server connection-retries="5" retry-connection-delay="0" retry-interval="1"
command-retries="3" command-retry-interval="0.1" client-request-timeout="90"
connection-timeout="5" port="9800" local-server-ip="192.168.0.108" enable-keep-alive="False"
keep-alive-interval="0" />
<cache id="demoCache" client-cache-id="" client-cache-syncmode="optimistic"
skip-client-cache-if-unavailable="False" reconnect-client-cache-interval="10"
default-readthru-provider="" default-writethru-provider="" load-balance="True"
enable-client-logs="True" log-level="info">
<server name="192.168.0.108" />
</cache>
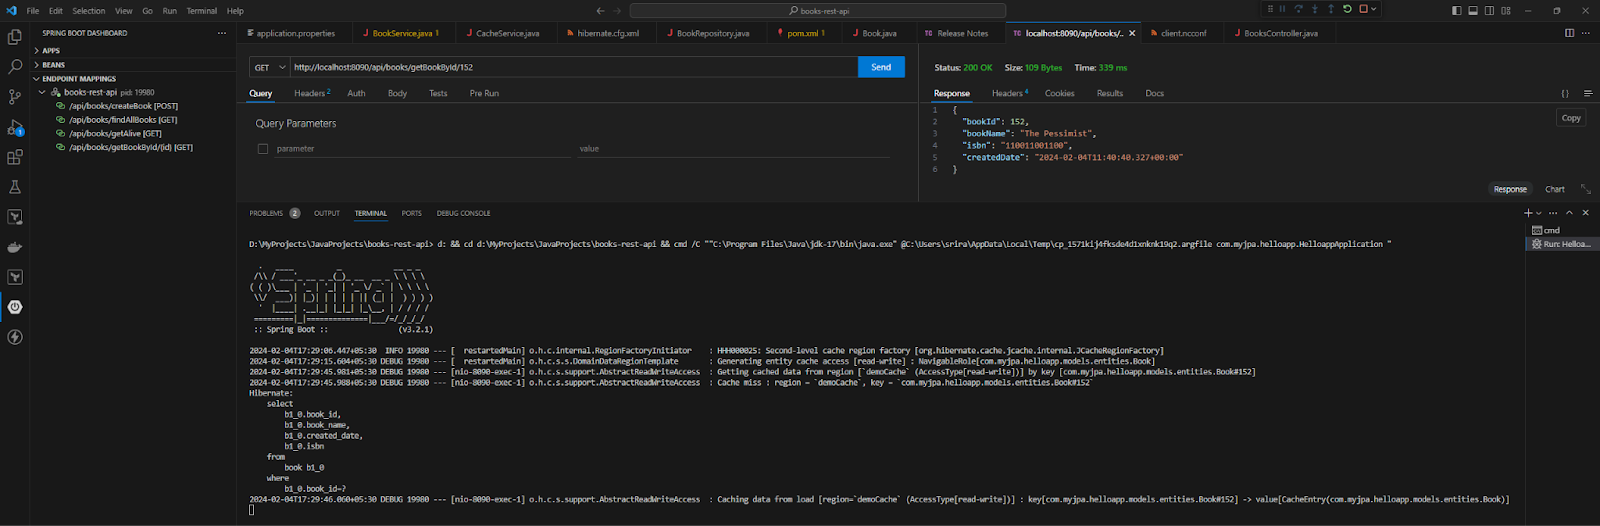
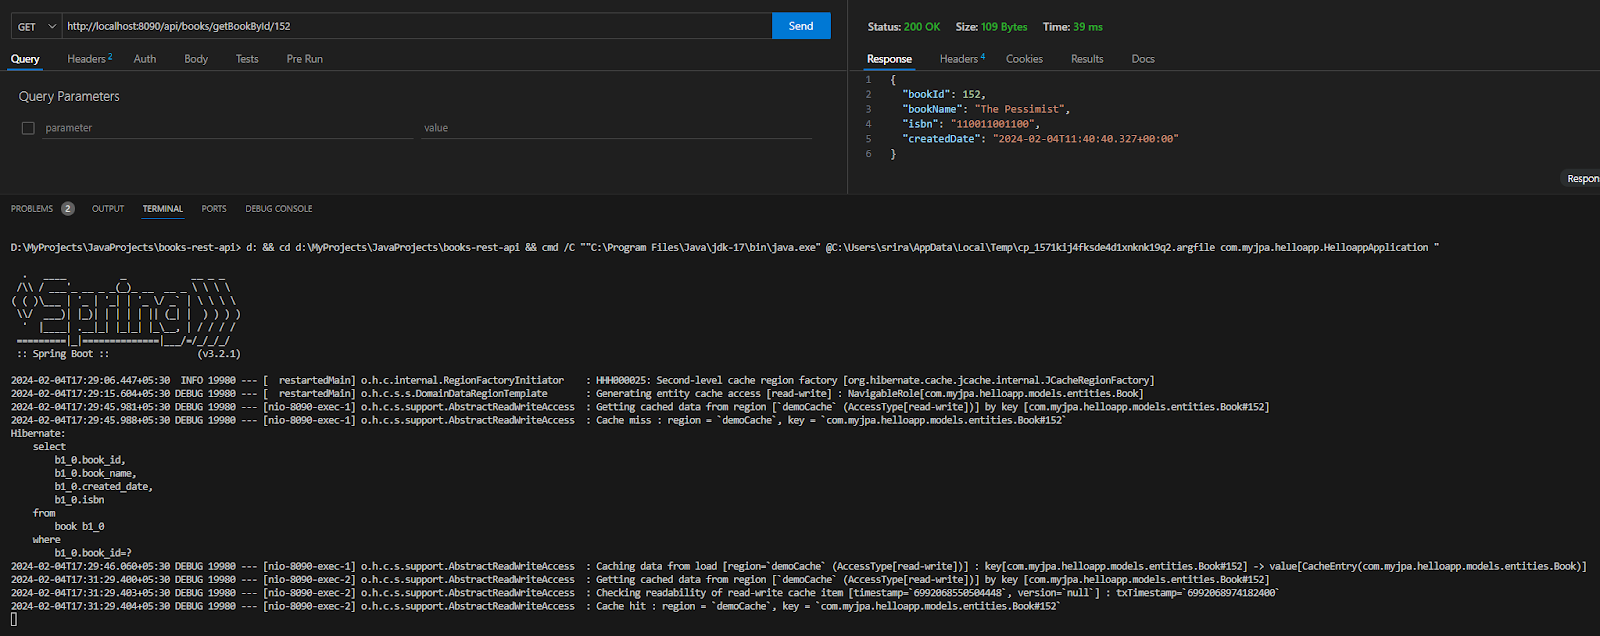
</configuration>이 설정으로 애플리케이션을 실행하고 단일 책에 대한 GET 작업을 수행할 때, Hibernate는 NCache 클러스터에서 엔티티를 조회하고 캐시된 엔티티를 반환합니다. 만약 존재하지 않으면 캐시 미스가 표시됩니다.
NCache를 사용한 쿼리 캐싱
NCache가 완전히 지원하는 Hibernate의 또 다른 기능은 쿼리 캐싱입니다. 이 방식에서 쿼리의 결과 집합은 자주 액세스되는 데이터를 위해 캐시될 수 있습니다. 이는 자주 액세스되는 데이터에 대해 데이터베이스가 자주 쿼리되지 않도록 합니다. 이는 HQL(Hibernate Query Language) 쿼리에 특정됩니다.
쿼리 캐싱을 활성화하려면 단순히 Hibernate.cfg.xml에 다음 줄을 추가하면 됩니다:
<property name="hibernate.cache.use_query_cache">true</property>저장소에서는 특정 쿼리를 실행하고 결과를 캐시하는 또 다른 메서드를 생성합니다.
@Repository

public interface BookRepository extends JpaRepository<Book, Integer> {


    @Query(value = "SELECT p FROM Book p WHERE bookName like 'T%'")

    @Cacheable(value = "demoCache")

    @Cache(usage = CacheConcurrencyStrategy.READ_ONLY, region = "demoCache")

    @QueryHints(value = { @QueryHint(name = "org.hibernate.cacheable", value = "true") })

    public List<Book> findAllBooks();

}
이 메서드에서는 T로 시작하는 모든 책을 쿼리하고 결과 집합을 캐시해야 합니다. 이를 위해 캐싱을 true로 설정할 쿼리 힌트를 추가합니다.
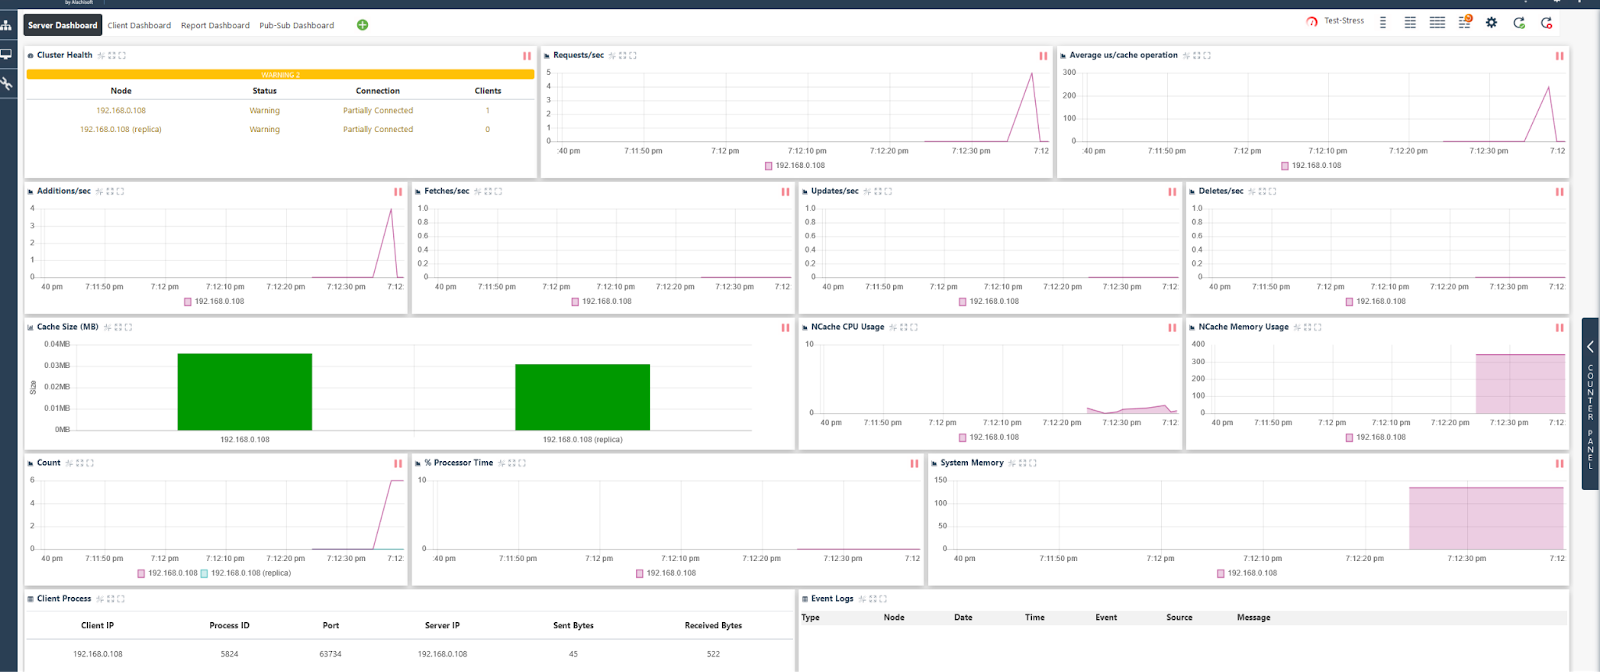
이 메서드를 호출하는 API를 호출할 때 모든 데이터 세트가 이제 캐시되어 있음을 알 수 있습니다.
결론
캐싱은 분산 애플리케이션을 구축하는 데 가장 많이 사용되는 전략 중 하나입니다. 마이크로서비스 아키텍처에서 한 애플리케이션이 부하에 따라 X배로 확장되는 경우 데이터에 대한 데이터베이스를 자주 치는 것은 비용이 많이 들 수 있습니다.
NCache와 같은 캐싱 공급자는 쿼리 데이터베이스에 대한 Hibernate를 사용하는 Java 마이크로서비스에 쉽고 삽입 가능한 솔루션을 제공합니다. 이 기사에서는 NCache를 Hibernate용 L2 캐시로 사용하여 개별 엔터티 및 쿼리 캐싱을 캐시하는 방법을 살펴보았습니다.
Source:
https://dzone.com/articles/how-to-integrate-ncache-with-jpa-hibernate-for-cac