


저자는 위키미디어 재단을(를) 기부를 위한 글쓰기 프로그램의 일환으로 선정했습니다.
소개
인프라스트럭처의 코드화(IaC)는 코드에서 자원 상태와 그들의 관계를 정의하여 인프라 배포 및 수정을 자동화하는 실천법입니다. 이 코드를 실행하면 클라우드에서 실제 자원을 생성하거나 수정합니다. IaC를 사용하면 엔지니어들이 인프라 프로비저닝을 위해 테라폼과 같은 IaC 도구(HashiCorp의)를 사용할 수 있습니다.
IaC를 사용하면 인프라의 변경 사항이 응용 프로그램 코드와 동일한 코드 검토 과정을 거칠 수 있습니다. 코드를 버전 제어(예: Git)에 저장하여 인프라의 상태를 기록할 수 있으며, 자가 서비스 내부 개발자 플랫폼(IDP)과 같은 고수준 도구로 배포 프로세스를 자동화할 수 있습니다.
테라폼은 많은 플랫폼을 지원하여 인기 있는 플랫폼 중립적 IaC 도구입니다. 이에는 GitHub, Cloudflare, 그리고 DigitalOcean 등이 포함됩니다. 대부분의 테라폼 구성은 HashiCorp 구성 언어 (HCL)를 사용하여 작성됩니다.
테라폼을 기반으로 한 테라폼용 클라우드 개발 키트 (CDKTF)는 익숙한 프로그래밍 언어 (TypeScript, Python, 또는 Go와 같은)를 사용하여 인프라를 정의할 수 있는 도구입니다. 이는 HCL에 익숙하지 않은 개발자들에게는 더 낮은 학습 곡선을 제공하면서 루프, 변수 및 함수와 같은 네이티브 프로그래밍 기능을 사용할 수 있습니다.
이 튜토리얼에서는 먼저 cdktf 명령줄 인터페이스 (CLI) 도구를 설치합니다. 그런 다음 TypeScript로 CDKTF 프로젝트를 작성하고 두 개의 NGINX 서버를 정의하여 로드 밸런서로 로드 밸런싱합니다. 그런 다음 cdktf를 사용하여 인프라를 배포합니다. 이 튜토리얼의 끝에는 인프라를 확장할 수 있는 CDKTF 프로젝트가 준비됩니다.
참고: 이 튜토리얼은 CDKTF 0.11.2 및 Terraform 1.2.2와 함께 테스트되었습니다.
필수 조건
이 튜토리얼을 완료하려면 다음이 필요합니다:
- A good understanding of Infrastructure-as-Code (IaC). You can learn about IaC in Infrastructure as Code Explained.
- A DigitalOcean account. If you do not have one, sign up for a new account.
- A DigitalOcean Personal Access Token, which you can create via the DigitalOcean console. Instructions on how to do that can be found at How to Generate a Personal Access Token.
- A password-less SSH key added to your DigitalOcean account. You can add that by following How To Use SSH Keys with DigitalOcean Droplets. When you add the key to your account, remember the name you give it, as you will need it in this tutorial. For CDKTF to accept the name of your key, it must start with a letter or underscore and may contain only letters, digits, underscores, and dashes.
- 로컬 머신에 설치된 Terraform. 이는 DigitalOcean과 Terraform 사용하기의 “단계 1 – Terraform 설치하기”에서 설정할 수 있습니다.
- 로컬 머신에 설치된 Node.js. 이에 대한 지침은 Node.js 설치 및 로컬 개발 환경 만들기 시리즈에서 찾을 수 있습니다.
- JavaScript로 프로그래밍하는 데 익숙해야합니다. 기술을 향상시키려면 JavaScript로 코딩하는 방법 시리즈를 확인하십시오.
- TypeScript의 기본 기능을 사용하는 데 익숙해야합니다. TypeScript에 익숙하지 않은 경우 TypeScript로 코딩하는 방법 튜토리얼 시리즈는 신속하게 익히기에 좋은 자료입니다.
- A code editor or integrated development environment (IDE) that supports TypeScript. If you are not currently using one, try Visual Studio Code. You can also read up on How To Work With TypeScript in Visual Studio Code.
단계 1 — cdktf CLI 설치하기
먼저 cdktf 명령줄 도구를 설치합니다.
cdktf CLI는 NPM 패키지로 제공됩니다. npmjs.com에서 cdktf를 검색하면 두 개의 유사한 이름의 패키지를 찾을 수 있습니다: cdktf와 cdktf-cli.
개념적으로, CDKTF는 Terraform 위에 있는 추상화 계층입니다. 두 부분으로 구성됩니다:
-
언어별 구성요소(함수 및 클래스와 같은)를 포함하는 라이브러리로, 인프라를 정의하는 데 사용됩니다. 이 부분은
cdktfnpm 패키지 내에 캡슐화되어 있습니다. 예를 들어, 다음 CDKTF 프로젝트 샘플에서cdktf패키지의App및TerraformStack클래스의 사용을 볼 수 있습니다: -
CDKTF 프로젝트 내의 구성 요소를 구문 분석하고 이를 JSON 문서 집합으로 줄이는 어댑터는 HCL이 소화되는 것과 동일한 방식으로 Terraform에 흡수됩니다. 이 어댑터는
cdktf-cli패키지에서 제공되는cdktf라는 CLI 도구에 캡슐화됩니다.
cdktf CLI 도구를 설치하려면 cdktf-cli 패키지가 필요합니다. 이 패키지는 npm, yarn 또는 선택한 패키지 관리자를 사용하여 전역적으로 설치할 수 있습니다.
cdktf-cli를 npm으로 설치하려면 다음을 실행하세요:
참고: 이 문서를 게시한 후에는 cdktf-cli 패키지의 새로운 버전이 있을 수 있습니다. 최신 버전으로 튜토리얼을 따라가려면 npm install --global cdktf-cli@latest를 대신 실행해 보세요. 그러나 일부 출력이 약간 다를 수 있습니다.
또는 macOS 또는 Linux에서 Homebrew를 사용하여 cdktf CLI를 설치할 수 있습니다.
설치가 성공적으로 완료되었는지 확인하려면 인수 없이 cdktf 명령을 실행하세요:
다음과 유사한 출력을 볼 수 있습니다:
OutputPlease pass a command to cdktf, here are all available ones:
cdktf

Commands:
  cdktf init                Create a new cdktf project from a template.
  cdktf get                 Generate CDK Constructs for Terraform providers and modules.
  cdktf convert             Converts a single file of HCL configuration to CDK for Terraform.
  cdktf deploy [stacks...]  Deploy the given stacks
  cdktf destroy [stacks..]  Destroy the given stacks
  cdktf diff [stack]        Perform a diff (terraform plan) for the given stack
  cdktf list                List stacks in app.
  cdktf login               Retrieves an API token to connect to Terraform Cloud.
  cdktf synth               Synthesizes Terraform code for the given app in a directory.
  cdktf watch [stacks..]    [experimental] Watch for file changes and automatically trigger a deploy
  cdktf output [stacks..]   Prints the output of stacks
  cdktf debug               Get debug information about the current project and environment
  cdktf completion          generate completion script

Options:
      --version                   버전 번호 표시
      --disable-logging           로그 파일을 작성하지 않습니다. CDKTF_DISABLE_LOGGING 환경을 사용하여 지원됩니다.
      --disable-plugin-cache-env  TF_PLUGIN_CACHE_DIR를 자동으로 설정하지 않습니다.
      --log-level                 어떤 로그 수준을 작성해야 합니까?
  -h, --help                      Show help

Options can be specified via environment variables with the "CDKTF_" prefix (e.g. "CDKTF_OUTPUT")
출력은 사용 가능한 명령을 보여줍니다. 이 튜토리얼의 나머지 부분에서는 cdktf init, cdktf get, cdktf deploy, 및 cdktf destroy를 사용하여 경험을 쌓게 됩니다.
이제 cdktf CLI를 설치했으므로 TypeScript 코드를 작성하여 인프라를 정의할 수 있습니다.
단계 2 — 새 CDKTF 프로젝트 생성
이 단계에서는 방금 설치한 cdktf CLI를 사용하여 후속 단계에서 빌드할 CDKTF 프로젝트의 보일러플레이트를 생성합니다.
다음 명령을 실행하여 CDKTF 프로젝트를 저장할 디렉토리를 만듭니다:
그런 다음, 새로 생성된 디렉토리로 이동합니다:
cdktf init 명령을 사용하여 빌드할 CDKTF 프로젝트 스캐폴드를 생성합니다:
CDKTF는 TypeScript, Python, Java, C# 또는 Go를 사용하여 인프라를 정의할 수 있게 해줍니다. --template=typescript 옵션은 cdktf에게 TypeScript를 사용하여 이 CDKTF 프로젝트의 뼈대를 만들도록 지시합니다.
Terraform (따라서 CDKTF도)은 관리하는 리소스를 Terraform 상태 파일이라는 파일에 그 정의와 상태를 기록하여 추적합니다. --local 옵션은 CDKTF에게 이 상태 파일을 cdktf를 실행하는 기기에 로컬로 유지하도록 지시합니다 (각 파일은 terraform.<stack>.tfstate 형식의 네이밍 구조를 따릅니다).
명령을 실행한 후에 CLI는 제품을 개선하기 위해 CDKTF 팀에게 충돌 보고서를 보낼 권한을 요청할 수 있습니다:
Output? Do you want to send crash reports to the CDKTF team? See https://www.terraform.io/cdktf/create-and-deploy/configuration-file for
 more information (Y/n)
동의하려면 Y를 입력하고 동의하지 않으려면 N을 입력한 다음 ENTER를 누르세요.
cdktf는 프로젝트 뼈대를 생성하고 패키지를 설치합니다. 프로젝트가 뼈대가 되면 다음과 유사한 출력이 표시됩니다:
Output  Your cdktf typescript project is ready!

  cat help                Print this message

  Compile:
    npm run get           Import/update Terraform providers and modules (you should check-in this directory)
    npm run compile       Compile typescript code to javascript (or "npm run watch")
    npm run watch         Watch for changes and compile typescript in the background
    npm run build         Compile typescript

  Synthesize:
    cdktf synth [stack]   Synthesize Terraform resources from stacks to cdktf.out/ (ready for 'terraform apply')

  Diff:
    cdktf diff [stack]    Perform a diff (terraform plan) for the given stack

  Deploy:
    cdktf deploy [stack]  Deploy the given stack

  Destroy:
    cdktf destroy [stack] Destroy the stack

  Test:
    npm run test        Runs unit tests (edit __tests__/main-test.ts to add your own tests)
    npm run test:watch  Watches the tests and reruns them on change

  Upgrades:
    npm run upgrade        Upgrade cdktf modules to latest version
    npm run upgrade:next   Upgrade cdktf modules to latest "@next" version (last commit)
infra 디렉터리에 일부 새 파일이 추가된 것을 볼 수도 있습니다. 가장 중요한 파일은 cdktf.json과 main.ts입니다.
cdktf.json은 CDKTF 프로젝트의 구성 파일입니다. 파일을 열면 다음과 유사한 내용이 표시됩니다:
app 속성은 TypeScript 코드를 Terraform 호환 JSON으로 합성하는 명령을 정의합니다. 이 속성은 main.ts가 CDKTF 프로젝트의 진입점임을 나타냅니다.
만약 main.ts 파일을 열면 다음과 유사한 것을 볼 수 있습니다:
CDKTF 언어에서 관련된 인프라 리소스 모음은 스택으로 그룹화될 수 있습니다. 예를 들어, API 응용 프로그램을 구성하는 리소스인 Droplets, 로드 밸런서 및 DNS 레코드는 APIStack이라는 단일 스택으로 그룹화될 수 있습니다. 각 스택은 자체 상태를 유지하며 다른 스택과 독립적으로 배포, 수정 또는 파괴될 수 있습니다. 스택의 일반적인 사용 예는 프로덕션용 스택과 개발용으로 별도의 스택을 갖는 것입니다.
응용 프로그램은 여러 스택을 포함하는 컨테이너입니다. 예를 들어, 응용 프로그램은 여러 마이크로서비스의 스택을 그룹화할 수 있습니다.
main.ts에서 생성된 CDKTF 프로젝트 스캐폴드에는 현재 리소스를 정의하지 않은 단일 스택 클래스인 MyStack이 포함되어 있습니다. infra라는 이름으로 app이라는 응용 프로그램 내에 포함된 MyStack의 인스턴스가 생성됩니다. 이후 단계에서는 MyStack 생성자 내에서 인프라 리소스를 정의하게 됩니다.
프로젝트를 생성한 후, 다음 단계는 공급자로 CDKTF 프로젝트를 구성하는 것입니다.
3단계 — DigitalOcean 공급자 설치
이 단계에서는 CDKTF 프로젝트에 DigitalOcean Provider를 설치합니다.
프로바이더는 Terraform이 (내부적으로는 cdktf에서 사용됨) 클라우드 제공 업체, SaaS 제공 업체 및 다른 플랫폼에서 애플리케이션 프로그래밍 인터페이스(API)를 노출하는 리소스를 생성, 업데이트 및 삭제하는 방법에 대한 지침을 제공하는 라이브러리입니다. 프로바이더는 이러한 상위 API를 호출하는 논리를 표준 함수로 캡슐화하여 Terraform이 호출할 수 있도록 합니다.
예를 들어, Terraform을 사용하지 않고 새 DigitalOcean Droplet을 만들려면 DigitalOcean API의 /v2/droplets 엔드포인트로 POST 요청을 보내야 합니다. 그러나 Terraform을 사용하면 DigitalOcean 프로바이더를 설치하고 다음 샘플 스니펫과 같이 digitalocean_droplet 리소스를 정의할 수 있습니다:
그런 다음 cdktf CLI 도구를 사용하여이 TypeScript 코드를 Terraform 호환 JSON으로 변환하고 해당 프로바이더에 전달하여 대신에 Droplet을 생성하는 적절한 API 호출을 수행할 수 있습니다.
이제 프로바이더가 무엇인지 이해했으므로 CDKTF 프로젝트에 DigitalOcean 프로바이더를 설정할 수 있습니다.
cdktf.json 파일을 열고 terraformProviders 배열에 문자열 digitalocean/digitalocean을 추가하십시오:
digitalocean/digitalocean은 Terraform 레지스트리의 DigitalOcean 프로바이더를 식별하는 식별자입니다.
파일을 저장하고 닫으십시오.
다음으로 cdktf get을 실행하여 프로바이더를 다운로드하고 설치하십시오.
cdktf get은 프로바이더를 다운로드하고 스키마를 추출하고 해당 TypeScript 클래스를 생성하여 .gen/providers/ 하위의 TypeScript 모듈로 추가합니다. 이 자동 코드 생성은 CDKTF를 사용하여 모든 Terraform 프로바이더와 HCL 모듈을 사용할 수 있도록 하며, 이는 CDKTF가 지원하는 편집기에서 코드 완성을 제공하는 방법입니다.

cdktf get 실행이 완료되면 다음과 유사한 출력이 표시됩니다:
OutputGenerated typescript constructs in the output directory: .gen
또한 생성된 프로바이더의 코드가 포함된 .gen이라는 새 디렉터리가 표시됩니다.
이 단계에서는 digitalocean/digitalocean 프로바이더를 프로젝트에 설치했습니다. 다음 단계에서는 DigitalOcean API와 프로바이더를 인증하는 데 필요한 자격 증명으로 DigitalOcean 프로바이더를 구성합니다.
단계 4 – DigitalOcean 프로바이더 구성
이 단계에서는 DigitalOcean 공급자를 구성하고, 해당 공급자가 DigitalOcean API를 호출할 수 있도록 DigitalOcean 개인 액세스 토큰을 설정합니다.
다른 공급자는 상위 API와 인증하기 위해 다른 자격 증명을 필요로하며 지원합니다. DigitalOcean 공급자의 경우 DigitalOcean 개인 액세스 토큰을 제공해야 합니다. 이 토큰은 DIGITALOCEAN_TOKEN 또는 DIGITALOCEAN_ACCESS_TOKEN 환경 변수로 설정하여 공급자에 전달할 수 있습니다.
해당 터미널 세션에 환경 변수를 설정하려면 터미널에서 다음 명령을 실행하십시오.
참고: export를 호출하면 해당 터미널 세션에만 환경 변수가 설정됩니다. 터미널을 닫고 다시 열거나 다른 터미널에서 cdktf 명령을 실행하려면 환경 변수가 적용되도록 다시 export 명령을 실행해야 합니다.
다음으로, 공급자를 MyStack 클래스 내에서 지정하여 스택 내에서 제공자가 제공하는 리소스를 정의할 수 있습니다. main.ts 파일을 다음과 같이 업데이트하십시오:
공급자 모듈은 ./.gen/providers/digitalocean에 위치하며, cdktf get을 실행할 때 자동으로 생성되었습니다.
이 단계에서는 자격 증명이 구성된 digitalocean/digitalocean 공급자를 설정했습니다. 다음으로, 이 튜토리얼의 목표 일부를 형성하는 인프라를 정의하기 시작할 것입니다.
단계 5 — 드롭렛에 웹 애플리케이션 정의하기
이 단계에서는 각각 다른 파일을 제공하는 두 개의 NGINX 서버를 정의하고, 두 개의 동일한 우분투 20.04 드롭렛에 배포할 것입니다.
먼저 두 개의 드롭렛을 정의합니다. 강조된 변경 사항이 있는 main.ts를 수정합니다:
코드에서 중복을 피하기 위해 JavaScript 기본 루프인 (Array.prototype.map())를 사용합니다.
콘솔을 통해 드롭렛을 생성하는 것과 마찬가지로 여러 매개변수를 지정해야 합니다:
image– 드롭렛이 실행할 리눅스 배포판 및 버전입니다.region– 드롭렛이 실행될 데이터 센터입니다.size– 드롭렛에 예약할 CPU 및 메모리 리소스 양입니다.name– 드롭렛을 참조하기 위해 사용되는 고유한 이름입니다.
이미지, 지역, 및 크기의 값은 DigitalOcean에서 지원하는 것이어야합니다. 지원되는 모든 Linux 배포 이미지, 드롭렛 크기 및 지역에 대한 유효한 값(스러그로 불림)을 DigitalOcean API 슬러그 페이지에서 찾을 수 있습니다. 필수 및 선택적 속성의 완전한 목록은 digitalocean_droplet 문서 페이지에서 찾을 수 있습니다.
SSH 키 추가
전제 조건의 일환으로, DigitalOcean 계정에 암호 없는 SSH 공개 키를 업로드하고 그 이름을 메모했습니다. 이제 해당 이름을 사용하여 SSH 키의 ID를 검색하고 드롭렛 정의에 전달합니다.
SSH 키가 DigitalOcean 계정에 수동으로 추가되었으므로 현재 Terraform 구성에서 관리되는 리소스가 아닙니다. 새 digitalocean_ssh_key 리소스를 정의하려고 하면 기존 키를 사용하는 대신 새로운 SSH 키를 생성합니다.
대신, 새로운 digitalocean_ssh_key 데이터 소스를 정의할 것입니다. 테라폼에서는 데이터 소스가 현재 테라폼 구성에서 관리되지 않는 인프라에 대한 정보를 가져오는 데 사용됩니다. 다시 말해, 이들은 기존의 외부 인프라의 상태에 대한 읽기 전용 뷰를 제공합니다. 데이터 소스를 정의한 후에는 해당 데이터를 테라폼 구성의 다른 곳에서 사용할 수 있습니다.
여전히 main.ts 파일 안에 있으며 MyStack 생성자 내에서, 새로운 DataDigitaloceanSshKey 데이터 소스를 정의하고 SSH 키에 할당한 이름을 전달하세요 (여기서 이름은 do_cdktf입니다):
그런 다음, Droplet의 정의를 업데이트하여 SSH 키를 포함하세요:
프로비저닝되면 비밀 SSH 키를 사용하여 Droplet에 액세스할 수 있습니다.
NGINX 설치를 위한 사용자 데이터 스크립트 지정
이제 Ubuntu에서 실행되는 두 개의 동일한 Droplet을 정의하여 SSH 액세스가 구성되었습니다. 다음 작업은 각 Droplet에 NGINX를 설치하는 것입니다.
드롭렛을 생성할 때 CloudInit라는 도구가 서버를 부트스트랩합니다. CloudInit는 사용자 데이터라고 불리는 파일을 수용할 수 있으며, 이를 통해 서버 부트스트랩 방법을 수정할 수 있습니다. 사용자 데이터는 서버가 해석할 수 있는 임의의 cloud-config 파일이거나 스크립트일 수 있습니다.
이 단계의 나머지 부분에서는 Bash 스크립트를 만들고 Droplet의 사용자 데이터로 지정합니다. 이 스크립트는 부트스트래핑 프로세스의 일부로 NGINX를 설치할 것입니다. 또한 스크립트는 Droplet의 호스트 이름과 IP 주소로 /var/www/html/index.html 파일(NGINX가 제공하는 기본 파일)의 내용을 대체할 것입니다. 이로써 두 NGINX 서버가 서로 다른 파일을 제공하게 됩니다. 다음 단계에서는 두 NGINX 서버 모두 로드 밸런서 뒤에 두어서 서로 다른 파일을 제공함으로써 로드 밸런서가 요청을 올바르게 분산하는지 여부를 명확히 할 것입니다.
main.ts에서 여전히 새로운 userData 속성을 Droplet의 구성 객체에 추가합니다.
경고: Shebang(#!) 앞에 새 줄이 없는지 확인하세요. 그렇지 않으면 스크립트가 실행되지 않을 수 있습니다.
드롭렛이 처음으로 프로비저닝되면 스크립트는 root 사용자로 실행됩니다. 우분투의 패키지 관리자인 APT를 사용하여 nginx 패키지를 설치합니다. 그런 다음 디지털오션의 메타데이터 서비스를 사용하여 자신에 대한 정보를 검색하고 호스트 이름과 IP 주소를 index.html에 씁니다. 이 파일은 NGINX에 의해 제공됩니다.
이 단계에서는 우분투를 실행하는 두 개의 드롭렛을 정의하고 각각에 SSH 액세스를 구성하고 사용자 데이터 기능을 사용하여 NGINX를 설치했습니다. 다음 단계에서는 이러한 NGINX 서버 앞에 위치한 로드 밸런서를 정의하고 라운드 로빈 방식으로 로드 밸런싱하도록 구성할 것입니다.
단계 6 — 로드 밸런서 정의
이 단계에서는 디지털오션 로드 밸런서를 정의하여 digitalocean_loadbalancer 리소스의 인스턴스를 정의합니다.
main.ts에서 여전히 MyStack 생성자의 끝에 로드 밸런서에 대한 다음 정의를 추가합니다:
forwardingRule 인수는 로드 밸런서가 포트 80에서 HTTP 요청을 수신하고 각 드롭렛으로 포트 80으로 전달하도록 지시합니다.
dropletIds는 로드 밸런서가 요청을 전달할 드롭렛을 지정합니다. 이는 숫자를 취하지만 droplet.id의 값은 문자열입니다. 따라서 문자열 드롭렛 ID 값을 숫자로 변환하기 위해 Fn.tonumber Terraform 함수를 사용했습니다.
참고: 여기서 JavaScript 기본 parseInt 대신 Fn.tonumber Terraform 함수를 사용한 이유는 droplet.id의 값이 드롭렛이 프로비저닝될 때까지 알 수 없기 때문입니다. Terraform 함수는 Terraform이 구성을 적용하기 전에 알 수 없는 런타임 값을 처리하는 데 설계되었습니다.
파일을 저장하고 닫습니다.
이제 두 개의 드롭렛과 그 앞에 위치한 로드 밸런서를 정의했습니다. main.ts는 다음과 같아야 합니다:
다음 단계에서는 cdktf CLI 도구를 사용하여 전체 CDKTF 프로젝트를 실현할 것입니다.
단계 7 — 인프라 프로비저닝
이 단계에서는 이전 단계에서 정의한 Droplets 및 로드 밸런서를 프로비저닝하기 위해 cdktf CLI 도구를 사용할 것입니다.
infra/ 디렉터리에 있고 터미널 세션에 DIGITALOCEAN_ACCESS_TOKEN 환경 변수가 설정되어 있는지 확인한 후 cdktf deploy 명령을 실행하십시오:
다음과 유사한 출력이 표시됩니다:
Outputinfra  Initializing the backend...
infra  Initializing provider plugins...
infra  - Reusing previous version of digitalocean/digitalocean from the dependency lock file
infra  - Using previously-installed digitalocean/digitalocean v2.19.0
infra  Terraform has been successfully initialized!
infra  Terraform used the selected providers to generate the following execution
       plan. Resource actions are indicated with the following symbols:
       + create

       Terraform will perform the following actions:
infra    # digitalocean_droplet.bar (bar) will be created
         + resource "digitalocean_droplet" "bar" {
       + backups              = false
       + created_at           = (known after apply)
       + disk                 = (known after apply)
       + graceful_shutdown    = false
       + id                   = (known after apply)
       + image                = "ubuntu-20-04-x64"
       + ipv4_address         = (known after apply)
       + ipv4_address_private = (known after apply)
       + ipv6                 = false
       + ipv6_address         = (known after apply)
       + locked               = (known after apply)
       + memory               = (known after apply)
       + monitoring           = false
       + name                 = "bar"
       + price_hourly         = (known after apply)
       + price_monthly        = (known after apply)
       + private_networking   = (known after apply)
       + region               = "lon1"
       + resize_disk          = true
       + size                 = "s-1vcpu-1gb"
       + ssh_keys             = [
       + "34377800",
       ]
       + status               = (known after apply)
       + urn                  = (known after apply)
       + user_data            = "f9b1d9796d069fe504ce0d89439b6b664b14b1a1"
       + vcpus                = (known after apply)
       + volume_ids           = (known after apply)
       + vpc_uuid             = (known after apply)
       }

         # digitalocean_droplet.foo (foo)가 생성될 것입니다
         + resource "digitalocean_droplet" "foo" {
       + backups              = false
       + created_at           = (known after apply)
       + disk                 = (known after apply)
       + graceful_shutdown    = false
       + id                   = (known after apply)
       + image                = "ubuntu-20-04-x64"
       + ipv4_address         = (known after apply)
       + ipv4_address_private = (known after apply)
       + ipv6                 = false
       + ipv6_address         = (known after apply)
       + locked               = (known after apply)
       + memory               = (known after apply)
       + monitoring           = false
       + name                 = "foo"
       + price_hourly         = (known after apply)
       + price_monthly        = (known after apply)
       + private_networking   = (known after apply)
       + region               = "lon1"
       + resize_disk          = true
       + size                 = "s-1vcpu-1gb"
       + ssh_keys             = [
       + "34377800",
       ]
       + status               = (known after apply)
       + urn                  = (known after apply)
       + user_data            = "f9b1d9796d069fe504ce0d89439b6b664b14b1a1"
       + vcpus                = (known after apply)
       + volume_ids           = (known after apply)
       + vpc_uuid             = (known after apply)
       }

         # digitalocean_loadbalancer.lb (lb)가 생성될 것입니다
         + resource "digitalocean_loadbalancer" "lb" {
       + algorithm                        = "round_robin"
       + disable_lets_encrypt_dns_records = false
       + droplet_ids                      = (known after apply)
       + enable_backend_keepalive         = false
       + enable_proxy_protocol            = false
       + id                               = (known after apply)
       + ip                               = (known after apply)
       + name                             = "default"
       + redirect_http_to_https           = false
       + region                           = "lon1"
       + size_unit                        = (known after apply)
       + status                           = (known after apply)
       + urn                              = (known after apply)
       + vpc_uuid                         = (known after apply)

       + forwarding_rule {
       + certificate_id   = (known after apply)
       + certificate_name = (known after apply)
       + entry_port       = 80
       + entry_protocol   = "http"
       + target_port      = 80
       + target_protocol  = "http"
       + tls_passthrough  = false
       }

       + healthcheck {
       + check_interval_seconds   = (known after apply)
       + healthy_threshold        = (known after apply)
       + path                     = (known after apply)
       + port                     = (known after apply)
       + protocol                 = (known after apply)
       + response_timeout_seconds = (known after apply)
       + unhealthy_threshold      = (known after apply)
       }

       + sticky_sessions {
       + cookie_name        = (known after apply)
       + cookie_ttl_seconds = (known after apply)
       + type               = (known after apply)
       }
       }

       Plan: 3 to add, 0 to change, 0 to destroy.

       ─────────────────────────────────────────────────────────────────────────────

       Saved the plan to: plan

       To perform exactly these actions, run the following command to apply:
       terraform apply "plan"

Please review the diff output above for infra
❯ Approve  Applies the changes outlined in the plan.
  Dismiss
  Stop
참고: CDKTF는 여전히 개발 중이며 출력이 위에 표시된 것과 다를 수 있습니다.
이 표시에서는 cdktf가 생성, 업데이트 및 삭제할 모든 리소스 및 속성을 나열합니다. Droplet의 ID와 같은 일부 값은 리소스가 프로비저닝된 후에만 알려집니다. 이러한 경우 출력에서 속성 값으로 (apply 후 알려짐)을 볼 수 있습니다.
예상한 대로 리소스 목록을 검토하십시오. 그런 다음 화살표 키를 사용하여 승인 옵션을 선택하고 ENTER를 누르십시오.
다음과 유사한 출력이 표시됩니다:
Outputinfra  digitalocean_droplet.foo (foo): Creating...
       digitalocean_droplet.bar (bar): Creating...
infra  digitalocean_droplet.bar (bar): Still creating... [10s elapsed]
infra  digitalocean_droplet.foo (foo): Still creating... [10s elapsed]


1 Stack deploying     0 Stacks done     0 Stacks waiting
이 출력에서는 cdktf가 Droplet을 생성하기 위해 DigitalOcean API와 통신하고 있음을 알려줍니다. Droplet의 ID는 Droplet이 프로비저닝될 때까지 알 수 없으므로 cdktf는 먼저 Droplets를 생성합니다.
Droplet 생성은 일반적으로 1분 이내에 완료됩니다. Droplet이 프로비저닝되면 cdktf는 로드 밸런서를 생성하도록 진행합니다.
Outputinfra  digitalocean_droplet.bar (bar): Creation complete after 54s [id=298041598]
infra  digitalocean_droplet.foo (foo): Creation complete after 55s [id=298041600]
infra  digitalocean_loadbalancer.lb (lb): Creating...
infra  digitalocean_loadbalancer.lb (lb): Still creating... [10s elapsed]
로드 밸런서가 더 오래 걸릴 수 있습니다. 로드 밸런서가 생성된 후에는 스택이 성공적으로 배포되었음을 보여주는 요약이 표시됩니다.
Outputinfra  digitalocean_loadbalancer.lb (lb): Still creating... [1m30s elapsed]
infra  digitalocean_loadbalancer.lb (lb): Creation complete after 1m32s [id=4f9ae2b7-b649-4fb4-beed-96b95bb72dd1]
infra
       Apply complete! Resources: 3 added, 0 changed, 0 destroyed.


No outputs found.
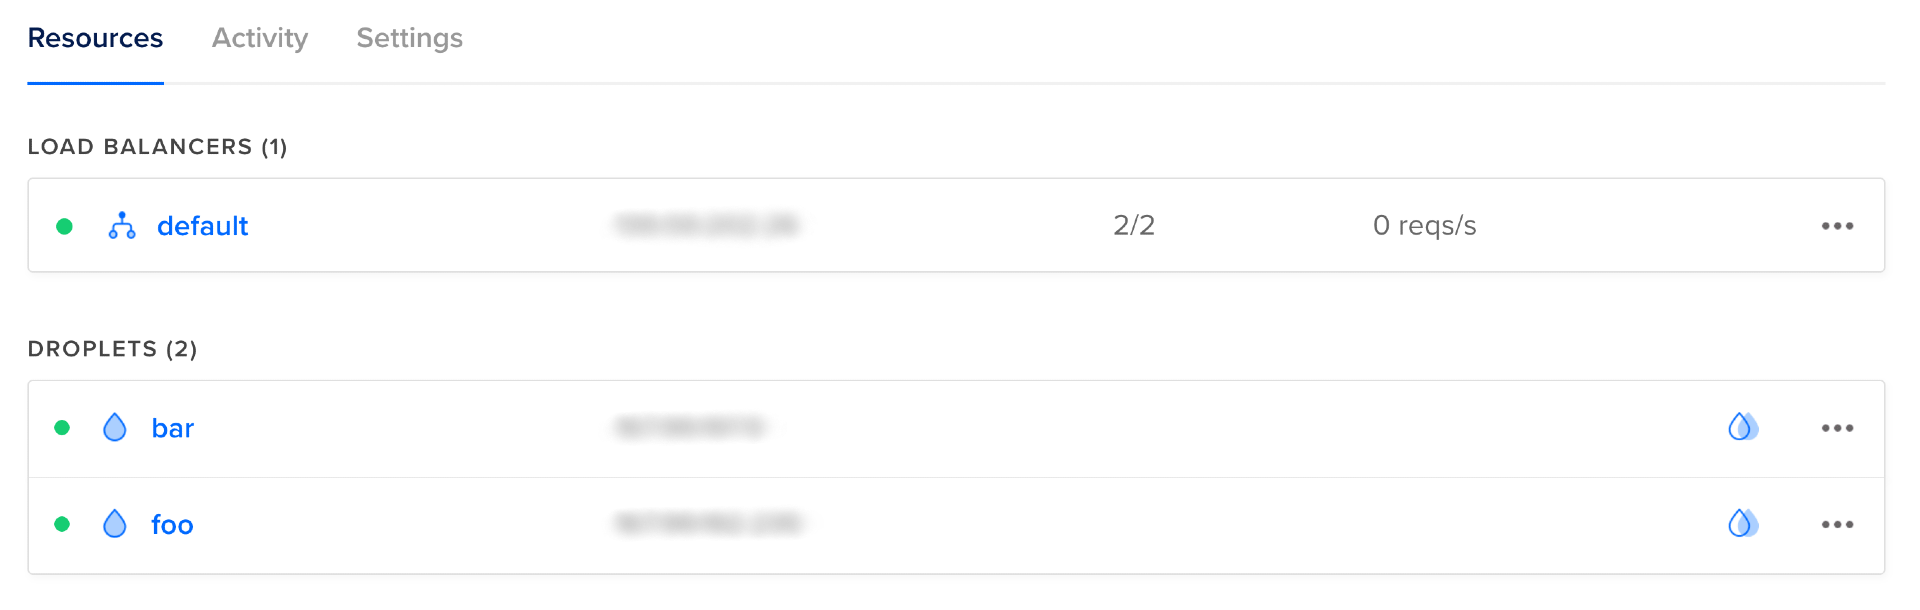
이제 DigitalOcean 콘솔을 방문하여 이름이 default이고 두 개의 건강한 드롭렛인 foo와 bar가 있는 로드 밸런서를 볼 수 있습니다. 각각이 로드 밸런서의 대상으로 작동합니다.
NGINX가 실행되고 콘텐츠가 올바르게 제공되는지 테스트하기 위해 각 드롭렛의 IP 주소를 방문하여 다음과 유사한 텍스트를 볼 수 있어야 합니다:
Droplet: bar, IP Address: droplet_ip
그 문자열 또는 서버가 응답하지 않는 경우, 지정한 사용자 데이터가 올바른지 확인하고 샵 뱅 (#!)을 앞에 둔 문자(새 줄을 포함하여)가 없는지 확인하십시오. 또한 SSH 개인 키를 사용하여 드롭렛에 SSH로 로그인하고 CloudInit에서 생성된 출력 로그를 /var/log/cloud-init-output.log에서 검토할 수 있습니다:
드롭렛이 정상적으로 작동하여 콘텐츠를 제공하는 것을 확인한 후에 로드 밸런서를 테스트할 수 있습니다. 몇 가지 요청을 보내어 이 작업을 수행합니다.
터미널에서 다음 명령을 실행하여 로드 밸런서로 열 가지 요청을 보냅니다:
다음과 같은 출력을 볼 수 있어야 합니다. 하지만 표시되는 IP 주소는 다를 수 있습니다:
OutputDroplet: foo, IP Address: droplet_foo_ip
Droplet: bar, IP Address: droplet_bar_ip
Droplet: foo, IP Address: droplet_foo_ip
Droplet: bar, IP Address: droplet_bar_ip
Droplet: bar, IP Address: droplet_bar_ip
Droplet: foo, IP Address: droplet_foo_ip
Droplet: bar, IP Address: droplet_bar_ip
Droplet: foo, IP Address: droplet_foo_ip
Droplet: bar, IP Address: droplet_bar_ip
Droplet: foo, IP Address: droplet_foo_ip
로드 밸런서로의 요청이 각 드롭렛으로 다섯 번씩 전달되었음을 보여줍니다. 로드 밸런서가 작동하는 것을 나타냅니다.
참고: 로드 밸런서가 항상 두 개의 드롭렛 사이를 완벽하게 균형을 맞추지는 않을 수 있습니다. 한 드롭렛으로 네 개의 요청이 전송되고 다른 드롭렛으로 여섯 개의 요청이 전송되는 경우도 있습니다. 이러한 동작은 정상적입니다.
이 단계에서는 cdktf를 사용하여 리소스를 프로비저닝하고, 그런 다음 디지털오션 콘솔을 사용하여 드롭렛과 로드 밸런서의 IP 주소를 발견했습니다. 그런 다음 각 드롭렛과 로드 밸런서에 요청을 보내서 작동하는지 확인했습니다.
다음 단계에서는 디지털오션 콘솔에 로그인하지 않고도 드롭렛과 로드 밸런서의 IP 주소를 얻을 것입니다.
단계 8 – 정보 출력
이전 단계에서는 드롭렛 및 로드 밸런서의 IP 주소를 얻기 위해 디지털오션 콘솔에 로그인해야했습니다. 이번 단계에서는 코드를 약간 수정하여 이 정보가 cdktf deploy 명령의 출력에 인쇄되도록 하여 콘솔에 가지 않아도 되도록 할 것입니다.
Terraform은 관리되는 리소스의 구성 및 상태를 상태 파일에 기록합니다. infra 스택의 경우, 상태 파일은 infra/terraform.infra.tfstate에서 찾을 수 있습니다. 이 상태 파일 안에 드롭렛과 로드 밸런서의 IP 주소를 찾을 수 있을 것입니다.
그러나 큰 파일을 살펴보는 것은 불편할 수 있습니다. CDKTF는 변수를 출력하고 스택 외부에서 이를 사용할 수 있게 하는 TerraformOutput 구조를 제공합니다. 출력은 cdktf deploy가 실행된 후 stdout에 인쇄됩니다. cdktf output을 실행하면 언제든지 출력을 인쇄할 수도 있습니다.
참고: 이 튜토리얼에서는 콘솔에 정보를 출력하기 위해 출력만 사용하지만, 실제로 그것의 진가는 다른 스택에서의 출력을 입력으로 사용하는 스택의 사용으로부터 옵니다. 이를 크로스-스택 참조라고하는 기능입니다.
main.ts 파일을 업데이트하여 로드 밸런서와 드롭릿의 IP 주소의 출력을 포함시킵니다:
파일을 저장하고 닫습니다.
cdktf deploy를 실행하여 변경 사항을 실제화합니다:
출력에서 다음과 유사한 내용을 볼 수 있어야 합니다:
Output─────────────────────────────────────────────────────────────────────────────

Changes to Outputs:
+ droplet0IP     = "droplet_foo_ip"
+ droplet1IP     = "droplet_bar_ip"
+ loadBalancerIP = "load_balancer_ip"

You can apply this plan to save these new output values to the Terraform
state, without changing any real infrastructure.

─────────────────────────────────────────────────────────────────────────────
이 출력은 인프라 변경이 없고 스택에서 출력되는 것만 알려줍니다.
승인을 선택한 다음 ENTER를 누릅니다. 터미널 출력의 끝에 다음과 유사한 내용이 표시됩니다:
Outputinfra
droplet0IP = droplet_foo_ip
droplet1IP = droplet_bar_ip
loadBalancerIP = load_balancer_ip
이제 cdktf deploy 또는 cdktf output을 실행할 때마다 드롭릿과 로드 밸런서의 IP 주소가 터미널 출력에 인쇄되어 DigitalOcean 콘솔에서 그 정보에 액세스할 필요가 없어집니다.
이제 두 개의 드롭릿과 로드 밸런서를 프로비저닝하고 작동 여부를 확인했습니다. 개발한 CDKTF 프로젝트를 기반으로 더 정교한 인프라를 정의할 수 있습니다(참조 구현은 do-community/digitalocean-cdktf-typescript에서 찾을 수 있습니다).
이 튜토리얼에서 제공된 리소스에는 요금이 부과됩니다. 만든 인프라를 사용할 계획이 없다면 파괴해야 합니다. 다음 및 마지막 단계에서는 이 튜토리얼에서 생성된 리소스를 정리합니다.
단계 9 — 인프라 파괴하기
이 단계에서는 이 튜토리얼에서 생성된 모든 리소스를 제거합니다.
infra/ 디렉토리 안에 있는 상태에서 cdktf destroy를 실행합니다:
다음과 유사한 출력이 표시됩니다:
Outputinfra  Initializing the backend...
infra  Initializing provider plugins...
infra  - Reusing previous version of digitalocean/digitalocean from the dependency lock file
infra  - Using previously-installed digitalocean/digitalocean v2.19.0
infra  Terraform has been successfully initialized!
infra  digitalocean_droplet.bar (bar): Refreshing state... [id=298041598]
       digitalocean_droplet.foo (foo): Refreshing state... [id=298041600]
infra  digitalocean_loadbalancer.lb (lb): Refreshing state... [id=4f9ae2b7-b649-4fb4-beed-96b95bb72dd1]
infra  Terraform used the selected providers to generate the following execution
       plan. Resource actions are indicated with the following symbols:
       - destroy

       Terraform will perform the following actions:
infra    # digitalocean_droplet.bar (bar) will be destroyed
         - resource "digitalocean_droplet" "bar" {
       - backups              = false -> null
       - created_at           = "2022-05-02T10:04:16Z" -> null
       - disk                 = 25 -> null
       - graceful_shutdown    = false -> null
       - id                   = "298041598" -> null
       - image                = "ubuntu-20-04-x64" -> null
       - ipv4_address         = "droplet_bar_public_ip" -> null
       - ipv4_address_private = "droplet_bar_private_ip" -> null
       - ipv6                 = false -> null
       - locked               = false -> null
       - memory               = 1024 -> null
       - monitoring           = false -> null
       - name                 = "bar" -> null
       - price_hourly         = 0.00744 -> null
       - price_monthly        = 5 -> null
       - private_networking   = true -> null
       - region               = "lon1" -> null
       - resize_disk          = true -> null
       - size                 = "s-1vcpu-1gb" -> null
       - ssh_keys             = [
       - "34377800",
       ] -> null
       - status               = "active" -> null
       - tags                 = [] -> null
       - urn                  = "do:droplet:298041598" -> null
       - user_data            = "f9b1d9796d069fe504ce0d89439b6b664b14b1a1" -> null
       - vcpus                = 1 -> null
       - volume_ids           = [] -> null
       - vpc_uuid             = "bed80b32-dc82-11e8-83ec-3cfdfea9f3f0" -> null
       }

         # digitalocean_droplet.foo (foo)가 파괴됩니다

         - resource "digitalocean_droplet" "foo" {
       - backups              = false -> null
       - created_at           = "2022-05-02T10:04:16Z" -> null
       - disk                 = 25 -> null
       - graceful_shutdown    = false -> null
       - id                   = "298041600" -> null
       - image                = "ubuntu-20-04-x64" -> null
       - ipv4_address         = "droplet_foo_public_ip" -> null
       - ipv4_address_private = "droplet_foo_private_ip" -> null
       - ipv6                 = false -> null
       - locked               = false -> null
       - memory               = 1024 -> null
       - monitoring           = false -> null
       - name                 = "foo" -> null
       - price_hourly         = 0.00744 -> null
       - price_monthly        = 5 -> null
       - private_networking   = true -> null
       - region               = "lon1" -> null
       - resize_disk          = true -> null
       - size                 = "s-1vcpu-1gb" -> null
       - ssh_keys             = [
       - "34377800",
       ] -> null
       - status               = "active" -> null
       - tags                 = [] -> null
       - urn                  = "do:droplet:298041600" -> null
       - user_data            = "f9b1d9796d069fe504ce0d89439b6b664b14b1a1" -> null
       - vcpus                = 1 -> null
       - volume_ids           = [] -> null
       - vpc_uuid             = "bed80b32-dc82-11e8-83ec-3cfdfea9f3f0" -> null
       }

         # digitalocean_loadbalancer.lb (lb)가 파괴됩니다

         - resource "digitalocean_loadbalancer" "lb" {
       - algorithm                        = "round_robin" -> null
       - disable_lets_encrypt_dns_records = false -> null
       - droplet_ids                      = [
       - 298041598,
       - 298041600,
       ] -> null
       - enable_backend_keepalive         = false -> null
       - enable_proxy_protocol            = false -> null
       - id                               = "4f9ae2b7-b649-4fb4-beed-96b95bb72dd1" -> null
       - ip                               = "load_balancer_ip" -> null
       - name                             = "default" -> null
       - redirect_http_to_https           = false -> null
       - region                           = "lon1" -> null
       - size_unit                        = 1 -> null
       - status                           = "active" -> null
       - urn                              = "do:loadbalancer:4f9ae2b7-b649-4fb4-beed-96b95bb72dd1" -> null
       - vpc_uuid                         = "bed80b32-dc82-11e8-83ec-3cfdfea9f3f0" -> null

       - forwarding_rule {
       - entry_port      = 80 -> null
       - entry_protocol  = "http" -> nul
infra  l
       - target_port     = 80 -> null
       - target_protocol = "http" -> null
       - tls_passthrough = false -> null
       }

       - healthcheck {
       - check_interval_seconds   = 10 -> null
       - healthy_threshold        = 5 -> null
       - path                     = "/" -> null
       - port                     = 80 -> null
       - protocol                 = "http" -> null
       - response_timeout_seconds = 5 -> null
       - unhealthy_threshold      = 3 -> null
       }

       - sticky_sessions {
       - cookie_ttl_seconds = 0 -> null
       - type               = "none" -> null
       }
       }

       Plan: 0 to add, 0 to change, 3 to destroy.

       ─────────────────────────────────────────────────────────────────────────────

       Saved the plan to: plan

       To perform exactly these actions, run the following command to apply:
       terraform apply "plan"

Please review the diff output above for infra
❯ Approve  Applies the changes outlined in the plan.
  Dismiss
  Stop
이번에는 각 리소스 옆에 +가 표시되는 대신에 -가 표시되어, CDKTF가 리소스를 파괴할 것을 나타냅니다. 제안된 변경 사항을 검토한 후, 화살표 키를 사용하여 승인을 선택하고 ENTER를 누릅니다. 이제 DigitalOcean 제공업체가 DigitalOcean API와 통신하여 리소스를 파괴할 것입니다.
Outputinfra  digitalocean_loadbalancer.lb (lb): Destroying... [id=4f9ae2b7-b649-4fb4-beed-96b95bb72dd1]
infra  digitalocean_loadbalancer.lb (lb): Destruction complete after 1s
infra  digitalocean_droplet.bar (bar): Destroying... [id=298041598]
       digitalocean_droplet.foo (foo): Destroying... [id=298041600]
로드 밸런서는 종속성이 없기 때문에(다른 리소스가 입력에서 로드 밸런서를 참조하지 않음) 먼저 삭제되었습니다. 로드 밸런서가 드롭렛을 참조하므로 로드 밸런서가 삭제된 후에만 드롭렛을 파괴할 수 있습니다.
리소스가 파괴된 후, 출력에 다음 줄이 표시됩니다:
OutputDestroy complete! Resources: 3 destroyed.
결론
이 튜토리얼에서는 CDKTF를 사용하여 NGINX 서버가 실행되는 두 개의 DigitalOcean Droplets로 구성된 로드 밸런싱된 웹 페이지를 프로비저닝하고 파괴하는 방법에 대해 알아보았습니다. 또한 리소스에 대한 정보를 터미널에 출력했습니다.
CDKTF는 Terraform 위의 추상화 계층입니다. Terraform에 대한 좋은 이해는 CDKTF를 이해하는 데 도움이 됩니다. Terraform에 대해 더 알고 싶다면, Terraform을 깊이 있는 방법으로 다루는 Terraform으로 인프라 관리하기 시리즈를 읽어보실 수 있습니다.
또한 CDKTF에 대해 더 알아보기 위해 공식 CDK for Terraform 문서와 튜토리얼을 확인할 수도 있습니다.